前言:笔者把学习的webpack知识从基础到原理写个系列,以便回顾。希望能帮助到更多正在学习webpack的小伙伴。
自动清理构建目录产物
- 使用clean-webpack-plugin
- 安装
npm i clean-webpack-plugin - 使用
const { CleanWebpackPlugin } = require('clean-webpack-plugin') module.exports = { plugins:[ new CleanWebpackPlugin() ] } - 结果:进行两次打包npm run build ,可以发现只有1个dist目录
PostCss插件autoprefixer自动补齐css3前缀
- 安装postcss和autoprefixer
npm i postcss-loader autoprefixer -D - 使用
module.exports = { module:[{ test: /\.less/, use: [ MiniCssExtractPlugin.loader, 'css-loader', 'less-loader', { loader:'postcss-loader', options:{ plugins: () => [ require('autoprefixer')({ overrideBrowserslist:['last 2 version','>1%','ios 7'] }) ] } } ] }] } - 结果:打包后,即可看到css3自动带上前缀了
移动端css的 px自动转换成rem
- 使用px2rem-loader
- 页面渲染时计算根元素的font-size值
- 这里可以使用手淘的lib-flexible库
- https://github.com/amfe/lib-flexible
- 安装
npm i px2rem-loader -D npm i lib-flexible -S - 使用
// webpack.config.js module.exports = { module:[{ test:/\.less/, use:[ 'css-loader', 'less-loader', { loader:'px2rem-loader', options:{ remUnit:75, remPrecesion:8, } } ] }] } - 打包后px会自动转换为rem
- 在html文件里引入lib-flexible,必须在head中引入
- 这样就可以适配移动端了
静态资源内联
资源内联的意义
- 代码层面
- 页面框架的初始化脚本
- 上报相关打点
- css内联避免页面闪动
- 请求层面
- 减少http请求数
html,js,css内联
- raw-loader 内联html
<script>${require('raw-loader!babel-loader!./meta.html')}</script> - raw-loader 内联js
<script>$;{require('raw-loader!babel-loader!./index.js')}</script> - css内联
- 借助style-loader
- html-inline-css-webpack-plugin
module.exports={
    module:{
        rules:[{
            test:/\.less/.
            use:[{
                loader:'style-loader',
                options:{
                    insertAt:'top',//样式插入到head
                    singleton:true,//将所以style标签合并成一个
                }
            }]
        }]
    }
}
多页面打包通用方案
动态获取entry 和 设置 html-webpack-plugin
利用 glob.sync
entry: glob.sync(path.join(__dirname,'./src/*/index.js'))安装glob库
npm i glob -D源码目录需要按照下面规则
- 在src目录下创建各自的文件夹,如search文件夹,在search文件夹中,创建index.html和index.js。其他一样。
使用: 动态获取entry和htmlWebpackPlugin
const setMPA = () => {
      const entry = {};
      const HtmlWebpackPlugins = [];

      // 匹配到每个模块的文件夹
      const entryFiles = glob.sync(path.join(__dirname,'./src/*/index.js'))
      Object.keys(entryFiles).map(index => {
          const entryFile = entryFiles[index]; // 获取每个js文件的路径
          const match  = entryFile.match(/src\/(.*)\/index\.js/);
          const pageName = match && match[1]
          entry[pageName] =entryFile;
          HtmlWebpackPlugins.push(
              new HtmlWebpackPlugin({
                  template:path.join(__dirname,`src/${pageName}/index.html`),
                  filename:`${pageName}.html`,
                  chunks:[pageName],
                  inject:true,
                  minify:{
                      html5:true,
                      collapseWhitespace:true,
                      preserveLineBreaks:false,
                      minifyCss:true,
                      minifyJs:true,
                      removeComments:false
                  }
              })
          )
      })
      return {
          entry,
          HtmlWebpackPlugins
      }
  }
  const {entry,HtmlWebpackPlugins} = setMPA()
  module.exports = {
      entry:entry,
      // ...
      plugins:[...HtmlWebpackPlugins]
  }
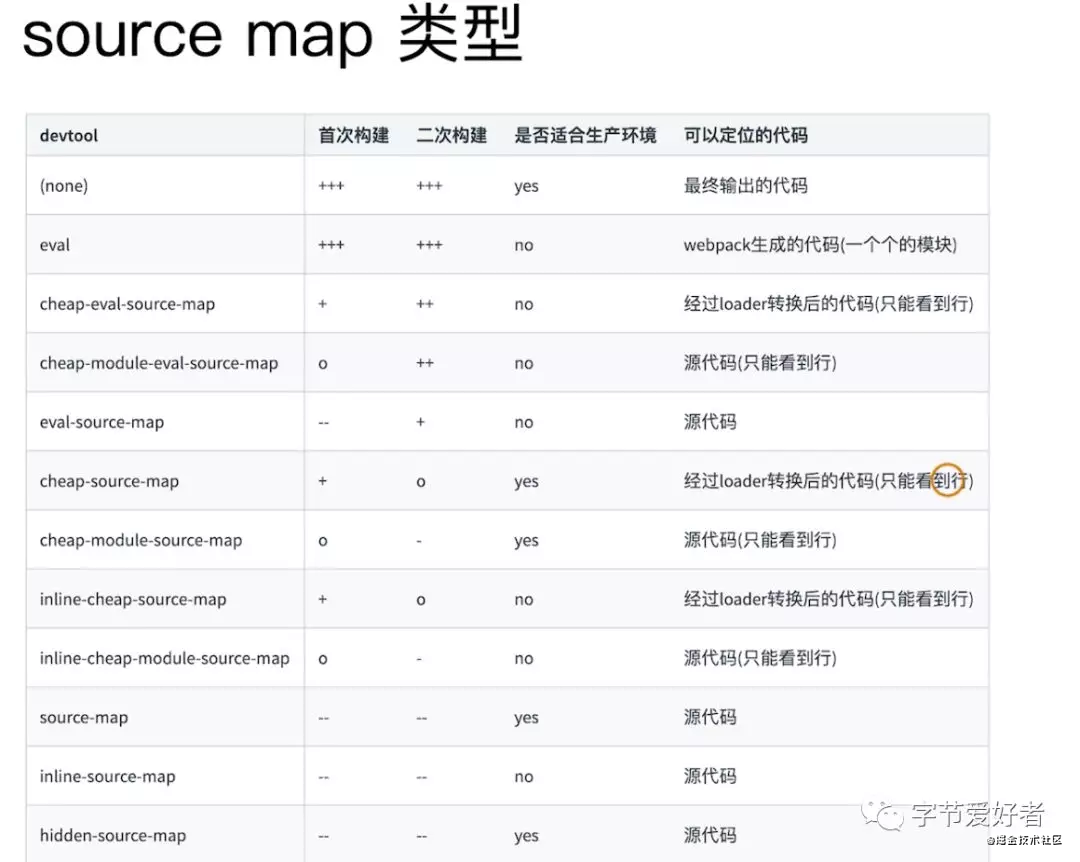
source-map
- 作用:通过source map定位到源代码
- 开发环境开启,线上环境关闭。
- 线上排查问题的适合可以将source map上传到错误监控系统
- source map 关键字
- eval:使用eval包裹模块代码
- source map:产生.map文件
- cheap: 不包含列信息
- inline: 将.map作为DataURI嵌入,不单独生成.map文件
- module:包含loader的sourcemap

- 使用
module.exports = { // ... devServer:{ contentBase:'./dist', hot: true }, devtool:'source-map' } - 运行即可生成.map文件
以上代码放到了github
可以下载调试。

