本文源码:GitHub·点这里 || GitEE·点这里
一、ElasticJob简介
1、定时任务
在前面的文章中,说过QuartJob这个定时任务,被广泛应用的定时任务标准。但Quartz核心点在于执行定时任务并不是在于关注的业务模式和场景,缺少高度自定义的功能。Quartz能够基于数据库实现任务的高可用,但是不具备分布式并行调度的功能。
2、ElasticJob说明
- 基础简介
Elastic-Job 是一个开源的分布式调度中间件,由两个相互独立的子项目 Elastic-Job-Lite 和 Elastic-Job-Cloud 组成。Elastic-Job-Lite 为轻量级无中心化解决方案,使用 jar 包提供分布式任务的调度和治理。 Elastic-Job-Cloud 是一个 Mesos Framework,依托于Mesos额外提供资源治理、应用分发以及进程隔离等服务。
功能特点
分布式调度协调 弹性扩容缩容 失效转移 错过执行作业重触发 作业分片一致性,保证同一分片在分布式环境中仅一个执行实例
补刀:人家官网这样描述的,这里赘述一下,充实一下文章。
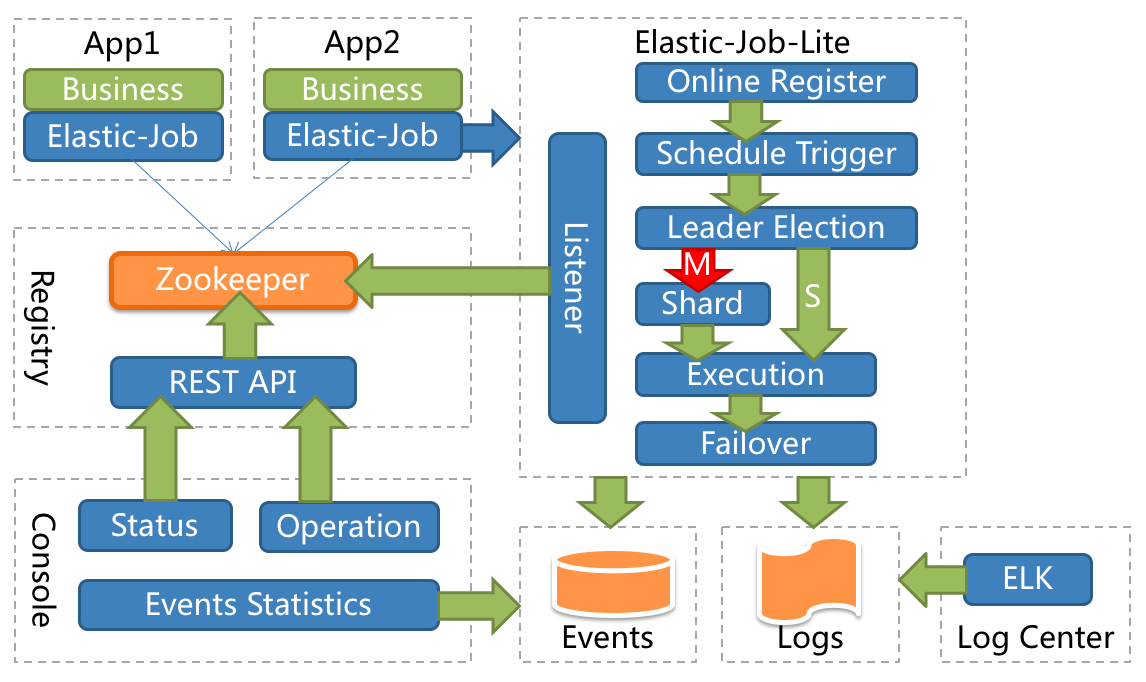
- 基础框架结构
该图片来自ElasticJob官网。

由图可知如下内容:
需要Zookeeper组件支持,作为分布式的调度任务,有良好的监听机制,和控制台,下面的案例也就冲这个图解来。
3、分片管理
这个概念在ElasticJob中是最具有特点的,实用性极好。
- 分片概念
任务的分布式执行,需要将一个任务拆分为多个独立的任务项,然后由分布式的服务器分别执行某一个或几个分片项。
场景描述:假设有服务3台,分3片管理,要处理数据表100条,那就可以100%3,按照余数0,1,2分散到三台服务上执行,看到这里分库分表的基本逻辑涌上心头,这就是为何很多大牛讲说,编程思维很重要。
- 个性化参数
个性化参数即shardingItemParameter,可以和分片项匹配对应关系,用于将分片项的数字转换为更加可读的业务代码。
场景描述:这里猛一读好像很飘逸,其实就是这个意思,如果分3片,取名[0,1,2]不好看,或者不好标识,可以分别给个别名标识一下,[0=A,1=B,2=C]。
二、定时任务加载
1、核心依赖包
这里使用2.0+的版本。
<dependency>
    <groupId>com.dangdang</groupId>
    <artifactId>elastic-job-lite-core</artifactId>
    <version>2.1.5</version>
</dependency>
<dependency>
    <groupId>com.dangdang</groupId>
    <artifactId>elastic-job-lite-spring</artifactId>
    <version>2.1.5</version>
</dependency>
2、核心配置文件
这里主要配置一下Zookeeper中间件,分片和分片参数。
zookeeper:
  server: 127.0.0.1:2181
  namespace: es-job

job-config:
  cron: 0/10 * * * * ?
  shardCount: 1
  shardItem: 0=A,1=B,2=C,3=D
3、自定义注解
看了官方的案例,没看到好用的注解,这里只能自己编写一个,基于案例的加载过程和核心API作为参考。
核心配置类:
com.dangdang.ddframe.job.lite.config.LiteJobConfiguration
根据自己想如何使用注解的思路,比如我只想注解定时任务名称和Cron表达式这两个功能,其他参数直接统一配置(这里可能是受QuartJob影响太深,可能根本就是想省事...)
@Inherited
@Target({ElementType.TYPE})
@Retention(RetentionPolicy.RUNTIME)
public @interface TaskJobSign {

    @AliasFor("cron")
    String value() default "";

    @AliasFor("value")
    String cron() default "";

    String jobName() default "";

}
4、作业案例
这里打印一些基本参数,对照配置和注解,一目了然。
@Component
@TaskJobSign(cron = "0/5 * * * * ?",jobName = "Hello-Job")
public class HelloJob implements SimpleJob {

    private static final Logger LOG = LoggerFactory.getLogger(HelloJob.class.getName()) ;

    @Override
    public void execute(ShardingContext shardingContext) {
        LOG.info("当前线程: "+Thread.currentThread().getId());
        LOG.info("任务分片:"+shardingContext.getShardingTotalCount());
        LOG.info("当前分片:"+shardingContext.getShardingItem());
        LOG.info("分片参数:"+shardingContext.getShardingParameter());
        LOG.info("任务参数:"+shardingContext.getJobParameter());
    }
}
5、加载定时任务
既然自定义注解,那加载过程自然也要自定义一下,读取自定义的注解,配置化,加入容器,然后初始化,等着任务执行就好。
@Configuration
public class ElasticJobConfig {

    @Resource
    private ApplicationContext applicationContext ;
    @Resource
    private ZookeeperRegistryCenter zookeeperRegistryCenter;

    @Value("${job-config.cron}") private String cron ;
    @Value("${job-config.shardCount}") private int shardCount ;
    @Value("${job-config.shardItem}") private String shardItem ;

    /**
     * 配置任务监听器
     */
    @Bean
    public ElasticJobListener elasticJobListener() {
        return new TaskJobListener();
    }
    /**
     * 初始化配置任务
     */
    @PostConstruct
    public void initTaskJob() {
        Map<String, SimpleJob> jobMap = this.applicationContext.getBeansOfType(SimpleJob.class);
        Iterator iterator = jobMap.entrySet().iterator();
        while (iterator.hasNext()) {
            // 自定义注解管理
            Map.Entry<String, SimpleJob> entry = (Map.Entry)iterator.next();
            SimpleJob simpleJob = entry.getValue();
            TaskJobSign taskJobSign = simpleJob.getClass().getAnnotation(TaskJobSign.class);
            if (taskJobSign != null){
                String cron = taskJobSign.cron() ;
                String jobName = taskJobSign.jobName() ;
                // 生成配置
                SimpleJobConfiguration simpleJobConfiguration = new SimpleJobConfiguration(
                                                JobCoreConfiguration.newBuilder(jobName, cron, shardCount)
                                                .shardingItemParameters(shardItem).jobParameter(jobName).build(),
                                                simpleJob.getClass().getCanonicalName());
                LiteJobConfiguration liteJobConfiguration = LiteJobConfiguration.newBuilder(
                                                simpleJobConfiguration).overwrite(true).build();
                TaskJobListener taskJobListener = new TaskJobListener();
                // 初始化任务
                SpringJobScheduler jobScheduler = new SpringJobScheduler(
                                                simpleJob, zookeeperRegistryCenter,
                                                liteJobConfiguration, taskJobListener);
                jobScheduler.init();
            }
        }
    }
}
絮叨一句:不要疑问这些API是怎么知道,看下官方文档的案例,他们怎么使用这些核心API,这里就是照着写过来,就是多一步自定义注解类的加载过程。当然官方文档大致读一遍还是很有必要的。
补刀一句:如何快速学习一些组件的用法,首先找到官方文档,或者开源库Wiki,再不济ReadMe文档(如果都没有,酌情放弃,另寻其他),熟悉基本功能是否符合自己的需求,如果符合,就看下基本用法案例,熟悉API,最后就是研究自己需要的功能模块,个人经验来看,该过程是弯路最少,坑最少的。
6、任务监听
用法非常简单,实现ElasticJobListener接口。
@Component
public class TaskJobListener implements ElasticJobListener {
    private static final Logger LOG = LoggerFactory.getLogger(TaskJobListener.class);

    private long beginTime = 0;

    @Override
    public void beforeJobExecuted(ShardingContexts shardingContexts) {
        beginTime = System.currentTimeMillis();
        LOG.info(shardingContexts.getJobName()+"===>开始...");
    }

    @Override
    public void afterJobExecuted(ShardingContexts shardingContexts) {
        long endTime = System.currentTimeMillis();
        LOG.info(shardingContexts.getJobName()+
        "===>结束...[耗时:"+(endTime - beginTime)+"]");
    }
}
絮叨一句:before和after执行前后,中间执行目标方法,标准的AOP切面思想,所以底层水平决定了对上层框架的理解速度,那本《Java编程思想》上的灰尘是不是该擦擦?
三、动态添加
1、作业任务
有部分场景需要动态添加和管理定时任务,基于上面的加载流程,在自定义一些步骤就可以。
@Component
public class GetTimeJob implements SimpleJob {

    private static final Logger LOG = LoggerFactory.getLogger(GetTimeJob.class.getName()) ;

    private static final SimpleDateFormat format =
            new SimpleDateFormat("yyyy-MM-dd HH:mm:ss") ;

    @Override
    public void execute(ShardingContext shardingContext) {
        LOG.info("Job Name:"+shardingContext.getJobName());
        LOG.info("Local Time:"+format.format(new Date()));
    }
}
2、添加任务服务
这里就动态添加上面的任务。
@Service
public class TaskJobService {

    @Resource
    private ZookeeperRegistryCenter zookeeperRegistryCenter;

    public void addTaskJob(final String jobName,final SimpleJob simpleJob,
                           final String cron,final int shardCount,final String shardItem) {
        // 配置过程
        JobCoreConfiguration jobCoreConfiguration = JobCoreConfiguration.newBuilder(
                                                    jobName, cron, shardCount)
                                                    .shardingItemParameters(shardItem).build();
        JobTypeConfiguration jobTypeConfiguration = new SimpleJobConfiguration(jobCoreConfiguration,
                                                    simpleJob.getClass().getCanonicalName());
        LiteJobConfiguration liteJobConfiguration = LiteJobConfiguration.newBuilder(
                                                    jobTypeConfiguration).overwrite(true).build();
        TaskJobListener taskJobListener = new TaskJobListener();
        // 加载执行
        SpringJobScheduler jobScheduler = new SpringJobScheduler(
                simpleJob, zookeeperRegistryCenter,
                liteJobConfiguration, taskJobListener);
        jobScheduler.init();
    }

}
补刀一句:这里添加之后,任务就会定时执行,如何停止任务又是一个问题,可以在任务名上做一些配置,比如在数据库生成一条记录[1,job1,state],如果调度到state为停止状态的任务,直接截胡即可。
3、测试接口
@RestController
public class TaskJobController {

    @Resource
    private TaskJobService taskJobService ;

    @RequestMapping("/addJob")
    public String addJob(@RequestParam("cron") String cron,@RequestParam("jobName") String jobName,
                         @RequestParam("shardCount") Integer shardCount,
                         @RequestParam("shardItem") String shardItem) {
        taskJobService.addTaskJob(jobName, new GetTimeJob(), cron, shardCount, shardItem);
        return "success";
    }
}
四、源代码地址
GitHub·地址
https://github.com/cicadasmile/middle-ware-parent
GitEE·地址
https://gitee.com/cicadasmile/middle-ware-parent


