本文源码:GitHub·点这里 || GitEE·点这里
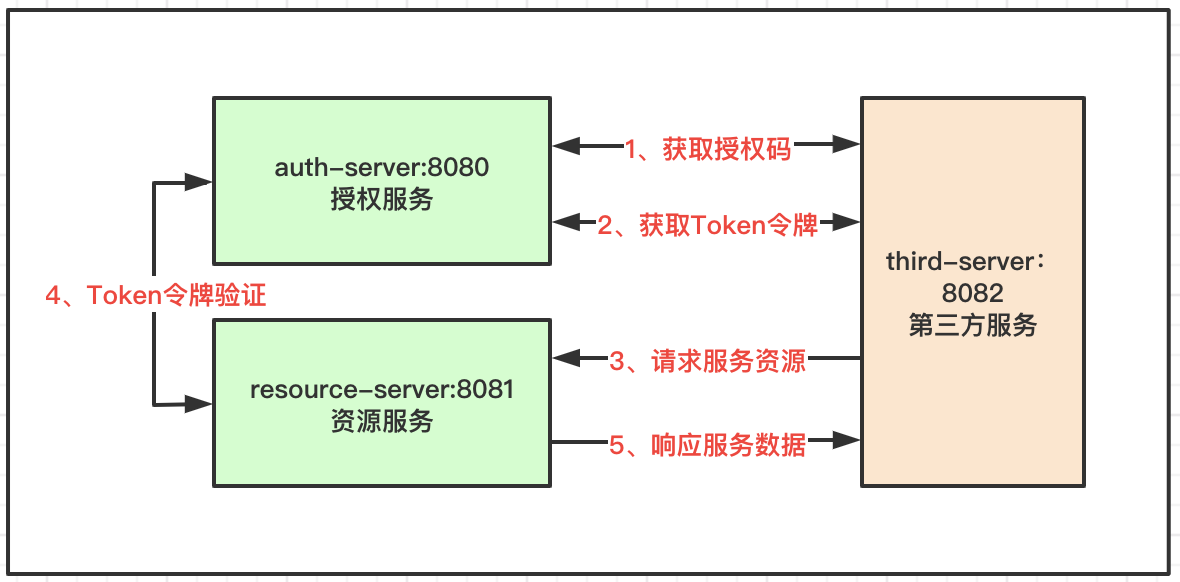
一、模式描述

授权服务
验证第三方服务的身份,验证邮箱用户的身份,记录和管理认证Token,为资源服务器提供Token校验。场景:第三方网站借助用户的邮箱登录,并访问邮箱账户的基础信息,头像、名称等。
资源服务
第三方服务通过邮箱账户登录后需要获取的一些信息,即理解为资源,存储邮箱账户的数据资源。
第三方服务
即借助邮箱用户的账户,快速登录第三个服务,免去繁杂的注册流程,有助于快速积累新用户。
交互流程
第三方服务给用户开放快速邮箱登录功能,引导用户调到邮箱认证服务,通过认证后返回身份令牌到第三方服务,第三方服务携带令牌访问邮箱的资源服务,获取一些基本的邮箱用户信息。
二、项目配置管理
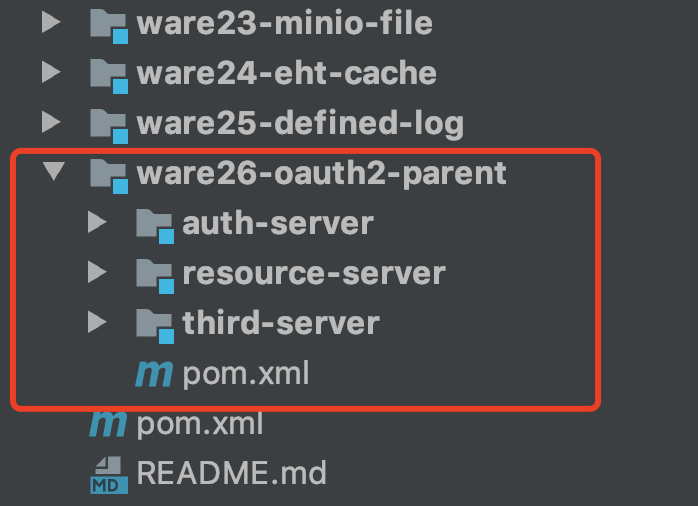
1、案例结构

核心依赖
<dependency>
    <groupId>org.springframework.boot</groupId>
    <artifactId>spring-boot-starter-web</artifactId>
</dependency>
<dependency>
    <groupId>org.springframework.security.oauth</groupId>
    <artifactId>spring-security-oauth2</artifactId>
    <version>2.1.3.RELEASE</version>
</dependency>
<dependency>
    <groupId>org.springframework.boot</groupId>
    <artifactId>spring-boot-starter-security</artifactId>
</dependency>
这里有两个核心组件依赖:OAuth2组件和Security组件。
模块划分
- auth-server:授权服务
- resource-server:资源服务器
- third-server:第三个服务
2、配置描述
【授权服务】
OAuth2配置
这里的配置管理的是第三方的授权流程和发放给第三方的身份证明ClientID和密码,实际的场景就是第三方借助邮箱账号登录,首先就是向邮箱管理方提供材料,获取访问邮箱服务的身份证明,然后才能对接开放服务,这种模式在第三方对接业务中很常见。
/**
 * 模拟第三方授权配置
 */
@EnableAuthorizationServer
@Configuration
public class AuthConfig extends AuthorizationServerConfigurerAdapter {

    @Resource
    ClientDetailsService clientDetailsService;

    /**
     * 资源服务器校验Token
     */
    @Override
    public void configure(AuthorizationServerSecurityConfigurer security) {
        security.checkTokenAccess("permitAll()").allowFormAuthenticationForClients();
    }
    /**
     * 第三方客户端请求配置,和资源服务访问的配置,不设置默认都可以访问,提供默认回调地址
     */
    @Override
    public void configure(ClientDetailsServiceConfigurer clients) throws Exception {
        clients.inMemory()
                .withClient("third01")
                .secret(new BCryptPasswordEncoder().encode("third01"))
                .resourceIds("resource-01")
                .authorizedGrantTypes("authorization_code","refresh_token")
                .scopes("all")
                .redirectUris("http://localhost:8082/notify.html");
    }
    /**
     * 配置访问端点
     */
    @Override
    public void configure(AuthorizationServerEndpointsConfigurer endpoints) {
        endpoints.authorizationCodeServices(authorizationCodeServices()).tokenServices(tokenServices());
    }
    /**
     * 内存管理
     */
    @Bean
    AuthorizationCodeServices authorizationCodeServices() {
        return new InMemoryAuthorizationCodeServices();
    }
    /**
     * Token管理规则
     */
    @Bean
    AuthorizationServerTokenServices tokenServices() {
        DefaultTokenServices services = new DefaultTokenServices();
        services.setClientDetailsService(clientDetailsService);
        services.setSupportRefreshToken(true);
        services.setTokenStore(tokenStore());
        services.setAccessTokenValiditySeconds(3600);
        services.setRefreshTokenValiditySeconds(3600*7);
        return services;
    }
    @Bean
    TokenStore tokenStore() {
        return new InMemoryTokenStore();
    }
}
通常需要数据库存储第三方信息,可以到第OAuth2开源项目中,获取表结构放到本地数据库中,然后这里换成数据源加载模式即可,简单的流程管理都在源码里写了SQL语句,数据源引入即可。
Security配置
/**
 * 模拟本地用户配置
 */
@Configuration
public class SecurityConfig extends WebSecurityConfigurerAdapter {
    /**
     * 密码加密方式
     */
    @Bean
    public PasswordEncoder passwordEncoder(){
        return new BCryptPasswordEncoder();
    }
    /**
     * 内存中虚拟用户和角色
     */
    @Override
    protected void configure(AuthenticationManagerBuilder auth) throws Exception {
        auth.inMemoryAuthentication()
                .withUser("user")
                .password(new BCryptPasswordEncoder().encode("123456"))
                .roles("user");
    }
    /**
     * 表单登录
     */
    @Override
    protected void configure(HttpSecurity http) throws Exception {
        http.csrf().disable().formLogin();
    }
}
基于这里的配置管理邮箱用户的认证流程,例如使用邮箱账号密码登录验证,判断授权是否成立,这里管理的是服务本地的邮箱账号,基于数据源存储数据在下面案例中都有。
- 案例一:JWT组件管理身份验证机制
- 案例二:Shiro组件实现用户权限管理
- 案例三:Security用户安全认证流程
关于Spring框架中安全认证的相关的几个组件,在使用OAuth2之前可以先了解一下。
【资源服务】
主要功能有三块,配置第三方携带的Token身份令牌校验机制,即访问授权服务校验接口,这里是OAuth2自定义好的接口;配置resourceId资源服务的编号,用来控制第三个服务能访问的资源服务范围,属于大的权限点控制;模拟校验用户的Role角色,较精细的控制权限。
/**
 * 资源服务管理配置
 */
@Configuration
@EnableResourceServer
public class ResourceServerConfig extends ResourceServerConfigurerAdapter {
    /**
     * Token令牌校验
     */
    @Bean
    RemoteTokenServices tokenServices() {
        RemoteTokenServices services = new RemoteTokenServices();
        services.setCheckTokenEndpointUrl("http://localhost:8080/oauth/check_token");
        services.setClientId("third01");
        services.setClientSecret("third01");
        return services;
    }
    /**
     * 服务资源ID配置
     */
    @Override
    public void configure(ResourceServerSecurityConfigurer resources) throws Exception {
        resources.resourceId("resource-01").tokenServices(tokenServices());
    }
    /**
     * 模拟用户权限规则
     */
    @Override
    public void configure(HttpSecurity http) throws Exception {
        http.authorizeRequests()
                .antMatchers("/user/**").hasRole("user")
                .anyRequest().authenticated();
    }
}
【第三方服务】
主要提供两个流程的模拟:请求授权服务获取身份令牌;携带身份令牌请求资源服务获取数据。这里则是授权码回调接口的处理方式。
@Controller
public class NotifyController {

    private static final Logger LOG = LoggerFactory.getLogger(NotifyController.class);

    @Resource
    private RestTemplate restTemplate;

    @GetMapping("/notify.html")
    public String notify(String code, Model model) {
        if (code != null) {
            MultiValueMap<String, String> map = new LinkedMultiValueMap<>();
            map.add("code", code);
            map.add("client_id", "third01");
            map.add("client_secret", "third01");
            map.add("redirect_uri", "http://localhost:8082/notify.html");
            map.add("grant_type", "authorization_code");
            Map<String,String> resp = restTemplate.postForObject("http://localhost:8080/oauth/token", map, Map.class);
            String accessToken = resp.get("access_token");
            LOG.info("身份令牌:{}",accessToken);
            HttpHeaders headers = new HttpHeaders();
            headers.add("Authorization", "Bearer " + accessToken);
            HttpEntity<Object> httpEntity = new HttpEntity<>(headers);
            ResponseEntity<String> entity = restTemplate.exchange("http://localhost:8081/user/resource", HttpMethod.GET, httpEntity, String.class);
            model.addAttribute("notifyMsg", entity.getBody());
        }
        return "notify";
    }
}
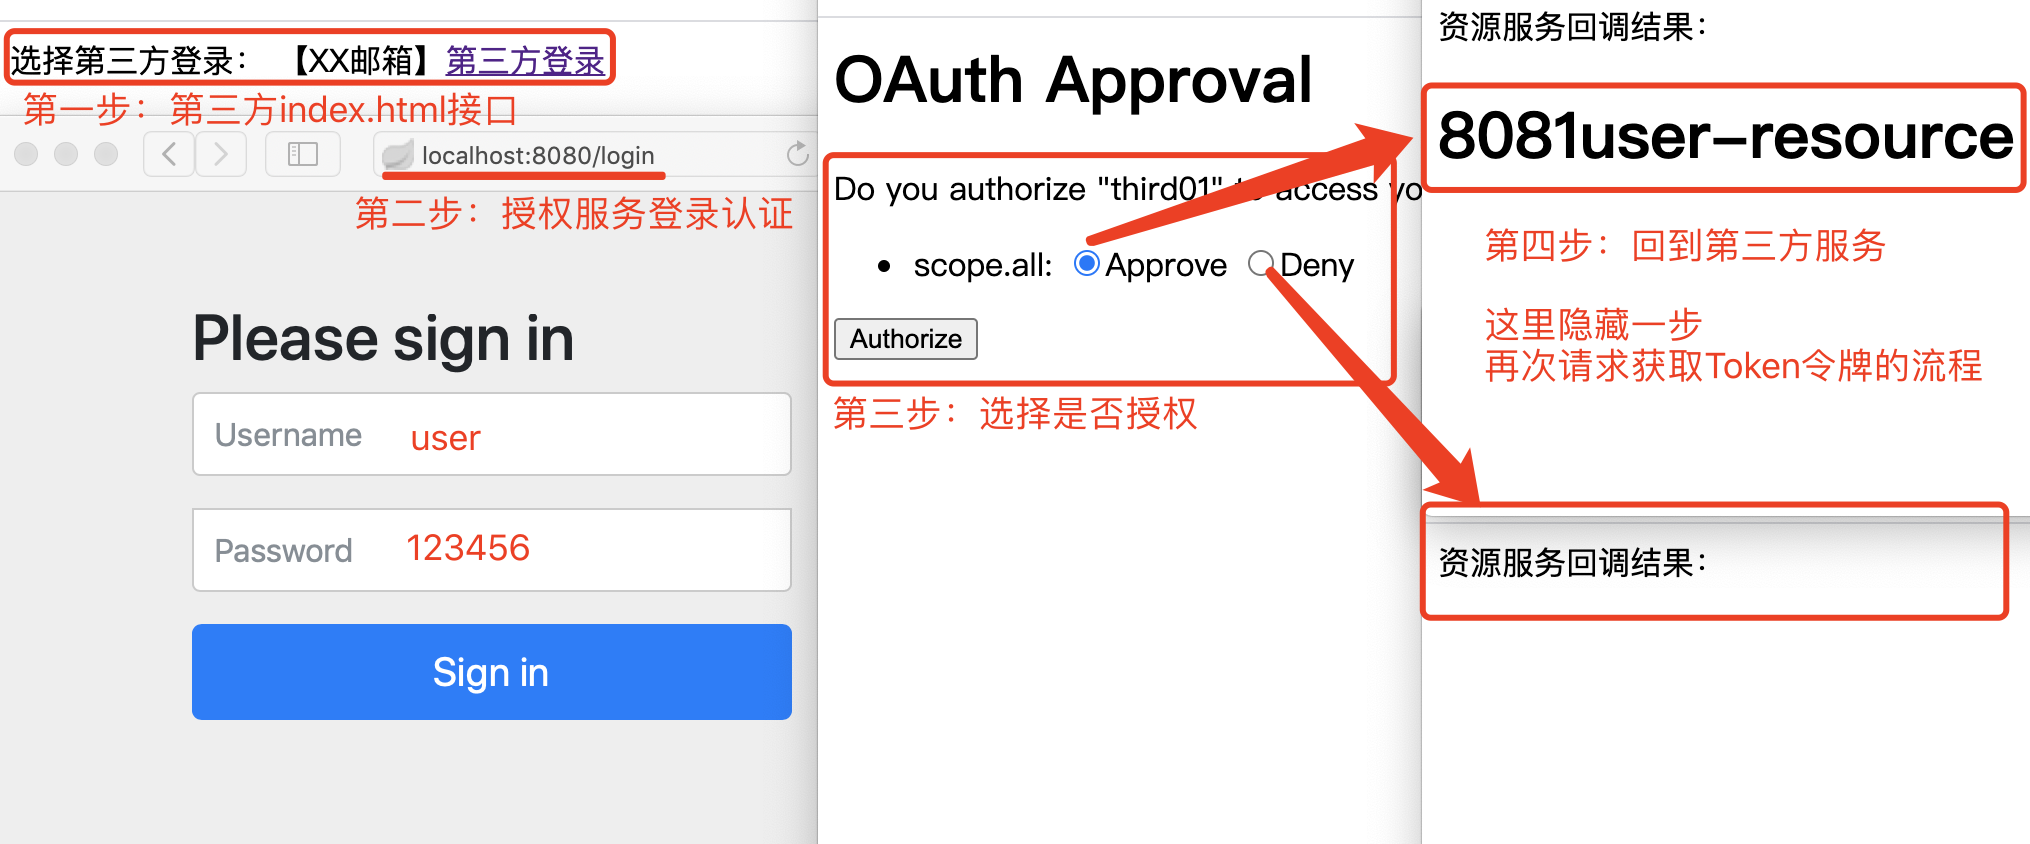
三、测试流程

通过上述测试流程,对比常见的第三方登录机制,理解OAuth2的授权码模式。
四、源代码地址
GitHub·地址
https://github.com/cicadasmile/middle-ware-parent
GitEE·地址
https://gitee.com/cicadasmile/middle-ware-parent


