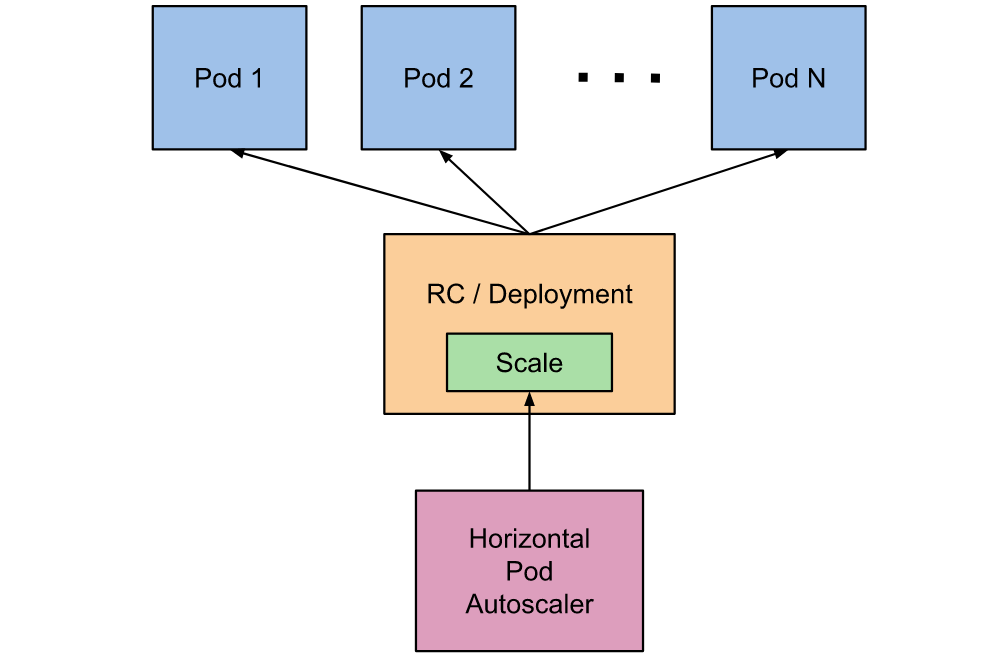
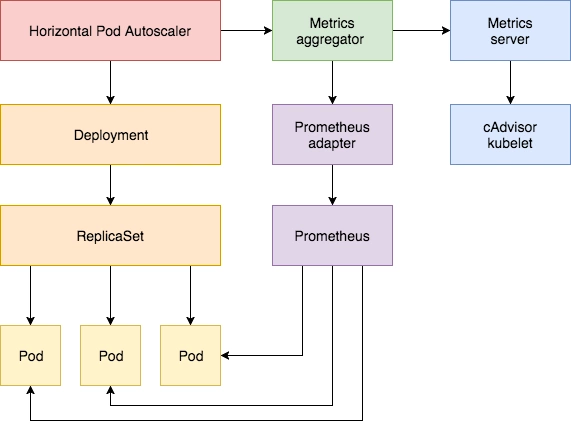
 Kubernetes 增强了应用服务的横向扩容能力,在应对线上应用服务的资源使用率在高峰和低谷的时候,我们需要能够自动去感知应用的负载变化去调整 Pod 的副本数量,削峰填谷,提高集群的整体资源利用率和应用的服务质量。为此,Kubernetes 1.2 版本中引入 Horizontal Pod Autoscaling (HPA), 它与 kubectl scale 命令相似,作为 Pod 水平自动缩放的实现。
工作机制
kubernetes 通过指标适配器获取 Pod 的资源使用情况,根据内存、CPU 或自定义度量指标自动扩缩 ReplicationController、Deployment、ReplicaSet 和 StatefulSet 中的 Pod 数量。

Horizontal Pod Autoscaler 由一个控制循环实现,循环周期由 kube-controller- manager 中的 --horizontal-pod-autoscaler-sync-period 参数指定(默认是 15 秒)。 在每个周期内,kube-controller- manager 会查询 HorizontalPodAutoscaler 中定义的指标度量值,并且与创建时设定的值和指标度量值做对比,从而实现自动伸缩的功能。
API对象
HorizontalPodAutoscaler 是 Kubernetes autoscaling API 组的资源。
[root@k8s-test-master01 ~]# kubectl api-versions  | grep autoscaling
autoscaling/v1
autoscaling/v2beta1
autoscaling/v2beta2当前稳定版本(autoscaling/v1)中只支持基于 CPU 指标的扩缩。
beta 版本(autoscaling/v2beta2)引入了基于内存和自定义指标的扩缩。
Aggregator API HPA 依赖指标适配器(如 metrics-server),要安装指标适配器需要开启 Aggregator ,Kubeadm 搭建的集群默认已经开启,如果是二进制的方式搭建的集群,需要配置kube-apiserver kube-controller-manager 。
  --requestheader-allowed-names="front-proxy-client" \
  --requestheader-client-ca-file=/etc/kubernetes/pki/ca.crt \
  --requestheader-extra-headers-prefix="X-Remote-Extra-" \
  --requestheader-group-headers=X-Remote-Group \
  --requestheader-username-headers=X-Remote-User \
  --proxy-client-cert-file=/etc/kubernetes/pki/front-proxy-client.crt \
  --proxy-client-key-file=/etc/kubernetes/pki/front-proxy-client.key \
注: requestheader-allowed-names 需要与证书定义的 CN 值一致。
Metrics API
HorizontalPodAutoscaler 控制器会从 Metrics API 中检索度量值。
metrics.k8s.io 资源指标 API,一般由 metrics-server 提供。
custom.metrics.k8s.io 自定义指标 API,一般由 prometheus-adapter 提供。
external.metrics.k8s.io 外部指标 API,一般由自定义指标适配器提供。
安装指标适配器
metrics-server 安装很简单,kubernetes 源码中提供了 yaml 清单。
# kubernetes 源码地址 cluster/addons/metrics-server
[root@k8s-test-master01 metrics-server]# ll
total 32
-rw-rw-r-- 1 root root  398 Jan 13 21:19 auth-delegator.yaml
-rw-rw-r-- 1 root root  419 Jan 13 21:19 auth-reader.yaml
-rw-rw-r-- 1 root root  388 Jan 13 21:19 metrics-apiservice.yaml
-rw-rw-r-- 1 root root 3352 Jan 13 21:19 metrics-server-deployment.yaml
-rw-rw-r-- 1 root root  336 Jan 13 21:19 metrics-server-service.yaml
-rw-rw-r-- 1 root root  188 Jan 13 21:19 OWNERS
-rw-rw-r-- 1 root root 1227 Jan 13 21:19 README.md
-rw-rw-r-- 1 root root  844 Jan 13 21:19 resource-reader.yaml
[root@k8s-test-master01 metrics-server]# kubectl create -f  .

# 或 https://github.com/kubernetes-sigs/metrics-server/tree/master/manifests/base
[root@k8s-test-master01 base]# ls -lrt
total 20
-rw-r--r-- 1 root root 1714 Feb 17 11:00 rbac.yaml
-rw-r--r-- 1 root root  185 Feb 17 11:00 kustomization.yaml.bak
-rw-r--r-- 1 root root  293 Feb 17 11:00 apiservice.yaml
-rw-r--r-- 1 root root 2163 Feb 17 11:07 deployment.yaml
-rw-r--r-- 1 root root  216 Feb 17 11:21 service.yaml
安装完成验证,正常能获取到资源使用情况。
[root@k8s-test-master01 ~]# kubectl top nodes
NAME                     CPU(cores)   CPU%   MEMORY(bytes)   MEMORY%
k8s-test-master01        273m         6%     4027Mi          52%
k8s-test-node01          207m         5%     2361Mi          30%
k8s-test-node02          180m         4%     1833Mi          23%
kubeedge-raspberrypi01   195m         4%     719Mi           19%
[root@k8s-test-master01 ~]#
Prometheus-adapter 顾名思义是基于普罗米修斯的自定义指标适配器,需要先安装普罗米修斯,如集群已经有普罗米修斯了,可以通过 prometheus.url prometheus.port 参数指定即可。
# 创建 namespace
kubectl create ns monitoring
# 安装 prometheus
helm repo add prometheus-community https://prometheus-community.github.io/helm-charts
helm search repo prometheus-community
helm install  my-release prometheus-community/prometheus --namespace monitoring --values https://bit.ly/2RgzDtg --version 13.2.1 \
--set alertmanager.persistentVolume.enabled=false \
--set server.persistentVolume.enabled=false

# 导出 prometheus-adapter yaml 清单,方便后续添加自定义指标
helm template my-adapter prometheus-community/prometheus-adapter --namespace monitoring  \
--set prometheus.url=http://my-release-prometheus-server \
--set prometheus.port=80 \
--set rules.default=true >adapter.yaml

# 安装 prometheus-adapter
kubectl create -f  adapter.yaml
安装完成验证
[root@k8s-test-master01 ~]# kubectl get --raw /apis/custom.metrics.k8s.io/v1beta1 | jq .
{
  "kind": "APIResourceList",
  "apiVersion": "v1",
  "groupVersion": "custom.metrics.k8s.io/v1beta1",
  "resources": [
    {
      "name": "namespaces/kube_statefulset_status_observed_generation",
      "singularName": "",
      "namespaced": false,
      "kind": "MetricValueList",
      "verbs": [
        "get"
      ]
    },
...
基于 CPU
使用 Deployment 来创建一个测试的 Pod,然后利用 HPA 来进行自动扩缩容。
---
apiVersion: apps/v1
kind: Deployment
metadata:
  name: demo
spec:
  selector:
    matchLabels:
      app: demo
  replicas: 1
  template:
    metadata:
      labels:
        app: demo
    spec:
      containers:
        - name: demo
          image: docker.io/library/debian:stable-slim
          command:
            - sleep
            - "3600"
          resources:
            requests:
              memory: "100Mi"
              cpu: "100m"
            limits:
              memory: "200Mi"
              cpu: "200m"
创建
[root@k8s-test-master01 demo]# kubectl create -f  demo.yaml
deployment.apps/demo created
[root@k8s-test-master01 demo]# kubectl get pods -l app=demo
NAME                    READY   STATUS    RESTARTS   AGE
demo-575ff999f8-dfs5s   1/1     Running   0          94s
创建 hpa
[root@k8s-test-master01 demo]# cat demo-cpu-hpa.yaml
apiVersion: autoscaling/v1
kind: HorizontalPodAutoscaler
metadata:
  name: demo-cpu
spec:
  scaleTargetRef:
    apiVersion: apps/v1
    kind: Deployment
    name: demo
  minReplicas: 1
  maxReplicas: 6
  targetCPUUtilizationPercentage: 100
[root@k8s-test-master01 demo]# kubectl create -f  demo-cpu-hpa.yaml
horizontalpodautoscaler.autoscaling/demo-cpu created
[root@k8s-test-master01 demo]# kubectl get hpa
NAME       REFERENCE         TARGETS   MINPODS   MAXPODS   REPLICAS   AGE
demo-cpu   Deployment/demo   0%/100%   1         6         1          12s

# 或使用 kubectl 命令创建
kubectl autoscale deployment demo --cpu-percent=100 --min=1 --max=6
使用一个 for 循环消耗 CPU
[root@k8s-test-master01 ~]# kubectl top pod
[root@k8s-test-master01 demo]# kubectl exec -it demo-575ff999f8-ckpbg -- bash
root@demo-575ff999f8-ckpbg:/# x=0
root@demo-575ff999f8-ckpbg:/#  while [ True ];do x=$x+1;done;
查看 hpa
[root@k8s-test-master01 ~]# kubectl get hpa
NAME       REFERENCE         TARGETS     MINPODS   MAXPODS   REPLICAS   AGE
demo-cpu   Deployment/demo   201%/100%   1         6         2          2m53s
[root@k8s-test-master01 ~]# kubectl get hpa
NAME       REFERENCE         TARGETS     MINPODS   MAXPODS   REPLICAS   AGE
demo-cpu   Deployment/demo   100%/100%   1         6         2          3m8s
[root@k8s-test-master01 ~]#
可以看到已经扩容了 2 个 Pod ,我们定义了最大值是 6 ,那为什么只扩容了 2 个 pod 呢? 这个就涉及到了 hpa 的算法细节了,官方给出的公式是
期望副本数 = ceil[当前副本数 * (当前指标 / 期望指标)]
因为当前度量值为 200,目标设定值为 100,那么 200/100 == 2,副本数量将会翻倍。当 pod 的数量为 2 时,平均的值为 100
[root@k8s-test-master01 ~]# kubectl top po
NAME                                 CPU(cores)   MEMORY(bytes)
demo-575ff999f8-ckpbg                201m         2Mi
demo-575ff999f8-gvq5l                0m           0Mi
在另外一个 pod 也执行下 for 循环后,查看 hpa
[root@k8s-test-master01 ~]# kubectl get hpa
NAME       REFERENCE         TARGETS     MINPODS   MAXPODS   REPLICAS   AGE
demo-cpu   Deployment/demo   100%/100%   1         6         4          9m54s
[root@k8s-test-master01 ~]# kubectl top pod
NAME                                 CPU(cores)   MEMORY(bytes)
demo-575ff999f8-ckpbg                200m         3Mi
demo-575ff999f8-gvq5l                201m         2Mi
demo-575ff999f8-q4zbj                0m           0Mi
demo-575ff999f8-xblz6                0m           0Mi
换一句话说,如果 pod 当前度量的平均值大于 hpa 设定值,则自动扩容,直到平均值小于设定值。实际上不会出现这种极端的情况,kubernetes 有负载均衡。感兴趣的读者可以去试试。
[root@k8s-test-master01 ~]# kubectl describe hpa demo-cpu
Name:                                                  demo-cpu
Namespace:                                             default
Labels:                                                <none>
Annotations:                                           <none>
CreationTimestamp:                                     Sat, 27 Feb 2021 18:18:44 +0800
Reference:                                             Deployment/demo
Metrics:                                               ( current / target )
  resource cpu on pods  (as a percentage of request):  0% (0) / 100%
Min replicas:                                          1
Max replicas:                                          6
Deployment pods:                                       1 current / 1 desired
Conditions:
  Type            Status  Reason            Message
  ----            ------  ------            -------
  AbleToScale     True    ReadyForNewScale  recommended size matches current size
  ScalingActive   True    ValidMetricFound  the HPA was able to successfully calculate a replica count from cpu resource utilization (percentage of request)
  ScalingLimited  True    TooFewReplicas    the desired replica count is less than the minimum replica count
Events:
  Type     Reason                        Age                From                       Message
  ----     ------                        ----               ----                       -------
  Warning  FailedGetResourceMetric       20m (x5 over 20m)  horizontal-pod-autoscaler  failed to get cpu utilization: did not receive metrics for any ready pods
  Warning  FailedComputeMetricsReplicas  20m (x5 over 20m)  horizontal-pod-autoscaler  invalid metrics (1 invalid out of 1), first error is: failed to get cpu utilization: did not receive metrics for any ready pods
  Normal   SuccessfulRescale             18m                horizontal-pod-autoscaler  New size: 2; reason: cpu resource utilization (percentage of request) above target
  Normal   SuccessfulRescale             12m                horizontal-pod-autoscaler  New size: 3; reason: cpu resource utilization (percentage of request) above target
  Normal   SuccessfulRescale             12m                horizontal-pod-autoscaler  New size: 4; reason: cpu resource utilization (percentage of request) above target
  Normal   SuccessfulRescale             108s               horizontal-pod-autoscaler  New size: 2; reason: All metrics below target
  Normal   SuccessfulRescale             98s                horizontal-pod-autoscaler  New size: 1; reason: All metrics below target
基于内存
使用 beta API 创建 hpa
[root@k8s-test-master01 demo]# cat demo-men-hpa.yaml
apiVersion: autoscaling/v2beta2
kind: HorizontalPodAutoscaler
metadata:
  name: demo-mem
  namespace: default
spec:
  scaleTargetRef:
    apiVersion: apps/v1
    kind: Deployment
    name: demo
  minReplicas: 1
  maxReplicas: 6
  metrics:
  - type: Resource
    resource:
      name: memory
      target:
        type: AverageValue
        averageValue: 10Mi
[root@k8s-test-master01 demo]# kubectl get hpa
NAME       REFERENCE         TARGETS        MINPODS   MAXPODS   REPLICAS   AGE
demo-mem   Deployment/demo   823296/100Mi   1         6         1          27s
[root@k8s-test-master01 demo]#
与 CPU 差不多,这里就不展开了。
[root@k8s-test-master01 demo]# kubectl get hpa
NAME       REFERENCE         TARGETS       MINPODS   MAXPODS   REPLICAS   AGE
demo-mem   Deployment/demo   14737408/10Mi   1         6         2          6m10s
基于自定义指标
除了基于 CPU 和内存来进行自动扩缩容之外,还可以使用 Prometheus Adapter 获取普罗米修斯收集的指标并使用来设置扩展策略。
 写一个程序,获取 http 请求连接数等指标。
完整代码:
https://github.com/prodanlabs/kubernetes-hpa-examples
package prometheus

import (
    "strconv"
    "time"

    "github.com/kataras/iris/v12"
    "github.com/prometheus/client_golang/prometheus"
)

const (
    reqsName        = "http_requests_total"
    latencyName     = "http_request_duration_seconds"
    connectionsName = "tcp_connections_total"
)

type Prometheus struct {
    reqs        *prometheus.CounterVec
    latency     *prometheus.HistogramVec
    connections *prometheus.GaugeVec
}
示例程序 yaml
[root@k8s-test-master01 demo]# cat hpa-examples.yaml
---
apiVersion: apps/v1
kind: Deployment
metadata:
  name: hpa-examples
spec:
  selector:
    matchLabels:
      app: hpa-examples
  replicas: 2
  template:
    metadata:
      labels:
        app: hpa-examples
      annotations:
        prometheus.io/port: "8080"
        prometheus.io/scrape: "true"
    spec:
      containers:
      - name: hpa-examples
        image: prodan/kubernetes-hpa-examples:latest
        env:
        - name: POD_NAME
          valueFrom:
            fieldRef:
              fieldPath: metadata.name
        - name: POD_NAMESPACE
          valueFrom:
            fieldRef:
              fieldPath: metadata.namespace
        ports:
        - containerPort: 8080
          protocol: TCP
        resources:
          requests:
            memory: "50Mi"
            cpu: "100m"
          limits:
            memory: "256Mi"
            cpu: "500m"
---
apiVersion: v1
kind: Service
metadata:
  name: hpa-examples
  labels:
    app: hpa-examples
spec:
  ports:
    - port: 8080
      targetPort: 8080
      protocol: TCP
  selector:
    app: hpa-examples
确认是否接入普罗米修斯

prometheus-adapter 的 configmap 加入下列配置
    - seriesQuery: '{__name__=~"^http_requests_.*",kubernetes_pod_name!="",kubernetes_namespace!=""}'
      seriesFilters: []
      resources:
        overrides:
          kubernetes_namespace:
            resource: namespace
          kubernetes_pod_name:
            resource: pod
      name:
        matches: ^(.*)_(total)$
        as: "${1}"
      metricsQuery: sum(rate(<<.Series>>{<<.LabelMatchers>>}[1m])) by (<<.GroupBy>>)
查看是否能获取到自定义指标
[root@k8s-test-master01 demo]# kubectl get --raw "/apis/custom.metrics.k8s.io/v1beta1/namespaces/default/pods/*/http_requests" | jq .
{
  "kind": "MetricValueList",
  "apiVersion": "custom.metrics.k8s.io/v1beta1",
  "metadata": {
    "selfLink": "/apis/custom.metrics.k8s.io/v1beta1/namespaces/default/pods/%2A/http_requests"
  },
  "items": [
    {
      "describedObject": {
        "kind": "Pod",
        "namespace": "default",
        "name": "hpa-examples-954c4fb6c-h7j2g",
        "apiVersion": "/v1"
      },
      "metricName": "http_requests",
      "timestamp": "2021-02-27T12:03:56Z",
      "value": "100m",
      "selector": null
    },
    {
      "describedObject": {
        "kind": "Pod",
        "namespace": "default",
        "name": "hpa-examples-954c4fb6c-vxnrb",
        "apiVersion": "/v1"
      },
      "metricName": "http_requests",
      "timestamp": "2021-02-27T12:03:56Z",
      "value": "100m",
      "selector": null
    }
  ]
}
创建hpa
---
apiVersion: autoscaling/v2beta2
kind: HorizontalPodAutoscaler
metadata:
  name: hpa-examples-requests
spec:
  scaleTargetRef:
    apiVersion: apps/v1
    kind: Deployment
    name: hpa-examples
  minReplicas: 2
  maxReplicas: 6
  metrics:
    - type: Pods
      pods:
        metric:
          name: http_requests
        target:
          type: AverageValue
          averageValue: 5
[root@k8s-test-master01 demo]# kubectl get hpa
NAME                    REFERENCE                 TARGETS    MINPODS   MAXPODS   REPLICAS   AGE
hpa-examples-requests   Deployment/hpa-examples   100m/5   2         6         2          25s
测试
kubectl run -i --tty load-generator --rm --image=busybox --restart=Never -- /bin/sh -c "while sleep 0.01; do wget -q -O- http://hpa-examples:8080/api/v1/hostname; done"查看 hpa 扩容过程
[root@k8s-test-master01 demo]# kubectl get hpa
NAME                    REFERENCE                 TARGETS    MINPODS   MAXPODS   REPLICAS   AGE
hpa-examples-requests   Deployment/hpa-examples   14982m/5   2         6         6          3m18s
[root@k8s-test-master01 demo]# kubectl describe hpa hpa-examples-requests
Name:                       hpa-examples-requests
Namespace:                  default
Labels:                     <none>
Annotations:                <none>
CreationTimestamp:          Sat, 27 Feb 2021 20:29:27 +0800
Reference:                  Deployment/hpa-examples
Metrics:                    ( current / target )
  "http_requests" on pods:  15280m / 5
Min replicas:               2
Max replicas:               6
Deployment pods:            6 current / 6 desired
Conditions:
  Type            Status  Reason            Message
  ----            ------  ------            -------
  AbleToScale     True    ReadyForNewScale  recommended size matches current size
  ScalingActive   True    ValidMetricFound  the HPA was able to successfully calculate a replica count from pods metric http_requests
  ScalingLimited  True    TooManyReplicas   the desired replica count is more than the maximum replica count
Events:
  Type    Reason             Age   From                       Message
  ----    ------             ----  ----                       -------
  Normal  SuccessfulRescale  82s   horizontal-pod-autoscaler  New size: 4; reason: pods metric http_requests above target
  Normal  SuccessfulRescale  72s   horizontal-pod-autoscaler  New size: 6; reason: pods metric http_requests above target
[root@k8s-test-master01 demo]# kubectl get po  -l app=hpa-examples
NAME                           READY   STATUS    RESTARTS   AGE
hpa-examples-954c4fb6c-4rlvx   1/1     Running   0          74s
hpa-examples-954c4fb6c-9fz2f   1/1     Running   0          74s
hpa-examples-954c4fb6c-h7j2g   1/1     Running   0          35m
hpa-examples-954c4fb6c-s95lf   1/1     Running   0          84s
hpa-examples-954c4fb6c-vxnrb   1/1     Running   0          35m
hpa-examples-954c4fb6c-zlp5b   1/1     Running   0          84s
参考文档:
https://github.com/kubernetes-sigs/prometheus-adapter https://kubernetes.io/docs/tasks/run-application/horizontal-pod-autoscale/
感兴趣的读者可以关注下微信号


