单向链表及其Java实现
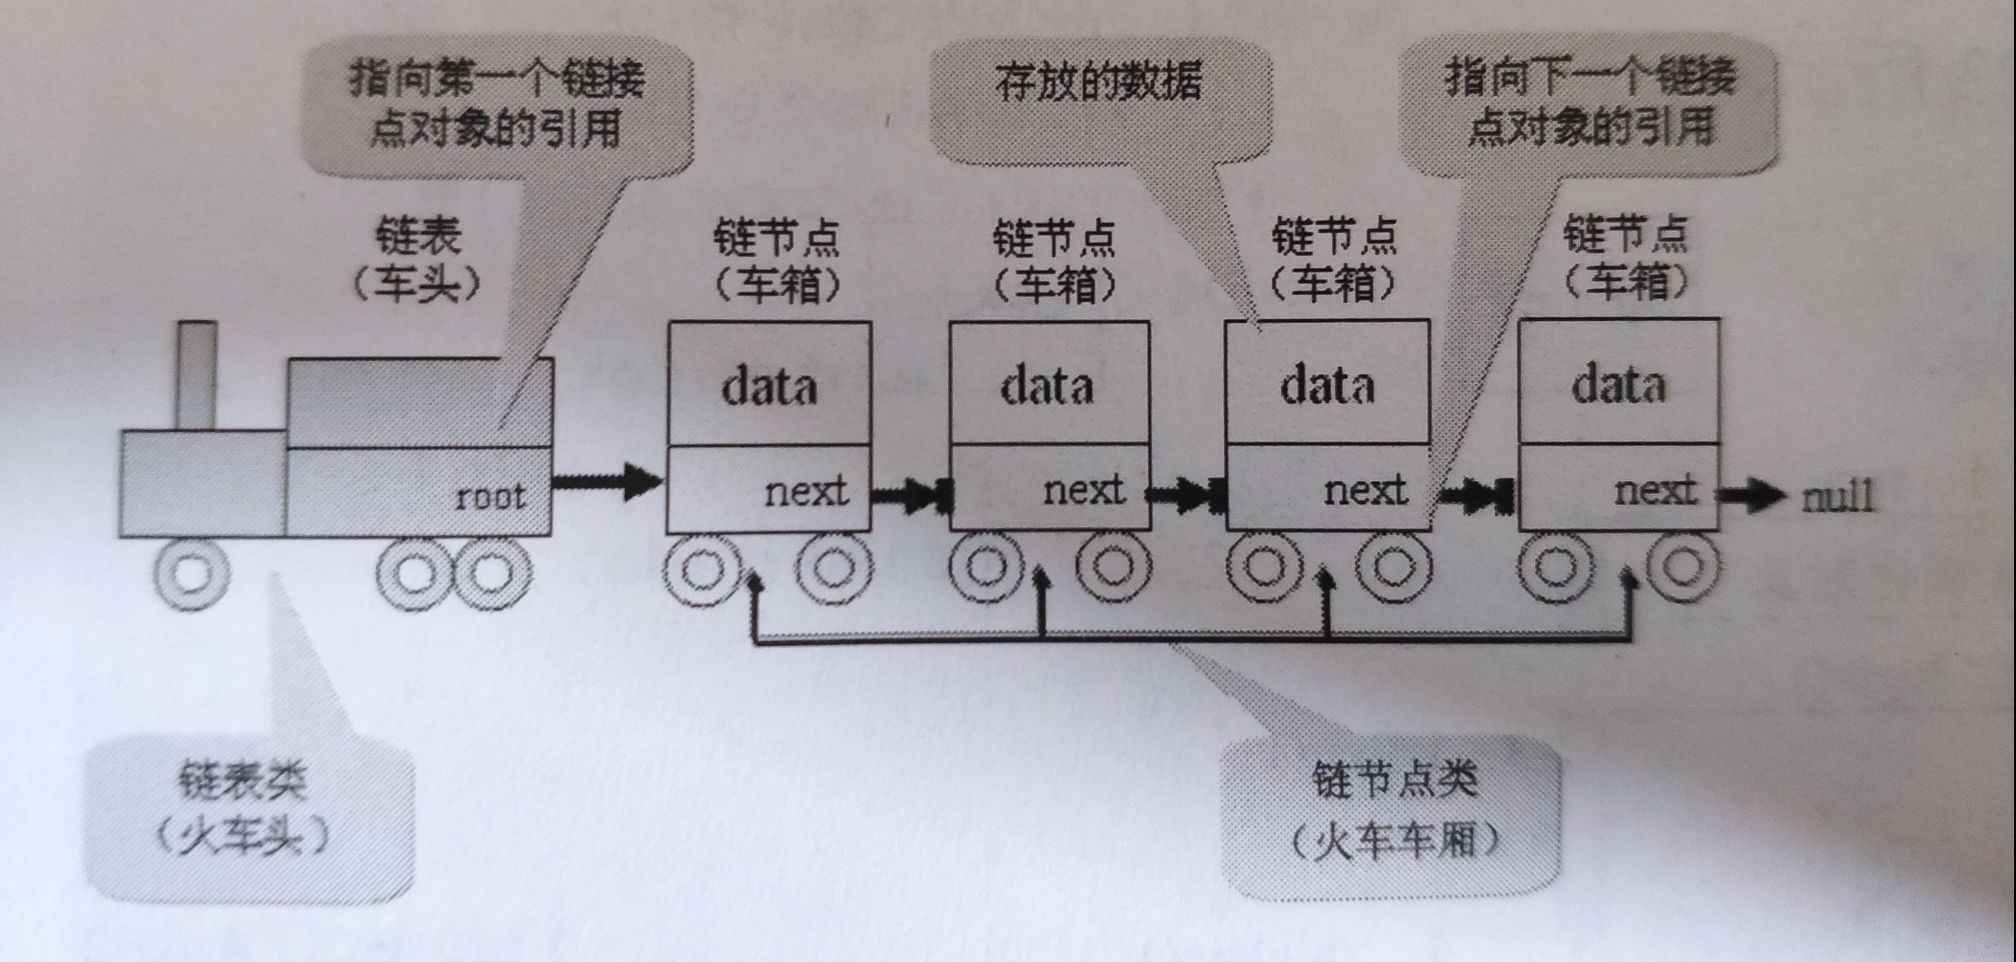
单向链表(单链表)是链表的一种,其特点是链表的链接方向是单向的,访问链表时要从头部开始顺序读取。一个单向链表的节点(Node)可以分为两个部分,一部分是数据域(data),用来存放节点的数据信息;一部分是指针域(next),用来存放下一个节点的地址,即每一个节点都有下一个节点对象的引用。由于最后一个数据元素没有直接后继,最后一个节点的指针为”空“,null。(单向链表是指节点中的指针域只有一个沿着同一个方向表示的链式存储结构。)
具体的数据结构如图:

1.节点类的实现
由于节点是一个独立的对象,所以能够实现独立的节点类。以下是一个节点类的定义:
    class Node{
        private String data;
            private Node next;
        public Node(String data) {
            // TODO Auto-generated constructor stub
            this.data=data;
        }
        public String getData() {
            return data;
        }
        public void setData(String data) {
            this.data = data;
        }
        public Node getNext() {
            return next;
        }
        public void setNext(Node next) {
            this.next = next;
        }
    }
1.1简单链表的设置及输出
package person.xsc.datamanage;
class NodeDemo {
    static class Node{
        private String data;
        private Node next;
        public Node(String data) {
            // TODO Auto-generated constructor stub
            this.data=data;
        }
        public String getData() {
            return data;
        }
        public void setData(String data) {
            this.data = data;
        }
        public Node getNext() {
            return next;
        }
        public void setNext(Node next) {
            this.next = next;
        }
    }
    //递归输出:判断一个节点之后是否还有后续节点,如果存在后续节点,则输出,如果不存在则不输出。
    public static void printNode(Node node) {
        System.out.print(node.getData()+"\t");
        if(node.getNext()!=null) {
            printNode(node.getNext());
        }else {
            System.out.print("嘿,后面已经没有节点了!");
        }
    }
    public static void main(String []args) {
        Node root=new Node("我是链表头节点!");
        Node n1=new Node("我是一号节点!");
        Node n2=new Node("我是二号节点!");
        Node n3=new Node("我是三号节点!");
        root.setNext(n1);
        n1.setNext(n2);
        n2.setNext(n3);
        //三号节点之后不再有后续节点,所以不再单独设置关系
        printNode(root);
    }
}
输出:
我是链表头节点!    我是一号节点!    我是二号节点!    我是三号节点!    后面已经没有节点了
1.2链表操作(插入、查找、删除)
1.2.1 插入运算
(1)尾插入法
实现思路:如果链表没有头结点,新结点直接成为头结点;否则需要先找到链表当前的尾结点,并将新结点插入到链表尾部。下面是插入节点的示意图:

package person.xsc.datamanage;
public class NodeDemo1 {
    private static Node head; //头结点
    static class Node{
        private String data;
        private Node next;
        public Node(String data) {
            // TODO Auto-generated constructor stub
            this.data=data;
        }
        public String getData() {
            return data;
        }
        public void setData(String data) {
            this.data = data;
        }
        public Node getNext() {
            return next;
        }
        public void setNext(Node next) {
            this.next = next;
        }
    }
    public void addTailNode(String value) {
        // TODO Auto-generated method stub
         Node newNode = new Node(value);//定义需要插入的新节点对象
           //头节点不存在,新结点成为头节点,相当于第一个结点,将tail顺便一起指向这个节点
           if (head == null) {
               head = newNode;
               return;
           }else {
             //如果存在头节点,那么就要找到最后一个结点
               Node tail =head;//一个移动的指针(把头节点看作一个指向节点的指针)
               while (tail.next != null) {//遍历单链表,直至最后一个跳出循环
                   tail = tail.next;//往后移动一个节点,指向下一个节点
               }
               //新结点插入到链表尾部
               tail.next = newNode;
           }
    }
    public void printNode() {
        if(head==null) {
            return;
        }
        System.out.println(head.getData());
        Node temp=head.next;
        while(true) {
            if(temp==null) {
                break;
            }
            System.out.println(temp.getData());
            temp=temp.next;
        }
    }
    public static void main(String[] args) {
        // TODO Auto-generated method stub
        NodeDemo1 n=new NodeDemo1();
        n.addTailNode("我是新插入的节点--1号");
        n.addTailNode("我是在1号后面新插入的节点--2号");
        n.addTailNode("我是在2号后面新插入的节点--3号");
        n.addTailNode("我是在3号后面新插入的节点--4号");
        n.printNode();
    }
}
输出:
我是新插入的节点--1号
我是在1号后面新插入的节点--2号
我是在2号后面新插入的节点--3号
我是在3号后面新插入的节点--4号
(2)头插入法
实现思路:将每个新节点都插在头节点的前面,并自己成为头节点。下面是插入节点的示意图:

public void addFirst(String value) {
        Node newNode = new Node(value);//定义需要插入的新节点对象
        if(head==null) {//是否头节点为空
            head=newNode;//头节点就为新建节点
            return;
        }
        newNode.next=head;
        head=newNode;
}
重复代码已省略!
---------------------------------------------------------------------
public static void main(String[] args) {
        // TODO Auto-generated method stub
        head=new Node("我是头节点");
        head.next=new Node("我是1号节点");
        NodeDemo1 n=new NodeDemo1();
        n.addFirst("我是新插入的头节点");
        n.printNode();
}
输出:
我是新插入的头节点
我是头节点
我是1号节点
(3)指定位置插入法 实现思路:先判断插入位置为头尾两端的情况,即index == 0直接调用头插入法,index == 链表长度直接调用尾插入法;如果插入位置不是头尾两端,则先找出节点增加的位置。
public void addNodeByIndex(Node head,String value, int index) {
        if (index < 0 || index > =size(head)) { //注意index是可以等于size()的
            throw new IndexOutOfBoundsException("IndexOutOfBoundsException");
        }
        if (index == 0) {  //直接调用头插入法
            addFirst(value);
        } else if (index == size(head)-1) {//直接调用尾插入法
            addTailNode(value);
        } else {  //插到某个中间位置
            Node newNode = new Node(value);//定义需要插入的新节点对象
            while(head.next!=null&&index>1){//寻找节点增加的位置
                head=head.next;//头节点就为下一节点
                index--;
            }
            newNode.next=head.next;//新节点的下一节点为原先的头节点的下一节点
            head.next=newNode;//头节点的下一节点为新节点
        }
    }
    private int size(Node head) {
        int length = 0;
        //临时节点,从首节点开始
        if(head!=null) {
            length=1;
            Node temp = head.next;
            // 找到尾节点
            while (temp != null) {
                length++;
                temp = temp.next;
            }
        }
        return length;
    }
重复代码已省略!
------------------------------------------------------
public static void main(String[] args) {
        // TODO Auto-generated method stub
        head=new Node("我是头节点");
        head.next=new Node("我是1号节点");
        head.next.next=new Node("我是2号节点");
        NodeDemo1 n=new NodeDemo1();
        n.addNodeByIndex(head,"我是在位置2处插入的节点", 2);
        n.printNode();
}
输出:
我是头节点
我是1号节点
我是在位置2处插入的节点
我是2号节点
1.2.2查找运算
实现思路:定义一个while循环来查找,如果当前数据和要查找的数据相同,则返回该数据位置;如果不同,则将当前节点的下一个节点设置为当前节点,沿着当前节点向前继续寻找,将链表长度作为循环条件,直至长度减为0,代表遍历完成,如果这时候还未找到该数据,返回null,不存在。
public String find(String value,Node head) {
        Node current=head;
        int length=size(head);
        int index=0;
        while(length>0) {
            if(value.equals(current.getData())) {
                return "该数据存在,数据存在的位置为"+index;
            }else {
                current=current.next;
                index++;
            }
            length--;
        }
        return "该数据不存在!";
    }
重复代码已省略!
--------------------------------------------------
public static void main(String[] args) {
        // TODO Auto-generated method stub
        head=new Node("我是头节点");
        head.next=new Node("我是1号节点");
        head.next.next=new Node("我是2号节点");
        NodeDemo1 n=new NodeDemo1();
        System.out.print(n.find("我是2号节点",head));
}
输出:
该数据存在,数据存在的位置为2
1.2.3删除运算
(1)指定数据删除法 实现思路:首先判断链表的长度,如果链表长度为0,为空,不执行任何操作,返回fasle;如果不为空,通过while循环找到要删除的元素;若删除的是头节点,则需要把要删除的节点的下一个节点指定为头节点;如果删除的不是头节点,则将该节点的上一个节点的next指针指向该节点的下一个节点,如果该节点的下一个节点为空,则指向null。
public boolean deleteNode(String value,Node head) {
        int length=size(head);
        if(length==0) {//如果链表长度为空,则说明链表为空,直接返回false;
           return false;
        }
        Node current=head;//用于记录该节点
        Node previous=head;//用于记录该节点上一节点
        //通过while循环找到要删除的元素
        while(current.getData()!=value) {
            if(current.next==null) {
                return false;
            }else {
                previous=current;
                current=current.next;
            }
        }
        //如果删除的是头节点,则需要把要删除的节点的下一个节点指定为头节点
        if(current==head) {
            head=current.next;
            length--;
        //如果删除的不是头节点,则将该节点的上一个节点的next指针指向该节点的下一个节点,如果该节点的下一个节点为空,则指向null
        }else {
            previous.next=current.next;
            length--;
        }
        return true;
    }
重复代码已省略!
--------------------------------
public static void main(String[] args) {
        // TODO Auto-generated method stub
        head=new Node("我是头节点");
        head.next=new Node("我是1号节点");
        head.next.next=new Node("我是2号节点");
        head.next.next.next=new Node("我是3号节点");
        NodeDemo1 n=new NodeDemo1();
        System.out.println("---------删除前--------");
        n.printNode();
        System.out.println(n.deleteNode("我是2号节点",head));
        System.out.println("---------删除后--------");
        n.printNode();
}
输出:
---------删除前--------
我是头节点
我是1号节点
我是2号节点
我是3号节点
true
---------删除后--------
我是头节点
我是1号节点
我是3号节点
(2)指定位置删除法 实现思路:找出当前index位置的结点current以及前一个结点 previous,previous.next直接指向current.next即可删除current结点。
// 删除指定位置的结点
    public void deleteNodeAtIndex(int index) {
        if (index < 0 || index > size(head)-1) {
            throw new IndexOutOfBoundsException("IndexOutOfBoundsException");
        }
        if (index == 0) { //删除头
            head = head.next;
            return;
        }
        int position = 0;  //记录当前位置
        Node current = head;  //标记当前结点
        Node previous = null;  //记录前置结点
        while (current != null) {
            if (position == index) {
                previous.next = current.next;
                current.next = null;  //断开cur与链表的连接
                return;
            }
            previous = current;
            current = current.next;
            position++;
        }
    }
重复代码已省略!
-----------------------------------------
public static void main(String[] args) {
        // TODO Auto-generated method stub
        head=new Node("我是头节点");
        head.next=new Node("我是1号节点");
        head.next.next=new Node("我是2号节点");
        head.next.next.next=new Node("我是3号节点");
        NodeDemo1 n=new NodeDemo1();
        System.out.println("---------删除前--------");
        n.printNode();
        n.deleteNodeAtIndex(1);
        System.out.println("---------删除后--------");
        n.printNode();
}
输出:
---------删除前--------
我是头节点
我是1号节点
我是2号节点
我是3号节点
---------删除后--------
我是头节点
我是2号节点
我是3号节点
1.3关于单向链表的面试问题
- 链表反转
利用两个辅助的结点:previous 和 next 分别代表当前要处理的节点的前一个结点和后一个结点;然后通过改变结点的next域的指向来反转整个链表,通过循环处理,每次反转一个之后,previous指向下一个结点,也就是head,head更改为head的下一个结点,也就是next,这样直到head为空,返回previous就反转了整个单链表.
public Node Reverse(Node head) {
        // head看作是前一结点,head.getNext()是当前结点,reHead是反转后新链表的头结点
        if (head == null || head.getNext() == null) {
            return head;// 若为空链或者当前结点在尾结点,则直接还回
        }
        Node previous=null;
        Node next=null;
        while(head!=null){
            next=head.next;
            head.next=previous;
            previous=head;
            head=next;
        }
        return previous;
    }
重复代码已省略!
--------------------------------------
public static void main(String[] args) {
        // TODO Auto-generated method stub
        head=new Node("我是头节点");
        head.next=new Node("我是1号节点");
        head.next.next=new Node("我是2号节点");
        head.next.next.next=new Node("我是3号节点");
        NodeDemo1 n=new NodeDemo1();
        head=n.Reverse(head);
        n.printNode();
    }
输出:
我是3号节点
我是2号节点
我是1号节点
我是头节点
