来源: DevOpSec公众号 作者: DevOpSec
背景及需求
在多机房之间联通或机房和办公区之间异构网络网络联通时,考虑到数据和网络安全,我们通常会搭建IPSec VPN做site-to-site通信。
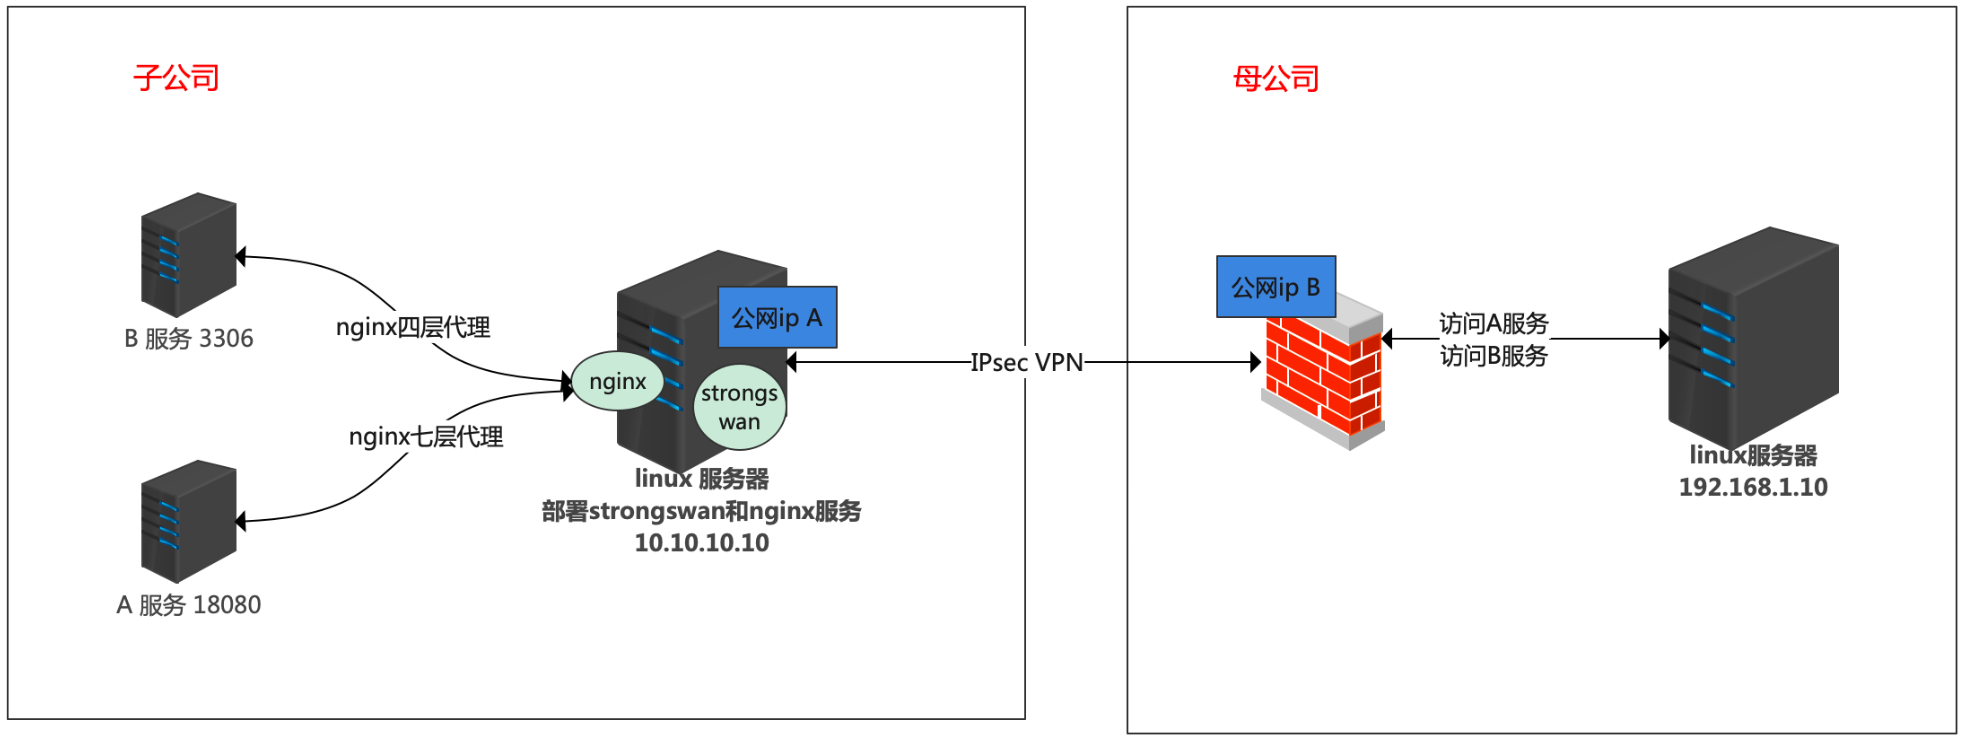
下面我们来看一下需求场景:母公司自建IDC有网络设备可以搭建IPsec VPN隧道,子公司公有云没有网络设备
母公司访问子公司A服务
http18080端口母公司访问子公司的B服务
3306端口
方案
网络安全上:子公司侧部署一台Linux服务器,安装开源软件Strongswan,和母公司配置Site-To-Site IPSec VPN功能。
网络流量管控和数据审计上:使用nginx做流量控制转发,对流量做审计
架构

Strongswan和nginx部署在同一台机器上母公司和子公司公网ip相互限制只允许对方ip访问
只暴露
linux服务器ip的80和3306端口给母公司方案
技术栈
母公司网络设备:H3C FW
子公司: centos 7.9 VPN软件 Strongswan 5.5.3 nginx 1.20.1
安装
子公司侧,安装vpn软件和nginx
Strongswan 部署
yum install epel-release
yum install strongswan
nginx 部署
yum install nginx配置
子公司侧的配置
Strongswan的配置
链接配置
cat /etc/strongswan/ipsec.conf
conn h3c
       keyexchange=ikev1                                  #使用Isakmp ikev1
       auto=start                                                #自动启动该连接
       aggressive=yes                                         #IPSEC 主动模式
       #本端信息
       left=公网ip A                              #Linux系统公网接口IP(公有云私有 ip 如 ucloud)
       leftid=公网ip A                                #使用IP地址作为IPSEC设备ID
       leftsubnet=10.10.10.10/32             #Linux站点侧要保护的子网,可以是该系统的接口IP, (对端能访问的 ip)
       #对端信息
       right=公网ip B                                  #防火墙公网接口IP
       rightid=公网ip B                                #使用IP地址作为IPSEC设备ID
       rightsubnet=192.168.1.0/24               #防火墙侧要保护的子网
       leftauth=psk                                             #认证方式为预共享密钥
       rightauth=psk                                   #认证方式为预共享密钥
       type=tunnel                                             #IPSEC模式为隧道模式
       ike=aes128-md5-modp2048               #IPSEC 第一阶段密钥参数
       esp=aes128-sha1                                      #IPSEC 第二阶段加密参数
第一阶段秘钥
cat /etc/strongswan/ipsec.secrets
##本端IP  对端IP : PSK 预共享密钥
公网ipB  公网ipB : PSK 90bc773ec2781568690648a30255639b
启动strongswan
strongswan start #启动strongswan查看状态
strongswan status如果日志里有如下信息
found 1 matching config, but none allows pre-shared key authentication using main mode把ipsec.conf 配置里aggressive=yes 主动模式注释掉
出现下面状态说明链接成功了
Security Associations (1 up, 0 connecting)即为链路已通。nginx的配置
nginx 配置目录
tree /apps/nginx/conf/
/apps/nginx/conf/
├── http
│   └── A.conf
├── stream
│   └── B.conf
├── nginx.conf
nginx.conf
....
http {
    ......
    include http/*.conf;

}
include stream/*.conf;
A服务的7层代理配置,A.conf
upstream  a_server  {
      server 10.10.10.11:18080;

      check interval=3000 rise=2 fall=3 timeout=10000 type=http;
      check_http_send "HEAD / HTTP/1.0\r\n\r\n";
      check_http_expect_alive http_2xx http_3xx http_4xx;
}


server {
    listen       80;
    server_name   yourdomain.com ;
    index index.html index.htm index.jsp;#设定访问的默认首页地址


    #转发到tomcat
    location / {
       proxy_pass http://a_server;#转向A服务处理
       proxy_set_header Host $host;
       proxy_set_header X-Real-IP $remote_addr;
       proxy_set_header X-Forwarded-For $proxy_add_x_forwarded_for;
       proxy_connect_timeout 660;
       proxy_send_timeout 660;
       proxy_read_timeout 660;
       proxy_intercept_errors on;

    }

}
B服务4层的转发配置
cat B.conf
#日志配置
log_format  log_format_tcp 'v1{|]$remote_addr:$remote_port{|]$protocol{|]$upstream_addr{|]$time_iso8601{|]$bytes_sent{|]$bytes_received{|]$session_time{|]$upstream_bytes_sent{|]$status{|]$upstream_bytes_received{|]$upstream_connect_time;

access_log log/nginx/tcp-access.log log_format_tcp ;
error_log  log/nginx/tcp-error.log  ;

stream {
    upstream b_server {
        server 10.10.10.12:3306 max_fails=3 fail_timeout=5s;
    }
    server {
        listen 3306;
        proxy_connect_timeout 5s;  # 与被代理服务器建立连接的超时时间为5s
        proxy_timeout 10s;   # 获取被代理服务器的响应最大超时时间为10s
        proxy_next_upstream on;  # 当被代理的服务器返回错误或超时时,将未返回响应的客户端连接请求传递给upstream中的下一个服务器
        proxy_next_upstream_tries 3;   # 转发尝试请求最多3次
        proxy_next_upstream_timeout 7200s;    # 总尝试超时时间为2h
        proxy_socket_keepalive on;  # 开启SO_KEEPALIVE选项进行心跳检测

        proxy_pass b_server;
    }

}
nginx 日志配置,用于审计
http 日志配置,cat nginx.conf
http {
    http {
    .....

    log_format  log_format 'v1{|]$remote_addr:$remote_port{|]$http_x_forwarded_for{|]$upstream_addr{|]$time_iso8601{|]$request_method{|]$server_name{|]$uri{|]$args{|]$status{|]$http_referer{|]$body_bytes_sent{|]$request_time{|]$upstream_response_time{|]$http_user_agent{|]$sent_http_location{|]$http_cookie';

    access_log  logs/access.log  log_format;
}
tcp 日志配置,见B.conf
母公司侧配置
H3C FW 配置
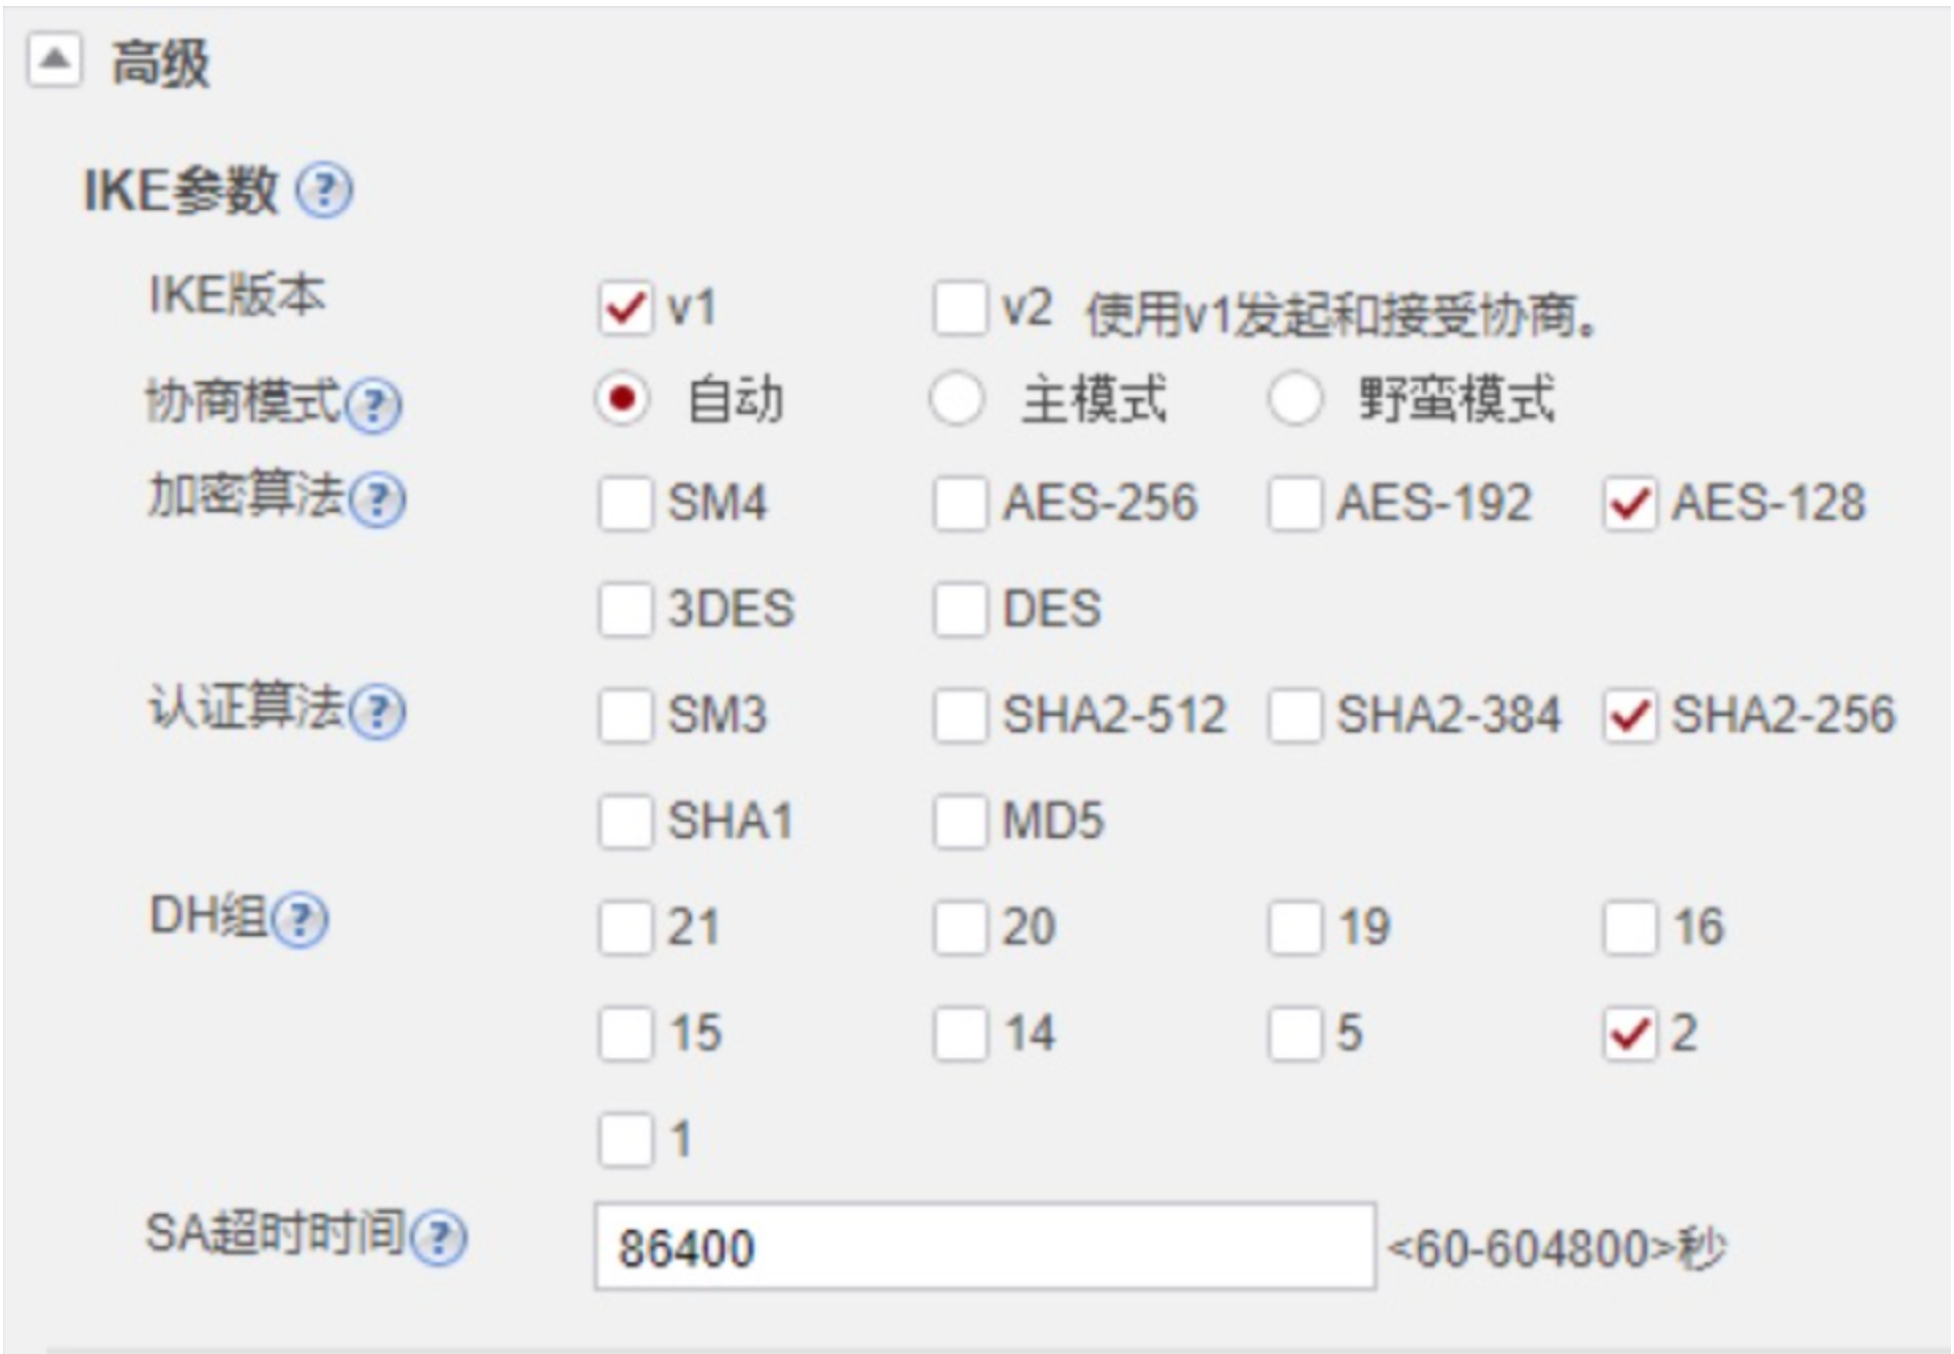
IKE 配置

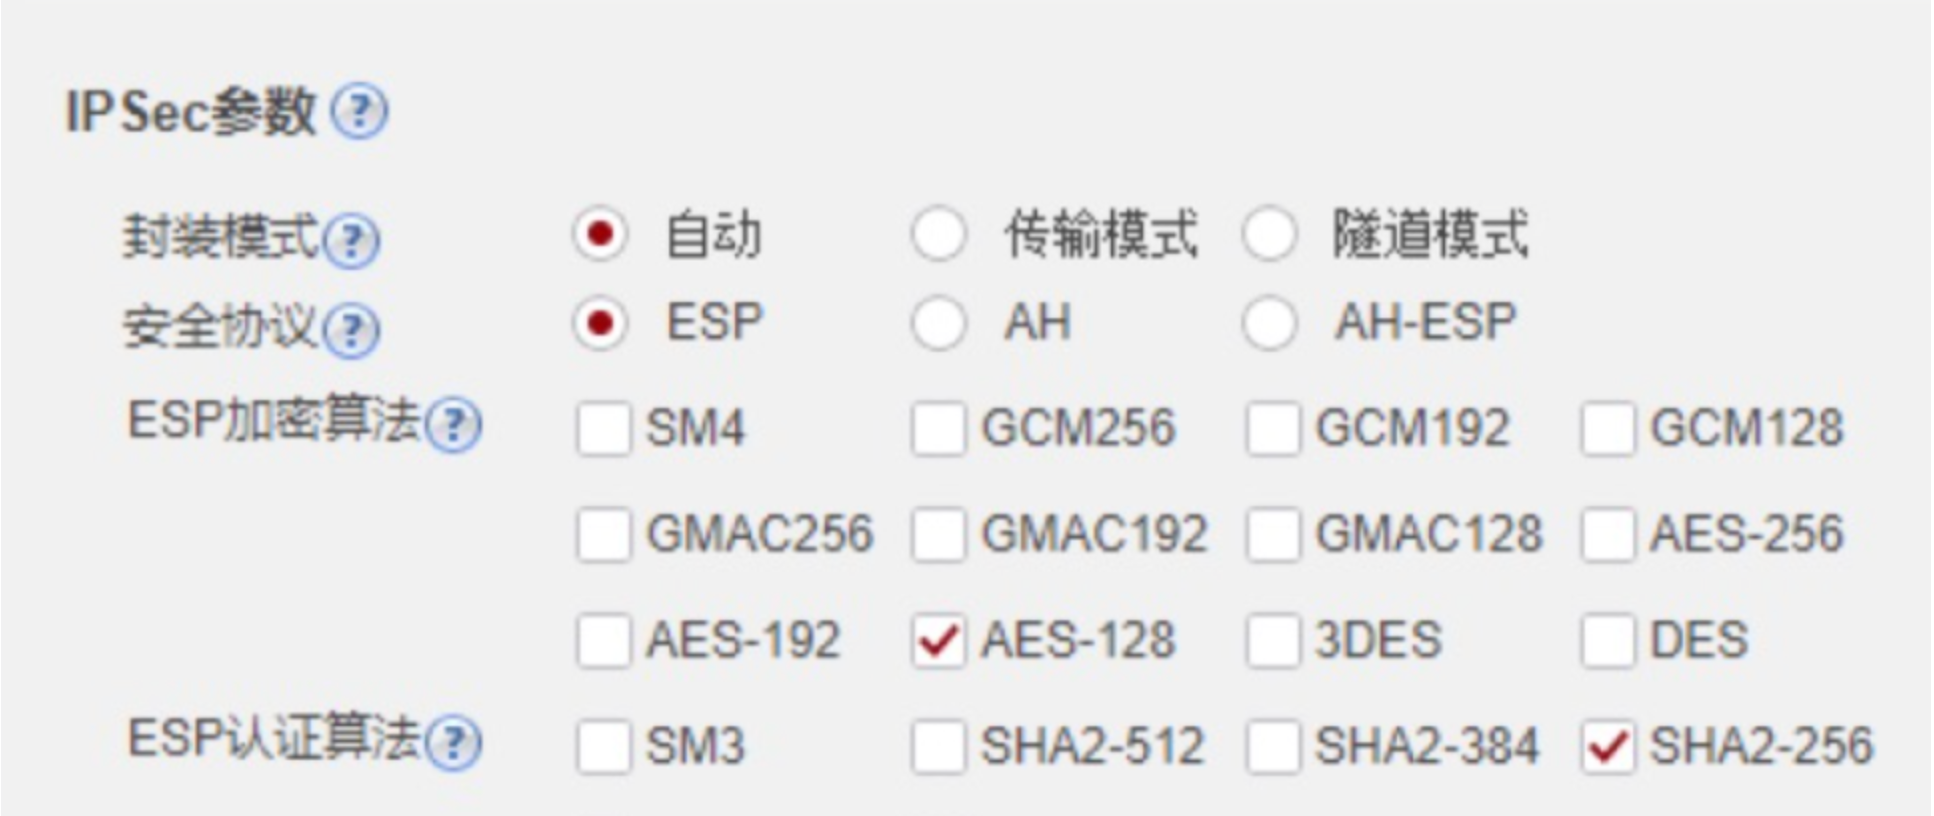
IPSec配置

对端ip配置
配置公网ip A 本地地址配置ip段:192.168.1.0/24 远端地址配置ip:10.10.10.10/32
总结
通过Strongswan可以在不依赖硬件的情况下做site-to-site IPSec VPN隧道,再结合nginx等代理软件,在各地职场、集团个公司之间或者在合作伙伴之间既能打通同异构网络,还能做到网络数据安全管控。欢迎关注DevOpSec,每周分享干货,我们一起进步。


