最近一直在补线代的理论,边学边用代码实现里面的知识点。但是学习知识的目的总归是为了运用到工作和生活中去,为了不让这个过程太枯燥,试着利用目前复习的线代基础知识,做一个小demo。思考良久,决定实现一下Spine、live2D、龙骨这些工具的网格变换功能。开干!
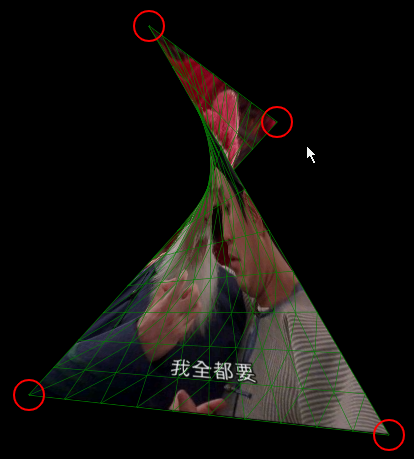
效果图如下:

原理:
①把图片水平垂直分成m×n份,每份沿对角线划分出两个三角形;
②移动图片四个顶点,对移动后的图像再进行一遍①操作;
③遍历每个三角形,通过三角形的变化计算出仿射变换矩阵,应用到原图,并裁剪出变化后的三角形区域;
这里再稍微补一下数学知识,仿射变换是指对坐标系进行一次线性变换(缩放、旋转、反射、错切)+一次平移。
二维坐标系内的线性变换可以通过把坐标(行向量)左乘一个2×2的矩阵来实现, 如:

注:A左乘B的结果为AB,右乘为BA
但是平移操作通常用向量加法表示,如下:

为了用一个矩阵表示仿射变换(即同时表示线性映射和平移),于是引入了齐次坐标,把二维矩阵A和平移向量并入一个三维增广矩阵。用数学来解释该过程的话:
一个对向量 平移
平移 ,与旋转放大缩小
 的仿射映射为
上式在齐次坐标系中,等价于下面的式子

到本例中,即

注:欧式空间的二维点(x,y)和齐次坐标系(X,Y,ω) 的转换是x=X/ω ; y=Y/ω。如:在欧式坐标中的一个二维点 (2,2) 可以在齐次坐标中表示为 (2,2,1),如果点逐渐移动向无穷远处,齐次坐标为 (2,2,0)
根据es标准的规定,void ctx.transform(a, b, c, d, e, f) 转化为矩阵形式为

可推断,canvas中的transform使用的是初等列变换,使用列向量右乘变换矩阵。即:

如果把仿射矩阵分解,在线性变换的时候就引入齐次坐标,再右乘平移矩阵,可以达到a,b,c,d,e,f给个元素代表的意义。这里直接给出结论,有兴趣的同学可以自己去推到一下。仿射矩阵有三个影响因素:旋转中心(x , y)、缩放因子(scale)、旋转角度(angle),可以表示为:

其中α=scale⋅cos(angle) , β=scale⋅sin(angle)
在这个例子中,由于每个三角的仿射变换不确定,很难直接找到这个矩阵,所以使用3个点在原图和变换后图像的位置,计算出仿射矩阵。
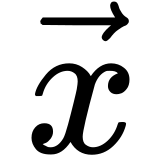
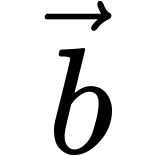
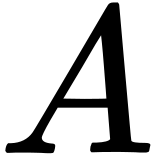
假设有变化前的三点(x1,y1) (x2,y2) (x3,y3)和变化后的三点(x1',y1') (x2',y2') (x3',y3'),仿射矩阵T,则有

可得

至此,前面仅仅三章学的线代知识就全部用上啦。
行列式的求值、计算代数余子式,矩阵求逆、相乘运算都已经在上几篇文章封装好了。代码中使用的核心API是
① CanvasRenderingContext2D.transform(),用于对图像进行仿射变换;
② CanvasRenderingContext2D.clip(),用于裁剪仿射后的图像
除去数学相关算法的代码大约200行,如下:
let ctx = null
let imgWidth = 0
let imgHeight = 0
const CANVAS_WIDTH = 800
const CANVAS_HEIGHT = 800
const arcRadius = 15
let newPoints // 图片四个角的坐标
let originPoints // 图片四个角的原始坐标
const splitH = 10 // 图片分割成的行数
const splitV = 10 // 图片分割成的列数
let splitPoints = [] // 被分割出来的点的集合
let originSplitPoints // 被分割出来的点的原始集合

let imgUrl = 'https://kaysama.gitee.io/image-host/happy.jpg'
const matches = location.search.substring(1).match(/(^|&)img=([^&]*)(&|$)/)
if (matches) {
  imgUrl = decodeURI(matches[2])
}
let imgLeft, imgTop // 图片位置
const img = new Image()
img.src = imgUrl
img.onload = function () {
  const canvas = document.getElementById('canvas')
  let pageWidth = window.innerWidth
  let pageHeight = window.innerHeight
  let canvasLeft = (pageWidth - CANVAS_WIDTH) / 2
  let canvasTop = (pageHeight - CANVAS_HEIGHT) / 2
  let targetPoint // 选中的圆
  let mouseX, mouseY // 鼠标位置

  ctx = canvas.getContext('2d')

  canvas.width = CANVAS_WIDTH
  canvas.height = CANVAS_HEIGHT

  // 图片最宽最高不能超过canvas宽高的一半
  imgWidth = img.width
  imgHeight = img.height
  const imgRatio = imgWidth / imgHeight
  if (imgWidth > CANVAS_WIDTH / 2) {
    imgWidth = CANVAS_WIDTH / 2
    imgHeight = imgWidth / imgRatio
  }
  if (imgHeight > CANVAS_HEIGHT / 2) {
    imgHeight = CANVAS_HEIGHT / 2
    imgWidth = imgHeight * imgRatio
  }
  img.width = imgWidth
  img.height = imgHeight

  imgLeft = (canvas.width - imgWidth) / 2
  imgTop = (canvas.height - imgHeight) / 2

  originPoints = [
    {
      x: imgLeft, y: imgTop
    },
    {
      x: imgLeft + imgWidth, y: imgTop
    },
    {
      x: imgLeft + imgWidth, y: imgTop + imgHeight
    },
    {
      x: imgLeft, y: imgTop + imgHeight
    },
  ]

  originSplitPoints = generatePoints(originPoints, splitH, splitV)

  newPoints = JSON.parse(JSON.stringify(originPoints))

  window.onresize = function () {
    pageWidth = document.documentElement.clientWidth
    pageHeight = document.documentElement.clientHeight
    canvasLeft = (pageWidth - CANVAS_WIDTH) / 2
  }
  let dragging = false // 拖动中
  document.body.onmousedown = function (e) {
    dragging = true
    mouseX = e.clientX - canvasLeft
    mouseY = e.clientY - canvasTop
    console.log(newPoints, e.clientY, mouseX, mouseY)
    for (let i = 0; i < 4; i++) {
      if (mouseX > newPoints[i].x - arcRadius && mouseX < newPoints[i].x + arcRadius && mouseY > newPoints[i].y - arcRadius && mouseY < newPoints[i].y + arcRadius) {
        targetPoint = newPoints[i]
        console.log('targetPoint:', targetPoint)
        break
      }
    }
  }
  document.body.onmousemove = function (e) {
    if (dragging && targetPoint) {
      if (e.pageX - canvasLeft < 0) {
        targetPoint.x = 0
      }
      else if (e.pageX - canvasLeft > CANVAS_WIDTH) {
        targetPoint.x = CANVAS_WIDTH
      }
      else {
        targetPoint.x = e.pageX - canvasLeft
      }

      if (e.pageY - canvasTop < 0) {
        targetPoint.y = 0
      }
      else if (e.pageY - canvasTop > CANVAS_HEIGHT) {
        targetPoint.y = CANVAS_HEIGHT
      }
      else {
        targetPoint.y = e.pageY - canvasTop
      }
      update()
    }
  }
  document.body.onmouseup = function (e) {
    dragging = false
  }

  update()
}

function update () {

  const newSplitPoints = generatePoints(newPoints, splitH, splitV)

  ctx.clearRect(0, 0, CANVAS_WIDTH, CANVAS_HEIGHT)
  ctx.save()
  ctx.fillStyle = 'black'
  ctx.fillRect(0, 0, CANVAS_WIDTH, CANVAS_HEIGHT)

  for (let i = 0; i < newSplitPoints.length; i++) {
    if (i < newSplitPoints.length - splitH - 2 && (i + 1) % (splitH + 1) !== 0) {
      drawTriangleImage(
        originSplitPoints[i + 1], originSplitPoints[i + 1 + splitH + 1], originSplitPoints[i + splitH + 1],
        newSplitPoints[i + 1], newSplitPoints[i + 1 + splitH + 1], newSplitPoints[i + splitH + 1]
      ) // 先画下三角
      drawTriangleImage(
        originSplitPoints[i], originSplitPoints[i + 1], originSplitPoints[i + splitH + 1],
        newSplitPoints[i], newSplitPoints[i + 1], newSplitPoints[i + splitH + 1]
      )  // 再画上三角
    }
    // 四个角
    if (i === 0 || i === splitH || i === (splitH + 1) * splitV || i === (splitH + 1) * (splitV + 1) - 1) {
      drawArc(newSplitPoints[i])
    }
  }
  ctx.restore()
}

/**
 * 生成分割点
 * @param points 四边形四个点
 * @param splitH “水平”方向被等分数
 * @param splitV “竖直”方向被等分数
 */
function generatePoints (points, splitH, splitV) {
  splitPoints = []
  let vLeft = {
    x: (points[3].x - points[0].x) / splitV,
    y: (points[3].y - points[0].y) / splitV
  }
  let vRight = {
    x: (points[2].x - points[1].x) / splitV,
    y: (points[2].y - points[1].y) / splitV
  }
  let x1, y1, x2, y2
  let i, j
  for (i = 0; i <= splitV; i++) {
    x1 = points[0].x + vLeft.x * i
    y1 = points[0].y + vLeft.y * i
    x2 = points[1].x + vRight.x * i
    y2 = points[1].y + vRight.y * i
    for (j = 0; j <= splitH; j++) {
      splitPoints.push({
        x: x1 + (x2 - x1) / splitH * j,
        y: y1 + (y2 - y1) / splitH * j
      })
    }
  }
  return splitPoints
}

/**
 * 画三角形图片
 */
function drawTriangleImage (p1, p2, p3, newP1, newP2, newP3) {
  const matrixFrom = new Matrix(
    // 使用列向量
    [
      p1.x, p1.y, 1,
      p2.x, p2.y, 1,
      p3.x, p3.y, 1,
    ],
    3, // 3行(带齐次坐标 )
    3, // 3列
    'column'
  )
  const matrixTo = new Matrix(
    // 使用列向量
    [
      newP1.x, newP1.y, 1,
      newP2.x, newP2.y, 1,
      newP3.x, newP3.y, 1,
    ],
    3, // 3行(带齐次坐标 )
    3, // 3列
    'column'
  )
  const matrixTransform = matrixTo.multiply(matrixFrom.getInverseMatrix())
  const itemList = matrixTransform.itemList
  ctx.save()
  //根据变换后的坐标创建剪切区域
  ctx.beginPath()
  ctx.moveTo(newP1.x, newP1.y)
  ctx.lineTo(newP2.x, newP2.y)
  ctx.lineTo(newP3.x, newP3.y)
  ctx.closePath()
  ctx.lineWidth = 1
  ctx.strokeStyle = 'green'
  ctx.stroke()
  ctx.clip()
  //绘制图片
  ctx.transform(itemList[0][0], itemList[1][0], itemList[0][1], itemList[1][1], itemList[0][2], itemList[1][2])
  ctx.drawImage(img, imgLeft, imgTop, imgWidth, imgHeight)
  ctx.restore()
}

/**
 * 画四边形的四个点
 */
function drawArc (point) {
  ctx.save()
  ctx.lineWidth = 2
  ctx.beginPath()
  ctx.arc(point.x, point.y, arcRadius, 0, 2 * Math.PI)
  ctx.strokeStyle = 'red'
  ctx.stroke()
  ctx.restore()
}
至此,所以功能已经实现,不过还没完。前面几篇博客也都提到过,一旦涉及到大量的像素级操作,在不严格要求兼容性的情况下,webGL始终是性能最优的方案。事实上,webGL内置了一套显卡硬件加速过的矩阵算法,利用这些内置函数来做矩阵运算,性能可以达到数量级的提升,下一篇文章我会用webGL来重构这套实现。


