Spring事务
Spring声明式事务让我们从复杂的事务处理中得到解脱,使我们再也不用去处理这些步骤:获得连接、关闭连接、事务提交和回滚操作。再也不需要在事务相关方法中处理大量的try..catch..finally代码。
Spring中事务的使用虽然已经相对简单的多,但是,还是有很多的使用和配置规则,下面我们开始我们本章重点。
SpringAop基本原理和思想
1、事务保证数据一致性问题,只需要加上@Transactional
2、纯手写SpringAop环绕通知+手动事务就可以声明事务
基于Spring注解方式构建整合JDBC环境
@Repository public class OrderDao { @Autowired() private JdbcTemplate jdbcTemplate; public void addOrder() { jdbcTemplate.update("insert into order_info values(null,'mayikt','zhangsan','1111')"); } }
@Configuration @ComponentScan("com.mayikt") @EnableTransactionManagement//开启事务注解 public class MyConfig { ** //注入到ioc容器中 beanid =dataSource class=DataSource类的完整路径地址 // 配置我们的数据源** @Bean public DataSource dataSource() { MysqlDataSource mysqlDataSource = new MysqlDataSource(); mysqlDataSource.setUser("root"); mysqlDataSource.setPassword("root"); mysqlDataSource.setURL("jdbc:mysql://127.0.0.1:3306/test?useUnicode=true&characterEncoding=UTF-8"); mysqlDataSource.setDatabaseName("test"); return mysqlDataSource; } /** * 注入JdbcTemplate */ @Bean public JdbcTemplate jdbcTemplate() { return new JdbcTemplate(dataSource()); } @Bean public PlatformTransactionManager platformTransactionManager(){ return new DataSourceTransactionManager(dataSource()); } }
@Service public class OrderServiceImpl implements OrderService { @Autowired private OrderDao orderDao; @Transactional//开启事务 public void addOrder() { try { orderDao.addOrder(); int i = 1 / 0; // 如果报错的情况下肯定是会插入到数据库中 } catch (Exception e) { } } }
<!-- mysql 依赖 -->
<dependency>
    <groupId>mysql</groupId>
    <artifactId>mysql-connector-java</artifactId>
    <version>5.1.46</version>
</dependency>
<dependency>
    <groupId>org.springframework</groupId>
    <artifactId>spring-jdbc</artifactId>
    <version>5.0.5.RELEASE</version>
</dependency>
Spring声明事务底层源码分析
@EnableTransactionManagement**//开启事务**
@Target(ElementType.TYPE) @Retention(RetentionPolicy.RUNTIME) @Documented @Import(TransactionManagementConfigurationSelector.class) public @interface EnableTransactionManagement {
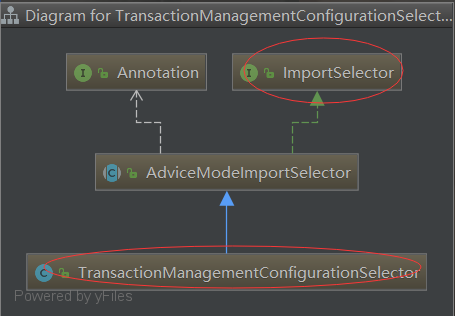
TransactionManagementConfigurationSelector的祖宗是ImportSelector

public class TransactionManagementConfigurationSelector extends AdviceModeImportSelector
@Override protected String[] selectImports(AdviceMode adviceMode) { switch (adviceMode) { case PROXY: return new String[] {AutoProxyRegistrar.class.getName(), ProxyTransactionManagementConfiguration.class.getName()}; case ASPECTJ: return new String[] {TransactionManagementConfigUtils.TRANSACTION_ASPECT_CONFIGURATION_CLASS_NAME}; default: return null; } }
}
public class AutoProxyRegistrar implements ImportBeanDefinitionRegistrar {//向IOC容器中注入Bean对象 .... @Override public void registerBeanDefinitions(AnnotationMetadata importingClassMetadata, BeanDefinitionRegistry registry) { .... if (mode != null && proxyTargetClass != null && AdviceMode.class == mode.getClass() && Boolean.class == proxyTargetClass.getClass()) { candidateFound = true; if (mode == AdviceMode.PROXY) { AopConfigUtils.registerAutoProxyCreatorIfNecessary(registry); if ((Boolean) proxyTargetClass) { AopConfigUtils.forceAutoProxyCreatorToUseClassProxying(registry); return; } } } } .... }
public static BeanDefinition registerAutoProxyCreatorIfNecessary(BeanDefinitionRegistry registry) { return registerAutoProxyCreatorIfNecessary(registry, (Object)null); }
public static BeanDefinition registerAutoProxyCreatorIfNecessary(BeanDefinitionRegistry registry, @Nullable Object source) { return registerOrEscalateApcAsRequired(InfrastructureAdvisorAutoProxyCreator.class, registry, source); }
将InfrastructureAdvisorAutoProxyCreator注入到IOC容器中:
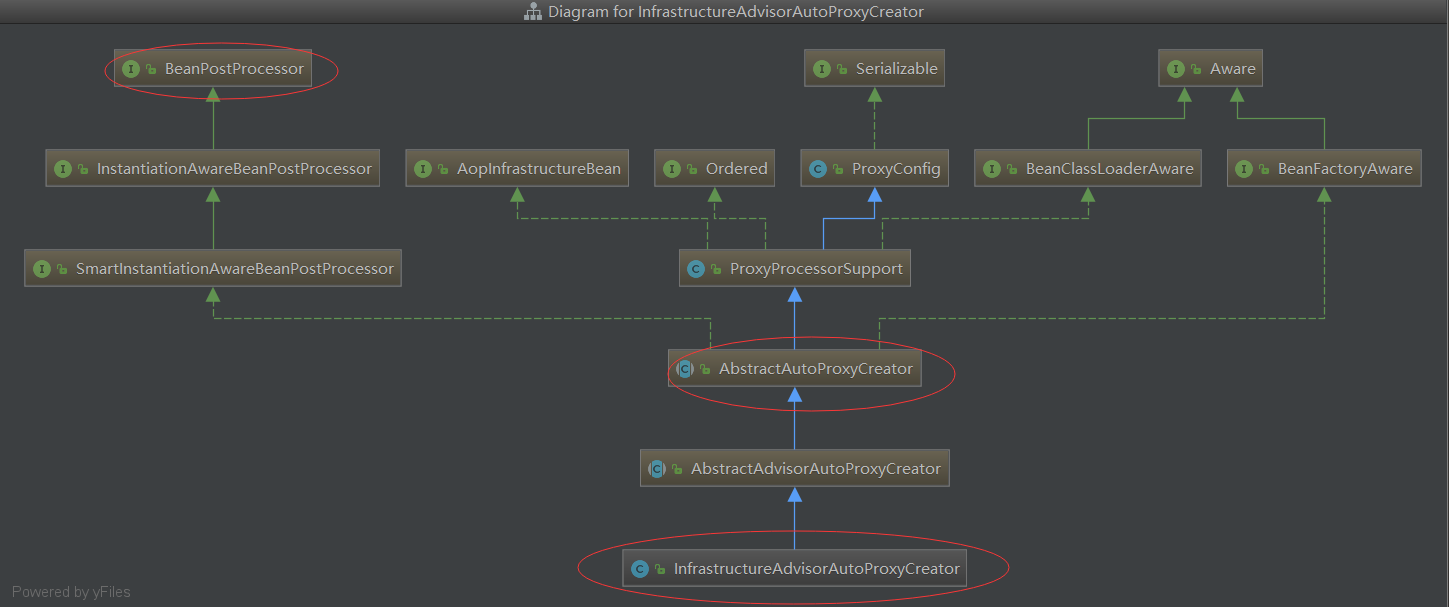
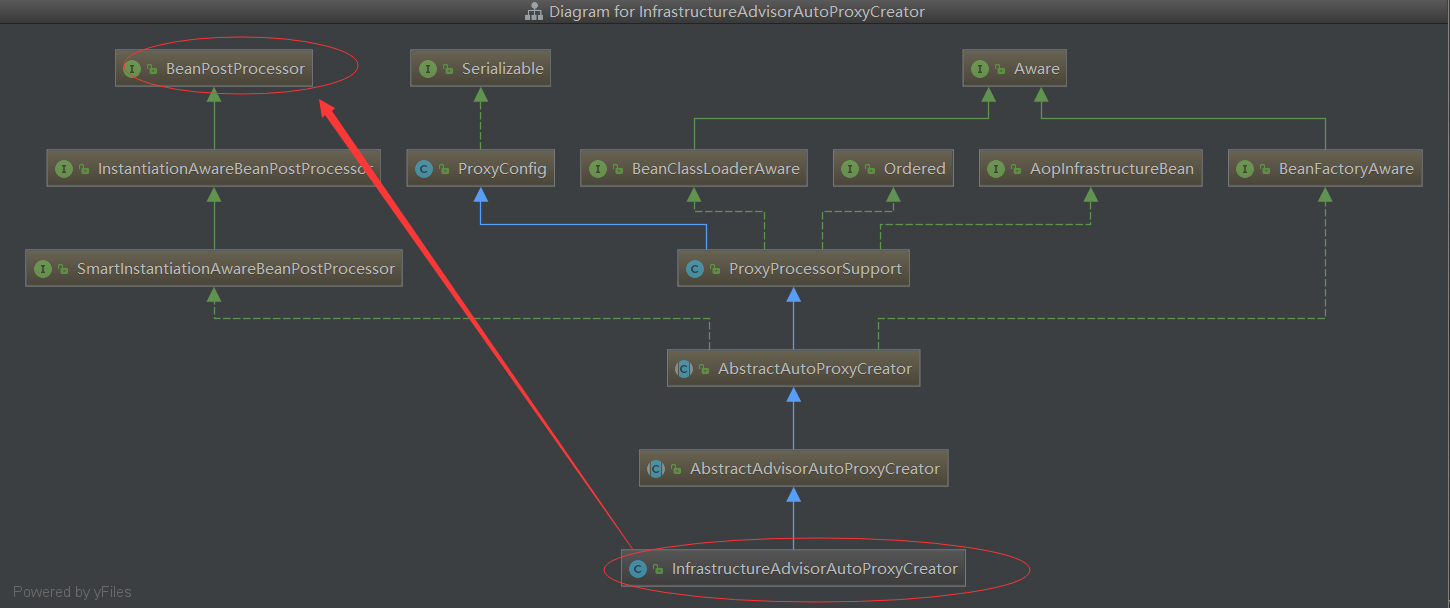
InfrastructureAdvisorAutoProxyCreator的类图如下:祖宗是BeanPostProcessor后置处理器,父类是AbstractAutoProxyCreater

回到registerOrEscalateApcAsRequired方法:beanid为:internalAutoProxyCreator,value为:InfrastructureAdvisorAutoProxyCreator对象
private static BeanDefinition registerOrEscalateApcAsRequired(Class<?> cls, BeanDefinitionRegistry registry, @Nullable Object source) { Assert.notNull(registry, "BeanDefinitionRegistry must not be null"); if (registry.containsBeanDefinition("org.springframework.aop.config.internalAutoProxyCreator")) { BeanDefinition apcDefinition = registry.getBeanDefinition("org.springframework.aop.config.internalAutoProxyCreator"); if (!cls.getName().equals(apcDefinition.getBeanClassName())) { int currentPriority = findPriorityForClass(apcDefinition.getBeanClassName()); int requiredPriority = findPriorityForClass(cls); if (currentPriority < requiredPriority) { apcDefinition.setBeanClassName(cls.getName()); } }
    return null;
} else {
    RootBeanDefinition beanDefinition = new RootBeanDefinition(cls);
    beanDefinition.setSource(source);
    beanDefinition.getPropertyValues().add("order", -2147483648);
    beanDefinition.setRole(2);
   **registry.registerBeanDefinition("org.springframework.aop.config.internalAutoProxyCreator", beanDefinition);**
    return beanDefinition;
}
}
下面回到ProxyTransactionManagementConfiguration方法
protected String[] selectImports(AdviceMode adviceMode) { switch (adviceMode) { case PROXY: return new String[] {AutoProxyRegistrar.class.getName(), ProxyTransactionManagementConfiguration.class.getName()}; case ASPECTJ: return new String[] {TransactionManagementConfigUtils.TRANSACTION_ASPECT_CONFIGURATION_CLASS_NAME}; default: return null; } }
@Configuration public class ProxyTransactionManagementConfiguration extends AbstractTransactionManagementConfiguration {
@Bean(name = TransactionManagementConfigUtils.TRANSACTION_ADVISOR_BEAN_NAME)
@Role(BeanDefinition.ROLE_INFRASTRUCTURE)
public BeanFactoryTransactionAttributeSourceAdvisor transactionAdvisor() {
BeanFactoryTransactionAttributeSourceAdvisor advisor = new BeanFactoryTransactionAttributeSourceAdvisor();
advisor.setTransactionAttributeSource(transactionAttributeSource());
advisor.setAdvice(transactionInterceptor());
if (this.enableTx != null) {
advisor.setOrder(this.enableTx.
BeanId:transactionInterceptor;value为:TransactionInterceptor这个对象
打印所有注册的Bean
org.springframework.context.annotation.internalConfigurationAnnotationProcessor
org.springframework.context.annotation.internalAutowiredAnnotationProcessor
org.springframework.context.annotation.internalRequiredAnnotationProcessor
org.springframework.context.annotation.internalCommonAnnotationProcessor
org.springframework.context.event.internalEventListenerProcessor
org.springframework.context.event.internalEventListenerFactory
myConfig
orderDao
orderServiceImpl
org.springframework.transaction.annotation.ProxyTransactionManagementConfiguration
org.springframework.transaction.config.internalTransactionAdvisor
transactionAttributeSource
transactionInterceptor【】【】【】【】这里
org.springframework.transaction.config.internalTransactionalEventListenerFactory
dataSource
jdbcTemplate
platformTransactionManager
org.springframework.aop.config.internalAutoProxyCreator【】【】【】【】这里
加上@EnableTransactionManagement这个注解将 :TransactionInterceptor,和InternalAutoProxyCreator****这两个类注入到IOC容器中
下面重点分析这两个类【transactionInterceptor】,【internalAutoProxyCreator】

从上面类结构可知:InfrastructureAdvisorAutoProxyCreator间接实现了SmartInstantiationAwareBeanPostProcessor,而SmartInstantiationAwareBeanPostProcessor又继承自
InstantiationAwareBeanPostProcessor,也就是说在Spring中,所有的bean实例化时Spring都会保证调用其postProcessAfterInstantiation方法,其实现是在父类AbstractAutoProxyCreater中实现的。
我们一旦把这个类:InfrastructureAdvisorAutoProxyCreator注入到容器中,Bean对象在初始化时,会判断是否需要创建代理类。
进入AbstractAutoProxyCreater的后置处理器:
public Object postProcessAfterInitialization(@Nullable Object bean, String beanName) throws BeansException { if (bean != null) { //根据给定的bean的class和name构建出key,beanClassName_beanName Object cacheKey = this.getCacheKey(bean.getClass(), beanName); //是否是由于避免循环依赖而创建bean的代理 if (!this.earlyProxyReferences.contains(cacheKey)) { return this.wrapIfNecessary(bean, beanName, cacheKey); } } return bean; }
这里实现的主要目的是针对指定的bean进行封装,当然首先要确定是否需要封装,检测及封装的工作都委托给了wrapIfNecessary函数进行。
protected Object wrapIfNecessary(Object bean, String beanName, Object cacheKey) { //如果已经处理过 if (StringUtils.hasLength(beanName) && this.targetSourcedBeans.contains(beanName)) { return bean; } else if (Boolean.FALSE.equals(this.advisedBeans.get(cacheKey))) { return bean; } else if (!this.isInfrastructureClass(bean.getClass()) && !this.shouldSkip(bean.getClass(), beanName)) { Object[] specificInterceptors = this.getAdvicesAndAdvisorsForBean(bean.getClass(), beanName, (TargetSource)null); if (specificInterceptors != DO_NOT_PROXY) { this.advisedBeans.put(cacheKey, Boolean.TRUE); Object proxy = this.createProxy(bean.getClass(), beanName, specificInterceptors, new SingletonTargetSource(bean));//关键点,创建代理,对需要增强的bean创建代理(CGLIBProxy或者JDKProxy) this.proxyTypes.put(cacheKey, proxy.getClass()); return proxy; } else { this.advisedBeans.put(cacheKey, Boolean.FALSE); return bean; } } else { this.advisedBeans.put(cacheKey, Boolean.FALSE); return bean; } }
wrapIfNecessary函数功能实现起来很复杂,但是逻辑上还是相对简单,在wrapIfNecessary函数中主要做了以下工作:
- 找出指定bean对应的增强器【上篇文章详细介绍了,异曲同工】
- 根据找出的增强器创建代理【上篇文章详细介绍了,异曲同工】
下面简单浏览下:
protected Object[] getAdvicesAndAdvisorsForBean(Class<?> beanClass, String beanName, @Nullable TargetSource targetSource) {
List
protected List
protected List
public static List
public static boolean canApply(Advisor advisor, Class<?> targetClass, boolean hasIntroductions) { if (advisor instanceof IntroductionAdvisor) { return ((IntroductionAdvisor)advisor).getClassFilter().matches(targetClass); } else if (advisor instanceof PointcutAdvisor) { PointcutAdvisor pca = (PointcutAdvisor)advisor; return canApply(pca.getPointcut(), targetClass, hasIntroductions); } else { return true; } }
public static boolean canApply(Pointcut pc, Class<?> targetClass, boolean hasIntroductions) { Assert.notNull(pc, "Pointcut must not be null"); if (!pc.getClassFilter().matches(targetClass)) { return false; } else { MethodMatcher methodMatcher = pc.getMethodMatcher(); .... for(int var11 = 0; var11 < var10; ++var11) { Method method = var9[var11]; if (introductionAwareMethodMatcher != null && introductionAwareMethodMatcher.matches(method, targetClass, hasIntroductions) || methodMatcher.matches(method, targetClass)) { return true; .... } } }
public boolean matches(Method method, @Nullable Class<?> targetClass) { .... //自定义标签解析时注入 TransactionAttributeSource tas = getTransactionAttributeSource(); return (tas == null || tas.getTransactionAttribute(method, targetClass) != null); }
public TransactionAttribute getTransactionAttribute(Method method, @Nullable Class<?> targetClass) { .... else { // We need to work it out. TransactionAttribute txAttr = computeTransactionAttribute(method, targetClass); .... }
protected TransactionAttribute computeTransactionAttribute(Method method, @Nullable Class<?> targetClass) { .... //method代表接口中的方法,specificMethod代表实现类中的方法 Method specificMethod = AopUtils.getMostSpecificMethod(method, targetClass);
// First try is the method in the target class. //查看方法中是否存在事务声明 TransactionAttribute txAttr = findTransactionAttribute(specificMethod); if (txAttr != null) { return txAttr; }
// Second try is the transaction attribute on the target class. txAttr = findTransactionAttribute(specificMethod.getDeclaringClass()); if (txAttr != null && ClassUtils.isUserLevelMethod(method)) { return txAttr; } //如果存在接口,则到接口中去寻找 if (specificMethod != method) { // Fallback is to look at the original method. txAttr = findTransactionAttribute(method); if (txAttr != null) { return txAttr; } // Last fallback is the class of the original method. txAttr = findTransactionAttribute(method.getDeclaringClass()); if (txAttr != null && ClassUtils.isUserLevelMethod(method)) { return txAttr; } }
return null; }
对于事务属性的获取规则相信大家都已经很清楚了,如果方法中存在事务属性,则使用方法上的属性,否则使用方法所在类上的属性,如果方法所在类的属性上还是没有搜寻到对应的事务属性,那么再搜寻接口中的方法,再没有的化,
最好尝试搜寻接口的类上面的声明。对于函数computeTransactionAttribute中的逻辑,就是搭建了一个执行框架而已,将搜寻事务属性任务委托给了****findTransactionAttribute方法去执行。下面看看这个方法。
protected TransactionAttribute findTransactionAttribute(Method method) { return determineTransactionAttribute(method); }
protected TransactionAttribute determineTransactionAttribute(AnnotatedElement ae) { for (TransactionAnnotationParser annotationParser : this.annotationParsers) { TransactionAttribute attr = annotationParser.parseTransactionAnnotation(ae); if (attr != null) { return attr; } } return null; }

public TransactionAttribute parseTransactionAnnotation(AnnotatedElement ae) { AnnotationAttributes attributes = AnnotatedElementUtils.findMergedAnnotationAttributes( ae, Transactional.class, false, false); if (attributes != null) { return parseTransactionAnnotation(attributes); } else { return null; } }
到这块,我们就看到了我们想看到的获取注解标记的代码。首先会判断当前类是否含有Transactional注解,这是事务属性的基础,当然如果有的化会继续调用parseTransactionAnnotation方法解析详细的属性
protected TransactionAttribute parseTransactionAnnotation(AnnotationAttributes attributes) {
RuleBasedTransactionAttribute rbta = new RuleBasedTransactionAttribute();
//解析propagation Propagation propagation = attributes.getEnum("propagation");
rbta.setPropagationBehavior(propagation.value());
//解析isolation
Isolation isolation = attributes.getEnum("isolation");
rbta.setIsolationLevel(isolation.value());
rbta.setTimeout(attributes.getNumber("timeout").intValue());
rbta.setReadOnly(attributes.getBoolean("readOnly"));
rbta.setQualifier(attributes.getString("value"));
ArrayList
上面方法实现了对对应类或者方法的事务属性解析,你会看到这个类中你所属性的属性。至此,事务功能的初始化工作便结束了
事务增强器
springaop在事务进行调用的时候会走transactionInterceptor进行拦截

执行目标方法,进入invoke()

Spring声明事务源码分析
1.@EnableTransactionManagement开启到我们的事务
2.@Import(TransactionManagementConfigurationSelector.class)
3. AdviceMode mode() default AdviceMode.PROXY;默认使用 PROXY选择器
4.return new String[] {AutoProxyRegistrar.class.getName(), ProxyTransactionManagementConfiguration.class.getName()};
5.加上@EnableTransactionManagement这个注解将 :TransactionInterceptor,和InternalAutoProxyCreator****这两个类注入到IOC容器中
6.进入****AbstractAutoProxyCreater的后置处理器的wrapIfNecessary方法针对指定bean进行封装
**####6.1.**找出指定bean对应的增强器
####6.2.根据找出的增强器创建代理
7.执行目标方法
8.一旦出现异常,尝试异常处理,默认 对(RuntimeException回滚)
9.提交事务前的事务信息清除
10.提交事务。
本文参考
参考书籍:Spring源码深度解析


