导读:本文主要围绕 Knative Service 域名展开,介绍了 Knative Service 的路由管理。文章首先介绍了如何修改默认主域名,紧接着深入一层介绍了如何添加自定义域名以及如何根据 path 关联到不同的 Knative Service 。期望通过本文的介绍,能够帮助您了解更多相关内容。
Knative 默认会为每一个 Service 生成一个域名,并且 Istio Gateway 要根据域名判断当前的请求应该转发给哪个 Knative Service。Knative 默认使用的主域名是 example.com,这个域名是不能作为线上服务的。
Knative Serving 的默认域名 example.com
首先需要部署一个 Knative Service,可以参考 Knative 初体验:Serving Hello World。
如果你已经有了一个 Knative 集群,那么直接把下面的内容保存到 helloworld.yaml 文件中。然后执行一下 kubectl apply -f helloworld.yaml 即可把 hello 服务部署到 helloworld namespace 中。
---
apiVersion: v1
kind: Namespace
metadata:
  name: helloworld

---
apiVersion: serving.knative.dev/v1alpha1
kind: Service
metadata:
  name: hello
  namespace: helloworld
spec:
  template:
    metadata:
      labels:
        app: hello
      annotations:
        autoscaling.knative.dev/target: "10"
    spec:
      containers:
        - image: registry.cn-hangzhou.aliyuncs.com/knative-sample/simple-app:132e07c14c49
          env:
            - name: TARGET
              value: "World!"
接下来看一下 Knative Service 自动生成的域名配置:
└─# kubectl -n helloworld get ksvc
NAME    URL                                   LATESTCREATED   LATESTREADY   READY   REASON
hello   http://hello.helloworld.example.com   hello-wsnvc     hello-wsnvc   True
现在使用 curl 指定 Host 就能访问服务了。
首先获取到 Istio Gateway IP;
└─# kubectl get svc istio-ingressgateway --namespace istio-system --output jsonpath="{.status.loadBalancer.ingress[*]['ip']}" 47.95.191.136
然后访问 hello 服务。
└─# curl -H "Host: hello.helloworld.example.com" http://47.95.191.136/ Hello World!!
如果想要在浏览器中访问 hello 服务需要先做 host 绑定,把域名 hello.helloworld.example.com 指向 47.95.191.136 才行。这种方式还不能对外提供服务。
配置自定义主域名
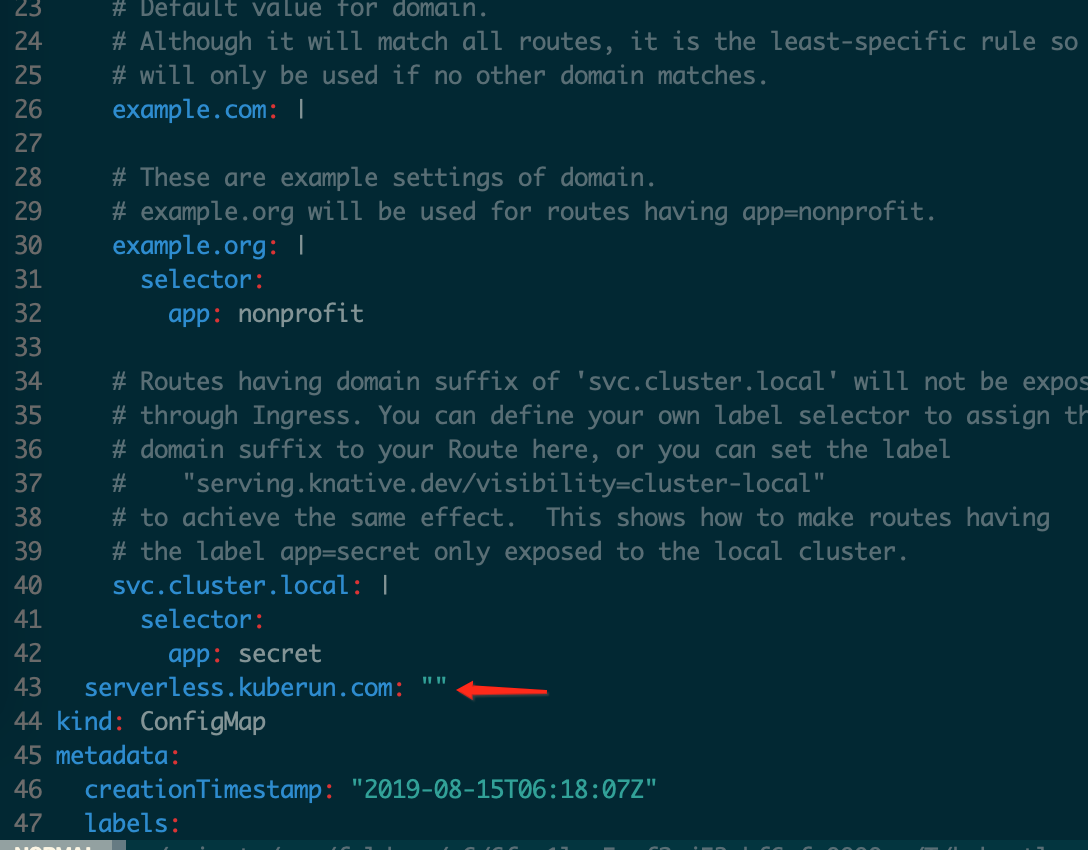
下面介绍一下如何把默认的 example.com 改成我们自己的域名,假设我们自己的域名是:serverless.kuberun.com,现在执行 kubectl edit cm config-domain --namespace knative-serving ,如下图所示,添加 serverless.kuberun.com 到 ConfigMap 中,然后保存退出就完成了自定义主域名的配置。

再来看一下 Knative Service 的域名, 如下所示已经生效了。
└─# kubectl -n helloworld get ksvc
NAME    URL                                              LATESTCREATED   LATESTREADY   READY   REASON
hello   http://hello.helloworld.serverless.kuberun.com   hello-wsnvc     hello-wsnvc   True
泛域名解析
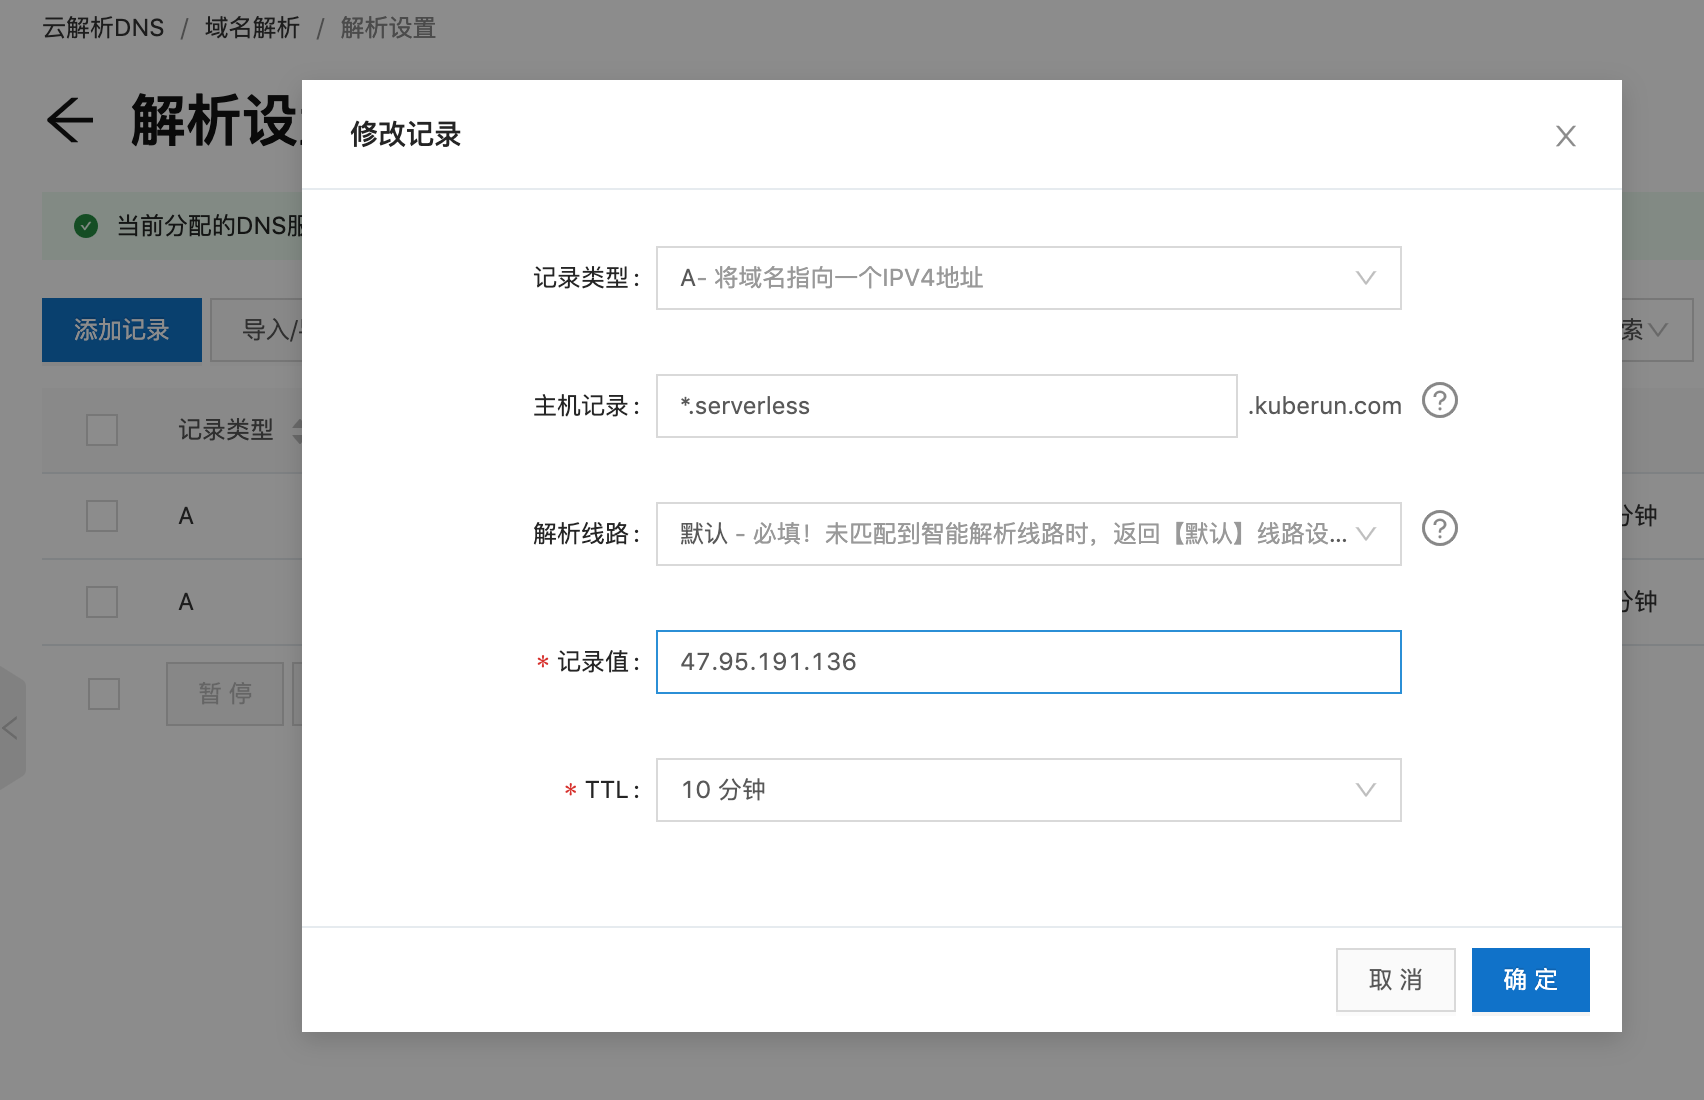
Knative Service 默认生成域名的规则是 servicename.namespace.use-domain 。所以不同的 namespace 会生成不同的子域名,每一个 Knative Service 也会生成一个唯一的子域名。为了保证所有的 Service 服务都能在公网上面访问到,需要做一个泛域名解析。把 *.serverless.kuberun.com 解析到 Istio Gateway 47.95.191.136 上面去。如果你是在阿里云(万网)上面购买的域名,你可以通过如下方式配置域名解析:

现在直接通过浏览器访问 http://hello.helloworld.serverless.kuberun.com/ 就可以直接看到 helloworld 服务了:

自定义服务域名
刚才我们给 Knative 指定了一个主域名,使得 Service 基于主域名生成自己的唯一域名。但自动生成的域名不是很友好,比如刚才部署的 helloworld 的域名 hello.helloworld.serverless.kuberun.com 对于普通用户来说意义不明显、不好记忆。
如果能通过 hello.kuberun.com 访问 hello world 服务那就完美了,接下来将会介绍实现方法:
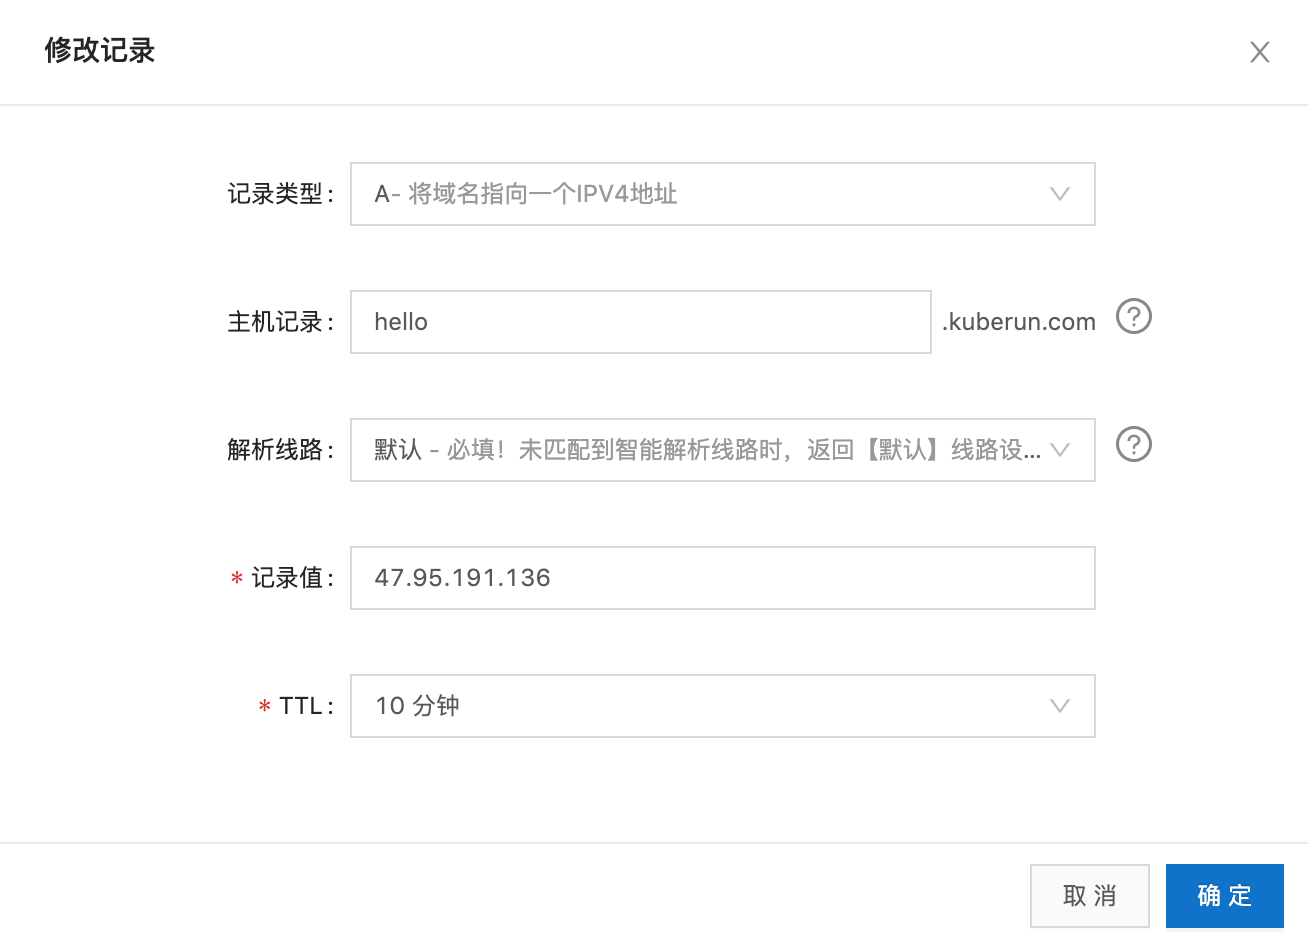
- 先在万网上面修改域名解析,把 hello.kuberun.com 的 A 记录指向 Istio Gateway 47.95.191.136;

- hello.kuberun.com 解析到 Istio Gateway 以后 Istio Gateway 并不知道此时应该转发到哪个服务,所以还需要配置 VirtualService 告知 Istio 如何转发。
把下面的内容保存到 hello-ingress-route.yaml 文件:
apiVersion: networking.istio.io/v1alpha3
kind: VirtualService
metadata:
 name: hello-ingress-route
 namespace: knative-serving
spec:
 gateways:
 - knative-ingress-gateway
 hosts:
 - hello.helloworld.serverless.kuberun.com
 - hello.kuberun.com
 http:
 - match:
   - uri:
       prefix: "/"
   rewrite:
     authority: hello.helloworld.svc.cluster.local
   retries:
     attempts: 3
     perTryTimeout: 10m0s
   route:
   - destination:
       host: istio-ingressgateway.istio-system.svc.cluster.local
       port:
         number: 80
     weight: 100
   timeout: 10m0s
   websocketUpgrade: true
现在打开 http://hello.kuberun.com/ 就能看到 helloworld 服务了:

基于路径的服务转发
真实线上服务的场景可能是一个路径后端对应着一个应用,现在我们对刚才的 hello.kuberun.com 进行一下扩展。让 /blog 开头的路径映射到 blog service,其他的路径还是原样打到 hello service 上面。
把下面的内容保存到 blog.yaml 文件,然后执行: kubectl apply -f blog.yaml 即可完成 blog 服务的部署。
---
apiVersion: v1
kind: Namespace
metadata:
  name: blog

---
apiVersion: serving.knative.dev/v1alpha1
kind: Service
metadata:
  name: hello-blog
  namespace: blog
spec:
  template:
    metadata:
      labels:
        app: hello
      annotations:
        autoscaling.knative.dev/target: "10"
    spec:
      containers:
        - image: registry.cn-hangzhou.aliyuncs.com/knative-sample/simple-app:132e07c14c49
          env:
            - name: TARGET
              value: "Blog!"
查看 blog 服务的默认域名:
└─# kubectl -n blog get ksvc
NAME    URL                                        LATESTCREATED   LATESTREADY   READY   REASON
hello   http://hello-blog.blog.serverless.kuberun.com   hello-zbm7q     hello-zbm7q   True
现在使用浏览器打开 http://hello-blog.blog.serverless.kuberun.com 就可以访问刚刚部署的服务了:

这是默认域名,我们的需求是想要通过 http://hello.kuberun.com/blog 访问, 所以还需要修改 Istio VirtualService 的配置。如下所示在 hello-ingress-route.yaml 增加 /blog 的配置:
apiVersion: networking.istio.io/v1alpha3
kind: VirtualService
metadata:
  name: hello-ingress-route
  namespace: knative-serving
spec:
  gateways:
  - knative-ingress-gateway
  hosts:
  - hello.helloworld.serverless.kuberun.com
  - hello.kuberun.com
  http:
  - match:
    - uri:
        prefix: "/blog"
    rewrite:
      authority: hello-blog.blog.svc.cluster.local
    retries:
      attempts: 3
      perTryTimeout: 10m0s
    route:
    - destination:
        host: istio-ingressgateway.istio-system.svc.cluster.local
        port:
          number: 80
      weight: 100
  - match:
    - uri:
        prefix: "/"
    rewrite:
      authority: hello.helloworld.svc.cluster.local
    retries:
      attempts: 3
      perTryTimeout: 10m0s
    route:
    - destination:
        host: istio-ingressgateway.istio-system.svc.cluster.local
        port:
          number: 80
      weight: 100
    timeout: 10m0s
    websocketUpgrade: true
现在就能在浏览器中打开 http://hello.kuberun.com/blog ,如下所示:

小结
本文主要围绕 Knative Service 域名展开,介绍了 Knative Service 的路由管理。通过本文的介绍,您应该了解到如下内容:
- Knative Service 默认的主域名是 example.com, 所有 Knative Service 生成的独立域名都是这个主域名的子域名;
- Knative Service 生成的域名规范;
- 如何配置 Knative Service 使用自定义的主域名,以及如何配置公网域名解析;
- 如何基于 Istio VirtualService 实现 Knative Service 的个性化 Ingress 配置,提供生产级别的服务路由。
欢迎加入 Knative 交流群


