在之前我们讲到了主从,但是对于大数据量的场景下我们就需要用到集群了,让我们来了解下集群吧。
为什么需要集群
- 单机内存太小
- redis最高可以达到10万/s 请求,如果超过该频率呢?
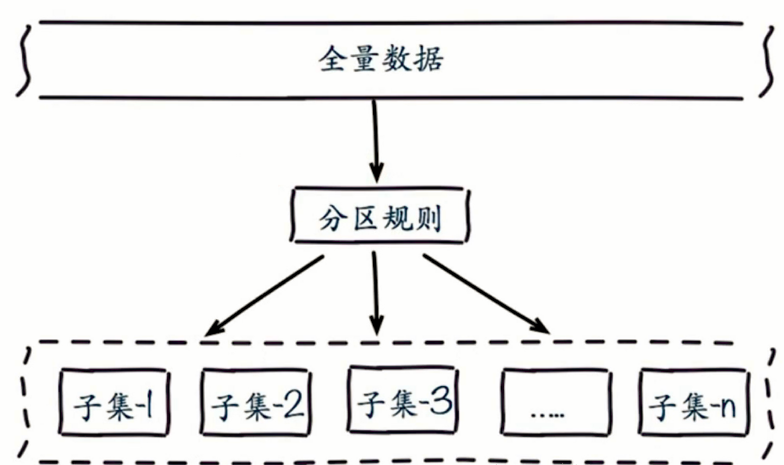
数据分布方式

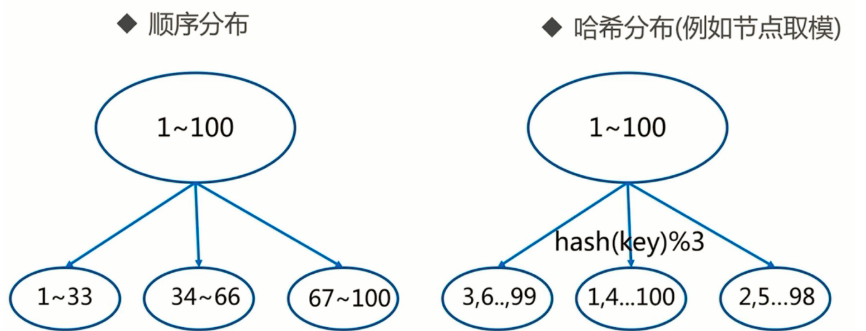
数据分布方式有如下两种方式:
- 顺序分布
- 哈希分布

分布方式
特点
典型产品
顺序分布
数据分散度易倾斜
可顺序访问
键值业务相关
支持批量操作
BigTable
HBase
哈希分布
数值分散度高
无法顺序访问
键值分布业务无关
支持批量操作
Redis Cluster
哈希分布
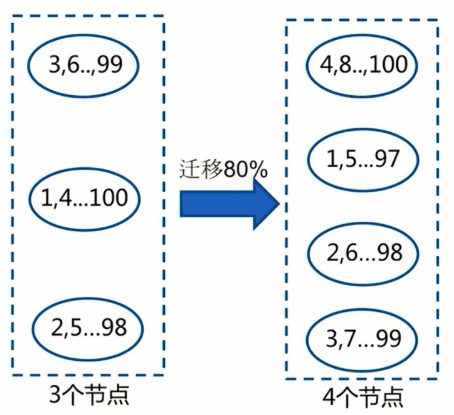
节点取余分区 hash(key) % nodes
如果要增加分区,数据迁移量在80%左右,数据迁移第一次是无法从数据中取到的,数据库需要进行回写到新节点。

如果翻倍扩容的话,就可以将数据迁移量减少30%。
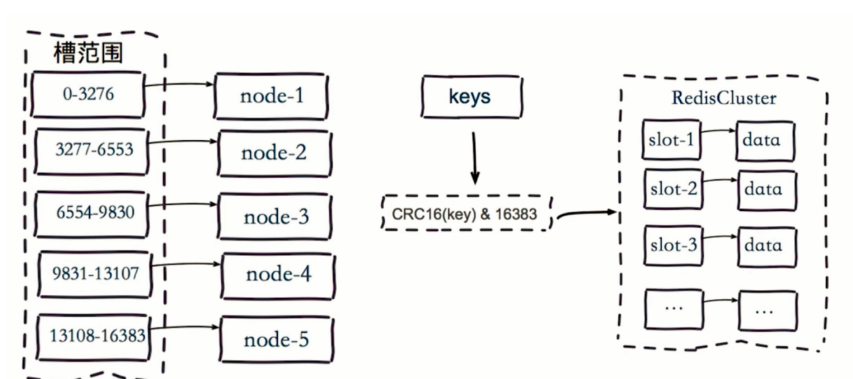
虚拟槽分区
- 预设虚拟槽:每一个槽映射一个数据子集,一般比节点数大
- 良好的哈希函数:例如 CRC16
- 服务端管理节点、槽、数据:例如 Redis Cluster

Redis 官方给出的集群方案中,数据的分配是按照槽位来进行分配的,每一个数据的键被哈希函数映射到一个槽位,redis-3.0.0 规定一共有 16384 个槽位,当然这个可以根据用户的喜好进行配置。当用户 put 或者是 get 一个数据的时候,首先会查找这个数据对应的槽位是多少,然后查找对应的节点,然后才把数据放入这个节点。这样就做到了把数据均匀的分配到集群中的每一个节点上,从而做到了每一个节点的负载均衡,充分发挥了集群的威力。
原生命令安装(三主三从)
1)创建 config 目录用来存放配置文件,创建 data 目录用来存放其他文件
mkdir config
mkdir data
2)新建配置文件 redis-7000.conf ,内容如下:
# 端口号
port 7000
# 是否以后台守护进程形式启动
daemonize yes
# 文件存放路径,此处使用绝对路径
dir "/usr/local/redis/redis4/data"
# rdb 文件名
dbfilename "dump-7000.rdb"
# 日志文件名
logfile "7001.log"
# 是否开启集群模式
cluster-enabled yes
# 节点配置文件名
cluster-config-file nodes-7000.conf
# 是否保证所有节点都可用,如果出现一个不可用就不对外提供服务
cluster-require-full-coverage no
3)修改配置中的端口新生成配置文件
[root@VM_0_15_centos config]# sed 's/7000/7001/g' redis-7000.conf > redis-7001.conf
[root@VM_0_15_centos config]# sed 's/7000/7002/g' redis-7000.conf > redis-7002.conf
[root@VM_0_15_centos config]# sed 's/7000/7003/g' redis-7000.conf > redis-7003.conf
[root@VM_0_15_centos config]# sed 's/7000/7004/g' redis-7000.conf > redis-7004.conf
[root@VM_0_15_centos config]# sed 's/7000/7005/g' redis-7000.conf > redis-7005.conf
依次启动六个 Redis 服务
[root@VM_0_15_centos redis4]# ./redis-server config/redis-7000.conf [root@VM_0_15_centos redis4]# ./redis-server config/redis-7001.conf [root@VM_0_15_centos redis4]# ./redis-server config/redis-7002.conf [root@VM_0_15_centos redis4]# ./redis-server config/redis-7003.conf [root@VM_0_15_centos redis4]# ./redis-server config/redis-7004.conf [root@VM_0_15_centos redis4]# ./redis-server config/redis-7005.conf [root@VM_0_15_centos redis4]# ps -ef | grep redis root 9203 1 0 14:31 ? 00:00:00 ./redis-server *:7000 [cluster] root 9211 1 0 14:31 ? 00:00:00 ./redis-server *:7001 [cluster] root 9217 1 0 14:31 ? 00:00:00 ./redis-server *:7002 [cluster] root 9224 1 0 14:31 ? 00:00:00 ./redis-server *:7003 [cluster] root 9229 1 0 14:31 ? 00:00:00 ./redis-server *:7004 [cluster] root 9237 1 0 14:31 ? 00:00:00 ./redis-server *:7005 [cluster] root 9282 8597 0 14:32 pts/0 00:00:00 grep --color=auto redis
注:集群模式下的 Redis 节点在没有分配虚拟槽之前是不能提供服务的,我们可以来测试下:
[root@VM_0_15_centos redis4]# ./redis-cli -h 127.0.0.1 -p 7000
127.0.0.1:7000> set name 123
(error) CLUSTERDOWN Hash slot not served
将这六个 Redis 节点通过
cluster meet命令依次加入集群[root@VM_0_15_centos redis4]# ./redis-cli -h 127.0.0.1 -p 7000 cluster meet 127.0.0.1 7001 OK [root@VM_0_15_centos redis4]# ./redis-cli -h 127.0.0.1 -p 7000 cluster meet 127.0.0.1 7002 OK [root@VM_0_15_centos redis4]# ./redis-cli -h 127.0.0.1 -p 7000 cluster meet 127.0.0.1 7003 OK [root@VM_0_15_centos redis4]# ./redis-cli -h 127.0.0.1 -p 7000 cluster meet 127.0.0.1 7004 OK [root@VM_0_15_centos redis4]# ./redis-cli -h 127.0.0.1 -p 7000 cluster meet 127.0.0.1 7005 OK
查看下集群信息:
[root@VM_0_15_centos redis4]# ./redis-cli -h 127.0.0.1 -p 7000 cluster info


-- 集群的状态
cluster_state:fail
-- 已分配的槽
cluster_slots_assigned:0
-- 槽的状态是ok的数目
cluster_slots_ok:0
-- 可能失效的槽的数目
cluster_slots_pfail:0
-- 已经失效的槽的数目
cluster_slots_fail:0
-- 集群中节点个数
cluster_known_nodes:6
-- 集群中设置的分片个数
cluster_size:0
-- 集群中的 currentEpoch 总是一致的,currentEpoch 越高,代表节点的配置或者操作越新,集群中最大的那个 node epoch
cluster_current_epoch:5
-- 当前节点的config epoch,每个主节点都不同,一直递增, 其表示某节点最后一次变成主节点或获取新slot所有权的逻辑时间.
cluster_my_epoch:1
cluster_stats_messages_ping_sent:135
cluster_stats_messages_pong_sent:137
cluster_stats_messages_meet_sent:5
cluster_stats_messages_sent:277
cluster_stats_messages_ping_received:137
cluster_stats_messages_pong_received:140
cluster_stats_messages_received:277
可以看到目前集群节点有6个。
将虚拟槽平均分配给三个主节点
[root@VM_0_15_centos redis4]# ./redis-cli -h 127.0.0.1 -p 7000 cluster addslots {0..5461} OK [root@VM_0_15_centos redis4]# ./redis-cli -h 127.0.0.1 -p 7001 cluster addslots {5462..10922} OK [root@VM_0_15_centos redis4]# ./redis-cli -h 127.0.0.1 -p 7002 cluster addslots {10923..16383} OK
6)设置主从配置
查看节点信息
[root@VM_0_15_centos redis4]# ./redis-cli -h 127.0.0.1 -p 7000 cluster nodes
4adb7015ebb695226191d5d0088f162b28f194e7 127.0.0.1:7001@17001 master - 0 1542871568543 2 connected
619eb9a99434f9a5c417855521e1df12bbbd6c2b 127.0.0.1:7002@17002 master - 0 1542871568000 3 connected
432bbdb530126050858e2ded78087dde4bfbe572 127.0.0.1:7004@17004 master 619eb9a99434f9a5c417855521e1df12bbbd6c2b 0 1542871563536 4 connected
648fd58f2b3acdc7aa10b49a291009a49f986217 127.0.0.1:7003@17003 master 41a52d8803eaa5aee74111eeed8e958520c66d12 0 1542871569545 1 connected
354e1e02362c04f07b8361d6690863a287d574e1 127.0.0.1:7005@17005 master 4adb7015ebb695226191d5d0088f162b28f194e7 0 1542871568000 5 connected
41a52d8803eaa5aee74111eeed8e958520c66d12 127.0.0.1:7000@17000 myself,master - 0 1542871565000 1 connected 0-16383
配置主从关系如下:
7003 --> 7000
7004 --> 7001
7005 --> 7002
[root@VM_0_15_centos redis4]# ./redis-cli -h 127.0.0.1 -p 7003 cluster replicate 41a52d8803eaa5aee74111eeed8e958520c66d12 OK [root@VM_0_15_centos redis4]# ./redis-cli -h 127.0.0.1 -p 7004 cluster replicate 4adb7015ebb695226191d5d0088f162b28f194e7 OK [root@VM_0_15_centos redis4]# ./redis-cli -h 127.0.0.1 -p 7005 cluster replicate 619eb9a99434f9a5c417855521e1df12bbbd6c2b OK
查看槽分配情况:
[root@VM_0_15_centos redis4]# ./redis-cli -p 7000 cluster slots
1) 1) (integer) 0
   2) (integer) 5461
   3) 1) "127.0.0.1"
      2) (integer) 7000
   4) 1) "127.0.0.1"
      2) (integer) 7003
2) 1) (integer) 5462
   2) (integer) 10922
   3) 1) "127.0.0.1"
      2) (integer) 7001
   4) 1) "127.0.0.1"
      2) (integer) 7004
3) 1) (integer) 10923
   2) (integer) 16383
   3) 1) "127.0.0.1"
      2) (integer) 7002
   4) 1) "127.0.0.1"
      2) (integer) 7005
官方工具安装
Ruby环境安装
下载 Ruby
[root@VM_0_15_centos ruby]# wget https://cache.ruby-lang.org/pub/ruby/2.3/ruby-2.3.1.tar.gz
解压文件
[root@VM_0_15_centos ruby]# tar -zxvf ruby-2.3.1.tar.gz
编译
进入解压缩后的目录
[root@VM_0_15_centos ruby]# cd ruby-2.3.1
配置信息并指定存放路径
[root@VM_0_15_centos ruby-2.3.1]# ./configure -prefix=/usr/local/ruby
编译并安装
[root@VM_0_15_centos ruby-2.3.1]# make && make install
验证是否安装成功
[root@VM_0_15_centos local]# ruby -v ruby 2.3.1p112 (2016-04-26 revision 54768) [x86_64-linux]
如果没有显示版本的话,需要配置下环境变量:
[root@VM_0_15_centos local]# vim /etc/profile
在最下面的 PATH 增加 :/usr/local/ruby,完整如下:
export PATH=$JAVA_HOME/bin:/usr/local/ruby/bin:$PATH
注意:放在 $PATH 前面避免使用系统默认的
刷新配置文件
source /etc/profile
rubygem redis 安装
1)下载文件
wget http://rubygems.org/downloads/redis-3.3.0.gem
2)安装
[root@VM_0_15_centos redis]# gem install -l redis-3.3.0.gem
ERROR:  Loading command: install (LoadError)
    cannot load such file -- zlib
ERROR:  While executing gem ... (NoMethodError)
    undefined method `invoke_with_build_args' for nil:NilClass
发现报错,错误原因是缺少 zlib 依赖,我们来安装下 zlib 依赖
# 进入之前下载的 ruby 源码目录
[root@VM_0_15_centos ruby-2.3.1]# cd ext/zlib/
[root@VM_0_15_centos zlib]# ruby ./extconf.rb
# 编译并安装
[root@VM_0_15_centos zlib]# make && make install
重新安装 rubygem redis
[root@VM_0_15_centos redis]# gem install -l redis-3.3.0.gem
Successfully installed redis-3.3.0
Parsing documentation for redis-3.3.0
Installing ri documentation for redis-3.3.0
Done installing documentation for redis after 0 seconds
1 gem installed


[root@VM_0_15_centos redis]# gem list -- check redis gem

*** LOCAL GEMS ***

bigdecimal (1.2.8)
did_you_mean (1.0.0)
io-console (0.4.5)
json (1.8.3)
minitest (5.8.3)
net-telnet (0.1.1)
power_assert (0.2.6)
psych (2.0.17)
rake (10.4.2)
rdoc (4.2.1)
redis (3.3.0)
test-unit (3.1.5)
安装 redis-trib.rb
# 进入 Redis 编译后的程序安装目录
[root@VM_0_15_centos]# cd /usr/local/redis/src
# 将 redis-trib.rb 拷贝到 reids4 目录下
[root@VM_0_15_centos src]# cp redis-trib.rb /usr/local/redis/redis4/
redis-trib 实现集群
启动六个
Redis服务[root@VM_0_15_centos redis4]# ./redis-server config/redis-7000.conf [root@VM_0_15_centos redis4]# ./redis-server config/redis-7001.conf [root@VM_0_15_centos redis4]# ./redis-server config/redis-7002.conf [root@VM_0_15_centos redis4]# ./redis-server config/redis-7003.conf [root@VM_0_15_centos redis4]# ./redis-server config/redis-7004.conf [root@VM_0_15_centos redis4]# ./redis-server config/redis-7005.conf [root@VM_0_15_centos redis4]# ps -ef | grep redis root 29570 1 0 10:15 ? 00:00:00 ./redis-server *:7000 [cluster] root 29575 1 0 10:15 ? 00:00:00 ./redis-server *:7001 [cluster] root 29581 1 0 10:15 ? 00:00:00 ./redis-server *:7002 [cluster] root 29587 1 0 10:15 ? 00:00:00 ./redis-server *:7003 [cluster] root 29593 1 0 10:15 ? 00:00:00 ./redis-server *:7004 [cluster] root 29599 1 0 10:15 ? 00:00:00 ./redis-server *:7005 [cluster] root 29635 1362 0 10:16 pts/0 00:00:00 grep --color=auto redis
创建集群
配置主从关系如下:
7003 --> 7000
7004 --> 7001
7005 --> 7002
[root@VM_0_15_centos redis4]# ./redis-trib.rb create --replicas 1 127.0.0.1:7000 127.0.0.1:7003 127.0.0.1:7002 127.0.0.1:7004 127.0.0.1:7003 127.0.0.1:7005
Creating cluster Performing hash slots allocation on 6 nodes... Using 3 masters: 127.0.0.1:7000 127.0.0.1:7003 127.0.0.1:7002 Adding replica 127.0.0.1:7003 to 127.0.0.1:7000 Adding replica 127.0.0.1:7005 to 127.0.0.1:7003 Adding replica 127.0.0.1:7004 to 127.0.0.1:7002 Trying to optimize slaves allocation for anti-affinity [WARNING] Some slaves are in the same host as their master M: 5de648cc0cc7c503169638bbe3a56fc3f4c3aa72 127.0.0.1:7000 slots:0-5460 (5461 slots) master M: 90ab3e9992a4b0f6abddc75d03fce63099b4fb38 127.0.0.1:7003 slots:5461-10922 (5462 slots) master M: 1e3ec7626adcb2662700aa0ca9933d60232847a6 127.0.0.1:7002 slots:10923-16383 (5461 slots) master S: 5a2bbf95047bdf9719ca60152cf91e48e8a956bd 127.0.0.1:7004 replicates 1e3ec7626adcb2662700aa0ca9933d60232847a6 S: 90ab3e9992a4b0f6abddc75d03fce63099b4fb38 127.0.0.1:7003 replicates 5de648cc0cc7c503169638bbe3a56fc3f4c3aa72 S: 892668ae60f407be5094a667f3532e760b867e64 127.0.0.1:7005 replicates 90ab3e9992a4b0f6abddc75d03fce63099b4fb38 Can I set the above configuration? (type 'yes' to accept): yes Nodes configuration updated Assign a different config epoch to each node Sending CLUSTER MEET messages to join the cluster Waiting for the cluster to join.. Performing Cluster Check (using node 127.0.0.1:7000) M: 5de648cc0cc7c503169638bbe3a56fc3f4c3aa72 127.0.0.1:7000 slots:0-5460 (5461 slots) master 0 additional replica(s) M: 90ab3e9992a4b0f6abddc75d03fce63099b4fb38 127.0.0.1:7003 slots:5461-10922 (5462 slots) master 1 additional replica(s) S: 892668ae60f407be5094a667f3532e760b867e64 127.0.0.1:7005 slots: (0 slots) slave replicates 90ab3e9992a4b0f6abddc75d03fce63099b4fb38 M: 1e3ec7626adcb2662700aa0ca9933d60232847a6 127.0.0.1:7002 slots:10923-16383 (5461 slots) master 1 additional replica(s) S: 5a2bbf95047bdf9719ca60152cf91e48e8a956bd 127.0.0.1:7004 slots: (0 slots) slave replicates 1e3ec7626adcb2662700aa0ca9933d60232847a6 [OK] All nodes agree about slots configuration.
名词解释:
- create :创建集群
- replicas 1:为集群中的每个主节点创建一个从节点
- Can I set the above configuration? (type 'yes' to accept) :会将配置信息显示出来,让你确认是否这样配置
- [OK] All nodes agree about slots configuration : 表示集群中的 16384 个槽都有至少一个主节点在处理, 集群运作正常。
查看槽信息:
[root@VM_0_15_centos redis4]# ./redis-cli -p 7000 cluster slots
1) 1) (integer) 5461
   2) (integer) 10922
   3) 1) "127.0.0.1"
      2) (integer) 7003
      3) "90ab3e9992a4b0f6abddc75d03fce63099b4fb38"
   4) 1) "127.0.0.1"
      2) (integer) 7005
      3) "892668ae60f407be5094a667f3532e760b867e64"
2) 1) (integer) 10923
   2) (integer) 16383
   3) 1) "127.0.0.1"
      2) (integer) 7002
      3) "1e3ec7626adcb2662700aa0ca9933d60232847a6"
   4) 1) "127.0.0.1"
      2) (integer) 7004
      3) "5a2bbf95047bdf9719ca60152cf91e48e8a956bd"
3) 1) (integer) 0
   2) (integer) 5460
   3) 1) "127.0.0.1"
      2) (integer) 7000
      3) "5de648cc0cc7c503169638bbe3a56fc3f4c3aa72"
跟之前我们用原生命令执行的是一样的效果,要注意的是在生产环境不建议使用原生命令创建集群,因为太过麻烦很容易出错。


