1.FastDFS是什么?
FastDFS是分布式文件系统。使用 FastDFS很容易搭建一套高性能的文件服务器集群提供文件上传、下载等服务。
2.工作原理
FastDFS 架构包括 Tracker server 和 Storage server。客户端请求 Tracker server 进行文件上传、下载,通过 Tracker server 调度最终由 Storage server 完成文件上传和下载。
Tracker server 作用是负载均衡和调度,通过 Tracker server 在文件上传时可以根据一些策略找到 Storage server 提供文件上传服务。可以将 tracker 称为追踪服务器或调度服务器。
Storage server 作用是文件存储,客户端上传的文件最终存储在 Storage 服务器上,Storage server 没有实现自己的文件系统而是利用操作系统的文件系统来管理文件。可以将storage称为存储服务器。

每个 tracker 节点地位平等。收集 Storage 集群的状态。
Storage 分为多个组,每个组之间保存的文件是不同的。每个组内部可以有多个成员,组成员内部保存的内容是一样的,组成员的地位是一致的,没有主从的概念。
3.文件的上传
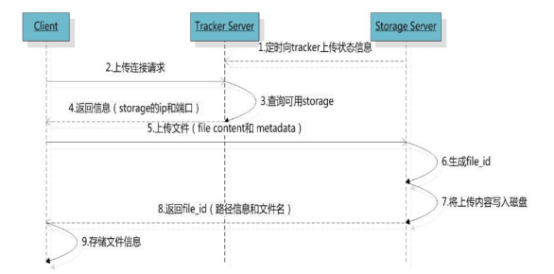
文件上传流程:

客户端上传文件后存储服务器将文件 ID 返回给客户端,此文件 ID 用于以后访问该文件的索引信息。文件索引信息包括:组名,虚拟磁盘路径,数据两级目录,文件名。
4.文件的下载
文件下载流程:

5.FastDFS安装
为了能够快速的搭建FastDFS环境进行代码开发,我们这里提供了安装好的镜像。
双击vmx文件,然后启动。注意:遇到下列提示选择“我已移动该虚拟机”!
IP地址已经固定为192.168.25.133 ,请设置你的仅主机网段为25。登录名为root 密码为root。
6.FastDFS入门小Demo
(1)创建Maven工程fastDFSdemo
由于FastDFS客户端jar包并没有在中央仓库中,所以需要使用下列命令手动安装jar包到Maven本地仓库
mvn install:install-file -DgroupId=org.csource.fastdfs -DartifactId=fastdfs -Dversion=1.2 -Dpackaging=jar -Dfile=d:\setup\fastdfs_client_v1.20.jar
(2)pom.xml引入
<!-- 文件上传组件 -->
<dependency>
     <groupId>org.csource.fastdfs</groupId>
     <artifactId>fastdfs</artifactId> </dependency>
 <dependency>
    <groupId>commons-fileupload</groupId>
    <artifactId>commons-fileupload</artifactId>
 </dependency>
(3)添加配置文件fdfs_client.conf ,将其中的服务器地址设置为192.168.25.133
# connect timeout in seconds
# default value is 30s
connect_timeout=30

# network timeout in seconds
# default value is 30s
network_timeout=60

# the base path to store log files
base_path=/home/fastdfs

# tracker_server can ocur more than once, and tracker_server format is
#  "host:port", host can be hostname or ip address

tracker_server=192.168.25.133:22122

#standard log level as syslog, case insensitive, value list:
### emerg for emergency
### alert
### crit for critical
### error
### warn for warning
### notice
### info
### debug
log_level=info

# if use connection pool
# default value is false
# since V4.05
use_connection_pool = false

# connections whose the idle time exceeds this time will be closed
# unit: second
# default value is 3600
# since V4.05
connection_pool_max_idle_time = 3600

# if load FastDFS parameters from tracker server
# since V4.05
# default value is false
load_fdfs_parameters_from_tracker=false

# if use storage ID instead of IP address
# same as tracker.conf
# valid only when load_fdfs_parameters_from_tracker is false
# default value is false
# since V4.05
use_storage_id = false

# specify storage ids filename, can use relative or absolute path
# same as tracker.conf
# valid only when load_fdfs_parameters_from_tracker is false
# since V4.05
storage_ids_filename = storage_ids.conf


#HTTP settings
http.tracker_server_port=80

#use "#include" directive to include HTTP other settiongs
##include http.conf
(4)创建java类,main方法代码如下
// 1、加载配置文件,配置文件中的内容就是 tracker 服务的地址。
        ClientGlobal.init("D:/maven_work/fastDFS-demo/src/fdfs_client.conf");
        // 2、创建一个 TrackerClient 对象。直接 new 一个。
        TrackerClient trackerClient = new TrackerClient();
        // 3、使用 TrackerClient 对象创建连接,获得一个 TrackerServer 对象。
        TrackerServer trackerServer = trackerClient.getConnection();
        // 4、创建一个 StorageServer 的引用,值为 null
        StorageServer storageServer = null;
        // 5、创建一个 StorageClient 对象,需要两个参数 TrackerServer 对象、StorageServer 的引用
        StorageClient storageClient = new StorageClient(trackerServer, storageServer);
        // 6、使用 StorageClient 对象上传图片。
        //扩展名不带“.”
        String[] strings = storageClient.upload_file("D:/pic/benchi.jpg", "jpg",
                null);
        // 7、返回数组。包含组名和图片的路径。
        for (String string : strings) {
            System.out.println(string);
        }
控制台输出如下结果
group1
M00/00/00/wKgZhVkMP4KAZEy-AAA-tCf93Fo973.jpg
在浏览器输入http://192.168.25.133/group1/M00/00/00/wKgZhVkMP4KAZEy-AAA-tCf93Fo973.jpg即可访问这张图片。
注意,在那个类中,第1步的配置文件路径需要使用文件的绝对路径,第6步的文件路径也是一样。
7.项目的整合
1)把fdfs_client.conf 拷贝到工程的config文件夹中。
2)在springmvc.xml中添加
<!-- 配置多媒体解析器 -->
<bean id="multipartResolver" class="org.springframework.web.multipart.commons.CommonsMultipartResolver">
        <property name="defaultEncoding" value="UTF-8"></property>
        <!-- 设定文件上传的最大值5MB,5*1024*1024 -->
        <property name="maxUploadSize" value="5242880"></property>
</bean>
3)新建application.properties文件,添加配置
FILE_SERVER_URL=http://192.168.25.133/
4)在控制层新建UploadController.java。这里用到了FastDFSClient的类,所以要把这个工具类复制到项目中:
package com.huanletao.shop.controller;
import org.springframework.beans.factory.annotation.Value;
import org.springframework.web.bind.annotation.RequestMapping;
import org.springframework.web.bind.annotation.RestController;
import org.springframework.web.multipart.MultipartFile;
import entity.Result;
import util.FastDFSClient;
/**
 * 文件上传Controller
 * @author Administrator
 *
 */
@RestController
public class UploadController {

    @Value("${FILE_SERVER_URL}")
    private String FILE_SERVER_URL;//文件服务器地址

    @RequestMapping("/upload")
    public Result upload( MultipartFile file){
        //1、取文件的扩展名
        String originalFilename = file.getOriginalFilename();
        String extName = originalFilename.substring(originalFilename.lastIndexOf(".") + 1);
        try {
//2、创建一个 FastDFS 的客户端
            FastDFSClient fastDFSClient = new FastDFSClient("classpath:config/fdfs_client.conf");
            //3、执行上传处理
            String path = fastDFSClient.uploadFile(file.getBytes(), extName);
            //4、拼接返回的 url 和 ip 地址,拼装成完整的 url
            String url = FILE_SERVER_URL + path;
            return new Result(true,url);
        } catch (Exception e) {
            e.printStackTrace();
            return new Result(false, "上传失败");
        }
    }
}
5)在工程的创建uploadService.js
//文件上传服务层
app.service("uploadService",function($http){
    this.uploadFile=function(){
        var formData=new FormData();
        formData.append("file",file.files[0]);
        return $http({
            method:'POST',
            url:"../upload.do",
            data: formData,
            headers: {'Content-Type':undefined},
            transformRequest: angular.identity
        });
    }
});


