前言介绍
附录:Spring源码学习专栏
在上一章节的学习中,我们对Springframework的AOP基本概念和用法有了基本的了解熟悉,接着本文继续学习Springframework核心技术点AOP技术的源码
1、实验环境准备
实验环境:
- SpringFramework版本
- Springframework5.0.x
- 开发环境
- JAR管理:gradle 4.9/ Maven3.+
- 开发IDE:IntelliJ IDEA 2018.2.5
- JDK:jdk1.8.0_31
- Git Server:Git fro window 2.8.3
- Git Client:SmartGit18.1.5(可选)
2、Spring AOP代理
在上一章的学习,我们知道了Spring AOP是AOP的实现方案之一,这种方案有别于AspectJ,这是一种将Spring IOC技术和Aop进行结合的技术,在Spring2.0+引用了AspectJ的jar,并进行自己的实现,这是一种基于代理的技术,具体来说是基于JDK动态代理和CBLIB动态代理的技术
为什么说Spring AOP实现基于IOC?首先挑出一个比较重要的Spring AOP自动创建代理类:DefaultAdvisorAutoProxyCreator
在IDEA中生成一张DefaultAdvisorAutoProxyCreator的类图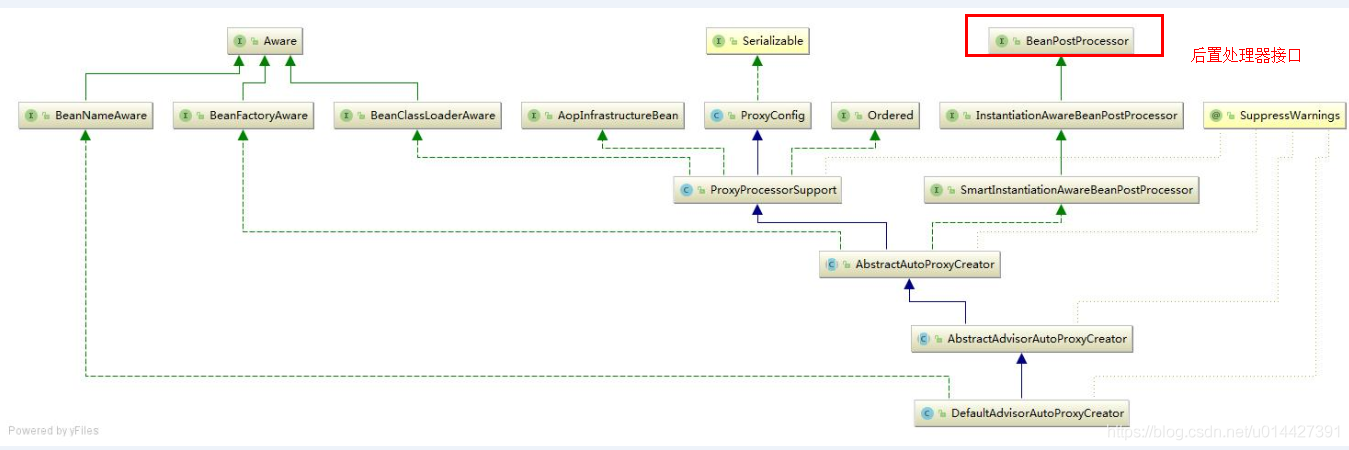
从图可以看出DefaultAdvisorAutoProxyCreator实现了后置处理器的接口,也就是说DefaultAdvisorAutoProxyCreator是一个后置处理器
3、使用调试代码
所以,本文要写个DefaultAdvisorAutoProxyCreator例子进行学习,学习源码,建议通过debug进行学习
User.java:
package com.example.aop.bean;

public class User {


    private String username;
    private String password;

    public String getUsername() {


        return username;
    }

    public void setUsername(String username) {


        this.username = username;
    }

    public String getPassword() {


        return password;
    }

    public void setPassword(String password) {


        this.password = password;
    }

    @Override
    public String toString() {


        return "User{" +
                "username='" + username + '\'' +
                ", password='" + password + '\'' +
                '}';
    }
}
UserService.java:
package com.example.aop.service;


import com.example.aop.bean.User;

/**
 * <pre>
 *      UserService
 * </pre>
 *
 * <pre>
 * @author mazq
 * 修改记录
 *    修改后版本:     修改人:  修改日期: 2020/11/20 18:02  修改内容:
 * </pre>
 */
public interface UserService {


    User addUser(User user);

    User getUser();

    String findUserNameById(Long id);
}
UserServiceImpl.java:
package com.example.aop.service.impl;

import com.example.aop.bean.User;
import com.example.aop.service.UserService;
import org.springframework.beans.BeanUtils;
import org.springframework.stereotype.Service;

/**
 * <pre>
 *      UserServiceImpl
 * </pre>
 *
 * <pre>
 * @author mazq
 * 修改记录
 *    修改后版本:     修改人:  修改日期: 2020/11/20 17:57  修改内容:
 * </pre>
 */
@Service
public class UserServiceImpl implements UserService {


    private static User user = null;

    @Override
    public User addUser(User userDto) {


        user = new User();
        BeanUtils.copyProperties(userDto,user);
        return user;
    }

    @Override
    public User getUser() {


        return user;
    }

    @Override
    public String findUserNameById(Long id) {


        return "tom";
    }
}
MethodInterceptor,是一个拦截方法的MethodInterceptor
package com.example.aop.core.interceptor;


import org.aopalliance.intercept.MethodInterceptor;
import org.aopalliance.intercept.MethodInvocation;

/**
 * <pre>
 *      TestMethodInterceptor
 * </pre>
 *
 * <pre>
 * @author mazq
 * 修改记录
 *    修改后版本:     修改人:  修改日期: 2020/11/23 10:28  修改内容:
 * </pre>
 */
public class TestMethodInterceptor  implements MethodInterceptor {


    @Override
    public Object invoke(MethodInvocation methodInvocation) throws Throwable {


        System.out.println(String.format("方法调用前(before method invoke) :%s",methodInvocation));
        Object implObj = methodInvocation.proceed();
        System.out.println(String.format("方法调用后(after method invoke) :%s",implObj));
        return implObj;
    }
}
配置类,拦截get开头的方法:
package com.example.aop.config;

import com.example.aop.core.interceptor.TestMethodInterceptor;
import com.example.aop.service.UserService;
import com.example.aop.service.impl.UserServiceImpl;
import org.aopalliance.aop.Advice;
import org.springframework.aop.framework.autoproxy.DefaultAdvisorAutoProxyCreator;
import org.springframework.aop.support.NameMatchMethodPointcutAdvisor;
import org.springframework.context.annotation.Bean;
import org.springframework.context.annotation.Configuration;

/**
 * <pre>
 *      SpringAutoProxyConfiguration
 * </pre>
 *
 * <pre>
 * @author mazq
 * 修改记录
 *    修改后版本:     修改人:  修改日期: 2020/11/26 14:57  修改内容:
 * </pre>
 */
@Configuration
public class SpringAutoProxyConfiguration {


    @Bean
    public UserService userService() {


        return new UserServiceImpl();
    }

    @Bean
    public Advice methodInterceptor() {


        return new TestMethodInterceptor();
    }

    @Bean
    public NameMatchMethodPointcutAdvisor nameMatchMethodPointcutAdvisor() {


        NameMatchMethodPointcutAdvisor nameMatchMethodPointcutAdvisor = new NameMatchMethodPointcutAdvisor();
        nameMatchMethodPointcutAdvisor.setMappedName("get*");
        nameMatchMethodPointcutAdvisor.setAdvice(methodInterceptor());
        return nameMatchMethodPointcutAdvisor;
    }

    @Bean
    public DefaultAdvisorAutoProxyCreator defaultAdvisorAutoProxyCreator() {


        return new DefaultAdvisorAutoProxyCreator();
    }

}
测试类:TestApplication
package com.example;

import com.example.aop.config.SpringAspectJConfiguration;
import com.example.aop.service.UserService;
import com.example.config.AppConfiguration;
import org.springframework.context.annotation.AnnotationConfigApplicationContext;


/**
 * <pre>
 *      TestController
 * </pre>
 *
 * <pre>
 * @author mazq
 * 修改记录
 *    修改后版本:     修改人:  修改日期: 2020/11/05 10:22  修改内容:
 * </pre>
 */
public class TestApplication {


    public static void testSpringAopProxy() {


        AnnotationConfigApplicationContext context = new AnnotationConfigApplicationContext();
        context.register(SpringAutoProxyConfiguration.class);
        context.refresh();
        //ClassPathXmlApplicationContext context = new ClassPathXmlApplicationContext("classpath:spring_defaultAdvisorAutoProxyCreator_config.xml");
        UserService userService = context.getBean(UserService.class);
        User userDto = new User();
        userDto.setUsername("tom");
        userDto.setPassword("11");
        userService.addUser(userDto);
        System.out.println(String.format("用户数据打印:%s",userService.getUser().toString()));
    }

    public static void main(String[] args) {


        // 测试AOP代理对象
        testSpringAopProxy();
    }
}
通过xml匹配文件也是可以实现的,spring_defaultAdvisorAutoProxyCreator_config.xml:
<?xml version="1.0" encoding="UTF-8"?>
<beans xmlns="http://www.springframework.org/schema/beans"
       xmlns:xsi="http://www.w3.org/2001/XMLSchema-instance"
       xsi:schemaLocation="http://www.springframework.org/schema/beans http://www.springframework.org/schema/beans/spring-beans.xsd">

    <!-- 具体业务实现类(target Object)-->
    <bean id="userService" class="com.example.aop.service.impl.UserServiceImpl"></bean>

    <!-- 定义MethodInterceptor -->
    <bean id="methodInterceptor" class="com.example.aop.core.interceptor.TestMethodInterceptor"></bean>

    <bean id="1" class="org.springframework.aop.support.NameMatchMethodPointcutAdvisor">
        <property name="mappedName" value="get*"></property>
        <property name="advice" ref="methodInterceptor"></property>
    </bean>

    <!-- 定义BeanNameAutoProxyCreator -->
    <bean id="autoProxyCreator" class="org.springframework.aop.framework.autoproxy.DefaultAdvisorAutoProxyCreator">
    </bean>


</beans>
通过ClassPathXmlApplicationContext context = new ClassPathXmlApplicationContext("classpath:spring_defaultAdvisorAutoProxyCreator_config.xml");获取ioc实例就行
4、Spring Bean创建
在上篇博客,我们知道了,Spring ioc是怎么bean的,前面分析了,spring aop其实就是基于spring ioc实现的,是基于后置处理器,然后再加上动态代理实现的,所以我们可以通过debug方式,跟下源码:
/**
 * Central method of this class: creates a bean instance,
 * populates the bean instance, applies post-processors, etc.
 * @see #doCreateBean
 */
@Override
protected Object createBean(String beanName, RootBeanDefinition mbd, @Nullable Object[] args)
        throws BeanCreationException {


    if (logger.isDebugEnabled()) {


        logger.debug("Creating instance of bean '" + beanName + "'");
    }
    RootBeanDefinition mbdToUse = mbd;

    // Make sure bean class is actually resolved at this point, and
    // clone the bean definition in case of a dynamically resolved Class
    // which cannot be stored in the shared merged bean definition.
    // ClassLoader加载BeanDefinition
    Class<?> resolvedClass = resolveBeanClass(mbd, beanName);
    if (resolvedClass != null && !mbd.hasBeanClass() && mbd.getBeanClassName() != null) {


        mbdToUse = new RootBeanDefinition(mbd);
        mbdToUse.setBeanClass(resolvedClass);
    }

    // Prepare method overrides.
    // 处理方法覆盖
    //  涉及bean 定义中的 <lookup-method />  和 <replaced-method />,先放过 todo
    try {


        mbdToUse.prepareMethodOverrides();
    }
    catch (BeanDefinitionValidationException ex) {


        throw new BeanDefinitionStoreException(mbdToUse.getResourceDescription(),
                beanName, "Validation of method overrides failed", ex);
    }

    try {


        // Give BeanPostProcessors a chance to return a proxy instead of the target bean instance.
        // 让InstantiationAwareBeanPostProcessor这个后置处理器有机会返回一个代理的实例,这个ioc源码学习先放过 todo
        Object bean = resolveBeforeInstantiation(beanName, mbdToUse);
        if (bean != null) {


            return bean;
        }
    }
    catch (Throwable ex) {


        throw new BeanCreationException(mbdToUse.getResourceDescription(), beanName,
                "BeanPostProcessor before instantiation of bean failed", ex);
    }

    try {


        // 重头戏,doCreateBean是实践执行bean创建的
        Object beanInstance = doCreateBean(beanName, mbdToUse, args);
        if (logger.isDebugEnabled()) {


            logger.debug("Finished creating instance of bean '" + beanName + "'");
        }
        return beanInstance;
    }
    catch (BeanCreationException | ImplicitlyAppearedSingletonException ex) {


        // A previously detected exception with proper bean creation context already,
        // or illegal singleton state to be communicated up to DefaultSingletonBeanRegistry.
        throw ex;
    }
    catch (Throwable ex) {


        throw new BeanCreationException(
                mbdToUse.getResourceDescription(), beanName, "Unexpected exception during bean creation", ex);
    }
}
{@link org.springframework.beans.factory.support.AbstractAutowireCapableBeanFactory#createBean(java.lang.String, org.springframework.beans.factory.support.RootBeanDefinition, java.lang.Object[])}
/**
 * Actually create the specified bean. Pre-creation processing has already happened
 * at this point, e.g. checking {@code postProcessBeforeInstantiation} callbacks.
 * <p>Differentiates between default bean instantiation, use of a
 * factory method, and autowiring a constructor.
 * @param beanName the name of the bean
 * @param mbd the merged bean definition for the bean
 * @param args explicit arguments to use for constructor or factory method invocation
 * @return a new instance of the bean
 * @throws BeanCreationException if the bean could not be created
 * @see #instantiateBean
 * @see #instantiateUsingFactoryMethod
 * @see #autowireConstructor
 */
protected Object doCreateBean(String beanName, RootBeanDefinition mbd, @Nullable Object[] args)
        throws BeanCreationException {


    // Instantiate the bean.
    BeanWrapper instanceWrapper = null;
    if (mbd.isSingleton()) {


        instanceWrapper = this.factoryBeanInstanceCache.remove(beanName);
    }
    // 不是FactoryBean的情况
    if (instanceWrapper == null) {


        // 1、创建Bean实例,但是还没设置属性
        instanceWrapper = createBeanInstance(beanName, mbd, args);
    }
    Object bean = instanceWrapper.getWrappedInstance();
    Class<?> beanType = instanceWrapper.getWrappedClass();
    if (beanType != NullBean.class) {


        mbd.resolvedTargetType = beanType;
    }

    // Allow post-processors to modify the merged bean definition.
    // 涉及到MergedBeanDefinitionPostProcessor,先跳过 todo
    synchronized (mbd.postProcessingLock) {


        if (!mbd.postProcessed) {


            try {


                applyMergedBeanDefinitionPostProcessors(mbd, beanType, beanName);
            }
            catch (Throwable ex) {


                throw new BeanCreationException(mbd.getResourceDescription(), beanName,
                        "Post-processing of merged bean definition failed", ex);
            }
            mbd.postProcessed = true;
        }
    }

    // Eagerly cache singletons to be able to resolve circular references
    // even when triggered by lifecycle interfaces like BeanFactoryAware.
    // 循环依赖的问题,单例bean才支持循环依赖
    boolean earlySingletonExposure = (mbd.isSingleton() && this.allowCircularReferences &&
            isSingletonCurrentlyInCreation(beanName));
    if (earlySingletonExposure) {


        if (logger.isDebugEnabled()) {


            logger.debug("Eagerly caching bean '" + beanName +
                    "' to allow for resolving potential circular references");
        }
        addSingletonFactory(beanName, () -> getEarlyBeanReference(beanName, mbd, bean));
    }

    // Initialize the bean instance.
    Object exposedObject = bean;
    try {


        // 2、装载属性,关键一步
        populateBean(beanName, mbd, instanceWrapper);
        // 3、调用初始化方法,应用BeanPostProcess后置处理器
        exposedObject = initializeBean(beanName, exposedObject, mbd);
    }
    catch (Throwable ex) {


        if (ex instanceof BeanCreationException && beanName.equals(((BeanCreationException) ex).getBeanName())) {


            throw (BeanCreationException) ex;
        }
        else {


            throw new BeanCreationException(
                    mbd.getResourceDescription(), beanName, "Initialization of bean failed", ex);
        }
    }

    if (earlySingletonExposure) {


        Object earlySingletonReference = getSingleton(beanName, false);
        if (earlySingletonReference != null) {


            if (exposedObject == bean) {


                exposedObject = earlySingletonReference;
            }
            else if (!this.allowRawInjectionDespiteWrapping && hasDependentBean(beanName)) {


                String[] dependentBeans = getDependentBeans(beanName);
                Set<String> actualDependentBeans = new LinkedHashSet<>(dependentBeans.length);
                for (String dependentBean : dependentBeans) {


                    if (!removeSingletonIfCreatedForTypeCheckOnly(dependentBean)) {


                        actualDependentBeans.add(dependentBean);
                    }
                }
                if (!actualDependentBeans.isEmpty()) {


                    throw new BeanCurrentlyInCreationException(beanName,
                            "Bean with name '" + beanName + "' has been injected into other beans [" +
                            StringUtils.collectionToCommaDelimitedString(actualDependentBeans) +
                            "] in its raw version as part of a circular reference, but has eventually been " +
                            "wrapped. This means that said other beans do not use the final version of the " +
                            "bean. This is often the result of over-eager type matching - consider using " +
                            "'getBeanNamesForType' with the 'allowEagerInit' flag turned off, for example.");
                }
            }
        }
    }

    // Register bean as disposable.
    try {


        registerDisposableBeanIfNecessary(beanName, bean, mbd);
    }
    catch (BeanDefinitionValidationException ex) {


        throw new BeanCreationException(
                mbd.getResourceDescription(), beanName, "Invalid destruction signature", ex);
    }

    return exposedObject;
}
调用初始化方法,调用BeanPostProcess后置处理器
/**
 * Initialize the given bean instance, applying factory callbacks
 * as well as init methods and bean post processors.
 * <p>Called from {@link #createBean} for traditionally defined beans,
 * and from {@link #initializeBean} for existing bean instances.
 * @param beanName the bean name in the factory (for debugging purposes)
 * @param bean the new bean instance we may need to initialize
 * @param mbd the bean definition that the bean was created with
 * (can also be {@code null}, if given an existing bean instance)
 * @return the initialized bean instance (potentially wrapped)
 * @see BeanNameAware
 * @see BeanClassLoaderAware
 * @see BeanFactoryAware
 * @see #applyBeanPostProcessorsBeforeInitialization
 * @see #invokeInitMethods
 * @see #applyBeanPostProcessorsAfterInitialization
 */
protected Object initializeBean(String beanName, Object bean, @Nullable RootBeanDefinition mbd) {


    if (System.getSecurityManager() != null) {


        AccessController.doPrivileged((PrivilegedAction<Object>) () -> {


            invokeAwareMethods(beanName, bean);
            return null;
        }, getAccessControlContext());
    }
    else {


        invokeAwareMethods(beanName, bean);
    }

    Object wrappedBean = bean;
    if (mbd == null || !mbd.isSynthetic()) {


        // 调用每一个后置处理器(BeanPostProcessor)的postProcessBeforeInitialization方法
        wrappedBean = applyBeanPostProcessorsBeforeInitialization(wrappedBean, beanName);
    }

    try {


        // 开始执⾏afterPropertiesSet(实现了InitializingBean接⼝)⽅法和initMethod
        invokeInitMethods(beanName, wrappedBean, mbd);
    }
    catch (Throwable ex) {


        throw new BeanCreationException(
                (mbd != null ? mbd.getResourceDescription() : null),
                beanName, "Invocation of init method failed", ex);
    }
    if (mbd == null || !mbd.isSynthetic()) {


        // 执行每一个 BeanPostProcessor 的 postProcessAfterInitialization 方法
        wrappedBean = applyBeanPostProcessorsAfterInitialization(wrappedBean, beanName);
    }

    return wrappedBean;
}
5、后置处理器
往下跟,看看后置处理器,是怎么执行每一个 BeanPostProcessor 的 postProcessAfterInitialization ?
@Override
public Object applyBeanPostProcessorsAfterInitialization(Object existingBean, String beanName)
        throws BeansException {


    Object result = existingBean;
    for (BeanPostProcessor processor : getBeanPostProcessors()) {


        // 调用每一个BeanPostProcessor的postProcessAfterInitialization
        Object current = processor.postProcessAfterInitialization(result, beanName);
        if (current == null) {


            return result;
        }
        result = current;
    }
    return result;
}
{@link org.springframework.aop.framework.autoproxy.AbstractAutoProxyCreator#postProcessAfterInitialization}
/**
 * Create a proxy with the configured interceptors if the bean is
 * identified as one to proxy by the subclass.
 * @see #getAdvicesAndAdvisorsForBean
 */
@Override
public Object postProcessAfterInitialization(@Nullable Object bean, String beanName) throws BeansException {


    if (bean != null) {


        Object cacheKey = getCacheKey(bean.getClass(), beanName);
        // 缓存 earlyProxyReferences
        if (this.earlyProxyReferences.remove(cacheKey) != bean) {


            // 往下跟,封装返回代理类
            return wrapIfNecessary(bean, beanName, cacheKey);
        }
    }
    return bean;
}
wrapIfNecessary方法
/**
 * Wrap the given bean if necessary, i.e. if it is eligible for being proxied.
 * @param bean the raw bean instance
 * @param beanName the name of the bean
 * @param cacheKey the cache key for metadata access
 * @return a proxy wrapping the bean, or the raw bean instance as-is
 */
protected Object wrapIfNecessary(Object bean, String beanName, Object cacheKey) {


    if (StringUtils.hasLength(beanName) && this.targetSourcedBeans.contains(beanName)) {


        return bean;
    }
    if (Boolean.FALSE.equals(this.advisedBeans.get(cacheKey))) {


        return bean;
    }
    if (isInfrastructureClass(bean.getClass()) || shouldSkip(bean.getClass(), beanName)) {


        this.advisedBeans.put(cacheKey, Boolean.FALSE);
        return bean;
    }

    // Create proxy if we have advice.
    //返回当前bean的advisor、advice、interceptor
    Object[] specificInterceptors = getAdvicesAndAdvisorsForBean(bean.getClass(), beanName, null);
    if (specificInterceptors != DO_NOT_PROXY) {


        this.advisedBeans.put(cacheKey, Boolean.TRUE);
        // 重点在这,创建代理
        // 两种方式:CGLIB动态代理和JDK代理
        Object proxy = createProxy(
                bean.getClass(), beanName, specificInterceptors, new SingletonTargetSource(bean));
        this.proxyTypes.put(cacheKey, proxy.getClass());
        return proxy;
    }

    this.advisedBeans.put(cacheKey, Boolean.FALSE);
    return bean;
}
6、createProxy过程
代理对象由createProxy方法创建,具体继续跟源码:
/**
 * Create an AOP proxy for the given bean.
 * @param beanClass the class of the bean
 * @param beanName the name of the bean
 * @param specificInterceptors the set of interceptors that is
 * specific to this bean (may be empty, but not null)
 * @param targetSource the TargetSource for the proxy,
 * already pre-configured to access the bean
 * @return the AOP proxy for the bean
 * @see #buildAdvisors
 */
protected Object createProxy(Class<?> beanClass, @Nullable String beanName,
        @Nullable Object[] specificInterceptors, TargetSource targetSource) {


    if (this.beanFactory instanceof ConfigurableListableBeanFactory) {


        AutoProxyUtils.exposeTargetClass((ConfigurableListableBeanFactory) this.beanFactory, beanName, beanClass);
    }

    // 创建ProxyFactory实例,创建AopProxy工作交给ProxyFactory
    ProxyFactory proxyFactory = new ProxyFactory();
    proxyFactory.copyFrom(this);

    // proxyTargetClass = false 默认不开启,默认是使用JDK代理的
    // @EnableAspectJAutoProxy(proxyTargetClass = false) 或者 <aop:config proxy-target-class="false">
    if (!proxyFactory.isProxyTargetClass()) {


        if (shouldProxyTargetClass(beanClass, beanName)) {


            // 实现ConfigurableListableBeanFactory接口,
            // 而且org.springframework.aop.TargetSource#@see shouldProxyTargetClass返回true
            proxyFactory.setProxyTargetClass(true);
        }
        else {


            // 两种情况:1、有接口的,调用一次或多次:proxyFactory.addInterface(ifc);
            // 2. 没有接口的,调用:proxyFactory.setProxyTargetClass(true);
            evaluateProxyInterfaces(beanClass, proxyFactory);
        }
    }
    // 构建当前 bean 的 advisors 数组,把指定和通⽤拦截对象合并, 并都适配成Advisor
    Advisor[] advisors = buildAdvisors(beanName, specificInterceptors);
    proxyFactory.addAdvisors(advisors);
    // 设置参数
    proxyFactory.setTargetSource(targetSource);
    customizeProxyFactory(proxyFactory);

    proxyFactory.setFrozen(this.freezeProxy);
    if (advisorsPreFiltered()) {


        proxyFactory.setPreFiltered(true);
    }
    // 通过proxyFactory获取代理对象,开始创建AopProxy工作
    return proxyFactory.getProxy(getProxyClassLoader());
}
ok,跟到这里,已经知道了一条信息代理对象是给ProxyFactory创建的
7、AopProxy创建
next,看看aopProxy怎么创建的
/**
 * Create a new proxy according to the settings in this factory.
 * <p>Can be called repeatedly. Effect will vary if we've added
 * or removed interfaces. Can add and remove interceptors.
 * <p>Uses the given class loader (if necessary for proxy creation).
 * @param classLoader the class loader to create the proxy with
 * (or {@code null} for the low-level proxy facility's default)
 * @return the proxy object
 */
public Object getProxy(@Nullable ClassLoader classLoader) {


    return createAopProxy().getProxy(classLoader);
}
createAopProxy:
/**
 * Subclasses should call this to get a new AOP proxy. They should <b>not</b>
 * create an AOP proxy with {@code this} as an argument.
 */
protected final synchronized AopProxy createAopProxy() {


    if (!this.active) {


        activate();
    }
    // 通过AopProxyFactory创建AopProxy
    return getAopProxyFactory().createAopProxy(this);
}
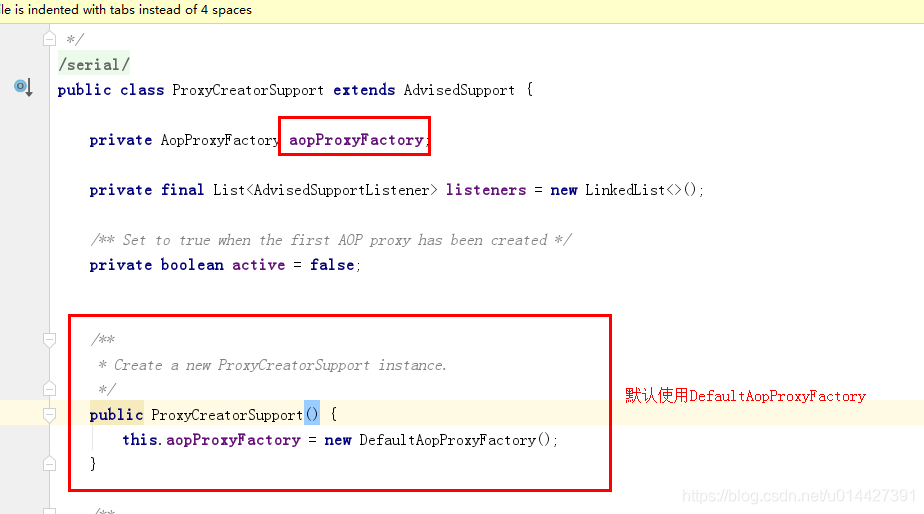
getAopProxyFactory返回的是DefaultAopProxyFactory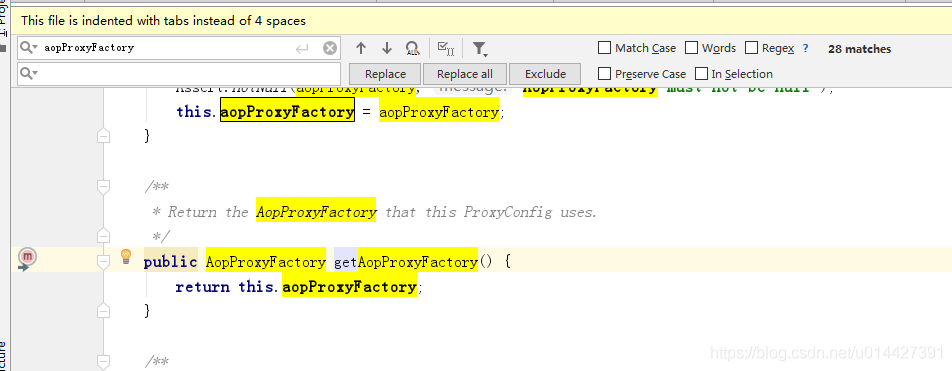
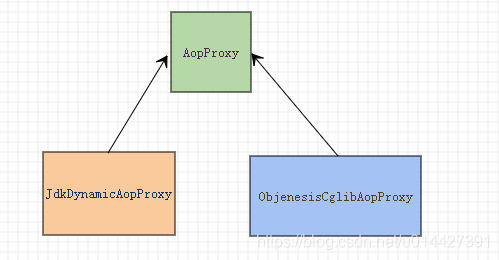
两个重要的代理对象:JdkDynamicAopProxy、ObjenesisCglibAopProxy
public class DefaultAopProxyFactory implements AopProxyFactory, Serializable {


    @Override
    public AopProxy createAopProxy(AdvisedSupport config) throws AopConfigException {


        if (config.isOptimize() || config.isProxyTargetClass() || hasNoUserSuppliedProxyInterfaces(config)) {


            Class<?> targetClass = config.getTargetClass();
            if (targetClass == null) {


                throw new AopConfigException("TargetSource cannot determine target class: " +
                        "Either an interface or a target is required for proxy creation.");
            }
            // 是接口(Interface)或者什么参数都不设置的情况使用JDK动态代理
            if (targetClass.isInterface() || Proxy.isProxyClass(targetClass)) {


                return new JdkDynamicAopProxy(config);
            }
            // 不是接口 proxyTargetClass为true的情况才使用CGLIB动态代理
            return new ObjenesisCglibAopProxy(config);
        }
        else {


            // JDK动态代理(默认)
            return new JdkDynamicAopProxy(config);
        }
    }

    /**
     * Determine whether the supplied {@link AdvisedSupport} has only the
     * {@link org.springframework.aop.SpringProxy} interface specified
     * (or no proxy interfaces specified at all).
     */
    private boolean hasNoUserSuppliedProxyInterfaces(AdvisedSupport config) {


        Class<?>[] ifcs = config.getProxiedInterfaces();
        return (ifcs.length == 0 || (ifcs.length == 1 && SpringProxy.class.isAssignableFrom(ifcs[0])));
    }

}
作用情况:
- 是接口(Interface)或者什么参数都不设置的情况使用JDK动态代理
- 不是接口 proxyTargetClass为true的情况才使用CGLIB动态代理
8、创建AOP代理对象
往回看AopProxy是怎么创建代理对象的
/**
 * Create a new proxy according to the settings in this factory.
 * <p>Can be called repeatedly. Effect will vary if we've added
 * or removed interfaces. Can add and remove interceptors.
 * <p>Uses the given class loader (if necessary for proxy creation).
 * @param classLoader the class loader to create the proxy with
 * (or {@code null} for the low-level proxy facility's default)
 * @return the proxy object
 */
public Object getProxy(@Nullable ClassLoader classLoader) {


    //  ⽤ProxyFactory创建AopProxy, 然后⽤AopProxy创建Proxy
    return createAopProxy().getProxy(classLoader);
}
Spring AOP的两张重要代理:JDK动态代理、CGLIB动态代理

8.1、JDK动态代理
{@link org.springframework.aop.framework.JdkDynamicAopProxy#getProxy(java.lang.ClassLoader)}
@Override
public Object getProxy(@Nullable ClassLoader classLoader) {


    if (logger.isDebugEnabled()) {


        logger.debug("Creating JDK dynamic proxy: target source is " + this.advised.getTargetSource());
    }
    Class<?>[] proxiedInterfaces = AopProxyUtils.completeProxiedInterfaces(this.advised, true);
    findDefinedEqualsAndHashCodeMethods(proxiedInterfaces);
    // 获取代理实例 调用了JDK API进行newProxyInstance,创建实例,
    // 参数:① classLoader,类加载实例  ② proxiedInterfaces,表示需要实现哪些接口
    // ③ this,表示InvocationHandler,JdkDynamicAopProxy实现了InvocationHandler
    return Proxy.newProxyInstance(classLoader, proxiedInterfaces, this);
}
8.2、CGLIB动态代理
{@link org.springframework.aop.framework.CglibAopProxy#getProxy(java.lang.ClassLoader)}
@Override
public Object getProxy(@Nullable ClassLoader classLoader) {


    if (logger.isDebugEnabled()) {


        logger.debug("Creating CGLIB proxy: target source is " + this.advised.getTargetSource());
    }

    try {


        Class<?> rootClass = this.advised.getTargetClass();
        Assert.state(rootClass != null, "Target class must be available for creating a CGLIB proxy");

        Class<?> proxySuperClass = rootClass;
        if (ClassUtils.isCglibProxyClass(rootClass)) {


            proxySuperClass = rootClass.getSuperclass();
            Class<?>[] additionalInterfaces = rootClass.getInterfaces();
            for (Class<?> additionalInterface : additionalInterfaces) {


                this.advised.addInterface(additionalInterface);
            }
        }

        // Validate the class, writing log messages as necessary.
        // 校验proxySuperClass,同时写日志
        validateClassIfNecessary(proxySuperClass, classLoader);

        // Configure CGLIB Enhancer...
        // 配置CGLIB增强
        Enhancer enhancer = createEnhancer();
        if (classLoader != null) {


            enhancer.setClassLoader(classLoader);
            if (classLoader instanceof SmartClassLoader &&
                    ((SmartClassLoader) classLoader).isClassReloadable(proxySuperClass)) {


                enhancer.setUseCache(false);
            }
        }
        enhancer.setSuperclass(proxySuperClass);
        enhancer.setInterfaces(AopProxyUtils.completeProxiedInterfaces(this.advised));
        enhancer.setNamingPolicy(SpringNamingPolicy.INSTANCE);
        enhancer.setStrategy(new ClassLoaderAwareUndeclaredThrowableStrategy(classLoader));

        Callback[] callbacks = getCallbacks(rootClass);
        Class<?>[] types = new Class<?>[callbacks.length];
        for (int x = 0; x < types.length; x++) {


            types[x] = callbacks[x].getClass();
        }
        // fixedInterceptorMap only populated at this point, after getCallbacks call above
        enhancer.setCallbackFilter(new ProxyCallbackFilter(
                this.advised.getConfigurationOnlyCopy(), this.fixedInterceptorMap, this.fixedInterceptorOffset));
        enhancer.setCallbackTypes(types);

        // Generate the proxy class and create a proxy instance.
        // ⽣成代理类,并且创建⼀个代理类的实例
        return createProxyClassAndInstance(enhancer, callbacks);
    }
    catch (CodeGenerationException | IllegalArgumentException ex) {


        throw new AopConfigException("Could not generate CGLIB subclass of " + this.advised.getTargetClass() +
                ": Common causes of this problem include using a final class or a non-visible class",
                ex);
    }
    catch (Throwable ex) {


        // TargetSource.getTarget() failed
        throw new AopConfigException("Unexpected AOP exception", ex);
    }
}
本文的代码例子可以在github找到下载链接:链接,SpringFramework代码中文注释,可以在我的github找到下载链接:链接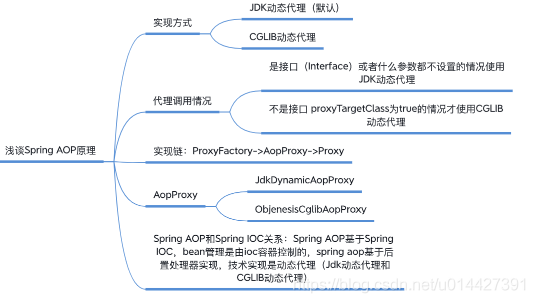
附录参考
优质博客参考:
- https://www.baeldung.com/spring-aop
- https://www.baeldung.com/spring-performance-logging
- https://www.javadoop.com/post/spring-aop-intro
本文同步分享在 博客“smileNicky”(CSDN)。
如有侵权,请联系 support@oschina.cn 删除。
本文参与“OSC源创计划”,欢迎正在阅读的你也加入,一起分享。


