前置说明
编写API文档,可能是最为枯燥无味的工作了,大部分程序猿都不太愿意干这个活,但是大部分人还是苦于没有找到更好的解决方案来处理这个问题,或者之前的代码不允许去做类似的工作,只能老老实实自己去写API。
但是,作为新项目启动,必须提前考虑这个问题,解放程序员双手,让他们撸更多业务代码,而不是整天纠结文档方面的工作。
如果要做到这些,那必须有一个前置条件,那就是你的代码足够规范,实体类命名、注释完备、数据库描述完善。
数据库结构
数据表结构必须规范、字段描述、表描述、主键策略、非空定义
CREATE TABLE `t_website` (
  `id` varchar(32) CHARACTER SET utf8mb4 COLLATE utf8mb4_bin NOT NULL COMMENT '网站ID',
  `name` varchar(255) CHARACTER SET utf8mb4 COLLATE utf8mb4_bin NOT NULL DEFAULT '' COMMENT '网站名称',
  `logo` varchar(255) CHARACTER SET utf8mb4 COLLATE utf8mb4_bin DEFAULT '' COMMENT '网站LOGO',
  PRIMARY KEY (`id`)
) ENGINE=InnoDB DEFAULT CHARSET=utf8mb4 COMMENT='网站信息';
出入参实体
如下,是一个比较规范的入参样本,使用ApiModelProperty描述好了字段的基本信息、是否非空
/**
* <p>
* 语言设置请求类
* </p>
*
* @author 聪明笨狗
* @since 2019-04-13 10:47
*/
@Data
@EqualsAndHashCode(callSuper = false)
@Accessors(chain = true)
@ApiModel(value="网站信息", description="网站信息")
public class WebsiteReqDTO implements Serializable {

    private static final long serialVersionUID = 1L;


    @ApiModelProperty(value = "网站ID", required=true)
    private String id;

    @ApiModelProperty(value = "网站名称", required=true)
    private String name;

    @ApiModelProperty(value = "网站LOGO")
    private String logo;

}
控制器类
如下,是一个比较规范的Controller控制器类
/**
* <p>
* 语言设置控制器
* </p>
*
* @author 聪明笨狗
* @since 2019-04-13 10:47
*/
@Api(tags={"网站信息"})
@Controller
@RequestMapping("/admin/website")
public class WebsiteController extends BaseController {

    @Autowired
    private WebsiteService baseService;

    /**
    * 添加
    * @param reqDTO
    * @return
    */
    @ResponseBody
    @ApiOperation(value = "添加")
    @RequestMapping(value = "/add", method = { RequestMethod.POST})
    public ApiRest<WebsiteRespDTO> add(@RequestBody WebsiteReqDTO reqDTO) {
        //保存数据并返回数据
    }

    /**
    * 根据ID修改
    * @param reqDTO
    * @return
    */
    @ResponseBody
    @ApiOperation(value = "根据ID修改")
    @RequestMapping(value = "/update", method = { RequestMethod.POST})
    public ApiRest edit(@RequestBody WebsiteReqDTO reqDTO) {
        //保存数据并返回数据
    }

    /**
    * 批量删除
    * @param reqDTO
    * @return
    */
    @ResponseBody
    @ApiOperation(value = "批量删除")
    @RequestMapping(value = "/delete", method = { RequestMethod.POST})
    public ApiRest edit(@RequestBody DeleteReqDTO reqDTO) {
        //删除数据并返回结果
    }

    /**
    * 查找详情
    * @param reqDTO
    * @return
    */
    @ResponseBody
    @ApiOperation(value = "查找详情")
    @RequestMapping(value = "/detail", method = { RequestMethod.POST})
    public ApiRest<WebsiteRespDTO> find(@RequestBody FindReqDTO reqDTO) {
       //返回详情数据
    }

}
Swagger配置
Swagger2.java
/**
 * Swagger2配置
 */
@Configuration
@EnableSwagger2
@ConfigurationProperties(prefix = "swagger")
public class Swagger2 {

    private static final String BASE_PACKAGE = "com.mycompany";
    @Value("${swagger.enable}")
    private boolean enableSwagger;

    @Bean
    public Docket helloDocket() {
        return new Docket(DocumentationType.SWAGGER_2)
                //用于分组功能,也可以不配置
                .groupName("admin")
                //注册整体api信息
                .apiInfo(apiInfo())
                //swagger功能是否启用,可以通过配置设置,也可以先写死
                .enable(enableSwagger)
                .select()
                //指定扫描的包
                .apis(RequestHandlerSelectors.basePackage(BASE_PACKAGE))
                //设置此组只匹配admin/**的请求
                .paths(PathSelectors.ant("/admin/**"))
                .build();
    }


    private ApiInfo apiInfo() {
        return new ApiInfoBuilder().title("后台管理项目")
                .description("通用的CRUD")
                .contact(new Contact("Van", "", ""))
                .version("1.0.0")
                .build();
    }
pom.xml
<!-- 引入swagger2包 -->
<dependency>
    <groupId>io.springfox</groupId>
    <artifactId>springfox-swagger2</artifactId>
    <version>2.9.2</version>
</dependency>

<!-- 引入自带UI,可选-->
<dependency>
    <groupId>io.springfox</groupId>
    <artifactId>springfox-swagger-ui</artifactId>
    <version>2.9.2</version>
</dependency>
以上配置好以后就OK了,项目启动以后,通过以下URL可以访问到API文档的JSON数据:
带分组的:
http://localhost:8080/v2/api-docs?group=admin
不带分组的:
http://localhost:8080/v2/api-docs
访问URL返回以下JSON:
{
    "swagger": "2.0",
    "info": {
        "description": "通用的CRUD",
        "version": "1.0.0",
        "title": "后台管理项目",
        "contact": {
            "name": "Van"
        }
    },
    "host": "127.0.0.1:8080",
    "basePath": "/",
    "tags": [{
        "name": "网站信息",
        "description": "WebsiteController"
    }],
    "paths": {
        "/admin/website/add": {
            "post": {
                "tags": ["网站信息"],
                "summary": "添加",
                "operationId": "addUsingPOST",
                "consumes": ["application/json"],
                "produces": ["*/*"],
                "parameters": [{
                    "in": "body",
                    "name": "reqDTO",
                    "description": "reqDTO",
                    "required": true,
                    "schema": {
                        "$ref": "#/definitions/网站信息"
                    }
                }],
                "responses": {
                    "200": {
                        "description": "OK",
                        "schema": {
                            "$ref": "#/definitions/接口响应"
                        }
                    },
                    "201": {
                        "description": "Created"
                    },
                    "401": {
                        "description": "Unauthorized"
                    },
                    "403": {
                        "description": "Forbidden"
                    },
                    "404": {
                        "description": "Not Found"
                    }
                },
                "deprecated": false
            }
        },
        "/admin/website/delete": {
            "post": {
                "tags": ["网站信息"],
                "summary": "批量删除",
                "operationId": "editUsingPOST",
                "consumes": ["application/json"],
                "produces": ["*/*"],
                "parameters": [{
                    "in": "body",
                    "name": "reqDTO",
                    "description": "reqDTO",
                    "required": true,
                    "schema": {
                        "$ref": "#/definitions/删除参数"
                    }
                }],
                "responses": {
                    "200": {
                        "description": "OK",
                        "schema": {
                            "$ref": "#/definitions/接口响应"
                        }
                    },
                    "201": {
                        "description": "Created"
                    },
                    "401": {
                        "description": "Unauthorized"
                    },
                    "403": {
                        "description": "Forbidden"
                    },
                    "404": {
                        "description": "Not Found"
                    }
                },
                "deprecated": false
            }
        },
        "/admin/website/detail": {
            "post": {
                "tags": ["网站信息"],
                "summary": "查找详情",
                "operationId": "findUsingPOST",
                "consumes": ["application/json"],
                "produces": ["*/*"],
                "parameters": [{
                    "in": "body",
                    "name": "reqDTO",
                    "description": "reqDTO",
                    "required": true,
                    "schema": {
                        "$ref": "#/definitions/查询参数"
                    }
                }],
                "responses": {
                    "200": {
                        "description": "OK",
                        "schema": {
                            "$ref": "#/definitions/接口响应«网站信息»"
                        }
                    },
                    "201": {
                        "description": "Created"
                    },
                    "401": {
                        "description": "Unauthorized"
                    },
                    "403": {
                        "description": "Forbidden"
                    },
                    "404": {
                        "description": "Not Found"
                    }
                },
                "deprecated": false
            }
        },

        "/admin/website/update": {
            "post": {
                "tags": ["网站信息"],
                "summary": "根据ID修改",
                "operationId": "editUsingPOST_1",
                "consumes": ["application/json"],
                "produces": ["*/*"],
                "parameters": [{
                    "in": "body",
                    "name": "reqDTO",
                    "description": "reqDTO",
                    "required": true,
                    "schema": {
                        "$ref": "#/definitions/网站信息"
                    }
                }],
                "responses": {
                    "200": {
                        "description": "OK",
                        "schema": {
                            "$ref": "#/definitions/接口响应"
                        }
                    },
                    "201": {
                        "description": "Created"
                    },
                    "401": {
                        "description": "Unauthorized"
                    },
                    "403": {
                        "description": "Forbidden"
                    },
                    "404": {
                        "description": "Not Found"
                    }
                },
                "deprecated": false
            }
        }
    },
    "definitions": {


        "删除参数": {
            "type": "object",
            "required": ["ids"],
            "properties": {
                "ids": {
                    "type": "array",
                    "description": "要删除的ID列表",
                    "items": {
                        "type": "string"
                    }
                }
            },
            "title": "删除参数",
            "description": "删除参数"
        },
        "接口响应": {
            "type": "object",
            "required": ["code"],
            "properties": {
                "code": {
                    "type": "integer",
                    "format": "int32",
                    "description": "响应代码,0为成功,1为失败"
                },
                "data": {
                    "type": "object",
                    "description": "响应内容"
                },
                "msg": {
                    "type": "string",
                    "description": "响应消息"
                },
                "success": {
                    "type": "boolean"
                }
            },
            "title": "接口响应",
            "description": "接口响应"
        },

        "接口响应«List«网站信息»»": {
            "type": "object",
            "required": ["code"],
            "properties": {
                "code": {
                    "type": "integer",
                    "format": "int32",
                    "description": "响应代码,0为成功,1为失败"
                },
                "data": {
                    "type": "array",
                    "description": "响应内容",
                    "items": {
                        "$ref": "#/definitions/网站信息"
                    }
                },
                "msg": {
                    "type": "string",
                    "description": "响应消息"
                },
                "success": {
                    "type": "boolean"
                }
            },
            "title": "接口响应«List«网站信息»»",
            "description": "接口响应"
        },
        "接口响应«网站信息»": {
            "type": "object",
            "required": ["code"],
            "properties": {
                "code": {
                    "type": "integer",
                    "format": "int32",
                    "description": "响应代码,0为成功,1为失败"
                },
                "data": {
                    "description": "响应内容",
                    "$ref": "#/definitions/网站信息"
                },
                "msg": {
                    "type": "string",
                    "description": "响应消息"
                },
                "success": {
                    "type": "boolean"
                }
            },
            "title": "接口响应«网站信息»",
            "description": "接口响应"
        },
        "查询参数": {
            "type": "object",
            "required": ["id"],
            "properties": {
                "id": {
                    "type": "string",
                    "description": "要查询的ID"
                }
            },
            "title": "查询参数",
            "description": "查询参数"
        },
        "网站信息": {
            "type": "object",
            "required": ["code", "id", "name", "state"],
            "properties": {
                "id": {
                    "type": "string",
                    "description": "网站ID"
                },
                "name": {
                    "type": "string",
                    "description": "网站名称"
                },
                "logo": {
                    "type": "string",
                    "description": "网站LOGO"
                }
            },
            "title": "网站信息",
            "description": "网站信息"
        }
    }
}
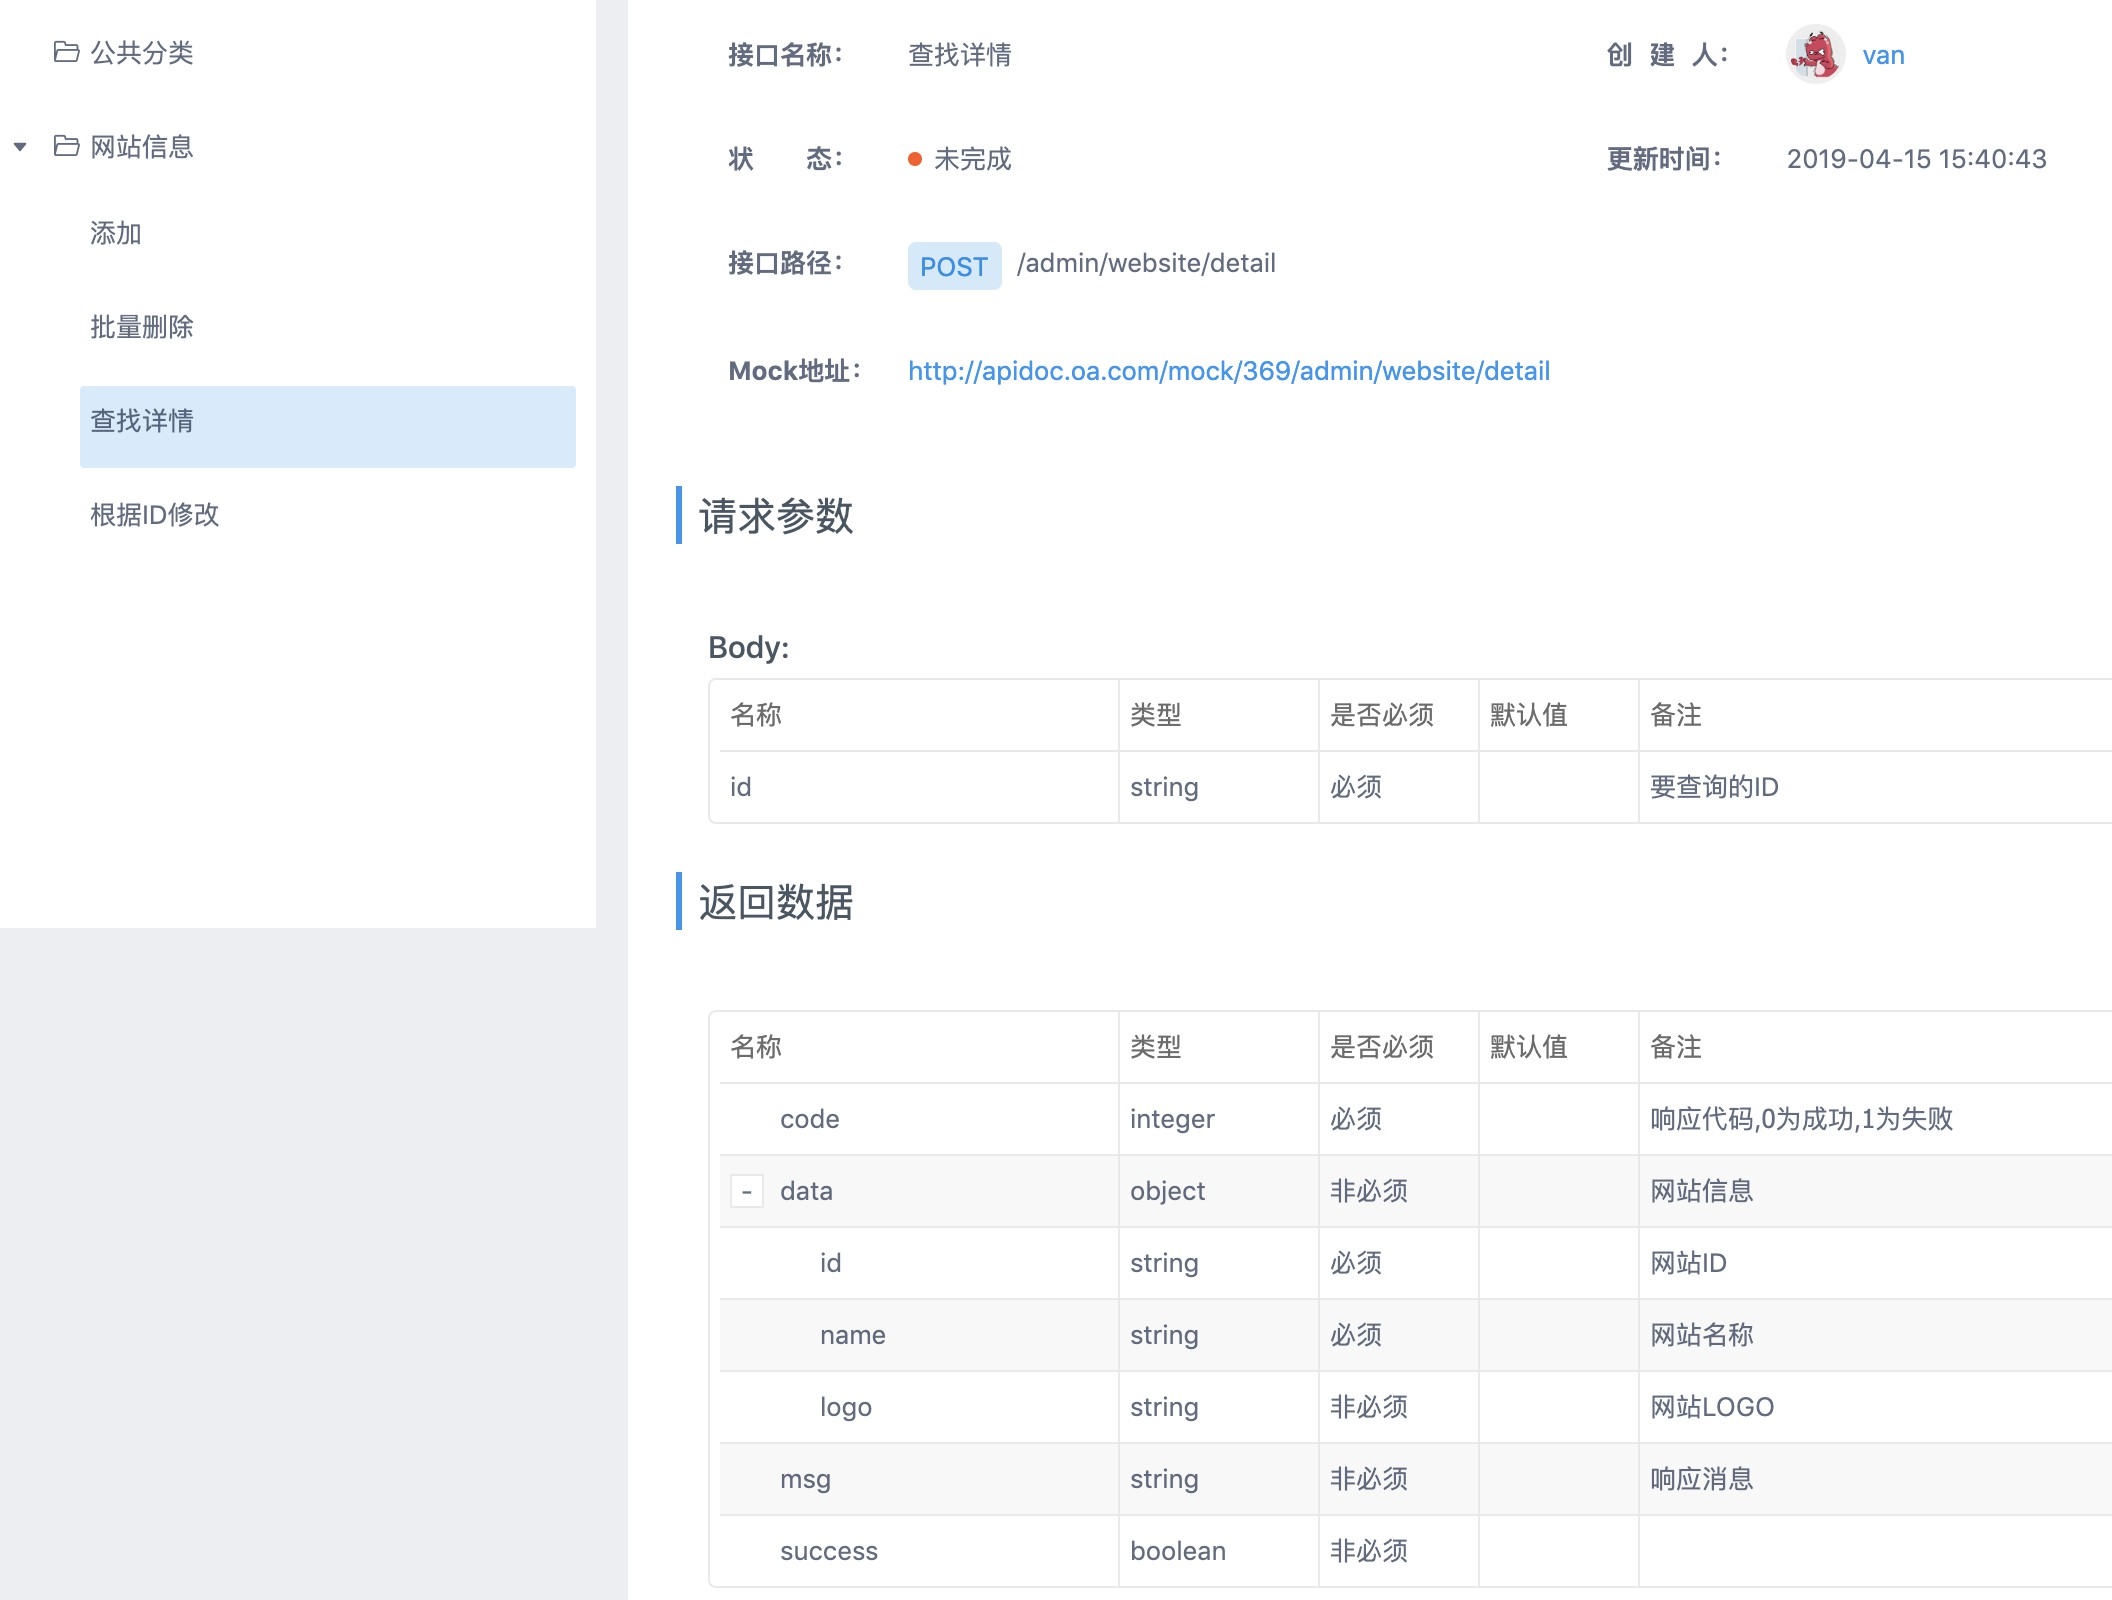
导入接口到YAPI
切换到YAPI的数据管理选项卡
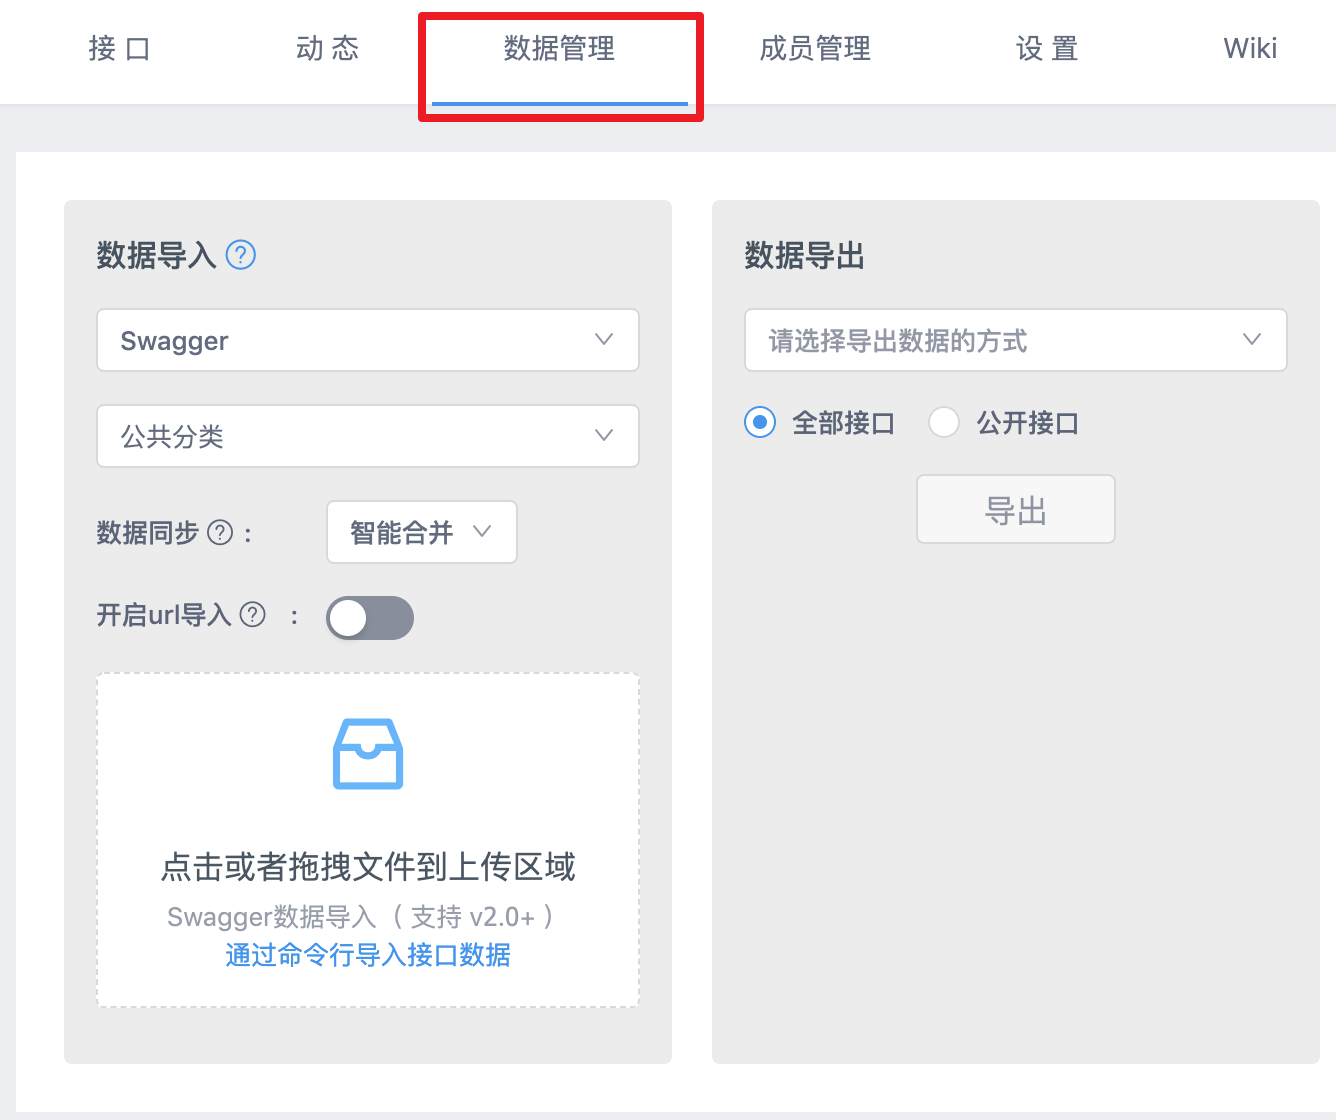
有两种方式导入YAPI
1、将JSON保存到文件,上传。
2、如果你的项目有外网URL的话,直接开启URL导入。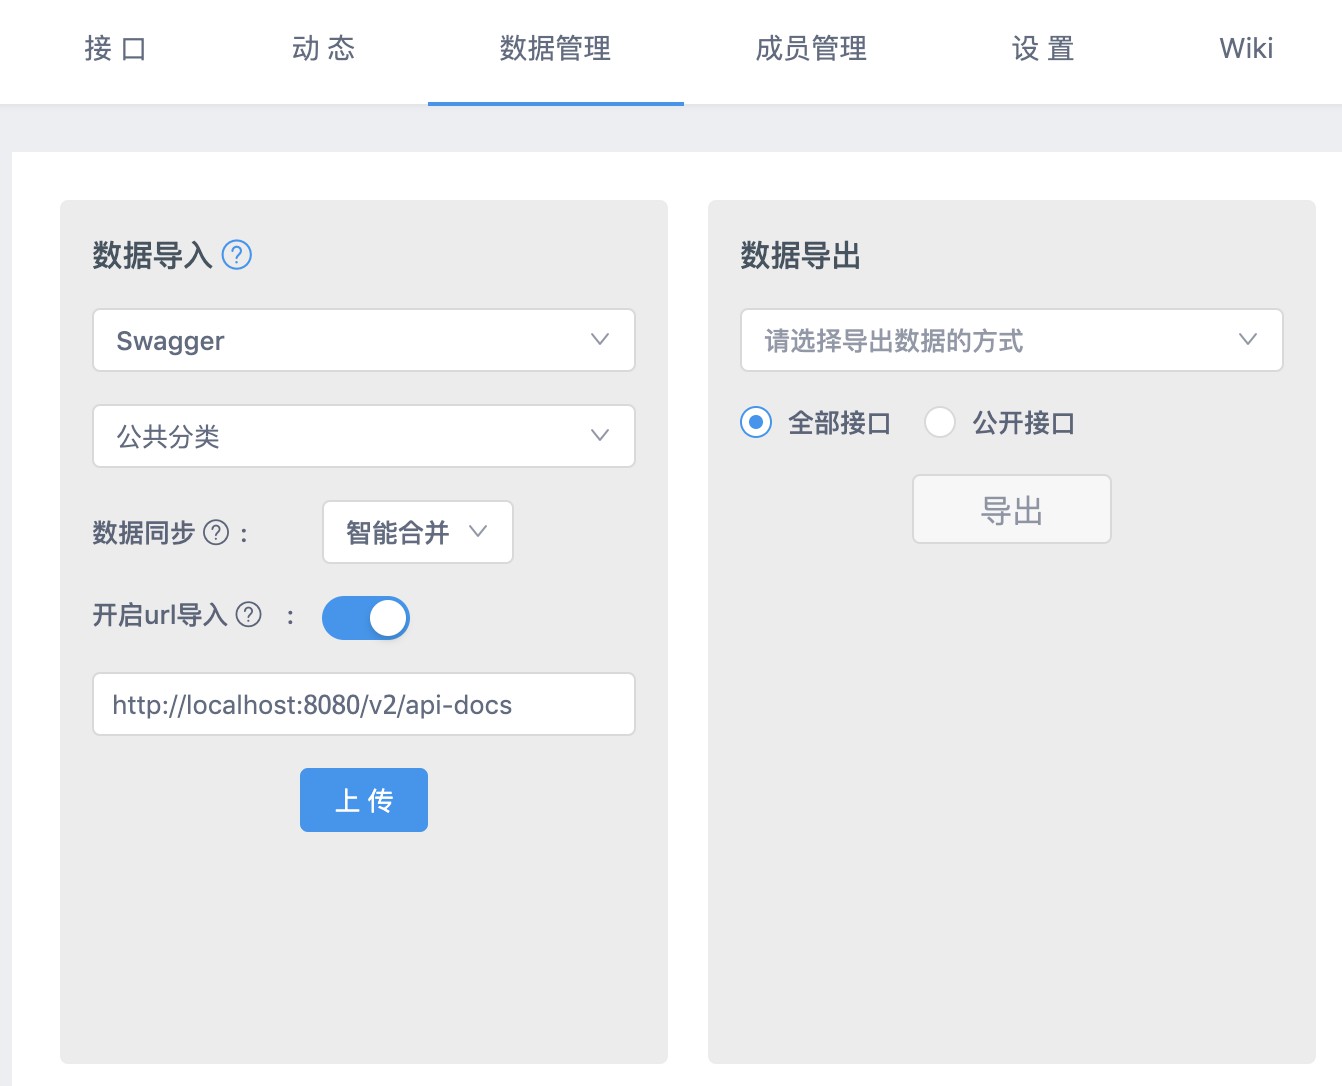
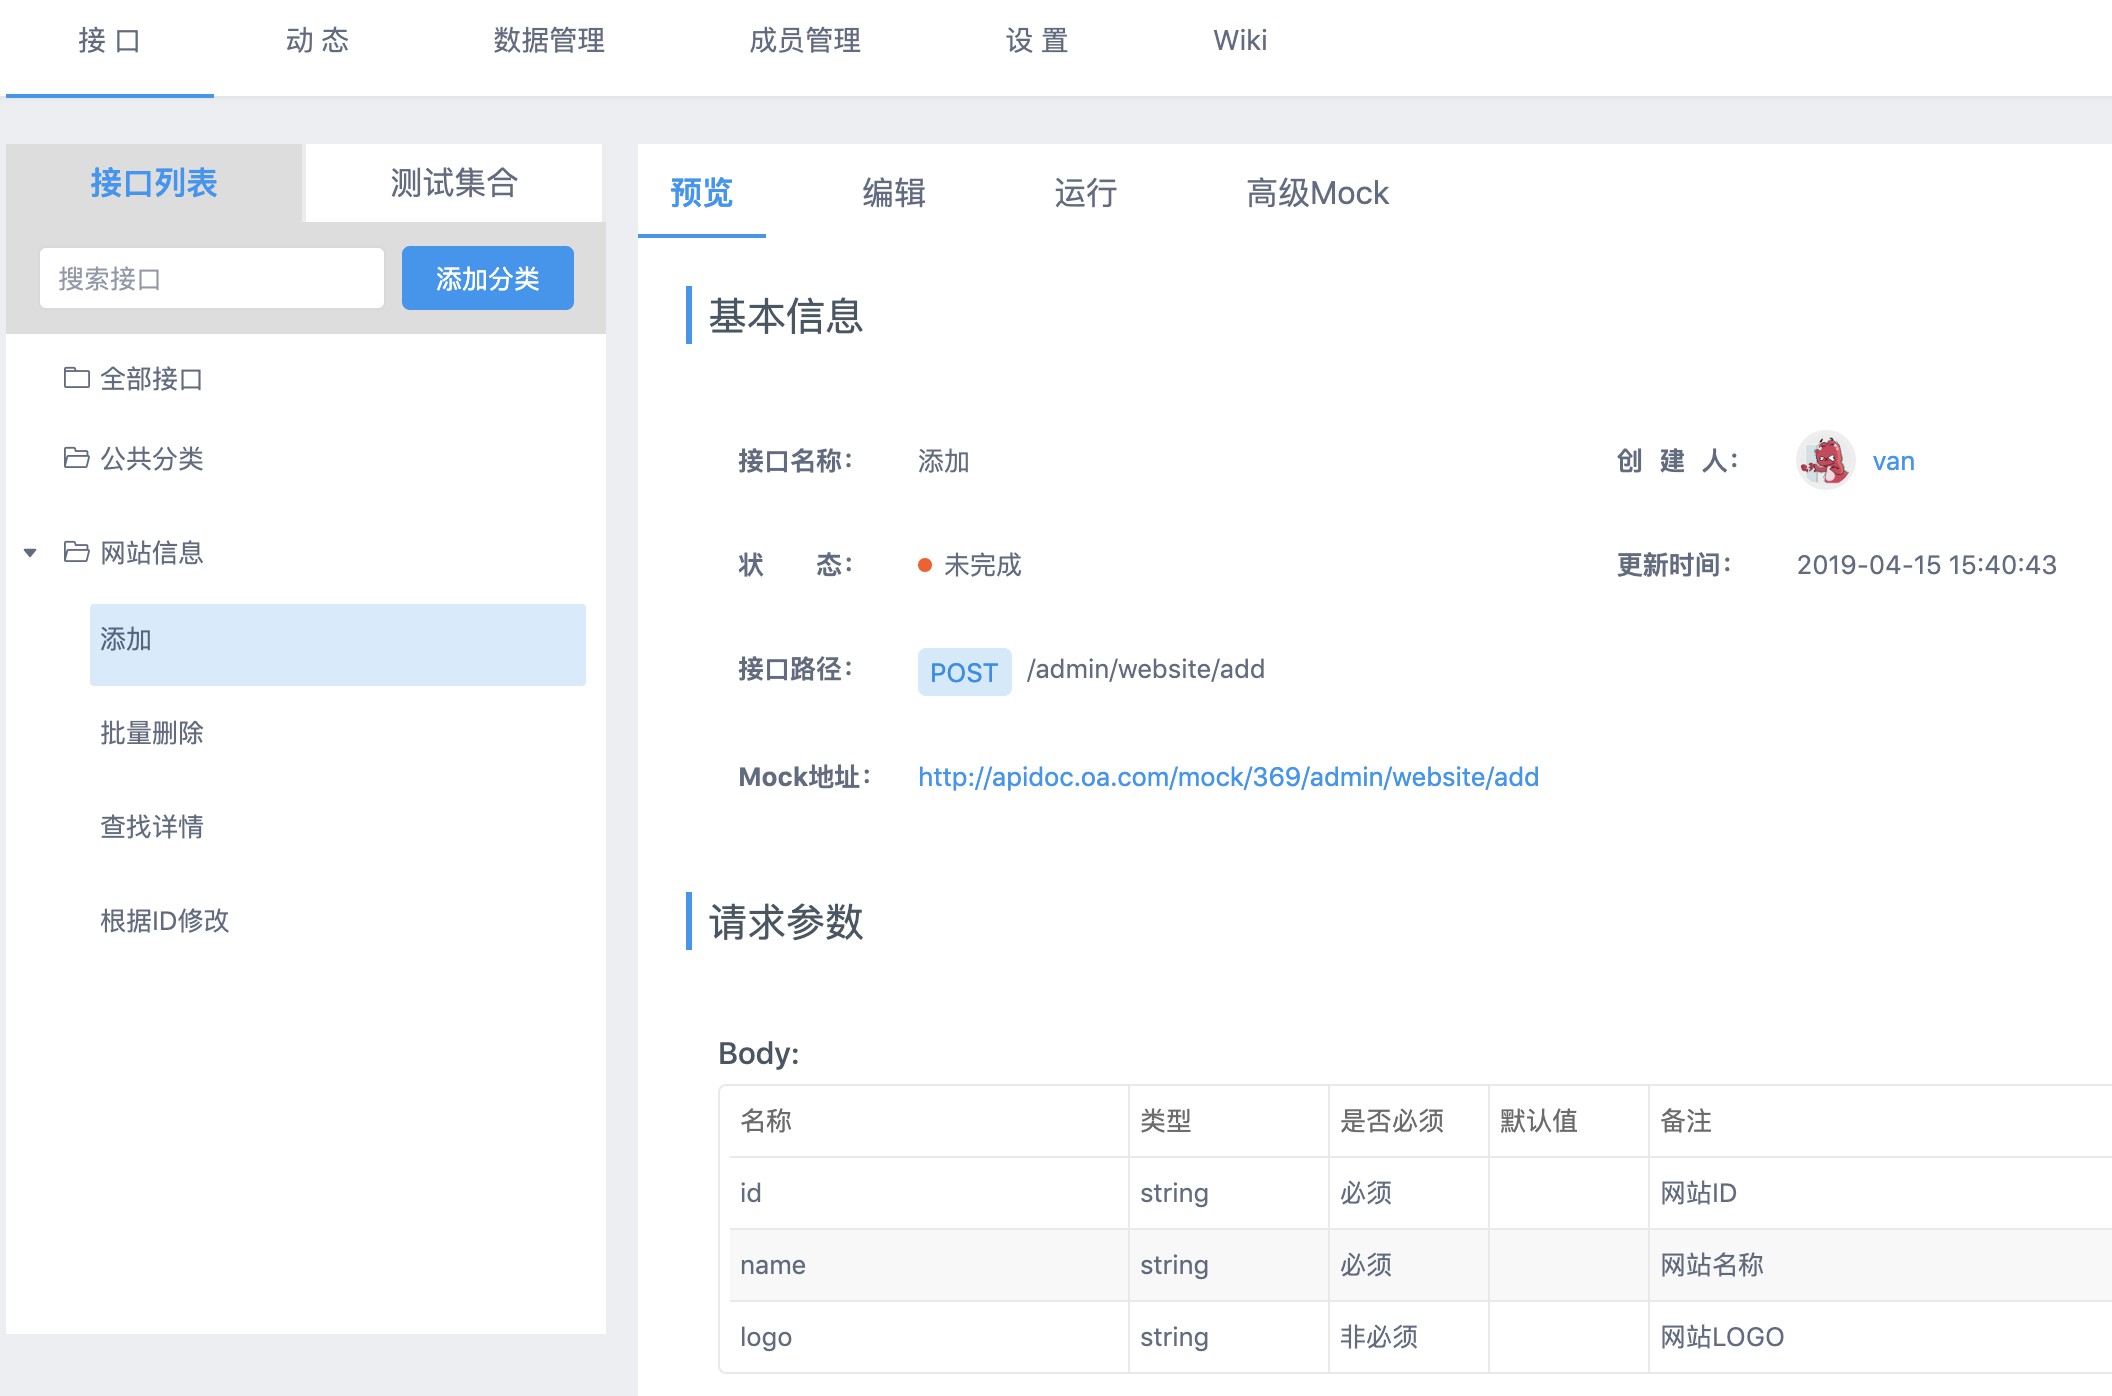
导入好的接口
总结
只要你的代码足够规范,使用此方案进行文档导入,可以节省90%的文档工作量,生成的内容只需要少量修改就可以直接交于前端同事对接,是不是美滋滋?
另外提供一个自己写的SpringCloud代码生成器,只需要要贴入建表语句,即可一键生成符合规范的DTO/Entity/Controller/Service/Mapper/
注:以上部分内容经过加工,只做演示用,并非真实代码


