1.去掉APP顶部标题栏
(1)打开 res -> values -> styles;
 (2)修改 DarkActionBar 为 NoActionBar。
默认AppTheme:
<style name="AppTheme" parent="Theme.AppCompat.Light.DarkActionBar">修改后的AppTheme:
<style name="AppTheme" parent="Theme.AppCompat.Light.NoActionBar">2.TextView实现文字自动轮播实现
效果图如下,
 首先最简单的两个动画,写在了XML里面,当然也可以写到java中,
第一个in_animation.xml,第二个out_animation.xml,
第一步:Android里面已经有了TextSwitcher这个类,我们继承这个类,实现ViewSwitcher.ViewFactory提供的创建TextView的方法即可;
第二步:为了实现轮播,当然是每隔一个时间段就播放一次的效果,我们可以使用Timer定时器,每隔几秒发送一个Message给Handler,handler接受到消息开始更新文字。
具体参考https://blog.csdn.net/cpcpcp123/article/details/82049660,讲解较详细。
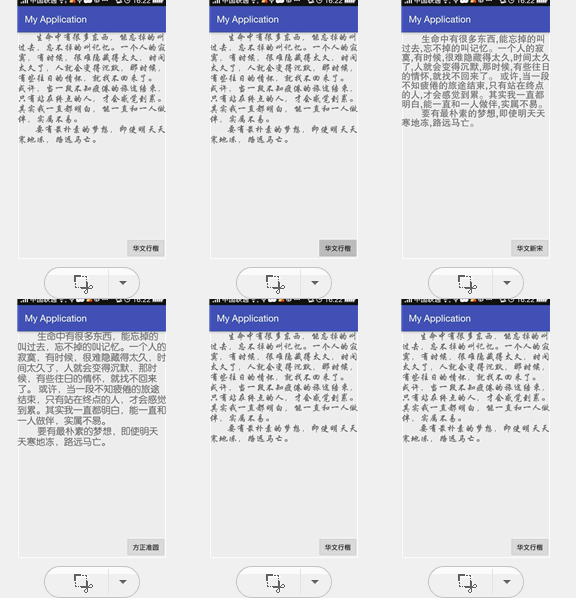
3.Android TextView字体设置
 核心代码
核心代码
Typeface mtypeface=Typeface.createFromAsset(getAssets(),"huawencaiyunv.TTF");
mTextViewContent.setTypeface(mtypeface);
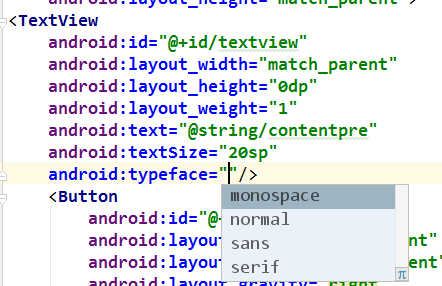
通过这种方式改变字体,会占用应用内存,因此一般不推荐使用这种方式,通过下图可以看到,实际上TextView本身自带有几种字体。
 具体可参考https://blog.csdn.net/mp624183768/article/details/79044063。
4.设置TextView文字内容大小颜色
(1)第一种方法在activity_main.xml李设置,Java文件不用改:
android:text="文字"
android:textSize="字体大小"
android:textColor="颜色"
(2)第二种方法,在MainActivity.java文件里设置,xml不用改:
text.setText("欲穷千里目,更上一层楼");//设置文字内容
text.setTextColor(Color.parseColor("#ff5e9cff"));//设置颜色
text.setTextSize(30);;//设置字体大小
5.ImageView 宽度设定,高度自适应
首先,需要给你的ImageView布局加上android:adjustViewBounds="true"
<ImageView android:id="@+id/test_image"
android:layout_width="wrap_content"
android:layout_height="wrap_content"
android:scaleType="fitXY"
android:adjustViewBounds="true"
android:layout_gravity="center"
android:contentDescription="@string/app_name"
android:src="@drawable/ic_launcher" />
然后,在代码里设置ImageView.最大宽度和最大高度,因为adjustViewBounds属性只有在设置了最大高度和最大宽度后才会起作用
int screenWidth = getScreenWidth(this);
ViewGroup.LayoutParams lp = testImage.getLayoutParams();
lp.width = screenWidth;
lp.height = LayoutParams.WRAP_CONTENT;
testImage.setLayoutParams(lp);
testImage.setMaxWidth(screenWidth);
testImage.setMaxHeight(screenWidth * 5); //这里其实可以根据需求而定,我这里测试为最大宽度的5倍具体可参考https://www.cnblogs.com/bcbr/articles/4268276.html
6.使用百度地图SDK获取定位信息
第一步,注册百度账号,在百度地图开放平台新建应用、生成API_KEY; 第二步,下载sdk; 第三步,建立Android Studio工程,配置环境; 第四步,将BaiduLBS_Android.jar加入环境变量(右键,Add As Library),并在app的build.gradle中的android中添加; 第五步,在AndroidManifest.xml文件中声明权限,并在application标签中添加内容; 第六步,测试代码,获取定位信息。 具体过程可参考https://www.jb51.net/article/105089.htm。
7.Android设置EditText默认取消焦点
在EditText的父控件中,添加两个属性即可, 如下,
android:focusable="true"
android:focusableInTouchMode="true"
添加后的实例如下,
<RelativeLayout
    android:layout_width="match_parent"
    android:layout_height="wrap_content"
    android:focusable="true"
    android:focusableInTouchMode="true">
    <EditText
        android:layout_width="match_parent"
        android:layout_height="80dp"
        android:gravity="top"
        android:imeOptions="actionDone"
        android:inputType="text"
        android:padding="4dp"
        android:text="测试文本内容"
        android:textSize="16sp" />
</RelativeLayout>可参考https://www.jianshu.com/p/83e816600667
8.自定义美观的SeekBar
SeekBar有两个属性progressDrawable和thumb,可以用来定义进度条和滑动块的样式,可自定义.xml文件来达到自己想要的美观效果,具体可参考 https://blog.csdn.net/sunbinkang/article/details/78999003和https://blog.csdn.net/qq_43377749/article/details/84841008
9.复制文本内容到系统剪贴板
(1)获取剪贴板管理器:
ClipboardManager mClipboardManager =(ClipboardManager)getSystemService(Context.CLIPBOARD_SERVICE);(2)创建能够存入剪贴板的ClipData对象(ClipData对象中包含一个或多个ClipData.Item对象):
//创建普通字符型ClipData,‘Label’这是任意文字标签
ClipData mClipData =ClipData.newPlainText("Label", "Content");
// 创建URL型ClipData:
ClipData.newRawUri("Label",Uri.parse("http://www.baidu.com"));
//创建Intent型ClipData:
ClipData.newIntent("Label", intent);
注意,上面三种方法只在ClipData对象中创建了一个ClipData.Item对象,如果想向ClipData对象中添加多个Item应该通过ClipData对象的addItem()方法添加。 (3)将ClipData数据复制到剪贴板:
ClipboardManager.setPrimaryClip(ClipData对象);(4)从剪贴板中获取ClipData数据:
ClipboardManager.getPrimaryClip();例子如下,
public class MainActivity extends Activity implements OnClickListener {
    private EditText copy_edt, paste_edt;
    private Button copy_btn, paste_btn;
    //剪切板管理工具类
    private ClipboardManager mClipboardManager;
    //剪切板Data对象
    private ClipData mClipData;

    @Override
    protected void onCreate(Bundle savedInstanceState) {
        super.onCreate(savedInstanceState);
        setContentView(R.layout.activity_main);
        mClipboardManager = (ClipboardManager) getSystemService(CLIPBOARD_SERVICE);
        initViews();
        initListeners();
    }

    private void initViews() {
        this.copy_btn = (Button) findViewById(R.id.copy_btn);
        this.paste_btn = (Button) findViewById(R.id.paste_btn);
        this.copy_edt = (EditText) findViewById(R.id.copy_edt);
        this.paste_edt = (EditText) findViewById(R.id.paste_edt);
    }

    private void initListeners() {
        this.copy_btn.setOnClickListener(this);
        this.paste_btn.setOnClickListener(this);
    }

    @Override
    public void onClick(View v) {
        String copy = copy_edt.getText().toString().trim();
        switch (v.getId()) {
        case R.id.copy_btn:
            if (TextUtils.isEmpty(copy)) {
                Toast.makeText(getApplicationContext(), "请输入内容!",
                        Toast.LENGTH_SHORT).show();
                return;
            }
            //创建一个新的文本clip对象
            mClipData = ClipData.newPlainText("Simple test", copy);
            //把clip对象放在剪贴板中
            mClipboardManager.setPrimaryClip(mClipData);
            Toast.makeText(getApplicationContext(), "文本已经复制成功!",
                    Toast.LENGTH_SHORT).show();
            break;
        case R.id.paste_btn:
            //GET贴板是否有内容
            mClipData = mClipboardManager.getPrimaryClip();
            //获取到内容
            ClipData.Item item = mClipData.getItemAt(0);
            String text = item.getText().toString();
            paste_edt.setText(text);
            Toast.makeText(getApplicationContext(), "粘贴成功!s",
                    Toast.LENGTH_SHORT).show();
            break;
        }
    }
}
可参考https://blog.csdn.net/true100/article/details/51123599和https://blog.csdn.net/qq_22078107/article/details/53447905
10.创建带3个按钮的对话框
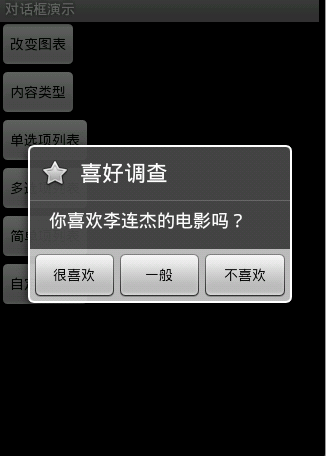
AlertDialog自带3个按钮PositiveButton、NegativeButton、NeutralButton,可以调用setPositiveButton、setNegativeButton、setNeutralButton三个方法来设置监听器,示例如下:
Dialog dialog = new AlertDialog.Builder(this).setIcon(

     android.R.drawable.btn_star).setTitle("喜好调查").setMessage("你喜欢李连杰的电影吗?")
     .setPositiveButton("很喜欢",new OnClickListener() {
          @Override
          public void onClick(DialogInterface dialog, int which) {
               // TODO Auto-generated method stub
               Toast.makeText(Main.this, "我很喜欢他的电影。",Toast.LENGTH_LONG).show();
          }
     })
     .setNegativeButton("不喜欢", new OnClickListener() {
        @Override
        public void onClick(DialogInterface dialog, int which) {
             // TODO Auto-generated method stub
             Toast.makeText(Main.this, "我不喜欢他的电影。", Toast.LENGTH_LONG).show();
        }
   })
   .setNeutralButton("一般", new OnClickListener() {
        @Override
        public void onClick(DialogInterface dialog, int which) {
             // TODO Auto-generated method stub
             Toast.makeText(Main.this, "谈不上喜欢不喜欢。", Toast.LENGTH_LONG).show();
    }
   }).create();
   dialog.show();
效果如图,

本文原文首发来自博客专栏移动应用开发,由本人转发至https://www.helloworld.net/p/dxXhj9sJni51,其他平台均属侵权,可点击https://blog.csdn.net/CUFEECR/article/details/103341336查看原文,也可点击https://blog.csdn.net/CUFEECR浏览更多优质原创内容。


