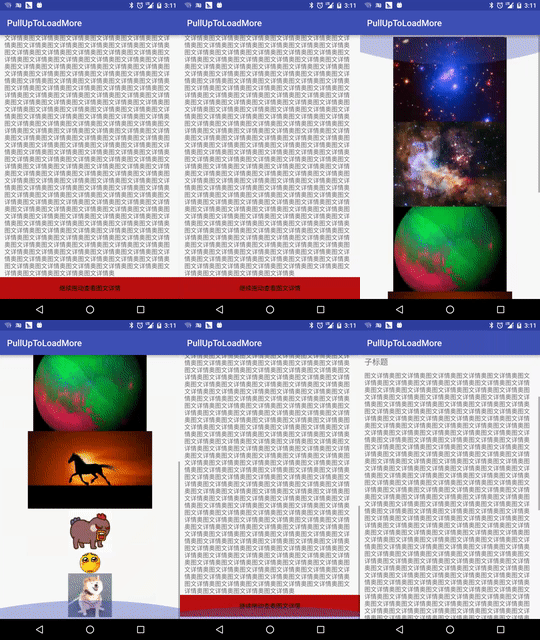
一、淘宝商品详情页效果

我们的效果

二、实现思路
使用两个scrollView,两个scrollView 竖直排列,通过自定义viewGroup来控制两个scrollView的竖直排列,以及滑动事件的处理。如下图
三、具体实现
1、继承viewGroup自定义布局View 重写onMeasure()和onLayout方法,在onLayout方法中完成对两个子ScrollView的竖直排列布局,代码如下:
布局文件:
1
2
3
4
5
6
7
8
9
10
11
12
13
14
15
16
17
18
19
20
21
22
23
24
25
26
27
28
29
30
31
32
33
34
35
36
37
38
39
40
41
42
43
44
45
46
47
48
49
50
51
52
53
54
55
56
57
58
59
60
61
62
63
64
65
66
67
68
69
70
71
72
73
74
75
76
<RelativeLayout xmlns:android= "[http://schemas.android.com/apk/res/android](https://www.oschina.net/action/GoToLink?url=http%3A%2F%2Fschemas.android.com%2Fapk%2Fres%2Fandroid)"
xmlns:tools= "[http://schemas.android.com/tools](https://www.oschina.net/action/GoToLink?url=http%3A%2F%2Fschemas.android.com%2Ftools)"
android:layout_width= "match_parent"
android:layout_height= "match_parent"
tools:context= "com.baoyunlong.view.pulluptoloadmore.MainActivity" >
<com.baoyunlong.view.pulluptoloadmore.PullUpToLoadMore
android:layout_width= "match_parent"
android:layout_height= "match_parent"
android:orientation= "vertical" >
<com.baoyunlong.view.pulluptoloadmore.MyScrollView
android:layout_width= "match_parent"
android:layout_height= "match_parent"
android:fillViewport= "true" >
<LinearLayout
android:layout_width= "match_parent"
android:layout_height= "match_parent"
android:orientation= "vertical" >
<ImageView
android:scaleType= "fitXY"
android:src= "@drawable/a1"
android:layout_width= "match_parent"
android:layout_height= "180dp" />
<TextView
android:text= "这里是标题"
android:textSize= "18dp"
android:layout_marginRight= "10dp"
android:layout_marginLeft= "10dp"
android:layout_marginTop= "10dp"
android:layout_width= "match_parent"
android:layout_height= "wrap_content" />
<TextView
android:layout_marginTop= "10dp"
android:text= "子标题"
android:layout_marginLeft= "10dp"
android:layout_marginRight= "10dp"
android:textSize= "18dp"
android:layout_width= "match_parent"
android:layout_height= "wrap_content" />
..............
<LinearLayout
android:layout_height= "0dp"
android:layout_weight= "1"
android:gravity= "bottom"
android:layout_width= "match_parent" >
<TextView
android:layout_width= "match_parent"
android:layout_height= "wrap_content"
android:height= "50dp"
android:background= "#b11"
android:gravity= "center"
android:text= "继续拖动查看图文详情"
android:textColor= "#000" />
</LinearLayout>
</LinearLayout>
</com.baoyunlong.view.pulluptoloadmore.MyScrollView>
<com.baoyunlong.view.pulluptoloadmore.MyScrollView
android:layout_width= "match_parent"
android:layout_height= "match_parent"
android:fillViewport= "true" >
<LinearLayout
android:layout_width= "match_parent"
android:layout_height= "match_parent"
android:gravity= "center"
android:orientation= "vertical" >
<ImageView
android:layout_width= "wrap_content"
android:layout_height= "wrap_content"
android:src= "@drawable/a1" />
<ImageView
android:layout_width= "wrap_content"
android:layout_height= "wrap_content"
android:src= "@drawable/a3" />
.........
</LinearLayout>
</com.baoyunlong.view.pulluptoloadmore.MyScrollView> </com.baoyunlong.view.pulluptoloadmore.PullUpToLoadMore>
</RelativeLayout>
代码:
1
2
3
4
5
6
7
8
9
10
11
12
13
14
15
16
17
18
19
20
21
22
23
24
25
26
public class PullUpToLoadMore extends ViewGroup {
public PullUpToLoadMore(Context context) {
super (context);
}
public PullUpToLoadMore(Context context, AttributeSet attrs) {
super (context, attrs);
}
public PullUpToLoadMore(Context context, AttributeSet attrs, int defStyleAttr) {
super (context, attrs, defStyleAttr);
}
[@Override](https://my.oschina.net/u/1162528)
protected void onMeasure( int widthMeasureSpec, int heightMeasureSpec) {
super .onMeasure(widthMeasureSpec, heightMeasureSpec);
measureChildren(widthMeasureSpec, heightMeasureSpec);
}
[@Override](https://my.oschina.net/u/1162528)
protected void onLayout( boolean changed, int l, int t, int r, int b) {
int childCount = getChildCount();
int childTop = t;
for ( int i = 0 ; i < childCount; i++) {
View child = getChildAt(i);
child.layout(l, childTop, r, childTop + child.getMeasuredHeight());
childTop += child.getMeasuredHeight();
}
}
}
2、处理滑动事件
规则如下 :
(1)、当处于第一屏时 第一个ScrollView已经滑动到底部并且滑动方向是往上滑动,这个时候滑动事件应该交给父view处理也就是拦截事件让onInterceptTouchEvent返回true.然后父view通过scrollBy()方法滚动,显示出第二个scrollView。
(2)、当处于第二屏时 第二个ScrollView已经滑动到顶部并且滑动方向是往下滑动,这个时候滑动事件交给父view处理,根据滑动事件显示出第一个ScrollView。
(3)、当手指离开屏幕时,根据滑动速度来决定是回弹到第一个ScrollView还是第二个ScrollView,通过VelocityTracker来获取滑动速度。
3、一些细节的处理
(1)、如果仔细看观察淘宝的实现效果你会发现,当你滑动到刚刚看到 “继续拖动,查看图文详情”的时候,手指抬起,然后再按下重新向上拖动你会发现,第二页并不会划出来,而是停留在了“继续拖动,查看图文详情”的底部,京东的效果也是一样。这样用户体验不太好,我们来优化一下。其实通过查看ScrollView的源码可以看出来,这是因为ScrollView类的onTouchEvent方法的默认实现,调用了parent.requestDisallowInterceptTouchEvent(true)方法 阻止了我们拦截事件,导致我们父view的onInterceptTouchEvent方法无法执行,也就拦截不到事件,拦截不到事件我们的onTouchEvent就无法执行,onTouchEvent无法执行,我们写在onTouchEvent里面的滚动逻辑就执行不到了,导致了上面我们看到的划不动的效果。解决方法就是,我们需要重写dispatchTouchEvent()方法,防止子view干扰我们,这样我们滑动的时候就可以一气呵成了。代码如下:
1
2
3
4
5
6
@Override
public boolean dispatchTouchEvent(MotionEvent ev) {
//防止子View禁止父view拦截事件
this .requestDisallowInterceptTouchEvent( false );
return super .dispatchTouchEvent(ev);
}
(2)、监听ScrollView滑动事件的问题
ScrollView没有提供滚动事件的监听方法,也就没法判断是否滚动到了顶部,或者底部,这里我们继承ScrollView 自己实现滚动事件监听。
1
2
3
4
5
6
7
8
9
10
11
12
13
14
15
16
17
18
19
20
21
22
23
24
25
26
27
28
29
30
31
32
33
34
35
36
37
38
39
40
41
42
43
44
45
46
47
48
/**
* Created by baoyunlong on 16/6/8.
*/
public class MyScrollView extends ScrollView {
private static String TAG=MyScrollView. class .getName();
public void setScrollListener(ScrollListener scrollListener) {
this .mScrollListener = scrollListener;
}
private ScrollListener mScrollListener;
public MyScrollView(Context context) {
super (context);
}
public MyScrollView(Context context, AttributeSet attrs) {
super (context, attrs);
}
public MyScrollView(Context context, AttributeSet attrs, int defStyleAttr) {
super (context, attrs, defStyleAttr);
}
@Override
public boolean onTouchEvent(MotionEvent ev) {
switch (ev.getAction()){
case MotionEvent.ACTION_MOVE:
if (mScrollListener!= null ){
int contentHeight=getChildAt( 0 ).getHeight();
int scrollHeight=getHeight();
int scrollY=getScrollY();
mScrollListener.onScroll(scrollY);
if (scrollY+scrollHeight>=contentHeight||contentHeight<=scrollHeight){
mScrollListener.onScrollToBottom();
} else {
mScrollListener.notBottom();
}
if (scrollY== 0 ){
mScrollListener.onScrollToTop();
}
}
break ;
}
boolean result= super .onTouchEvent(ev);
requestDisallowInterceptTouchEvent( false );
return result;
}
public interface ScrollListener{
void onScrollToBottom();
void onScrollToTop();
void onScroll( int scrollY);
void notBottom();
}
4、完整代码如下
1
2
3
4
5
6
7
8
9
10
11
12
13
14
15
16
17
18
19
20
21
22
23
24
25
26
27
28
29
30
31
32
33
34
35
36
37
38
39
40
41
42
43
44
45
46
47
48
49
50
51
52
53
54
55
56
57
58
59
60
61
62
63
64
65
66
67
68
69
70
71
72
73
74
75
76
77
78
79
80
81
82
83
84
85
86
87
88
89
90
91
92
93
94
95
96
97
98
99
100
101
102
103
104
105
106
107
108
109
110
111
112
113
114
115
116
117
118
119
120
121
122
123
124
125
126
127
128
129
130
131
132
133
134
135
136
137
138
139
140
141
142
143
144
145
146
147
148
149
150
151
152
153
154
155
156
157
158
159
160
161
162
163
164
165
166
167
168
169
170
171
172
173
174
175
176
177
178
179
180
/**
* Created by baoyunlong on 16/6/8.
*/
public class PullUpToLoadMore extends ViewGroup {
public static String TAG = PullUpToLoadMore. class .getName();
MyScrollView topScrollView, bottomScrollView;
VelocityTracker velocityTracker = VelocityTracker.obtain();
Scroller scroller = new Scroller(getContext());
int currPosition = 0 ;
int position1Y;
int lastY;
public int scaledTouchSlop; //最小滑动距离
int speed = 200 ;
boolean isIntercept;
public boolean bottomScrollVIewIsInTop = false ;
public boolean topScrollViewIsBottom = false ;
public PullUpToLoadMore(Context context) {
super (context);
init();
}
public PullUpToLoadMore(Context context, AttributeSet attrs) {
super (context, attrs);
init();
}
public PullUpToLoadMore(Context context, AttributeSet attrs, int defStyleAttr) {
super (context, attrs, defStyleAttr);
init();
}
private void init() {
post( new Runnable() {
@Override
public void run() {
topScrollView = (MyScrollView) getChildAt( 0 );
bottomScrollView = (MyScrollView) getChildAt( 1 );
topScrollView.setScrollListener( new MyScrollView.ScrollListener() {
@Override
public void onScrollToBottom() {
topScrollViewIsBottom = true ;
}
@Override
public void onScrollToTop() {
}
@Override
public void onScroll( int scrollY) {
}
@Override
public void notBottom() {
topScrollViewIsBottom = false ;
}
});
bottomScrollView.setScrollListener( new MyScrollView.ScrollListener() {
@Override
public void onScrollToBottom() {
}
@Override
public void onScrollToTop() {
}
@Override
public void onScroll( int scrollY) {
if (scrollY == 0 ) {
bottomScrollVIewIsInTop = true ;
} else {
bottomScrollVIewIsInTop = false ;
}
}
@Override
public void notBottom() {
}
});
position1Y = topScrollView.getBottom();
scaledTouchSlop = ViewConfiguration.get(getContext()).getScaledTouchSlop();
}
});
}
@Override
public boolean dispatchTouchEvent(MotionEvent ev) {
//防止子View禁止父view拦截事件
this .requestDisallowInterceptTouchEvent( false );
return super .dispatchTouchEvent(ev);
}
@Override
public boolean onInterceptTouchEvent(MotionEvent ev) {
int y = ( int ) ev.getY();
switch (ev.getAction()) {
case MotionEvent.ACTION_DOWN:
lastY = y;
break ;
case MotionEvent.ACTION_MOVE:
//判断是否已经滚动到了底部
if (topScrollViewIsBottom) {
int dy = lastY - y;
//判断是否是向上滑动和是否在第一屏
if (dy > 0 && currPosition == 0 ) {
if (dy >= scaledTouchSlop) {
isIntercept = true ; //拦截事件
lastY=y;
}
}
}
if (bottomScrollVIewIsInTop) {
int dy = lastY - y;
//判断是否是向下滑动和是否在第二屏
if (dy < 0 && currPosition == 1 ) {
if (Math.abs(dy) >= scaledTouchSlop) {
isIntercept = true ;
}
}
}
break ;
}
return isIntercept;
}
@Override
public boolean onTouchEvent(MotionEvent event) {
int y = ( int ) event.getY();
velocityTracker.addMovement(event);
switch (event.getAction()) {
case MotionEvent.ACTION_MOVE:
int dy = lastY - y;
if (getScrollY() + dy < 0 ) {
dy = getScrollY() + dy + Math.abs(getScrollY() + dy);
}
if (getScrollY() + dy + getHeight() > bottomScrollView.getBottom()) {
dy = dy - (getScrollY() + dy - (bottomScrollView.getBottom() - getHeight()));
}
scrollBy( 0 , dy);
break ;
case MotionEvent.ACTION_UP:
isIntercept = false ;
velocityTracker.computeCurrentVelocity( 1000 );
float yVelocity = velocityTracker.getYVelocity();
if (currPosition == 0 ) {
if (yVelocity < 0 && yVelocity < -speed) {
smoothScroll(position1Y);
currPosition = 1 ;
} else {
smoothScroll( 0 );
}
} else {
if (yVelocity > 0 && yVelocity > speed) {
smoothScroll( 0 );
currPosition = 0 ;
} else {
smoothScroll(position1Y);
}
}
break ;
}
lastY = y;
return true ;
}
@Override
protected void onMeasure( int widthMeasureSpec, int heightMeasureSpec) {
super .onMeasure(widthMeasureSpec, heightMeasureSpec);
measureChildren(widthMeasureSpec, heightMeasureSpec);
}
@Override
protected void onLayout( boolean changed, int l, int t, int r, int b) {
int childCount = getChildCount();
int childTop = t;
for ( int i = 0 ; i < childCount; i++) {
View child = getChildAt(i);
child.layout(l, childTop, r, childTop + child.getMeasuredHeight());
childTop += child.getMeasuredHeight();
}
}
//通过Scroller实现弹性滑动
private void smoothScroll( int tartY) {
int dy = tartY - getScrollY();
scroller.startScroll(getScrollX(), getScrollY(), 0 , dy);
invalidate();
}
@Override
public void computeScroll() {
if (scroller.computeScrollOffset()) {
scrollTo(scroller.getCurrX(), scroller.getCurrY());
postInvalidate();
}
}
}
源码:
以上所述是小编给大家介绍的Android 仿淘宝、京东商品详情页向上拖动查看图文详情控件DEMO详解,希望对大家有所帮助,如果大家有任何疑问请给我留言,小编会及时回复大家的。在此也非常感谢大家对脚本之家网站的支持!
您可能感兴趣的文章:


