Java技术栈
关注阅读更多优质文章
[
作者:海向
出处:www.cnblogs.com/haixiang/p/10900005.html
生产端 Confirm 消息确认机制
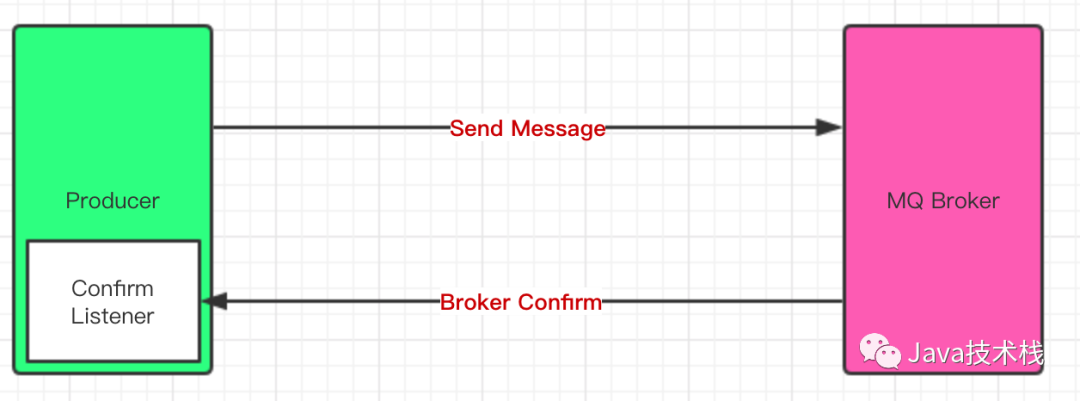
消息的确认,是指生产者投递消息后,如果 Broker 收到消息,则会给我们生产者一个应答。
生产者进行接收应答,用来确定这条消息是否正常的发送到 Broker ,这种方式也是消息的可靠性投递的核心保障!
Confirm 确认机制流程图

如何实现Confirm确认消息?
第一步:在 channel 上开启确认模式:
channel.confirmSelect()第二步:在 channel 上添加监听:
channel.addConfirmListener(ConfirmListener listener);, 监听成功和失败的返回结果,根据具体的结果对消息进行重新发送、或记录日志等后续处理!import com.rabbitmq.client.Channel;import com.rabbitmq.client.ConfirmListener;import com.rabbitmq.client.Connection;import com.rabbitmq.client.ConnectionFactory;import java.io.IOException;public class ConfirmProducer { public static void main(String[] args) throws Exception { ConnectionFactory factory = new ConnectionFactory(); factory.setHost("localhost"); factory.setVirtualHost("/"); factory.setUsername("guest"); factory.setPassword("guest"); Connection connection = factory.newConnection(); Channel channel = connection.createChannel(); String exchangeName = "test_confirm_exchange"; String routingKey = "item.update"; //指定消息的投递模式:confirm 确认模式 channel.confirmSelect(); //发送 final long start = System.currentTimeMillis(); for (int i = 0; i < 5 ; i++) { String msg = "this is confirm msg "; channel.basicPublish(exchangeName, routingKey, null, msg.getBytes()); System.out.println("Send message : " + msg); } //添加一个确认监听, 这里就不关闭连接了,为了能保证能收到监听消息 channel.addConfirmListener(new ConfirmListener() { /** * 返回成功的回调函数 / public void handleAck(long deliveryTag, boolean multiple) throws IOException { System.out.println("succuss ack"); System.out.println(multiple); System.out.println("耗时:" + (System.currentTimeMillis() - start) + "ms"); } /* * 返回失败的回调函数 */ public void handleNack(long deliveryTag, boolean multiple) throws IOException { System.out.printf("defeat ack"); System.out.println("耗时:" + (System.currentTimeMillis() - start) + "ms"); } }); }}
import com.rabbitmq.client.*;import java.io.IOException;public class ConfirmConsumer { public static void main(String[] args) throws Exception { ConnectionFactory factory = new ConnectionFactory(); factory.setHost("localhost"); factory.setVirtualHost("/"); factory.setUsername("guest"); factory.setPassword("guest"); factory.setAutomaticRecoveryEnabled(true); factory.setNetworkRecoveryInterval(3000); Connection connection = factory.newConnection(); Channel channel = connection.createChannel(); String exchangeName = "test_confirm_exchange"; String queueName = "test_confirm_queue"; String routingKey = "item.#"; channel.exchangeDeclare(exchangeName, "topic", true, false, null); channel.queueDeclare(queueName, false, false, false, null); //一般不用代码绑定,在管理界面手动绑定 channel.queueBind(queueName, exchangeName, routingKey); //创建消费者并接收消息 Consumer consumer = new DefaultConsumer(channel) { @Override public void handleDelivery(String consumerTag, Envelope envelope, AMQP.BasicProperties properties, byte[] body) throws IOException { String message = new String(body, "UTF-8"); System.out.println(" [x] Received '" + message + "'"); } }; //设置 Channel 消费者绑定队列 channel.basicConsume(queueName, true, consumer); }}
我们此处只关注生产端输出消息
Send message : this is confirm msg Send message : this is confirm msg Send message : this is confirm msg Send message : this is confirm msg Send message : this is confirm msg succuss acktrue耗时:3mssuccuss acktrue耗时:4ms
注意事项
我们采用的是异步 confirm 模式:提供一个回调方法,服务端 confirm 了一条或者多条消息后 Client 端会回调这个方法。除此之外还有单条同步 confirm 模式、批量同步 confirm 模式,由于现实场景中很少使用我们在此不做介绍,如有兴趣直接参考官方文档。关注公众号Java技术栈可以获取更多系列RabbitMQ教程。
我们运行生产端会发现每次运行结果都不一样,会有多种情况出现,因为 Broker 会进行优化,有时会批量一次性 confirm ,有时会分开几条 confirm。
succuss ack true耗时:3mssuccuss ack false耗时:4ms或者succuss ack true耗时:3ms
Return 消息机制
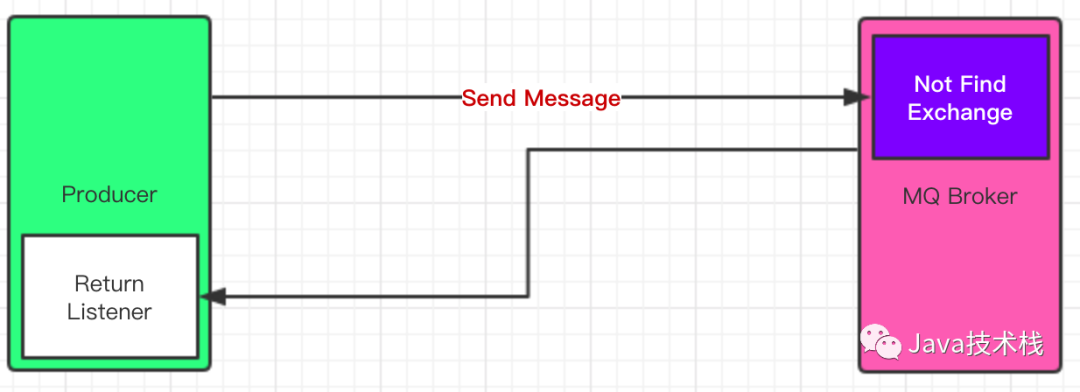
Return Listener 用于处理一-些不可路由的消息!
消息生产者,通过指定一个
Exchange和Routingkey,把消息送达到某一个队列中去,然后我们的消费者监听队列,进行消费处理操作!但是在某些情况下,如果我们在发送消息的时候,当前的 exchange 不存在或者指定的路由 key 路由不到,这个时候如果我们需要监听这种不可达的消息,就要使用
Return Listener !在基础API中有一个关键的配置项:
Mandatory:如果为true,则监听器会接收到路由不可达的消息,然后进行后续处理,如果为false,那么 broker 端自动删除该消息!
Return 消息机制流程图

Return 消息示例
首先我们需要发送三条消息,并且故意将第 0 条消息的
routing Key设置为错误的,让他无法正常路由到消费端。mandatory设置为true路由不可达的消息会被监听到,不会被自动删除.即channel.basicPublish(exchangeName, errRoutingKey, true,null, msg.getBytes());最后添加监听即可监听到不可路由到消费端的消息
channel.addReturnListener(ReturnListener r))import com.rabbitmq.client.;import java.io.IOException;public class ReturnListeningProducer { public static void main(String[] args) throws Exception { ConnectionFactory factory = new ConnectionFactory(); factory.setHost("localhost"); factory.setVirtualHost("/"); factory.setUsername("guest"); factory.setPassword("guest"); Connection connection = factory.newConnection(); Channel channel = connection.createChannel(); String exchangeName = "test_return_exchange"; String routingKey = "item.update"; String errRoutingKey = "error.update"; //指定消息的投递模式:confirm 确认模式 channel.confirmSelect(); //发送 for (int i = 0; i < 3 ; i++) { String msg = "this is return——listening msg "; //@param mandatory 设置为 true 路由不可达的消息会被监听到,不会被自动删除 if (i == 0) { channel.basicPublish(exchangeName, errRoutingKey, true,null, msg.getBytes()); } else { channel.basicPublish(exchangeName, routingKey, true, null, msg.getBytes()); } System.out.println("Send message : " + msg); } //添加一个确认监听, 这里就不关闭连接了,为了能保证能收到监听消息 channel.addConfirmListener(new ConfirmListener() { /* * 返回成功的回调函数 / public void handleAck(long deliveryTag, boolean multiple) throws IOException { System.out.println("succuss ack"); } /* * 返回失败的回调函数 */ public void handleNack(long deliveryTag, boolean multiple) throws IOException { System.out.printf("defeat ack"); } }); //添加一个 return 监听 channel.addReturnListener(new ReturnListener() { public void handleReturn(int replyCode, String replyText, String exchange, String routingKey, AMQP.BasicProperties properties, byte[] body) throws IOException { System.out.println("return relyCode: " + replyCode); System.out.println("return replyText: " + replyText); System.out.println("return exchange: " + exchange); System.out.println("return routingKey: " + routingKey); System.out.println("return properties: " + properties); System.out.println("return body: " + new String(body)); } }); }}
import com.rabbitmq.client.*;import java.io.IOException;public class ReturnListeningConsumer { public static void main(String[] args) throws Exception { //1. 创建一个 ConnectionFactory 并进行设置 ConnectionFactory factory = new ConnectionFactory(); factory.setHost("localhost"); factory.setVirtualHost("/"); factory.setUsername("guest"); factory.setPassword("guest"); factory.setAutomaticRecoveryEnabled(true); factory.setNetworkRecoveryInterval(3000); //2. 通过连接工厂来创建连接 Connection connection = factory.newConnection(); //3. 通过 Connection 来创建 Channel Channel channel = connection.createChannel(); //4. 声明 String exchangeName = "test_return_exchange"; String queueName = "test_return_queue"; String routingKey = "item.#"; channel.exchangeDeclare(exchangeName, "topic", true, false, null); channel.queueDeclare(queueName, false, false, false, null); //一般不用代码绑定,在管理界面手动绑定 channel.queueBind(queueName, exchangeName, routingKey); //5. 创建消费者并接收消息 Consumer consumer = new DefaultConsumer(channel) { @Override public void handleDelivery(String consumerTag, Envelope envelope, AMQP.BasicProperties properties, byte[] body) throws IOException { String message = new String(body, "UTF-8"); System.out.println(" [x] Received '" + message + "'"); } }; //6. 设置 Channel 消费者绑定队列 channel.basicConsume(queueName, true, consumer); }}
我们只关注生产端结果,消费端只收到两条消息。
Send message : this is return——listening msg Send message : this is return——listening msg Send message : this is return——listening msg return relyCode: 312return replyText: NO_ROUTEreturn exchange: test_return_exchangereturn routingKey: error.updatereturn properties: #contentHeader<basic>(content-type=null, content-encoding=null, headers=null, delivery-mode=null, priority=null, correlation-id=null, reply-to=null, expiration=null, message-id=null, timestamp=null, type=null, user-id=null, app-id=null, cluster-id=null)return body: this is return——listening msg succuss acksuccuss acksuccuss ack
消费端 Ack 和 Nack 机制
消费端进行消费的时候,如果由于业务异常我们可以进行日志的记录,然后进行补偿!如果由于服务器宕机等严重问题,那我们就需要手工进行ACK保障消费端消费成功!消费端重回队列是为了对没有处理成功的消息,把消息重新会递给Broker!一般我们在实际应用中,都会关闭重回队列,也就是设置为False。
参考 api
void basicNack(long deliveryTag, boolean multiple, boolean requeue) throws IOException;` void basicAck(long deliveryTag, boolean multiple) throws IOException;
如何设置手动 Ack 、Nack 以及重回队列
首先我们发送五条消息,将每条消息对应的循环下标 i 放入消息的
properties中作为标记,以便于我们在后面的回调方法中识别。其次, 我们将消费端的 ·
channel.basicConsume(queueName, false, consumer);中的autoAck属性设置为false,如果设置为true的话 将会正常输出五条消息。我们通过
Thread.sleep(2000)来延时一秒,用以看清结果。我们获取到properties中的num之后,通过channel.basicNack(envelope.getDeliveryTag(), false, true);将num为0的消息设置为 nack,即消费失败,并且将requeue属性设置为true,即消费失败的消息重回队列末端。import com.rabbitmq.client.*;import java.util.HashMap;import java.util.Map;public class AckAndNackProducer { public static void main(String[] args) throws Exception { ConnectionFactory factory = new ConnectionFactory(); factory.setHost("localhost"); factory.setVirtualHost("/"); factory.setUsername("guest"); factory.setPassword("guest"); Connection connection = factory.newConnection(); Channel channel = connection.createChannel(); String exchangeName = "test_ack_exchange"; String routingKey = "item.update"; String msg = "this is ack msg"; for (int i = 0; i < 5; i++) { Map<String, Object> headers = new HashMap<String, Object>(); headers.put("num" ,i); AMQP.BasicProperties properties = new AMQP.BasicProperties().builder() .deliveryMode(2) .headers(headers) .build(); String tem = msg + ":" + i; channel.basicPublish(exchangeName, routingKey, true, properties, tem.getBytes()); System.out.println("Send message : " + msg); } channel.close(); connection.close(); }}
import com.rabbitmq.client.*;import java.io.IOException;public class AckAndNackConsumer { public static void main(String[] args) throws Exception { ConnectionFactory factory = new ConnectionFactory(); factory.setHost("localhost"); factory.setVirtualHost("/"); factory.setUsername("guest"); factory.setPassword("guest"); factory.setAutomaticRecoveryEnabled(true); factory.setNetworkRecoveryInterval(3000); Connection connection = factory.newConnection(); final Channel channel = connection.createChannel(); String exchangeName = "test_ack_exchange"; String queueName = "test_ack_queue"; String routingKey = "item.#"; channel.exchangeDeclare(exchangeName, "topic", true, false, null); channel.queueDeclare(queueName, false, false, false, null); //一般不用代码绑定,在管理界面手动绑定 channel.queueBind(queueName, exchangeName, routingKey); Consumer consumer = new DefaultConsumer(channel) { @Override public void handleDelivery(String consumerTag, Envelope envelope, AMQP.BasicProperties properties, byte[] body) throws IOException { String message = new String(body, "UTF-8"); System.out.println(" [x] Received '" + message + "'"); try { Thread.sleep(2000); } catch (InterruptedException e) { e.printStackTrace(); } if ((Integer) properties.getHeaders().get("num") == 0) { channel.basicNack(envelope.getDeliveryTag(), false, true); } else { channel.basicAck(envelope.getDeliveryTag(), false); } } }; //6. 设置 Channel 消费者绑定队列 channel.basicConsume(queueName, false, consumer); }}
我们此处只关心消费端输出,可以看到第 0 条消费失败重新回到队列尾部消费。
[x] Received 'this is ack msg:1' [x] Received 'this is ack msg:2' [x] Received 'this is ack msg:3' [x] Received 'this is ack msg:4' [x] Received 'this is ack msg:0' [x] Received 'this is ack msg:0' [x] Received 'this is ack msg:0' [x] Received 'this is ack msg:0' [x] Received 'this is ack msg:0'


关注Java技术栈看更多干货


戳原文,获取精选面试题!
本文分享自微信公众号 - Java技术栈(javastack)。
如有侵权,请联系 support@oschina.cn 删除。
本文参与“OSC源创计划”,欢迎正在阅读的你也加入,一起分享。


