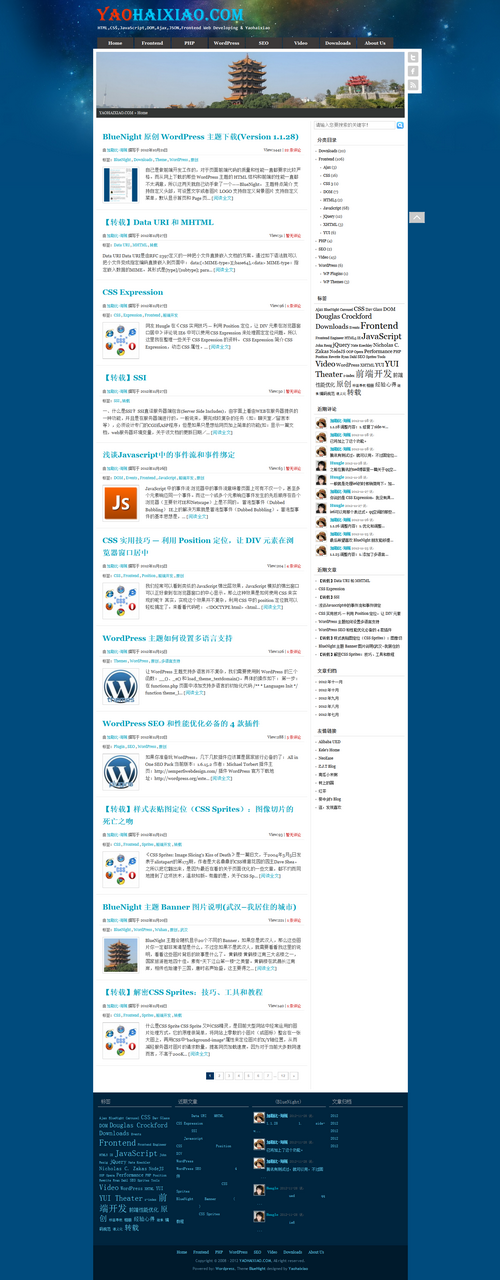
自己是做前端开发工作的,对于页面前端代码的质量和性能一直都要求比较严格。而从网上下载的那些 WordPress 主题的 HTML 结构和前端的性能一直都不太满意,所以这两天就自己动手做了一个——BlueNight。
BlueNight 主题特点简介
- 支持自定LOGO,可设置文字或者图片 LOGO
- 支持自定义背景图片
- 支持(顶部、主导航、底部)自定义菜单
- 支持 Featured Image, 默认尺寸:106 * 106
- 支持 Featured Image Header(首页幻灯图片)
- 非首页显示20张随机的背景图片,没什么特殊,就是为了展示一下自己的城市,让页面也不那么单调。如果您对这些图片背后的故事感兴趣,可以看看《BlueNight 主题 Banner 图片说明》。
- 自动生成文章摘要,默认170个字符
- 美化了分页导航,增加了数字分页导航
- 自带文章浏览次数统计
- 自带了文章分享功能
- 自带相关文章推荐
- 后台添加了主题设置菜单和主题设置页面
- 主题小工具中添加了带Avatar头像的最新评论Widget
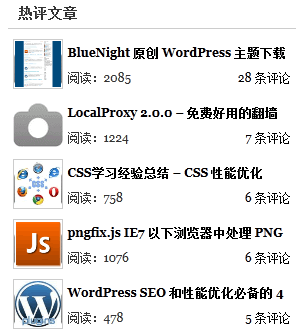
- 主题小工具中添加了Popular Post 热评文章的Widget
- Achives 文章归档页面(可以当作网站地图 – 需要咸湿佬的 WP-EasyAchives 插件)
- lazyload Gravatar 头像和特色图片
- 添加评论 Ajax 翻页
- 添加Tags 模版页(WP-EasyAchives 的补充,基本上是为SEO优化而作的)
- 代码的前端性能已经根据 YSLOW 的前端性能优化方案进行了优化
- 支持中英文双语言环境
标签
dark, light, white, blue, two-columns, right-sidebar, fixed-width, custom-background, custom-menu, featured-image-header, featured-images, blavatar, translation-ready, threaded-comments, theme-options
支持语言
- English (Default)
- 简体中文(加勒比-海贼)
Downloads:BlueNight.zip (Version 1.3.11)
自定义LOGO设置
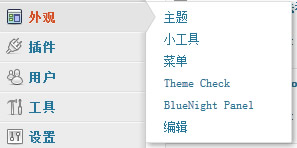
BlueNight 主题支持自定义LOGO设置,在后台的外观中选择 BlueNight Panel,如图:
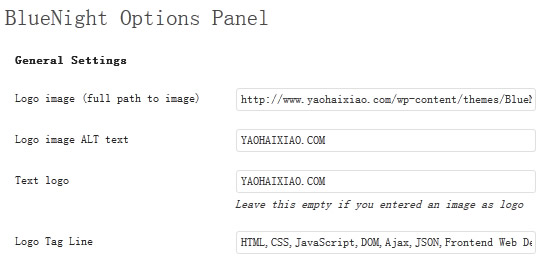
在 BlueNight Panel 中你可以设置图片或者文字的 LOGO,如下图:
如果设置了图片的 LOGO,则不会显示文字 LOGO(提示:如果为了 SEO,建议使用文字 LOGO)。BlueNight 主题中对 LOGO 高度做了限制,为 50px。如果想调整的话,请修改 style.css 中的样式:
.logo img { margin: 10px 0; /* 修改这里的高度 */ height: 50px; }
Featured Image 特色图片的设置和调整
BlueNight 主题支持Featured Image (特色图片)。如下图:
主题默认的特色图片的大小是自定义的 106 * 106。如果需要调整特色图片的大小,需要在 functions.php 调整:
/** * Add Thumbnails support */ if ( function_exists( 'add_theme_support' ) ) { add_theme_support( 'post-thumbnails' ); // 请修改这里的尺寸 add_image_size( 'imaj', 106, 106, true ); add_image_size('slider',940,179,true); }
特色图片的显示函数:
// array('class' => 'entry img post-image-prelaoder post-thumbnail') 给特色图片添加的 CSS class 样式 function imaj_image(){ if ( has_post_thumbnail() ) { ?> <a href="<?php the_permalink(); ?>" title="<?php the_title(); ?>"><?php the_post_thumbnail( 'imaj', array('class' => 'entry img post-image-prelaoder post-thumbnail') ); ?></a> <?php } else { } }
对应的样式代码(请根据你的需要自行调整):
.post-thumbnail { float: left; margin: 0 10px; border: 1px solid #CCC; padding: 4px; width: 106px; height: 106px; display: inline; }
Featured Image Header 首页头部特色图片幻灯的设置和调整
BlueNight 主题支持 Featured Image Header(头部特色图片幻灯)。首页的显示效果,如下图:
可以在 BlueNight Panel 中选择是否开启此功能,以及选择类目和显示条数,如下图:
这个幻灯片的 JavaScript 脚本采用的是我开发的《Carousel – jQuery 相册插件》,具体的使用方法请参考该文章的介绍。首页的幻灯片支持横向和纵向的滚动,调用代码在 footer.php 中:
<?php if(get_option('bluenight_slide')=='yes' && is_home() && !is_paged()){?> <script type="text/javascript" src="http://www.yaohaixiao.com/js/jquery.js"></script> <script type="text/javascript" src="http://www.yaohaixiao.com/js/carousel.js"></script> <script type="text/javascript"> jQuery.carousels({ root: '#slider', carousel: '#slide-list', pages: { prev: '#prev-slide', next: '#next-slide', current: '#cur-index', total: 'total-count' }, // 只需要修改这里 V - 纵向滚动,H - 横向滚动 direction: 'H', itemsPrePage: 1 }); </script> <?php }?>
非首页时,banner的背景图片会随机显示,header.php 中的代码如下:
<div class="wrap banner<?php if(is_home()){ echo ' pb10'; }else{ echo ' banner-'.rand(1, 10); } ?>" id="banner"> <?php if(get_option('bluenight_slide')=='yes' && is_home() && !is_paged()){?> <?php include (TEMPLATEPATH . '/slider.php'); ?> <?php }?> </div>
没什么特别的,只是用 rand 函数生成一个1~10的随机数的class名称,然后根据class显示背景,CSS 代码如下:
/* Banner */ .banner { height: 179px; padding-bottom: 0; background: transparent url(images/wuhan.jpg) 10px 10px no-repeat; } .banner, .container { background-color: #FFF; } .banner-1 { background-image: url(images/wuhan-1.jpg); } .banner-2 { background-image: url(images/wuhan-2.jpg); } .banner-3 { background-image: url(images/wuhan-3.jpg); } .banner-4 { background-image: url(images/wuhan-4.jpg); } .banner-5 { background-image: url(images/wuhan-5.jpg); } .banner-6 { background-image: url(images/wuhan-6.jpg); } .banner-7 { background-image: url(images/wuhan-7.jpg); } .banner-8 { background-image: url(images/wuhan-8.jpg); } .banner-9 { background-image: url(images/wuhan-9.jpg); } .banner-10 { background-image: url(images/wuhan-10.jpg); }
个人觉得用这种简单的方式基本上就实现了 WordPress 的自定义头部的类似效果了,所以 BlueNight 主题不会再去做自定义头部的支持了。
文章摘要的调整方法
BlueNight 主题支持自动生成文章摘要。如下图:
如果需要调整,请修改 functions.php 中的代码:
/** * Format Post Excerpt */ add_filter('excerpt_length', 'my_excerpt_length'); function my_excerpt_length($length) { // 摘要显示的字符数 return 170; } // 超过170个字符后,显示的文字 function new_excerpt_more($more) { global $post; return '... [<a href="'. get_permalink($post->ID) . '">阅读全文</a>]'; } add_filter('excerpt_more', 'new_excerpt_more');
如上图所示,摘要在列表页面(index.php、search.php、archive.php)中的完整显示是特色图片 + 文字摘要,页面中完整的代码如下:
<div class="entry"> <!-- 特色图片 --> <?php imaj_image(); ?> <!-- 文字摘要 --> <?php the_excerpt(10); ?> </div>
文章分享的设置
BlueNight 主题自带了文章分享功能。如图:
这个分享功能采用的是我以前的同事咸湿佬的 share.js。具体的处理可以查看他的《为网站添加分享按钮》。这里就把 JavaScript 代码贴出来:
(function(){ var link = encodeURIComponent(document.location), title = encodeURIComponent(document.title.substring(0, 76)), source = encodeURIComponent('YAOHAIXIAO.COM'), windowName = 'share'; site = 'http://www.yaohaixiao.com/', getParamsOfShareWindow = function(width, height){ return ['toolbar=0,status=0,resizable=1,width=' + width + ',height=' + height + ',left=', (screen.width - width) / 2, ',top=', (screen.height - height) / 2].join(''); }, byId = function(el){ if (el.nodeType === 1 && el.tagName) { return el; } else { if (document.getElementById) { return document.getElementById(el); } else { return null; } } }; if (byId('facebook-share')) { byId('facebook-share').onclick = function(){ var url = 'http://facebook.com/share.php?u=' + link + '&t=' + title; var params = getParamsOfShareWindow(626, 436); window.open(url, windowName, params); }; } if (byId('twitter-share')) { byId('twitter-share').onclick = function(){ var url = 'http://twitter.com/share?url=' + link + '&text=' + title; var params = getParamsOfShareWindow(500, 375); window.open(url, windowName, params); }; } if (byId('delicious-share')) { byId('delicious-share').onclick = function(){ var url = 'http://delicious.com/post?url=' + link + '&title=' + title; var params = getParamsOfShareWindow(550, 550); window.open(url, windowName, params); }; } if (byId('kaixin001-share')) { byId('kaixin001-share').onclick = function(){ var url = 'http://www.kaixin001.com/repaste/share.php?rurl=' + link + '&rcontent=' + link + '&rtitle=' + title; var params = getParamsOfShareWindow(540, 342); window.open(url, windowName, params); }; } if (byId('renren-share')) { byId('renren-share').onclick = function(){ var url = 'http://share.renren.com/share/buttonshare?link=' + link + '&title=' + title; var params = getParamsOfShareWindow(626, 436); window.open(url, windowName, params); }; } if (byId('douban-share')) { byId('douban-share').onclick = function(){ var url = 'http://www.douban.com/recommend/?url=' + link + '&title=' + title; var params = getParamsOfShareWindow(450, 350); window.open(url, windowName, params); }; } if (byId('sina-share')) { byId('sina-share').onclick = function(){ var url = 'http://v.t.sina.com.cn/share/share.php?url=' + link + '&title=' + title; var params = getParamsOfShareWindow(607, 523); window.open(url, windowName, params); }; } if (byId('netease-share')) { byId('netease-share').onclick = function(){ var url = 'http://t.163.com/article/user/checkLogin.do?link=' + link + 'source=' + source + '&info=' + title + ' ' + link; var params = getParamsOfShareWindow(642, 468); window.open(url, windowName, params); }; } if (byId('tencent-share')) { byId('tencent-share').onclick = function(){ var url = 'http://v.t.qq.com/share/share.php?title=' + title + '&url=' + link + '&site=' + site; var params = getParamsOfShareWindow(634, 668); window.open(url, windowName, params); }; } (function(){ var mainBlock = byId('main'), sideBar = byId('side'), mainHeight = mainBlock.offsetHeight, sideHeight = sideBar.offsetHeight; if (sideHeight > mainHeight) { mainBlock.style.height = sideHeight + 'px'; } })(); })();
分享功能基本上都是调用各个网站的分享API的地址,大家可以根据需要添加自己喜欢的网站的分享API地址。
相关文章的设置
BlueNight 主题自带了相关文章的支持,如下图:
相关文章的处理相对比较简单没有做什么推送算法的处理,就是取出文章所在分类的最近的5篇文章做相关文章,functions 中的代码如下:
function related_post(){
?>
<div class="related-posts" id="related-posts">
<?php
// 通过文章id获得文在所在分类
$categories = get_the_category($post->ID);
if ($categories) {
    $category_ids = array();
    foreach ($categories as $individual_category)
        $category_ids[] = $individual_category->term_id;
    $args = array(
        'category__in'=>$category_ids,
        'post__not_in'=>array($post->ID),
        'showposts'=>5, // Corresponds to Number of related posts to be shown.
        'caller_get_posts'=>1
    );
    $my_query = new wp_query($args);
    if ($my_query->have_posts()) {
        echo '<h2>你可能会感兴趣的文章</h2><ul>';
        while ($my_query->have_posts()) {
            $my_query->the_post();
?>
    <li><p class="related-post-image"><?php related_post_image(); ?></p><h3><a href="<?php the_permalink() ?>" rel="bookmark" title="Permanent Link to <?php the_title_attribute(); ?>"><?php the_title(); ?></a></h3></li>
<?php
        }
        echo '</ul>';
    }
}
$post = $backup;
wp_reset_query();
?>
</div>
<?php
}

// 显示相关文章的特色图片,如果没有则显示默认的(无特色)图片
function related_post_image(){
    if ( has_post_thumbnail() ) {
?>
    <a href="<?php the_permalink(); ?>" title="<?php the_title(); ?>"><?php the_post_thumbnail( 'imaj' ); ?></a>
<?php
    }
    else {
?>
        <a href="<?php the_permalink(); ?>" title="<?php the_title(); ?>"><img src="<?php echo get_template_directory_uri(); ?>/images/no-photo.gif" alt="<?php the_title(); ?>" widt="106" height="106" /></a>
<?php
    }
}
?>
虽然这个小功能对网站做内链的效果不是很大,不过添加了这个功能,总的SEO效果还是会好一些,对用户也算是更友好吧。
自定义的最新评论小工具
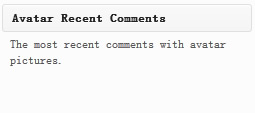
BlueNight 主题添加了带Avatar头像的用户评论小工具,可以在主题的小工具中看到,如下图:
在页面中的显示效果,如下图:
怎么样?是不是比 WordPress 自带的最新评论看上去酷一些?我在网上也查了不少的资料,大致有2中做法:
- 自己改 default-widget.php 中的代码的方法,将 WordPress 自带的 WP_Widget_Recent_Comments 插件的代码修改程带 Avatar 头像;
- 自己在 sidebar.php 中添加自己写的一个固定的最新评论的代码;
两种做法都有缺点,第一种如果 WordPress 更新了,那么这样的修改就被新的覆盖回原来默认的评论了。而第二种,写死的做法是不能在小工具中设置移除。所以我选择了自己写一个最新评论的 Widget 小工具。自己可以方便的在主题的小工具管理后台里设置,操作方便,也不怕 WordPress 版本更新后被覆盖重置了。具体代码如下(其实代码就是把 WordPress 自带的 WP_Widget_Recent_Comments 插件换个名字重写修改一下,比较简单的 ^-^):
/**
 * Recent_Avatar_Comments widget class
 * base on Recent_Comments
 *
 * @since 1.1.14
 */
class Widget_Recent_Avatar_Comments extends WP_Widget {

    function __construct() {
        $widget_ops = array('classname' => 'recent_avatar_comments', 'description' => __( 'The most recent comments on your site.','bluenight' ) );
        parent::__construct('recent-avatar-comments', __('Recent Comments (BlueNight)','bluenight'), $widget_ops);
        $this->alt_option_name = 'recent_avatar_comments';

        add_action( 'comment_post', array(&$this, 'flush_widget_cache') );
        add_action( 'transition_comment_status', array(&$this, 'flush_widget_cache') );
    }

    function flush_widget_cache() {
        wp_cache_delete('recent_avatar_comments', 'widget');
    }

    function widget( $args, $instance ) {
        global $comments, $comment;

        $cache = wp_cache_get('recent_avatar_comments', 'widget');

        if ( ! is_array( $cache ) ) {
            $cache = array();
        }

        if ( ! isset( $args['widget_id'] ) ) {
            $args['widget_id'] = $this->id;
        }

        if ( isset( $cache[ $args['widget_id'] ] ) ) {
            echo $cache[ $args['widget_id'] ];
            return;
        }

         extract($args, EXTR_SKIP);
         $output = '';
        $title = apply_filters( 'widget_title', empty( $instance['title'] ) ? __( 'Recent Comments (BlueNight)', 'bluenight' ) : $instance['title'], $instance, $this->id_base );

        if ( empty( $instance['number'] ) || ! $number = absint( $instance['number'] ) ) {
             $number = 5;
        }

        $comments = get_comments( apply_filters( 'widget_comments_args', array( 'number' => $number, 'status' => 'approve', 'post_status' => 'publish' ) ) );
        $output .= $before_widget;
        if ( $title ) {
            $output .= $before_title . $title . $after_title;
        }

        $output .= '<ul id="recentcomments" class="recentcomments-list">';
        if ( $comments ) {
            foreach ( (array) $comments as $comment) {
                $output .=  '<li class="recentcomments"><h3>'. get_avatar($comment,$size='32',$default='http://www.gravatar.com/avatar/be385381854ec020acbfd856b085bc0f?s=40&d=mm&r=g', get_comment_author()) .'</h3><p>' . sprintf(_x('<strong class="comment-author">%1$s</strong> <span class="comment-post-time">'. get_comment_date('Y-m-j') .__(':','bluenight').'</span> %2$s', 'widgets'), get_comment_author_link(), '<br /><a href="' . esc_url( get_comment_link($comment->comment_ID) ) . '">' . mb_strimwidth(strip_tags($comment->comment_content),0,37, "..." ) . '</a>') . '</p></li>';
            }
         }
        $output .= '</ul>';
        $output .= $after_widget;

        echo $output;
        $cache[$args['widget_id']] = $output;
        wp_cache_set('recent_avatar_comments', $cache, 'widget');
    }

    function update( $new_instance, $old_instance ) {
        $instance = $old_instance;
        $instance['title'] = strip_tags($new_instance['title']);
        $instance['number'] = absint( $new_instance['number'] );
        $this->flush_widget_cache();

        $alloptions = wp_cache_get( 'alloptions', 'options' );
        if ( isset($alloptions['recent_avatar_comments']) ){
            delete_option('recent_avatar_comments');
        }

        return $instance;
    }

    function form( $instance ) {
        $title = isset($instance['title']) ? esc_attr($instance['title']) : '';
        $number = isset($instance['number']) ? absint($instance['number']) : 5;
?>
        <p><label for="<?php echo $this->get_field_id('title'); ?>"><?php _e('Title:','bluenight'); ?></label>
        <input class="widefat" id="<?php echo $this->get_field_id('title'); ?>" name="<?php echo $this->get_field_name('title'); ?>" type="text" value="<?php echo $title; ?>" /></p>

        <p><label for="<?php echo $this->get_field_id('number'); ?>"><?php _e('Number of comments to show:','bluenight'); ?></label>
        <input id="<?php echo $this->get_field_id('number'); ?>" name="<?php echo $this->get_field_name('number'); ?>" type="text" value="<?php echo $number; ?>" size="3" /></p>
<?php
    }
}
register_widget('Widget_Recent_Avatar_Comments');
其实整个的关键就在这里,代码如下:
if ($comments) {
    foreach ((array) $comments as $comment) {
        $output .= '<li class="recentcomments"><h3>'.get_avatar($comment, $size = '32', $default = 'http://www.gravatar.com/avatar/be385381854ec020acbfd856b085bc0f?s=40&d=mm&r=g', get_comment_author()).'</h3><p>'.sprintf(_x('<strong class="comment-author">%1$s</strong> <span class="comment-post-time">'.get_comment_date('Y-m-j').__(':', 'bluenight').'</span> %2$s', 'widgets'), get_comment_author_link(), '<br /><a href="'.esc_url(get_comment_link($comment->comment_ID)).'">'.mb_strimwidth(strip_tags($comment->comment_content), 0, 37, "...").'</a>').'</p></li>';
    }
}
通过 get_avatar() 函数获得 Avatar 的用户头像。get_avatar()函数接收4个参数,代码解释如下:
get_avatar( $id_or_email, $size, $default, $alt );
id_or_email(integer/string/object) (required) 用户的id或者email
size(integer) (optional) 头像的大小 (max is 512).Default: 96
default(string) (optional) 默认头像的url, 缺省值为 “Mystery Man”.
alt(string) (optional) 图片的alt属性值
之后的事情就是通过评论相关的函数获得评论的作者,作者的主页地址,以及评论页面的地址和评论时间,然后在 style.css 里把样式调整齐,就大功告成了。主题控制评论的 CSS 代码如下:
/* Sidebar Widget Module */
.sidebar-widg {
    overflow: hidden;
    padding-bottom: 20px;
    clear: both;
}

.sidebar-widg ul {
    margin: 0;
    padding: 5px;
    overflow: hidden;
}

.sidebar-widg li {
    font-size: 12px;
    list-style-type: none;
    padding-left: 5px;
    height: 26px;
    line-height: 26px;
    overflow: hidden;
}

.sidebar-widg li.recentcomments {
    height: 40px;
    padding-top: 5px;
}

.sidebar-widg h3 {
    float: left;
    margin: 0;
    overflow: hidden;
}

.sidebar-widg h3, .sidebar-widg h3 img {
    width: 32px;
    height: 32px;
}

.sidebar-widg p {
    float: right;
    margin: 0;
    width: 191px;
    padding-left: 10px;
    line-height: 20px;
    overflow: hidden;
}

.comment-post-time {
    font-size: 11px;
    color: #676767;
}
Popular Post 热评文章的
BlueNight 主题添加了 Popular Post 热评文章小工具,可以在主题的小工具中看到,如下图:
填写好标题和要显示的文章条(默认是显示5条的)数就OK了。
设置好后,前台页面显示的效果如下图:
热评文章的排序是根据文章的评论数量的多少由高到低一次排序的。PHP 代码在 functions.php 文件中:
class Widget_Popular_Posts extends WP_Widget{
    function __construct() {
        $widget_ops = array('classname' => 'popular_post', 'description' => __( "The most popular posts on your site.", "bluenight") );
        parent::__construct('popular-posts', __('Popular Posts','bluenight'), $widget_ops);
        $this->alt_option_name = 'popular_post';

        add_action( 'save_post', array(&$this, 'flush_widget_cache') );
        add_action( 'deleted_post', array(&$this, 'flush_widget_cache') );
        add_action( 'switch_theme', array(&$this, 'flush_widget_cache') );
    }

    function form($instance){

        $title = isset($instance['title']) ? esc_attr($instance['title']) : '';
        $number = isset($instance['number']) ? absint($instance['number']) : 5;
?>
        <p><label for="<?php echo $this->get_field_id('title'); ?>"><?php _e('Title:','bluenight'); ?></label>
        <input class="widefat" id="<?php echo $this->get_field_id('title'); ?>" name="<?php echo $this->get_field_name('title'); ?>" type="text" value="<?php echo $title; ?>" /></p>

        <p><label for="<?php echo $this->get_field_id('number'); ?>"><?php _e('Number of posts to show:','bluenight'); ?></label>
        <input id="<?php echo $this->get_field_id('number'); ?>" name="<?php echo $this->get_field_name('number'); ?>" type="text" value="<?php echo $number; ?>" size="3" /></p>
<?php
    }

    function update($new_instance, $old_instance){
        $instance = $old_instance;
        $instance['title'] = strip_tags($new_instance['title']);
        $instance['number'] = absint( $new_instance['number'] );
        $this->flush_widget_cache();

        $alloptions = wp_cache_get( 'alloptions', 'options' );
        if ( isset($alloptions['popular_post']) ){
            delete_option('popular_post');
        }

        return $instance;
    }

    function flush_widget_cache() {
        wp_cache_delete('popular_posts', 'widget');
    }

    function widget($args, $instance){
        extract($args, EXTR_SKIP);

        echo $before_widget;
        $title = empty($instance['title']) ? ' ' : apply_filters('widget_title', $instance['title']);

        if (!empty($title)){
            echo $before_title . $title . $after_title;;
        }

        if ( empty( $instance['number'] ) || ! $number = absint( $instance['number'] ) ){
             $number = 5;
        }
        // Show Popular Post
?>
        <ul class="popular-posts">
<?php
        $popular_posts = new WP_Query('orderby=comment_count&posts_per_page='.$number);

        while ($popular_posts->have_posts()) : $popular_posts->the_post();
?>
        <li>
        <h3><?php thumbnail_image(); ?></h3>
        <h4><a href="<?php the_permalink(); ?>" title="<?php the_title(); ?>"><?php the_title(); ?></a></h4></a>
        <p><span class="post-views"><?php echo get_post_views(get_the_ID()); ?></span><span class="post-comments-count"><a href="<?php the_permalink()?>#comment"><?php comments_number(__('No Comments','bluenight'),__('One Comment','bluenight'),__('% Comments','bluenight'));?></a></span></p>
        </li>
<?php endwhile;?>
</ul>
 <?php
    echo $after_widget;
  }
}
安装 WP-EasyAchives,选择 Achives 页面模版创建文章归档列表页
BlueNight 主题有一个 Achives 页面模版,通过这个模版可以创建文章归档列表页(基本上算是网站地图的页面了)。不过需要安装 WP-EasyAchives 插件。Achives 页面的效果如图:


