实用类
- 枚举
- Math
- Random
- String
- StringBuffer
- 日期类
枚举
枚举(Enum)是一种有确定取值区间的数据类型,它本质上是一种类,具有简洁、安全、方便等特点。可以这样理解,枚举的值被约束到一个特定的范围,只能取这个范围以内的值。
我们为什么要用枚举呢?我们在描述对象的一些属性特征时,可选择的值是一个特定范围的,不能随便定义。比如性别只有男和女,一周只有七天,一年只有四季。出于对数据的安全性考虑,类似这种有特定取值范围的类型,指定了一个取值区间,我们只能从这个区间中取值。在没有枚举之前,我们需要定义一个类来描述周一到周日,可以通过定义静态常量的方式来完成。
public class Week{
    public static final int MONDAY = 0;
    public static final int TUESDAY = 1;
    public static final int WEDNESDAY = 2;
    public static final int THURSDAY = 3;
    public static final int FRIDAY = 4;
    public static final int SATURDAY = 5;
    public static final int SUNDAY = 6;
}
这种方式是可以完成需求的,但是编写起来会比较麻烦,用 int 类型的数据来描述周几也不是很直观,如果使用枚举类型就会方便很多:
enum Week{
    MONDAY,TUESDAY,WEDNESDAY,THURSDAY,FRIDAY,SATURDAY,SUNDAY;
}
枚举的定义与类很相似,使用 enum 关键字来描述,基本语法如下:
public enum 枚举名{
    值1,值2,值3,...
}
需要注意的是枚举中的常量使用逗号进行分割,看到这里有的读者可能会有疑惑,枚举中的常量是什么呢?枚举中的每一个常量都对应的是一个枚举实例,只不过表示的含义不同。拿上面这个例子来说,Java 在编译期会帮我生成一个 Week 类,并且继承自 java.lang.Enum,被 final 修饰,表示该类不可被继承。同时还生成了 7 个 Week 的实例对象分别对应枚举中定义的 7 个日期,因为枚举的静态常量直接对应其实例化对象,所以对于枚举的使用如下:
public class Test{
    public static void main(String[] args){
        Week week = Week.MONDAY;
        System.out.print(week);
    }
}
运行结果:
MONDAY
编译期生成的类是这样的:
public class Week extends Enum{
    public static final Week MONDAY;
    public static final Week TUESDAY;
    public static final Week WEDNESDAY;
    public static final Week THURSDAY;
    public static final Week FRIDAY;
    public static final Week SATURDAY;
    public static final Week SUNDAY;
    private static final Week $VALUES[];
    static{
        MONDAY = new Week("MONDAY",0);
        TUESDAY = new Week("TUESDAY",1);
        WEDNESDAY = new Week("WEDNESDAY",2);
        THURSDAY = new Week("THURSDAY",3);
        FRIDAY = new Week("FRIDAY",4);
        SATURDAY = new Week("SATURDAY",5);
        SUNDAY = new Week("SUNDAY",6);
        $VALUES = (new Week[]{MONDAY,TUESDAY,WEDNESDAY,THURSDAY,FRIDAY,SATURDAY,SUNDAY});
    }
    public static Week[] values(){
        return (Week[]) $VALUES.clone();
    }
    public static Week valueOf(String s){
        return (Week) Enum.valueOf(com/southwind/Week,s);
    }
    private Week(String s, int i){
        super(s,i);
    }
}
解读一下这个类:
首先定义了 7 个 Week 类型的静态常量和一个 Week 类型的静态数组常量。同时定义了一个私有的构造函数,String 类型的参数即当前枚举对象的值,int 类型的参数为它的下标。静态代码块中通过私有构造函数对 7 个静态常量以及静态数组常量赋值,所以代码中打印的的枚举值其实是创建该对象时传入的 String 类型参数,如 “MONDAY" 。同时该类还为我们提供了两个静态方法:values() 和 valueOf(String s) ,values() 方法可以返回该枚举类型的所有常量,valueOf(String s) 方法可以通过字符串 s 创建 对应的枚举对象,具体操作如下:
enum Week{
    MONDAY,TUESDAY,WEDNESDAY,THURSDAY,FRIDAY,SATURDAY,SUNDAY;
}

public class TestWeek {
    public static void main(String[] args) {
        Week[] weeks = Week.values();
        for(Week week:weeks) {
            System.out.println(week);
        }
        System.out.println("----------");
        Week week = Week.valueOf("MONDAY");
        System.out.println(week);
    }
}
运行结果:
在这里插入图片描述
Math
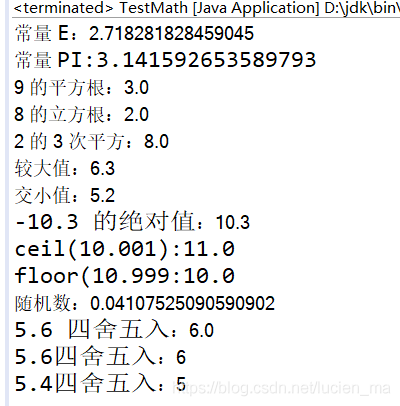
Math 类为开发者提供了一系列的数学方法,同时还提供了两个静态常量 E (自然对数的底数)和 PI(圆周率),以满足项目研发中对于数学运算的要求,Math 类中的所有方法全部都是静态的,通过类名直接调用。Math 类比较简单,我们直接来看 Math 方法的使用:
public class TestMath {
    public static void main(String[] args) {
        System.out.println("常量 E:"+Math.E);
        System.out.println("常量 PI:"+Math.PI);
        System.out.println("9 的平方根:"+Math.sqrt(9));
        System.out.println("8 的立方根:"+Math.cbrt(8));
        System.out.println("2 的 3 次平方:"+Math.pow(2, 3));
        System.out.println("较大值:"+Math.max(6.3, 5.2));
        System.out.println("交小值:"+Math.min(6.3, 5.2));
        System.out.println("-10.3 的绝对值:"+Math.abs(-10.3));
        System.out.println("ceil(10.001):"+Math.ceil(10.001));
        System.out.println("floor(10.999:"+Math.floor(10.999));
        System.out.println("随机数:"+Math.random());
        System.out.println("5.6 四舍五入:"+Math.rint(5.6));
        System.out.println("5.6四舍五入:"+Math.round(5.6));
        System.out.println("5.4四舍五入:"+Math.round(5.4));
    }
}
运行结果:
Random
Random 是用来产生一个随机数的类,并且可以任意指定一个区间,在此区间内产生一个随机数,Random 类的常用方法如下:
| 方法 | 描述 |
|---|---|
| public Random() | 创建一个无参的随机数构造器,使用系统时间(ms)作为默认种子 |
| public Random(long seed) | 使用 long 数据类型的种子创建一个随机数构造器 |
| public boolean nextBoolean() | 返回下一个伪随机数,它取自此随机数生成器序列的均匀分布的 boolean 值 |
| public double nextDouble() | 返回下一个伪随机数,它取自此随机数生成器序列的,在 0.0 和 1.0之间均匀分布的 double 值 |
| public float nextFloat() | 返回下一个伪随机数,它取自此随机数生成器序列的,在 0.0 和 1.0之间均匀分布的 float 值 |
| public int nextInt() | 返回下一个伪随机数,它取自此随机数生成器序列中均匀分布的 int 值 |
| public int nextInt(int n) | 返回一个随机数,它取自此随机数生成器序列的,在 0 和 n 之间均匀分布的 int 值 |
| public long nextLong() | 返回下一个伪随机数,它取自此随机数生成器序列的均匀分布的 long 值 |
| public synchronized void setSeed(long seed) | 使用单个 long 种子设置此随机数生成器的种子 |
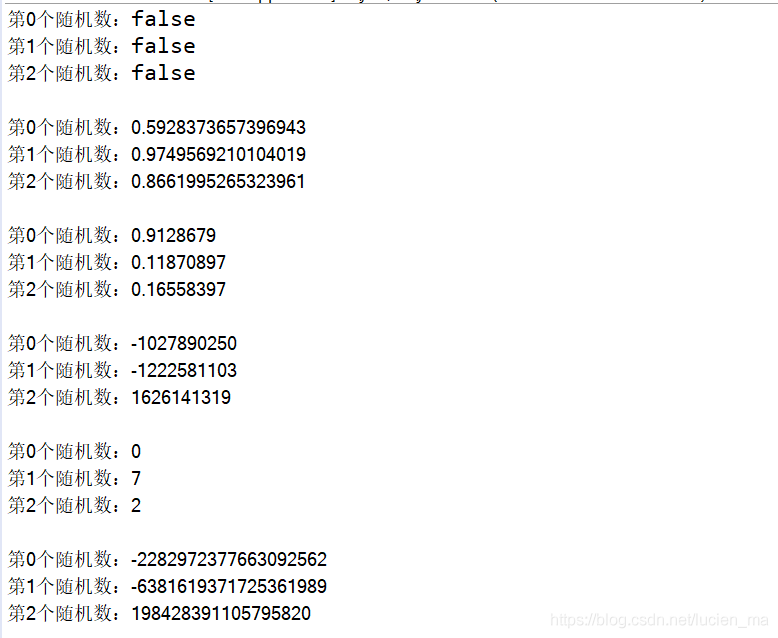
Random 类的具体使用如下:
public class TestRandom {
    public static void main(String[] args) {
        Random random = new Random();
        for(int i = 0; i < 3; i++) {
            boolean flag = random.nextBoolean();
            System.out.println("第"+i+"个随机数:"+flag);
        }
        System.out.println();
        for(int i = 0; i < 3; i++) {
            double num = random.nextDouble();
            System.out.println("第"+i+"个随机数:"+num);
        }
        System.out.println();
        for(int i = 0; i < 3; i++) {
            float num = random.nextFloat();
            System.out.println("第"+i+"个随机数:"+num);
        }
        System.out.println();
        for(int i = 0; i < 3; i++) {
            int num = random.nextInt();
            System.out.println("第"+i+"个随机数:"+num);
        }
        System.out.println();
        for(int i = 0; i < 3; i++) {
            int num = random.nextInt(10);
            System.out.println("第"+i+"个随机数:"+num);
        }
        System.out.println();
        for(int i = 0; i < 3; i++) {
            long num = random.nextLong();
            System.out.println("第"+i+"个随机数:"+num);
        }
    }
}
运行结果:
String
String 是我们实际开发中使用频率很高的类,Java 通过 String 类来创建和操作字符串数据。
String实例化
String 实例化方式有两种,第 1 种事直接赋值的方式,第 2 种事通过构造函数创建实例化对象的方式。String 类有一个带参数的构造函数:public String(String original),将 String 对象的值直接传入即可创建。两种方式的具体操作:
public class StringTest{
    public static void main(String[] args){
        //第一种方式直接赋值
        String str1 = "Hello";
        //第二种方式通过构造函数
        String str2 = new String("World");
        System.out.println(str1);
        System.out.println(str2);
    }
}
运行结果:
Hello
World
下面让我们看看两种方式的区别
public class StringTest{
    public static void main(Stirng[] args){
        String str1 = "Hello";
        String str2 = "Hello";
        System.out.println(str1 == str2);
        String str3 = new String("World");
        String str4 = new String("World");
        System.out.println(str3 == str4);
    }
}
运行结果:
true
false
== 判断的并不是对象的值是否相等,而是判断对象所引用的内存地址是否相等。通过结果我们可以得出结论,str1 所引用的内存地址和 str2 所引用的内存地址相同,即 str1 和 str2 指向堆内存中的同一块位置。而 str3 和 str4 则指向堆内存中不同的位置
详细解释:
第一种赋值的方式,会首先在栈内存中开辟一块空间来保存变量 str1 ,同时在堆内存中开辟一块合适的空间来存储 “Hello” ,然后将堆内存的地址赋给栈内存中的 str1,即 str1 中保存的是 “Hello” 的内存地址。Java 同时在堆内存中提供了一个字符串常量池,专门用来存储 String 类型的对象。此外字符串常量池有一个特点,在实例化一个 String 对象时,首先会在字符串常量池中查找,如果该字符串已经在池中创建,则直接返回它的内存地址。如果字符串常量池中不存在该字符串,就会先创建再返回,即字符串常量池中不会创建值相等的重复字符串对象。所以 str1 == str2 的返回值是 true,但是字符串常量池只适用于直接赋值的方式。如果是通过构造函数创建的对象则完全不同,这种方式创建的对象会在堆内存中开辟对应的空间来存储,即通过 new String("World") 和 new String("World") 创建了两个对象,虽然值相等,但是会开辟两块内存在存储,所以内存地址肯定是不同的。所以 str3 == str4 的返回值为 false
那我们如何来判断两个字符串对象的值是否相等呢?String 类对继承自 Object 类的 equals 方法进行了重写,具体重写的代码在这儿就不展示了。String 类在判断两个字符串对象是否相同时,会直接将字符串转为 byte 类型的数组,然后依次判断数组中的每一个值是否相等。如果全部相等,则认为两个字符串相等,返回 true ,否则返回 false,表示两个字符串不同。我们在判断哪两个字符串对象的是否相等时,直接调用 String 的 equals 方法即可。
实际上 String 类在存储字符串时,会将字符串的值保存在 byte 类型的数组中,我们知道数组一旦创建,其长度就是不可改变的。既然长度不可改变,也就意味着 byte 类型所存储的字符串值不可修改。一旦修改,就会重新创建一个 String 对象,用新对象的 byte 数组来存储修改之后的字符串。即如果我们修改了 String对象的值,它就已经不是之前的对象了,而是一个新的对象
public class StringTest{
    public static void main(String[] args){
        String str1 = new String("Hello");
        String str2 = str1;
        System.out.println(str2 == str1);
        str1 += " World";
        System.out.println(str2 == str1);
    }
}
运行结果:
true
false
String 常用方法
String 类提供了大量的方法,在实际开发中使用这些方法可以很方便地完成对字符串的操作,常用方法如表:
| 方法 | 描述 |
|---|---|
| public String() | 创建一个值为空的对象 |
| public String(String original) | 创建一个值为 original 的对象 |
| public String(char value[]) | 将一个 char 型数组转为字符串对象 |
| public String(char value[],int offset,int count) | 将一个指定范围的 char 型数组转为字符串对象 |
| public String(byte[] bytes) | 将一个 byte 型数组转为字符串对象 |
| public String(byte byte[],int offset,int length) | 将一个指定范围的 byte 型数组转为字符串对象 |
| public int length() | 返回字符串长度 |
| public boolean isEmpty() | 判断字符串是否为空 |
| public char charAt(int index) | 返回字符串中指定位置的字符 |
| public byte[] getBytes() | 将字符串转为 byte 型数组 |
| public boolean equals(Object anObject) | 判断两个字符串是否相等 |
| public boolean equalsIgnoreCase(String anotherString) | 判断两个字符串是否相等并且忽略大小写 |
| public int compareTo(String anotherString) | 对两个字符串进行排序 |
| public boolean startsWith(String prefix) | 判断是否以指定的值开头 |
| public boolean endsWith(String suffix) | 判断是否以指定的值结尾 |
| public int hashCode() | 获取字符串的散列值 |
| public int indexOf(String str) | 从开头查找指定字符的位置 |
| public int indexOf(String str,int fromIndex) | 从指定位置开始查找指定字符的位置 |
| public String substring(int beginIndex) | 截取字符串从指定位置开始到结尾 |
| public String substring(int beginIndex,int endIndex) | 截取字符串从指定位置开始到指定位置结束(是一个半闭半开区间) |
| public String concat(String str) | 追加字符串 |
| public String replaceAll(String regex,String replacement) | 替换字符串 |
| public String[] split(String regex) | 用指定字符串对目标字符串进行分割,返回数组 |
| public String toLowerCase() | 将字符串转为小写 |
| public String toUpperCase() | 将字符串转为大写 |
| public char[] toCharArray() | 将字符串转为 char 型数组 |
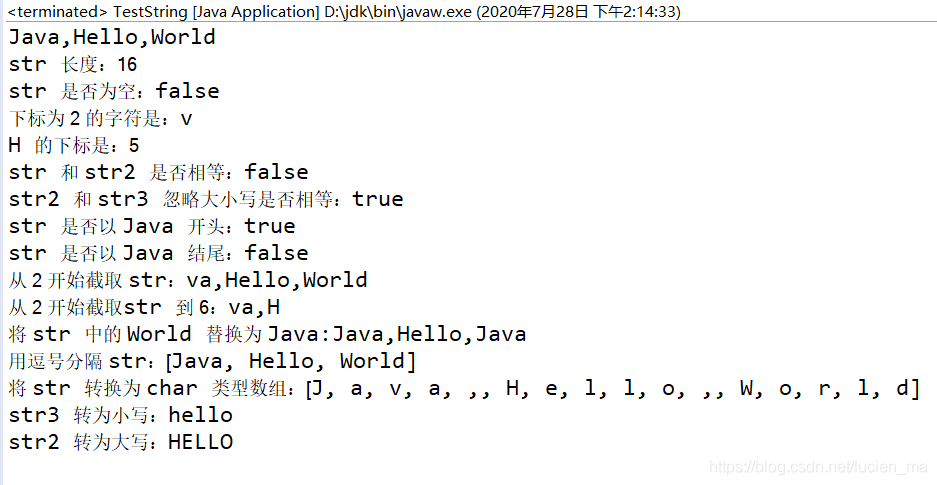
String 常用方法的使用:
public class TestString {
    public static void main(String[] args) {
        char[] array = {'J','a','v','a',',','H','e','l','l','o',',','W','o','r','l','d'};
        String str = new String(array);
        System.out.println(str);
        System.out.println("str 长度:"+str.length());
        System.out.println("str 是否为空:"+str.isEmpty());
        System.out.println("下标为 2 的字符是:"+str.charAt(2));
        System.out.println("H 的下标是:"+str.indexOf('H'));
        String str2 = "Hello";
        System.out.println("str 和 str2 是否相等:"+str.equals(str2));
        String str3 = "HELLO";
        System.out.println("str2 和 str3 忽略大小写是否相等:"+str2.equalsIgnoreCase(str3));
        System.out.println("str 是否以 Java 开头:"+str.startsWith("Java"));
        System.out.println("str 是否以 Java 结尾:"+str.endsWith("Java"));
        System.out.println("从 2 开始截取 str:"+str.substring(2));
        System.out.println("从 2 开始截取str 到 6:"+str.substring(2, 6));
        System.out.println("将 str 中的 World 替换为 Java:"+str.replaceAll("World", "Java"));
        System.out.println("用逗号分隔 str:"+Arrays.toString(str.split(",")));
        System.out.println("将 str 转换为 char 类型数组:"+Arrays.toString(str.toCharArray()));
        System.out.println("str3 转为小写:"+str3.toLowerCase());
        System.out.println("str2 转为大写:"+str2.toUpperCase());
    }
}
运行结果:
StringBuffer
在实际开发中用 String 类会存在一个问题,String 对象一旦创建,其值是不能修改的,如果要修改,会重新开辟内存空间来存储修改之后的对象,即修改了 String 的引用。因为 String 的底层是用数组来存值的,数组长度不可改变这一特性导致了上述问题,所以如果开发中需要对某个字符串进行频繁的修改,使用 String 就不合适了,会造成内存空间的浪费。如何解决这个问题呢?可以使用 StringBuffer 类来解决。StringBuffer 和 String 类似,底层也是用一个数组来存储字符串的值,并且数组的默认长度为 16,即一个空的 StringBuffer 对象,数组长度为 16。
当我们调用有参构造创建一个 StringBuffer 对象时,数组长度就不是 16 了,而是根据当前对象的值来决定数组的长度,“值的长度+16” 作为数组的长度。所以一个 StringBuffer 创建完成之后,有 16 字节的空间可以对其值进行修改。如果修改的值范围超过了 16 字节,则调用 ensureCapacityInternal() 方法继续对底层数组进行扩容,并且保持引用不变。以上就是 StringBuffer 创建及修改的底层原理。接下来,我们通过代码完成对 StringBuffer 的使用,StringBuffer 常用方法如表:
| 方法 | 描述 |
|---|---|
| public StringBuffer() | 无参构造,创建一个空的 StringBuffer |
| public StringBuffer(String str) | 有参构造 |
| public synchronized int length() | 返回 StringBuffer 的长度 |
| public synchronized char charAt(int index) | 返回字符串中指定位置的字符 |
| public synchronized StringBuffer append(String str) | 追加字符 |
| public synchronized StringBuffer delete(int start,int end) | 删除指定区间内的字符 |
| public synchronized StringBuffer deleteCharAt(int index) | 删除指定位置的字符 |
| public synchronized StringBuffer replace(int start,int end,String str) | 将指定区间内的值替换为 str |
| public synchronized String substring(int start) | 截取字符串从指定位置开始到结尾 |
| public synchronized String substring(int start,int end) | 截取字符串从指定位置开始到指定位置结束 |
| public synchronized StringBuffer insert(int offset, String str) | 向指定位置插入 str |
| public int indexOf(String str) | 从开头开始查找指定字符的位置 |
| public int indexOf(String str, int fromIndex) | 从指定的位置开始查找指定字符的位置 |
| public synchronized StringBuffer reverse() | 进行反转 |
| public synchronized String toString() | 返回 StringBuffer 对应的 String |
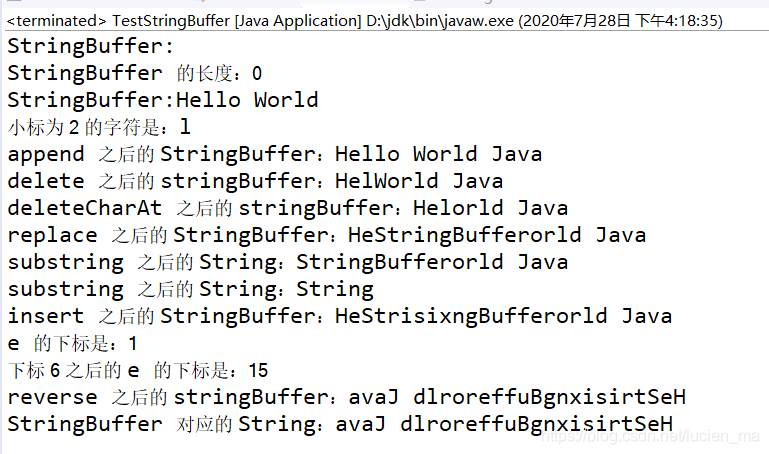
public class TestStringBuffer {
    public static void main(String[] args) {
        StringBuffer stringBuffer = new StringBuffer();
        System.out.println("StringBuffer:"+stringBuffer);
        System.out.println("StringBuffer 的长度:"+stringBuffer.length());
        stringBuffer = new StringBuffer("Hello World");
        System.out.println("StringBuffer:"+stringBuffer);
        System.out.println("小标为 2 的字符是:"+stringBuffer.charAt(2));
        stringBuffer = stringBuffer.append(" Java");
        System.out.println("append 之后的 StringBuffer:"+stringBuffer);
        stringBuffer = stringBuffer.delete(3, 6);
        System.out.println("delete 之后的 stringBuffer:"+stringBuffer);
        stringBuffer = stringBuffer.deleteCharAt(3);
        System.out.println("deleteCharAt 之后的 stringBuffer:"+stringBuffer);
        stringBuffer = stringBuffer.replace(2, 3, "StringBuffer");
        System.out.println("replace 之后的 StringBuffer:"+stringBuffer);
        String str = stringBuffer.substring(2);
        System.out.println("substring 之后的 String:"+str);
        str = stringBuffer.substring(2, 8);
        System.out.println("substring 之后的 String:"+str);
        stringBuffer = stringBuffer.insert(6, "six");
        System.out.println("insert 之后的 StringBuffer:"+stringBuffer);
        System.out.println("e 的下标是:"+stringBuffer.indexOf("e"));
        System.out.println("下标 6 之后的 e 的下标是:"+stringBuffer.indexOf("e", 6));
        stringBuffer = stringBuffer.reverse();
        System.out.println("reverse 之后的 stringBuffer:"+stringBuffer);
        str = stringBuffer.toString();
        System.out.println("StringBuffer 对应的 String:"+str);
    }
}
运行结果:
日期类
在实际开发中对日期的使用时必不可少的,比如显示系统时间等等。Java 对日期的使用也提供了良好的封装,主要包括 java.util.Date 和 java.util.Calendar.
Date
Date 类的使用较为简单,直接通过构造函数实例化对象即可,Date 对象表示当前的系统时间,具体代码如下:
public class DateTest{
    public static void main(String[] args){
        Date date = new Date();
        System.out.println(date);
    }
}
运行结果:
Tue Jul 28 17:40:01 CST 2020
我们已经得到了系统时间,但是表示方式并不符合我们所习惯的日期格式。可以通过 java.text.SimpleDateFormat 类对 Date 对象进行格式化,将日期的表示形式转换成我们所熟悉的方式。我们可以自己定义日期的转换格式,SimpleDateFormat 提供了模板标记,如表:
| 标记 | 描述 |
|---|---|
| y | 年,yyyy表示 4 位数的年份信息 |
| M | 月,MM表示 2 位数的月份信息 |
| m | 分钟,mm 表示 2 位数的分钟信息 |
| d | 天,dd 表示 2 位数的天信息 |
| H | 小时,HH 表示 2 位数的 24 小时制下的小时信息 |
| h | 小时,hh 表示 2 位数的 12 小时制下的小时信息 |
| s | 秒,ss 表示 2 位数的秒信息 |
| S | 毫秒,SSS 表示 3 位数的毫秒信息 |
具体使用如下:
public class DateTest {
    public static void main(String[] args) {
        Date date = new Date();
        System.out.println(date);
        //格式化
        SimpleDateFormat simpleDateFormat = new SimpleDateFormat("yyyy-MM-dd HH:mm:ss.SSS");
        String dateStr = simpleDateFormat.format(date);
        System.out.println(dateStr);
    }
}
运行结果:
Tue Jul 28 17:40:01 CST 2020 2020-07-28 17:40:01.657
Calendar
通过 Date 类我们可以获取当前系统时间,但是功能也仅限于此。如果需要对日期数据进行逻辑操作,如计算从当前时间算起 15 天后的日期是几月几号,如果是我们自己编写就会很困难,需要考虑的因素非常多,比如跨年、闰年、等等。Java 给我们提供了一个封装好的工具类可以帮我们完成业务代码。我们可以通过 Calendar 类来完成日期数据的逻辑运算。
使用 Calendar 进行日期运算的基本思路是先将日期数据赋给 Calendar ,再调用 Calendar 的方法来完成相关运算,我们首先介绍如何将日期数据赋给 Calendar 类。Calendar 类提供了很多静态常量,用来记录日期数据,常用的静态常量如表:
| 常量 | 描述 |
|---|---|
| public static final int YEAR | 年 |
| public static final int MONTH | 月 |
| public static final int DAY_OF_MONTH | 天,以月为单位,即当天是该月的第几天 |
| public static final int DAY_OF_YEAR | 天,以年为单位,即当天是该年的第几天 |
| public static final int HOUR_OF_DAY | 小时 |
| public static final int MINUTE | 分钟 |
| public static final int SECOND | 秒 |
| public static final int MILLISECOND | 毫秒 |
Calendar 常用方法的描述如表:
| 方法 | 描述 |
|---|---|
| public static Calendar getInstance() | 获取系统对应的 Calendar 实例化对象 |
| public void set(int field, int value) | 给静态常量赋值 |
| public int get(int field) | 取出静态常量 |
| public final Date getTime() | 获取 Calendar 对应的 Date 对象 |
Calendar 的具体操作如下:
public class CalendarTest {
    public static void main(String[] args) {
        //计算2020 年 7 月 28 日所在的周是 2020 年的第几周
        Calendar calendar = Calendar.getInstance();
        calendar.set(Calendar.YEAR, 2020);
        //1月为 0,所以 7 月为 6
        calendar.set(Calendar.MONTH, 6);
        calendar.set(Calendar.DAY_OF_MONTH, 28);
        int week = calendar.get(Calendar.WEEK_OF_YEAR);
        System.out.println("2020 年 7 月 28 日 所在的周是第"+week+"周");

        //计算2020年7月28日往后推21天的日期
        calendar.set(Calendar.DAY_OF_YEAR, calendar.get(Calendar.DAY_OF_YEAR)+21);
        SimpleDateFormat simpleDateFormat = new SimpleDateFormat("yyyy-MM-dd");
        String laterDateStr = simpleDateFormat.format(calendar.getTime());
        System.out.println("2020年7月28日之后的21天的日期是:"+laterDateStr);

        //计算2020年7月28日往前推 21 天的日期
        calendar.set(Calendar.YEAR,2020);
        calendar.set(Calendar.MONTH,6);
        calendar.set(Calendar.DAY_OF_MONTH,28);
        calendar.set(Calendar.DAY_OF_YEAR, calendar.get(Calendar.DAY_OF_YEAR) - 21);
        String frontDateStr = simpleDateFormat.format(calendar.getTime());
        System.out.println("2020年7月28日向前推 21 天的日期是:"+frontDateStr);
    }
}
运行结果:


