在 Netty 中创建 1 个 NioServerSocketChannel 在指定的端口监听客户端连接,这个过程主要有以下 个步骤:
- 创建 NioServerSocketChannel
- 初始化并注册 NioServerSocketChannel
- 绑定指定端口
首先列出一个简易服务端的启动代码:
public void start() {
    EventLoopGroup bossGroup = new NioEventLoopGroup(1);
    EventLoopGroup workerGroup = new NioEventLoopGroup();
    try {
        ServerBootstrap sbs = new ServerBootstrap()
                //添加 group
                .group(bossGroup, workerGroup)
                //指定服务端 Channel 类型
                .channel(NioServerSocketChannel.class)
                //添加服务端 Channel 的 Handler
                .handler(new HelloWorldServerHandler())
                //添加客户端 Channel 的 Handler
                .childHandler(new ChannelInitializer<NioSocketChannel>() {
                    @Override
                    protected void initChannel(NioSocketChannel ch) throws Exception {
                        //为后续接入的客户端 Channel 准备的字符串编解码 Handler
                        ch.pipeline().addLast(new StringDecoder());
                        ch.pipeline().addLast(new StringEncoder());
                    }
                });
        //监听指定的端口
        ChannelFuture future = sbs.bind(port).sync();
        System.out.println("Server start listen at " + port);
        future.channel().closeFuture().sync();
    } catch (Exception e) {
        bossGroup.shutdownGracefully();
        workerGroup.shutdownGracefully();
    }
}
下面就从 ServerBootstrap 的 bind(int port)方法开始分析服务端的 NioServerSocketChannel 的创建过程。
1. 创建 NioServerSocketChannel
跟随 bind 方法的调用,最终在 AbstractBootstrap 类的 doBind()方法找到了初始化,注册和绑定方法调用:
private ChannelFuture doBind(final SocketAddress localAddress) {
    //初始化并注册
    final ChannelFuture regFuture = initAndRegister();
    final Channel channel = regFuture.channel();
    if (regFuture.cause() != null) {
        return regFuture;
    }

    if (regFuture.isDone()) {
        // At this point we know that the registration was complete and successful.
        ChannelPromise promise = channel.newPromise();
        //绑定本地端口
        doBind0(regFuture, channel, localAddress, promise);
        return promise;
    } else {
        //....
    }
}
2. 初始化并注册 NioServerSocketChannel
首先来看一下这个 initAndRegister()方法:
final ChannelFuture initAndRegister() {
    Channel channel = null;
    try {
        //通过反射的方式创建 Channel
        channel = channelFactory.newChannel();
        //初始化 Channel
        init(channel);
    } catch (Throwable t) {
        //...
    }

    //注册
    ChannelFuture regFuture = config().group().register(channel);
    if (regFuture.cause() != null) {
        if (channel.isRegistered()) {
            channel.close();
        } else {
            channel.unsafe().closeForcibly();
        }
    }
    //...
}
Channel 也是通过工厂类来创建的,这个工厂默认是 ReflectiveChannelFactory,是在前面启动代码中,设置服务端 Channel 类型时创建的。通过名字可以知道,是用反射的方式创建了 Channel 对象,具体可以查看 NioServerSocketChannel 的构造方法。
init()方法有两种实现,这里分析的是 ServerBootstrap 的实现:
@Override
void init(Channel channel) throws Exception {
    //... option 的设置省略掉
    //pipeline 的创建,默认使用的 DefaultPipeline
    ChannelPipeline p = channel.pipeline();

    //... 客户端 Channel 相关配置的保存

    p.addLast(new ChannelInitializer<Channel>() {
        @Override
        public void initChannel(Channel ch) throws Exception {
            final ChannelPipeline pipeline = ch.pipeline();
            //这里添加的是启动代码中,服务端的 Handler
            ChannelHandler handler = config.handler();
            if (handler != null) {
                pipeline.addLast(handler);
            }

            // We add this handler via the EventLoop as the user may have used a ChannelInitializer as handler.
            // In this case the initChannel(...) method will only be called after this method returns. Because
            // of this we need to ensure we add our handler in a delayed fashion so all the users handler are
            // placed in front of the ServerBootstrapAcceptor.
            ch.eventLoop().execute(new Runnable() {
                @Override
                public void run() {
                    //这里添加了一个 Accepter,用来处理新连接的接入
                    pipeline.addLast(new ServerBootstrapAcceptor(
                            currentChildGroup, currentChildHandler, currentChildOptions, currentChildAttrs));
                }
            });
        }
    });
}
初始化 Channel 这个动作,主要做了 4 件事:
- 创建 pipeline(以 NioServerSocketChannel 为例,pipeline 实际上是在其构造方法中创建的)
- 为 Channel 添加用户创建的 Handler
- 添加 Accepter
- 其他属性的设置
接下来分析 Channel 的注册,需要关注的是这行代码:
ChannelFuture regFuture = config().group().register(channel);
config()方法获取了启动时创建的 config 对象,这个对象的 group()方法就返回了启动时传入的 bossGroup。启动代码中传入了两个 group,返回的为什么是 boosGroup 呢?查看启动代码中的 group(EventLoopGroup parentGroup, EventLoopGroup childGroup)方法,在它第一行就调用了 super.group(parentGroup),将第一个 group 对象传给了父类 AbstractBootstrap。而此处 config 调用的 group()方法返回的正是父类中的 group。
因为这里是一个 NioEventLoopGroup 对象,所以使用的 register(channel)方法是 MultithreadEventLoopGroup 中的。
@Override
public ChannelFuture register(Channel channel) {
    return next().register(channel);
}
查看 next()方法可以发现,最终是调用之前创建 group 时创建的 chooser 的 next()方法,该方法会返回一个 NioEventLooop 对象(EventLoop 是在这里分配的),它的 register()方法是在父类 SingleThreadEventLoop 中实现的。最终调用了 AbstractChannel 中的注册方法。
@Override
public final void register(EventLoop eventLoop, final ChannelPromise promise) {
    //...
    //将前面返回的 eventLoop 保存起来
    AbstractChannel.this.eventLoop = eventLoop;
    //判断 eventLoop 中的 thread 是否是当前线程
    //初次启动时,eventLoop 中的 thread 为 null
    if (eventLoop.inEventLoop()) {
        register0(promise);
    } else {
        try {
            //将注册任务传进去
            eventLoop.execute(new Runnable() {
                @Override
                public void run() {
                    //注册
                    register0(promise);
                }
            });
        } catch (Throwable t) {
            //...
        }
    }
}
将注册动作封装成一个任务,然后交给 eventLoop 对象处理。
@Override
public void execute(Runnable task) {
    //...
    // 这里一开始是 main 线程,所以结果是 false
    boolean inEventLoop = inEventLoop();
    if (inEventLoop) {
        addTask(task);
    } else {
        //启动线程
        startThread();
        addTask(task);//将前面传进来的注册任务添加进队列
        if (isShutdown() && removeTask(task)) {
            reject();
        }
    }

    if (!addTaskWakesUp && wakesUpForTask(task)) {
        wakeup(inEventLoop);
    }
}

private void startThread() {
    //判断是否需要启动线程
    if (STATE_UPDATER.get(this) == ST_NOT_STARTED) {
        if (STATE_UPDATER.compareAndSet(this, ST_NOT_STARTED, ST_STARTED)) {
            //启动线程
            doStartThread();
        }
    }
}
上面代码中的 startThread()方法有个 STATE_UPDATER,它是用来更新该对象的 state 属性,是一个线程安全的操作。state 默认值为 ST_NOT_STARTED,所以第一次进入该方法,条件判断为 true,接下来进行 CAS 操作,将 state 设置为 ST_STARTED,然后调用 doStartThread()方法。当 group 中的线程都启用之后,下一次 chooser 再选中这个线程,startThread()方法中的第一个 if 的条件判断就是 false 了,不会再创建新的线程。
private void doStartThread() {
    assert thread == null;
    //这个 executor 就是构建 group 时,创建出来的 executor
    executor.execute(new Runnable() {
        @Override
        public void run() {
            thread = Thread.currentThread();
            if (interrupted) {
                thread.interrupt();
            }

            boolean success = false;
            updateLastExecutionTime();
            try {
                //前面创建的是 NioEventLoop
                SingleThreadEventExecutor.this.run();
                success = true;
            } catch (Throwable t) {
                logger.warn("Unexpected exception from an event executor: ", t);
            } finally {
                for (;;) {
                    //更新 state
                    int oldState = STATE_UPDATER.get(SingleThreadEventExecutor.this);
                    if (oldState >= ST_SHUTTING_DOWN || STATE_UPDATER.compareAndSet(
                            SingleThreadEventExecutor.this, oldState, ST_SHUTTING_DOWN)) {
                        break;
                    }
                }
                //...
            }
        }
    });
}
前一篇分析 EventLoopGroup 创建时说过,会在 EventLoop 保存一个 executor 对象的引用,最终个任务就是交给这个 executor 来处理的。executor 的 execute(Runnable task) 方法会创建新线程,并执行传入的 task。接下来看一下 NioEventLoop 中的 run() 方法。
protected void run() {
    for (;;) {
        try {
            //计算 select 策略,当前有任务时,会进行一次 selectNow(NIO),返回就绪的 key 个数
            //显然 switch 中没有匹配项,直接跳出 switch
            //无任务时,则直接返回 SelectStrategy.SELECT
            //这里的 SelectStrategy.CONTINUE 感觉不会匹配到
            switch (selectStrategy.calculateStrategy(selectNowSupplier, hasTasks())) {
                case SelectStrategy.CONTINUE:
                    continue;
                case SelectStrategy.SELECT:
                    //当没有可处理的任务时,直接进行 select 操作
                    // wakenUp.getAndSet(false) 返回的是 oldValue,由于默认值是 false
                    // 所以第一次返回的是 false
                    select(wakenUp.getAndSet(false));

                    // 'wakenUp.compareAndSet(false, true)' is always evaluated
                    // before calling 'selector.wakeup()' to reduce the wake-up
                    // overhead. (Selector.wakeup() is an expensive operation.)
                    //
                    // However, there is a race condition in this approach.
                    // The race condition is triggered when 'wakenUp' is set to
                    // true too early.
                    //
                    // 'wakenUp' is set to true too early if:
                    // 1) Selector is waken up between 'wakenUp.set(false)' and
                    //    'selector.select(...)'. (BAD)
                    // 2) Selector is waken up between 'selector.select(...)' and
                    //    'if (wakenUp.get()) { ... }'. (OK)
                    //
                    // In the first case, 'wakenUp' is set to true and the
                    // following 'selector.select(...)' will wake up immediately.
                    // Until 'wakenUp' is set to false again in the next round,
                    // 'wakenUp.compareAndSet(false, true)' will fail, and therefore
                    // any attempt to wake up the Selector will fail, too, causing
                    // the following 'selector.select(...)' call to block
                    // unnecessarily.
                    //
                    // To fix this problem, we wake up the selector again if wakenUp
                    // is true immediately after selector.select(...).
                    // It is inefficient in that it wakes up the selector for both
                    // the first case (BAD - wake-up required) and the second case
                    // (OK - no wake-up required).

                    if (wakenUp.get()) {
                        selector.wakeup();
                    }
                default:
                    // fallthrough
            }

            cancelledKeys = 0;
            needsToSelectAgain = false;
            final int ioRatio = this.ioRatio;
            //根据比例来处理 IO 事件和任务
            if (ioRatio == 100) {
                try {
                    //处理就绪的 key
                    processSelectedKeys();
                } finally {
                    // Ensure we always run tasks.
                    //执行任务
                    runAllTasks();
                }
            } else {
                final long ioStartTime = System.nanoTime();
                try {
                    processSelectedKeys();
                } finally {
                    // Ensure we always run tasks.
                    // 计算出处理 IO 事件的时间,然后根据比例算出执行任务的时间
                    final long ioTime = System.nanoTime() - ioStartTime;
                    runAllTasks(ioTime * (100 - ioRatio) / ioRatio);
                }
            }
        } catch (Throwable t) {
            handleLoopException(t);
        }
        // Always handle shutdown even if the loop processing threw an exception.
        try {
            if (isShuttingDown()) {
                closeAll();
                if (confirmShutdown()) {
                    return;
                }
            }
        } catch (Throwable t) {
            handleLoopException(t);
        }
    }
}
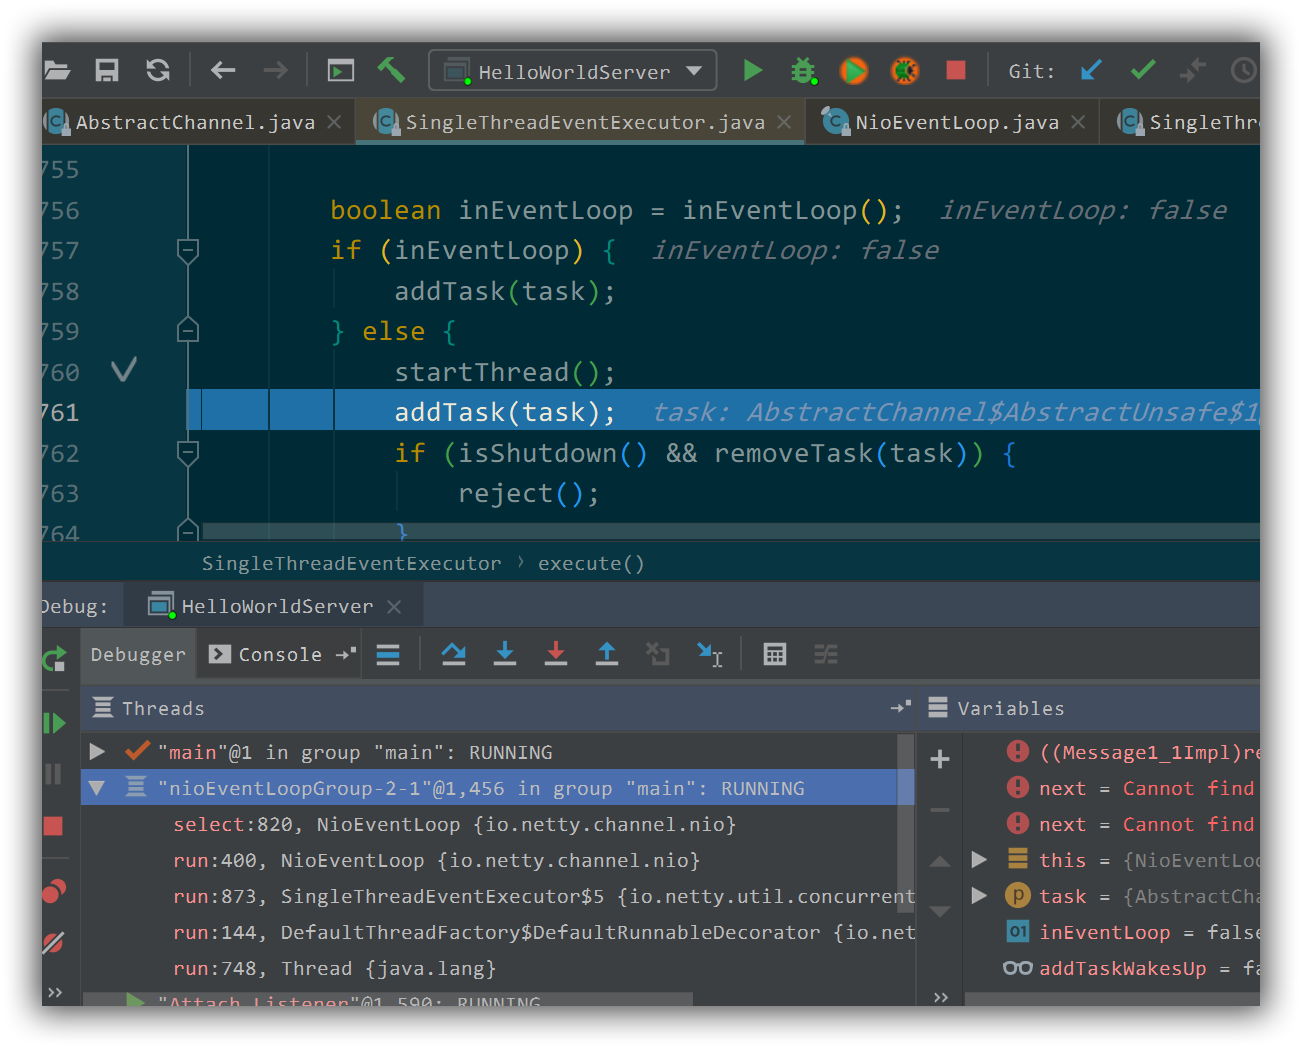
run()方法主要是做 select 操作,和处理 IO 事件和任务队列中的任务,这部分内容下一篇文章再分析。从 executor 执行 execute()方法开始,由 Netty 管理的线程就开始启动运行了。实际上此时的 NioServerSocketChannel 对象还没有注册到 Netty 线程的 Selector 上,Debug 结果如下图:

上图中的 startThread()方法实际上是给 executor 提交了一个任务,紧接着 main 线程就调用了 addTask()方法,将 task 添加到 EventLoop 对象的任务队列中,而这个 task 的内容就是执行注册操作。在添加了注册任务之后,Netty 线程就会在 select 完成后,执行队列中的任务,将 NioServerSocketChannel 注册到该线程的 Selector 上。接下来分析一下 AbstractChannel 的 register0()方法:
private void register0(ChannelPromise promise) {
    try {
        // check if the channel is still open as it could be closed in the mean time when the register
        // call was outside of the eventLoop
        if (!promise.setUncancellable() || !ensureOpen(promise)) {
            return;
        }
        boolean firstRegistration = neverRegistered;
        //注册通道
        doRegister();
        neverRegistered = false;
        registered = true;

        // Ensure we call handlerAdded(...) before we actually notify the promise. This is needed as the
        // user may already fire events through the pipeline in the ChannelFutureListener.
        //添加服务端 Channel 的 Handler
        pipeline.invokeHandlerAddedIfNeeded();

        safeSetSuccess(promise);
        //触发通道注册事件在 pipeline 上传播
        pipeline.fireChannelRegistered();
        // Only fire a channelActive if the channel has never been registered. This prevents firing
        // multiple channel actives if the channel is deregistered and re-registered.
        if (isActive()) {//第一次运行到这儿时,结果为 false,因为此时还没有 bind
            if (firstRegistration) {
                pipeline.fireChannelActive();
            } else if (config().isAutoRead()) {
                // This channel was registered before and autoRead() is set. This means we need to begin read
                // again so that we process inbound data.
                //
                // See https://github.com/netty/netty/issues/4805
                beginRead();
            }
        }
    } catch (Throwable t) {
        // Close the channel directly to avoid FD leak.
        closeForcibly();
        closeFuture.setClosed();
        safeSetFailure(promise, t);
    }
}
doRegister()方法实际上就是 Java NIO 中将通道注册到 Selector 上的操作:
selectionKey = javaChannel().register(eventLoop().selector, 0, this);//这里感兴趣的事件传入的是 0
pipeline.invokeHandlerAddedIfNeeded() 和 pipeline.fireChannelRegistered() 则是用来添加 Handler 并触发 Handler 被添加事件的动作。
在 isActive()这个方法,由于当前是 NioServerSocketChannel,所以实际上是判断当前通道是否成功绑定到一个地址,很显然到目前为止,只是创建了通道并注册到 Selector 上,还没有绑定。
3. 绑定指定端口
在 initAndRegister()方法结束后,main 线程开始调用 doBind0()方法,该方法将绑定操作封装成任务交给 Netty 线程去执行。最后,调用 DefaultPipeline 中的 HeadContext 的 bind()方法,然后通过 unsafe.bind(localAddress,promise)完成绑定:
@Override
public final void bind(final SocketAddress localAddress, final ChannelPromise promise) {
    //...
    //显然这里返回的是 false
    boolean wasActive = isActive();
    try {
        //绑定操作
        doBind(localAddress);
    } catch (Throwable t) {
        safeSetFailure(promise, t);
        closeIfClosed();
        return;
    }

    if (!wasActive && isActive()) {
        invokeLater(new Runnable() {
            @Override
            public void run() {
                //这里才是触发服务端 Channel 激活事件的地方
                pipeline.fireChannelActive();
            }
        });
    }

    safeSetSuccess(promise);
}
这个过程,建议 Debug 跟一下代码,比较清楚代码是如何一步一步到 HeadContext 中来的。接下来分析一下 doBind()方法:
@Override
protected void doBind(SocketAddress localAddress) throws Exception {
    if (PlatformDependent.javaVersion() >= 7) {
        javaChannel().bind(localAddress, config.getBacklog());
    } else {
        javaChannel().socket().bind(localAddress, config.getBacklog());
    }
}
最终是根据平台及其 Java 版本来调用 JDK 中的绑定方法。在绑定完成后,会触发通道激活事件,在 HeadContext 中经过时,发现它里面有这么一行代码:
readIfIsAutoRead();
Debug 一下,发现这个方法最终会调用到 HeadContext 的 read()方法,该方法是调用了 unsafe.beginRead(),紧接着就到了 AbstractNioChannel 的 doBeginRead()方法:
@Override
protected void doBeginRead() throws Exception {
    // Channel.read() or ChannelHandlerContext.read() was called
    final SelectionKey selectionKey = this.selectionKey;
    if (!selectionKey.isValid()) {
        return;
    }

    readPending = true;

    final int interestOps = selectionKey.interestOps();
    if ((interestOps & readInterestOp) == 0) {//说明对 OP_ACCEPT 不感兴趣
        selectionKey.interestOps(interestOps | readInterestOp);//通过 | 修改感兴趣的事件
    }
}
前面通过反射创建 NioServerSocketChannel 对象时,调用了父类也就是 AbstractNioChannel 的构造方法,将 readInterestOp 设置为 16 了,在 NIO 中就是 OP_ACCEPT。从此,该 NioServerSocketChannel 就可以接收客户端连接了。
4. 总结
在 Netty 服务端启动过程中,主线程仅仅是创建了 EventLoopGroup 和启动引导对象,然后发起绑定操作。这个过程中的绑定,注册等操作都是主线程封装成任务交给 Netty 线程去执行的。
由于 Netty 代码中抽象类和接口都比较多,所以某些地方调用的方法有很多种实现,不熟悉的时候可以通过 Debug 来确定。


