点击下载源码密码: pius
需要下载的插件:lombok
本项目包含:activemq mybatis
数据库:
CREATE TABLE `t_user` (
  `user_id` int(11) NOT NULL AUTO_INCREMENT,
  `user_name` varchar(255) NOT NULL,
  `password` varchar(255) NOT NULL,
  `phone` varchar(255) NOT NULL,
  PRIMARY KEY (`user_id`)
) ENGINE=InnoDB AUTO_INCREMENT=1009 DEFAULT CHARSET=utf8;
最终项目结构
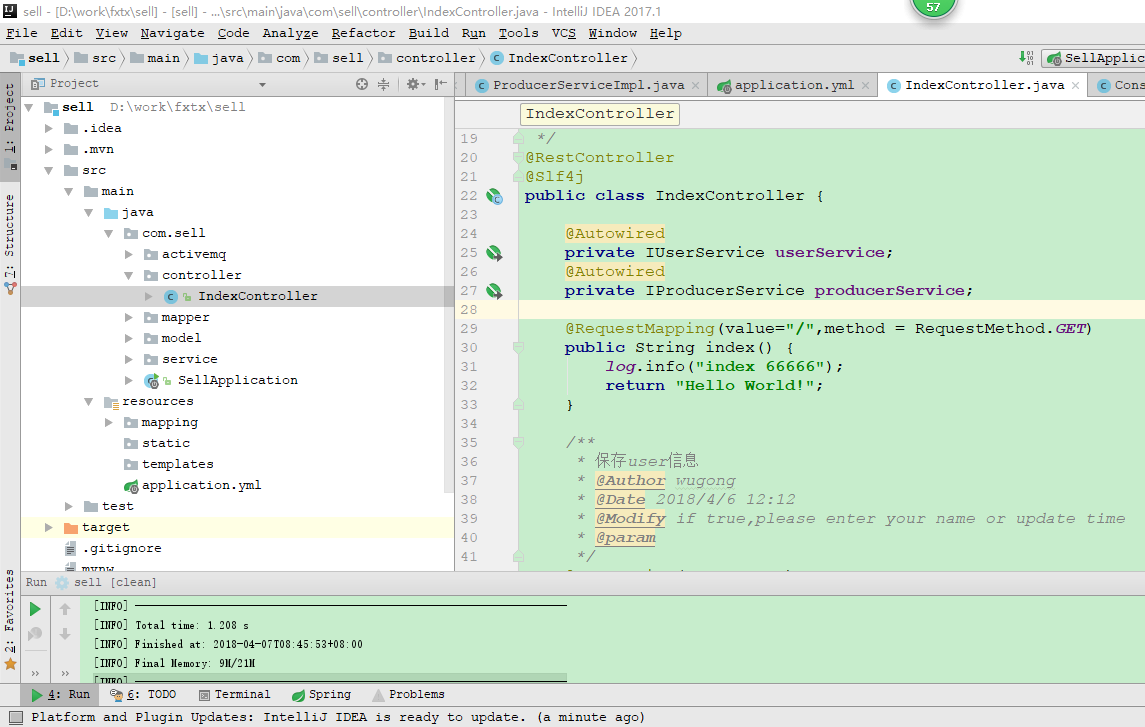
1、创建project
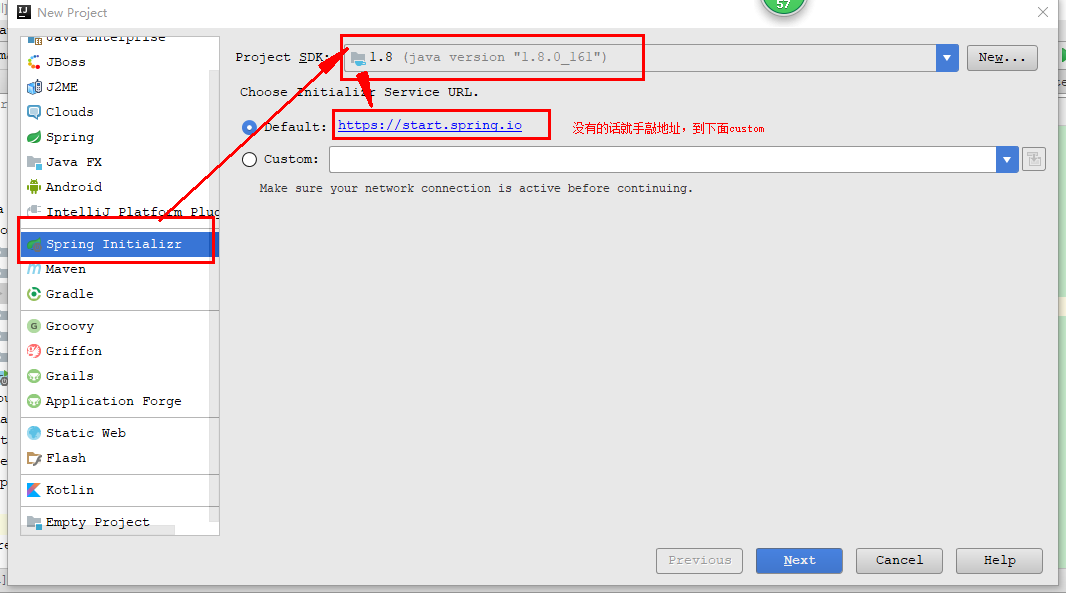
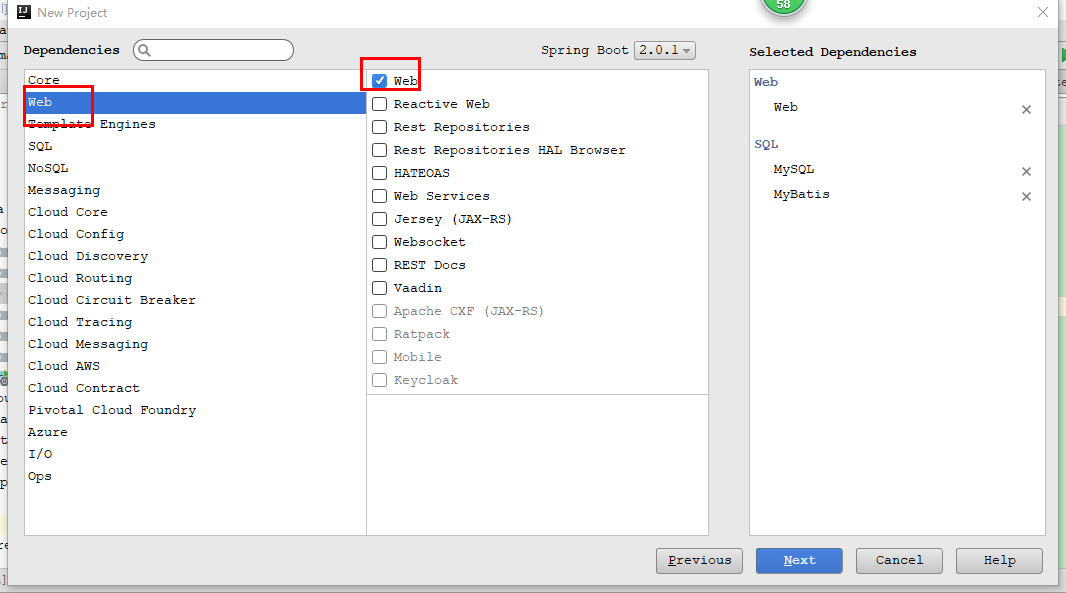
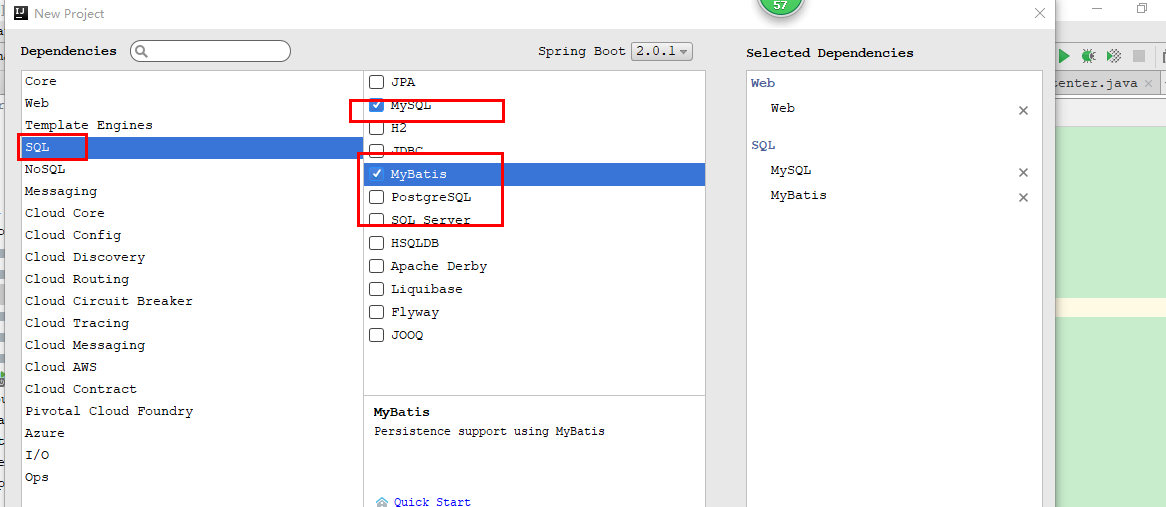
按照上面的步骤完成创建项目,第一次创建springboot 会比较慢。。。
使用:application.yml
server: port: 8080
spring: datasource: name: test url: jdbc:mysql://192.168.1.150:3306/boot-ssm username: root password: root # 使用druid数据源 type: com.alibaba.druid.pool.DruidDataSource driver-class-name: com.mysql.jdbc.Driver filters: stat maxActive: 20 initialSize: 1 maxWait: 60000 minIdle: 1 timeBetweenEvictionRunsMillis: 60000 minEvictableIdleTimeMillis: 300000 validationQuery: select 'x' testWhileIdle: true testOnBorrow: false testOnReturn: false poolPreparedStatements: true maxOpenPreparedStatements: 20 activemq: user: admin password: admin broker-url: tcp://192.168.1.150:61616 pool: enabled: true max-connections: 10
persistenceAdapter jdbcPersistenceAdapter
mybatis: mapper-locations: classpath:mapping/*.xml type-aliases-package: com.sell.model
#pagehelper分页插件 pagehelper: helperDialect: mysql reasonable: true supportMethodsArguments: true params: count=countSql
pom:
  <dependency>
     <groupId>org.springframework.boot</groupId>
     <artifactId>spring-boot-starter-test</artifactId>
     <scope>test</scope>
  </dependency>

  <!-- https://mvnrepository.com/artifact/org.assertj/assertj-core -->
  <dependency>
     <groupId>org.assertj</groupId>
     <artifactId>assertj-core</artifactId>
     <version>2.6.0</version>
     <scope>test</scope>
  </dependency>
  <!--log快捷方式插件-->
  <dependency>
     <groupId>org.projectlombok</groupId>
     <artifactId>lombok</artifactId>
  </dependency>
  <dependency>
     <groupId>mysql</groupId>
     <artifactId>mysql-connector-java</artifactId>
     <scope>runtime</scope>
  </dependency>
  <!-- alibaba的druid数据库连接池 -->
  <dependency>
     <groupId>com.alibaba</groupId>
     <artifactId>druid</artifactId>
     <version>1.0.11</version>
  </dependency>
  <dependency>
     <groupId>com.fasterxml.jackson.core</groupId>
     <artifactId>jackson-core</artifactId>
  </dependency>
  <dependency>
     <groupId>com.fasterxml.jackson.core</groupId>
     <artifactId>jackson-databind</artifactId>
  </dependency>
  <dependency>
     <groupId>com.fasterxml.jackson.datatype</groupId>
     <artifactId>jackson-datatype-joda</artifactId>
  </dependency>
  <dependency>
     <groupId>com.fasterxml.jackson.module</groupId>
     <artifactId>jackson-module-parameter-names</artifactId>
  </dependency>
  <dependency>
     <groupId>com.alibaba</groupId>
     <artifactId>druid-spring-boot-starter</artifactId>
     <version>1.1.0</version>
  </dependency>
  <dependency>
     <groupId>org.mybatis.spring.boot</groupId>
     <artifactId>mybatis-spring-boot-starter</artifactId>
     <version>1.3.2</version>
  </dependency>
  <!--spring boot 热部署功能-->
  <dependency>
     <groupId>org.springframework.boot</groupId>
     <artifactId>spring-boot-devtools</artifactId>
     <optional>true</optional>
  </dependency>
  <!--activemq依赖-->
  <dependency>
     <groupId>org.springframework.boot</groupId>
     <artifactId>spring-boot-starter-activemq</artifactId>
  </dependency>
  <dependency>
     <groupId>org.apache.activemq</groupId>
     <artifactId>activemq-pool</artifactId>
     <!-- <version>5.7.0</version> -->
  </dependency>
然后自己网上百度逆向工程生成mapper与model mapping.xml
activemq:配置,只是实现了简单的发送接收,没有进行持久化,springboot我还不太会持久化activemq
首先,pom中添加activemq依赖
创建生产者与消费者,我只是实现了queue方式
ProducerServiceImpl
package com.sell.activemq;
import com.sell.activemq.spi.IProducerService; import org.apache.activemq.command.ActiveMQQueue; import org.springframework.beans.factory.annotation.Autowired; import org.springframework.jms.core.JmsMessagingTemplate; import org.springframework.stereotype.Service;
import javax.jms.Destination;
/** * @author wugong.jie * @version v1.0.0 * @date 2018/4/6 */ @Service public class ProducerServiceImpl implements IProducerService {
@Autowired
private JmsMessagingTemplate jmsMessagingTemplate;

/\*\*
 \* 发送到指定的消息队列中
 \* @Author wugong
 \* @Date 2018/4/6 14:55
 \* @Modify if true,please enter your name or update time
 \* @param
 \*/
@Override
public void sendTextMessage(Destination destination, String textMessage){
    jmsMessagingTemplate.convertAndSend(destination, textMessage);
}

/\*\*
 \* 发送到默认的消息队列中
 \* @Author wugong
 \* @Date 2018/4/6 14:55
 \* @Modify if true,please enter your name or update time
 \* @param
 \*/
@Override
public void sendTextMessage(String textMessage){
    Destination destination = new ActiveMQQueue("boot-queue");
    this.sendTextMessage(destination,textMessage);
}
}
ConsumerListenter
package com.sell.activemq;
import lombok.extern.slf4j.Slf4j; import org.springframework.jms.annotation.JmsListener; import org.springframework.stereotype.Component;
/** * @author wugong.jie * @version v1.0.0 * @date 2018/4/6 */ @Component @Slf4j public class ConsumerListenter {
@JmsListener(destination = "boot-queue")
public void receiveMeessage(String message){
  log.info("接收的消息:"+message);
}
}
indexController:
package com.sell.controller;
import com.sell.activemq.spi.IProducerService; import com.sell.model.User; import com.sell.service.spi.IUserService; import lombok.extern.slf4j.Slf4j; import org.springframework.beans.factory.annotation.Autowired; import org.springframework.web.bind.annotation.GetMapping; import org.springframework.web.bind.annotation.RequestMapping; import org.springframework.web.bind.annotation.RequestMethod; import org.springframework.web.bind.annotation.RestController;
import java.util.Random;
/** * @author wugong.jie * @version v1.0.0 * @date 2018/3/31 */ @RestController @Slf4j public class IndexController {
@Autowired
private IUserService userService;
@Autowired
private IProducerService producerService;

@RequestMapping(value="/",method = RequestMethod.GET)
public String index() {
    log.info("index 66666");
    return "Hello World!";
}

/\*\*
 \* 保存user信息
 \* @Author wugong
 \* @Date 2018/4/6 12:12
 \* @Modify if true,please enter your name or update time
 \* @param
 \*/
@GetMapping("saveUser")
public String saveUserMapp(){
    User user = new User();
    user.setPassword("11111");
    user.setPhone("12345678901");
    user.setUserName(new Random(1000).nextInt()+"");
    userService.saveUser(user);
    log.info("请求创建用户信息");
    producerService.sendTextMessage("创建了一个用户:"+user.getUserName());
    return "save user";
}
}
package com.sell.service;
import com.sell.mapper.UserMapper; import com.sell.model.User; import com.sell.service.spi.IUserService; import org.springframework.beans.factory.annotation.Autowired; import org.springframework.stereotype.Service; import org.springframework.transaction.annotation.Transactional;
/** * @author wugong.jie * @version v1.0.0 * @date 2018/4/6 */ @Service public class UserServiceImpl implements IUserService {
@Autowired
private UserMapper userMapper;

@Override
@Transactional
public void saveUser(User user){
    userMapper.insert(user);
}
}
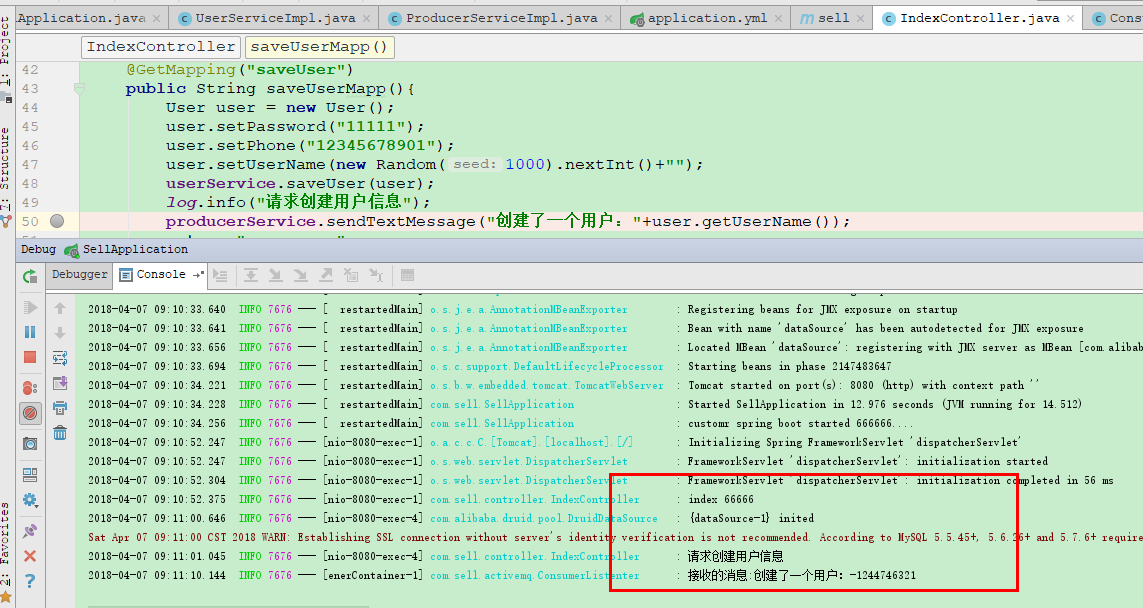
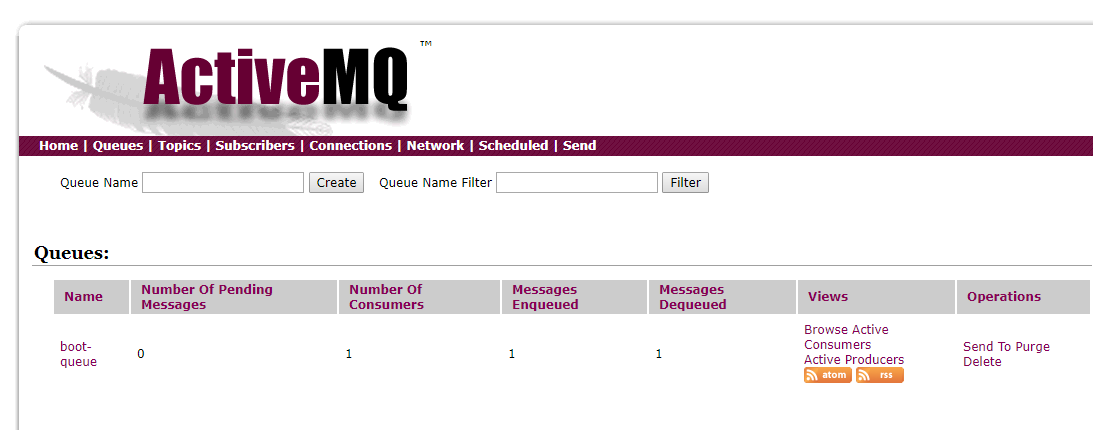
1、activemq启动
2、启动springboot:
3、访问:localhost:8080/saveUser
会新增一个用户信息,然后发送一条消息
