转载于http://www.cnblogs.com/kevingrace/p/9104423.html
之前的文档介绍了ELK架构的基础知识(推荐参考下http://blog.oldboyedu.com/elk/),日志集中分析系统的实施方案:
- ELK+Redis
- ELK+Filebeat
- ELK+Filebeat+Redis
- ELK+Filebeat+Kafka+ZooKeeper
ELK进一步优化架构为EFK,其中F就表示Filebeat。Filebeat即是轻量级数据收集引擎,基于原先Logstash-fowarder 的源码改造出来。换句话说:Filebeat就是新版的 Logstash-fowarder,也会是ELK Stack在shipper端的第一选择。
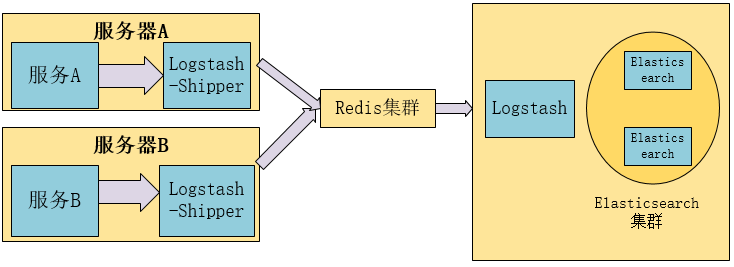
这里选择ELK+Redis的方式进行部署,下面简单记录下ELK结合Redis搭建日志分析平台的集群环境部署过程,大致的架构如下:
+ Elasticsearch是一个分布式搜索分析引擎,稳定、可水平扩展、易于管理是它的主要设计初衷
+ Logstash是一个灵活的数据收集、加工和传输的管道软件
+ Kibana是一个数据可视化平台,可以通过将数据转化为酷炫而强大的图像而实现与数据的交互将三者的收集加工,存储分析和可视转化整合在一起就形成了ELK。
基本流程:
1)Logstash-Shipper获取日志信息发送到redis。
2)Redis在此处的作用是防止ElasticSearch服务异常导致丢失日志,提供消息队列的作用。
3)logstash是读取Redis中的日志信息发送给ElasticSearch。
4)ElasticSearch提供日志存储和检索。
5)Kibana是ElasticSearch可视化界面插件。
1)机器环境
1
2
3
4
5
6
7
8
9
10
11
12
13
14
15
16
17
18
19
20
21
22
23
24
25
26
27
28
29
30
31
32
33
34
35
36
37
38
39
40
41
42
43
44
45
46
47
48
49
50
51
52
53
54
55
主机名 ip地址 部署的服务
elk-node01 192.168.10.213 es01,redis01
elk-node02 192.168.10.214 es02,redis02(vip:192.168.10.217)
elk-node03 192.168.10.215 es03,kibana,nginx
三台节点都是centos7.4系统
[root@elk-node01 ~] # cat /etc/redhat-release
CentOS Linux release 7.4.1708 (Core)
三台节点各自修改主机名
[root@localhost ~] # hostname elk-node01
[root@localhost ~] # hostnamectl set-hostname elk-node01
关闭三台节点的iptables和selinux
[root@elk-node01 ~] # systemctl stop firewalld.service
[root@elk-node01 ~] # systemctl disable firewalld.service
[root@elk-node01 ~] # firewall-cmd --state
not running
[root@elk-node01 ~] # setenforce 0
[root@elk-node01 ~] # getenforce
Disabled
[root@elk-node01 ~] # vim /etc/sysconfig/selinux
......
SELINUX=disabled
三台节点机都要做下hosts绑定
[root@elk-node01 ~] # cat /etc/hosts
......
192.168.10.213 elk-node01
192.168.10.214 elk-node02
192.168.10.215 elk-node03
同步三台节点机的系统时间
[root@elk-node01 ~] # yum install -y ntpdate
[root@elk-node01 ~] # ntpdate ntp1.aliyun.com
三台节点都要部署java8环境
下载地址:https: //pan .baidu.com /s/1pLaAjPp
提取密码:x27s
[root@elk-node01 ~] # rpm -ivh jdk-8u131-linux-x64.rpm --force
[root@elk-node01 ~] # vim /etc/profile
......
JAVA_HOME= /usr/java/jdk1 .8.0_131
JAVA_BIN= /usr/java/jdk1 .8.0_131 /bin
PATH= /usr/local/sbin : /usr/local/bin : /usr/sbin : /usr/bin : /root/bin : /bin : /sbin/
CLASSPATH=.: /lib/dt .jar: /lib/tools .jar
export JAVA_HOME JAVA_BIN PATH CLASSPATH
[root@elk-node01 ~] # source /etc/profile
[root@elk-node01 ~] # java -version
java version "1.8.0_131"
Java(TM) SE Runtime Environment (build 1.8.0_131-b11)
Java HotSpot(TM) 64-Bit Server VM (build 25.131-b11, mixed mode)
2)部署ElasticSearch集群环境
1
2
3
4
5
6
7
8
9
10
11
12
13
14
15
16
17
18
19
20
21
22
23
24
25
26
27
28
29
30
31
32
33
34
35
36
37
38
39
40
41
42
43
44
45
46
47
48
49
50
51
52
53
54
55
56
57
58
59
60
61
62
63
64
65
66
67
68
69
70
71
72
73
74
75
76
77
78
79
80
81
82
83
84
85
86
87
88
89
90
91
92
93
94
95
96
97
98
99
100
101
102
103
104
105
106
107
108
109
110
111
112
113
114
115
116
117
118
119
120
121
122
123
124
125
126
127
128
129
130
131
132
133
134
135
136
137
138
139
140
141
142
143
144
145
146
147
148
149
150
151
152
153
154
155
156
157
158
159
160
161
162
163
164
165
166
167
168
169
170
171
172
173
174
175
176
177
178
179
180
181
182
183
184
185
186
187
188
189
190
191
192
193
194
195
a)安装Elasticsearch(三台节点都要操作。部署的时候,要求三台节点机器都能正常对外访问,正常联网)
[root@elk-node01 ~] # vim /etc/yum.repos.d/elasticsearch.repo
[elasticsearch-2.x]
name=Elasticsearch repository for 2.x packages
baseurl=http: //packages .elastic.co /elasticsearch/2 .x /centos
gpgcheck=1
gpgkey=http: //packages .elastic.co /GPG-KEY-elasticsearch
enabled=1
[root@elk-node01 ~] # yum install -y elasticsearch
b)配置Elasticsearch集群
elk-node01节点的配置
[root@elk-node01 ~] # cp /etc/elasticsearch/elasticsearch.yml /etc/elasticsearch/elasticsearch.yml.bak
[root@elk-node01 ~] # cat /etc/elasticsearch/elasticsearch.yml|grep -v "#"
cluster.name: kevin-elk #集群名称,三个节点的集群名称配置要一样
node.name: elk-node01 #集群节点名称,一般为本节点主机名。注意这个要是能ping通的,即在各节点的/etc/hosts里绑定。
path.data: /data/es-data #集群数据存放目录,注意目录权限要是elasticsearch
path.logs: /var/log/elasticsearch #日志路径,默认就是这个路径
network.host: 192.168.10.213 #服务绑定的网络地址,一般填写本节点ip;也可以填写0.0.0.0
http.port: 9200
discovery.zen. ping .unicast.hosts: [ "192.168.10.213" , "192.168.10.214" , "192.168.10.215" ] #添加集群中的主机地址,会自动发现并自动选择master主节点
[root@elk-node01 ~] # mkdir -p /data/es-data
[root@elk-node01 ~] # mkdir -p /var/log/elasticsearch/
[root@elk-node01 ~] # chown -R elasticsearch.elasticsearch /data/es-data
[root@elk-node01 ~] # chown -R elasticsearch.elasticsearch /var/log/elasticsearch/
[root@elk-node01 ~] # systemctl daemon-reload
[root@elk-node01 ~] # systemctl enable elasticsearch
[root@elk-node01 ~] # systemctl start elasticsearch
[root@elk-node01 ~] # systemctl status elasticsearch
[root@elk-node01 ~] # lsof -i:9200
-------------------------------------------------------------------------------------
elk-node02节点的配置
[root@elk-node02 ~] # cat /etc/elasticsearch/elasticsearch.yml |grep -v "#"
cluster.name: kevin-elk
node.name: elk-node02
path.data: /data/es-data
path.logs: /var/log/elasticsearch
network.host: 192.168.10.214
http.port: 9200
discovery.zen. ping .unicast.hosts: [ "192.168.10.213" , "192.168.10.214" , "192.168.10.215" ]
[root@elk-node02 ~] # mkdir -p /data/es-data
[root@elk-node02 ~] # mkdir -p /var/log/elasticsearch/
[root@elk-node02 ~] # chown -R elasticsearch.elasticsearch /data/es-data
[root@elk-node02 ~] # chown -R elasticsearch.elasticsearch /var/log/elasticsearch/
[root@elk-node02 ~] # systemctl daemon-reload
[root@elk-node02 ~] # systemctl enable elasticsearch
[root@elk-node02 ~] # systemctl start elasticsearch
[root@elk-node02 ~] # systemctl status elasticsearch
[root@elk-node02 ~] # lsof -i:9200
-------------------------------------------------------------------------------------
elk-node03节点的配置
[root@elk-node03 ~] # cat /etc/elasticsearch/elasticsearch.yml|grep -v "#"
cluster.name: kevin-elk
node.name: elk-node03
path.data: /data/es-data
path.logs: /var/log/elasticsearch
network.host: 192.168.10.215
http.port: 9200
discovery.zen. ping .unicast.hosts: [ "192.168.10.213" , "192.168.10.214" , "192.168.10.215" ]
[root@elk-node03 ~] # mkdir -p /data/es-data
[root@elk-node03 ~] # mkdir -p /var/log/elasticsearch/
[root@elk-node03 ~] # chown -R elasticsearch.elasticsearch /data/es-data
[root@elk-node03 ~] # chown -R elasticsearch.elasticsearch /var/log/elasticsearch/
[root@elk-node03 ~] # systemctl daemon-reload
[root@elk-node03 ~] # systemctl enable elasticsearch
[root@elk-node03 ~] # systemctl start elasticsearch
[root@elk-node03 ~] # systemctl status elasticsearch
[root@elk-node03 ~] # lsof -i:9200
c)查看elasticsearch集群信息(下面命令在任意一个节点机器上操作都可以)
[root@elk-node01 ~] # curl -XGET 'http://192.168.10.213:9200/_cat/nodes'
192.168.10.213 192.168.10.213 8 49 0.01 d * elk-node01 #带*号表示该节点是master主节点。
192.168.10.214 192.168.10.214 8 49 0.00 d m elk-node02
192.168.10.215 192.168.10.215 8 59 0.00 d m elk-node03
后面添加 ? v ,表示详细显示
[root@elk-node01 ~] # curl -XGET 'http://192.168.10.213:9200/_cat/nodes?v'
host ip heap.percent ram .percent load node.role master name
192.168.10.213 192.168.10.213 8 49 0.00 d * elk-node01
192.168.10.214 192.168.10.214 8 49 0.06 d m elk-node02
192.168.10.215 192.168.10.215 8 59 0.00 d m elk-node03
查询集群状态方法
[root@elk-node01 ~] # curl -XGET 'http://192.168.10.213:9200/_cluster/state/nodes?pretty'
{
"cluster_name" : "kevin-elk" ,
"nodes" : {
"1GGuoA9FT62vDw978HSBOA" : {
"name" : "elk-node01" ,
"transport_address" : "192.168.10.213:9300" ,
"attributes" : { }
},
"EN8L2mP_RmipPLF9KM5j7Q" : {
"name" : "elk-node02" ,
"transport_address" : "192.168.10.214:9300" ,
"attributes" : { }
},
"n75HL99KQ5GPqJDk6F2W2A" : {
"name" : "elk-node03" ,
"transport_address" : "192.168.10.215:9300" ,
"attributes" : { }
}
}
}
查询集群中的master
[root@elk-node01 ~] # curl -XGET 'http://192.168.10.213:9200/_cluster/state/master_node?pretty'
{
"cluster_name" : "kevin-elk" ,
"master_node" : "1GGuoA9FT62vDw978HSBOA"
}
或者
[root@elk-node01 ~] # curl -XGET 'http://192.168.10.213:9200/_cat/master?v'
id host ip node
1GGuoA9FT62vDw978HSBOA 192.168.10.213 192.168.10.213 elk-node01
查询集群的健康状态(一共三种状态:green、yellow,red;其中green表示健康)
[root@elk-node01 ~] # curl -XGET 'http://192.168.10.213:9200/_cat/health?v'
epoch timestamp cluster status node.total node.data shards pri relo init unassign pending_tasks max_task_wait_time active_shards_percent
1527576950 14:55:50 kevin-elk green 3 3 0 0 0 0 0 0 - 100.0%
或者
[root@elk-node01 ~] # curl -XGET 'http://192.168.10.213:9200/_cluster/health?pretty'
{
"cluster_name" : "kevin-elk" ,
"status" : "green" ,
"timed_out" : false ,
"number_of_nodes" : 3,
"number_of_data_nodes" : 3,
"active_primary_shards" : 0,
"active_shards" : 0,
"relocating_shards" : 0,
"initializing_shards" : 0,
"unassigned_shards" : 0,
"delayed_unassigned_shards" : 0,
"number_of_pending_tasks" : 0,
"number_of_in_flight_fetch" : 0,
"task_max_waiting_in_queue_millis" : 0,
"active_shards_percent_as_number" : 100.0
}
d)在线安装elasticsearch插件(三个节点上都要操作,且机器都要能对外正常访问)
安装 head 插件
[root@elk-node01 ~] # /usr/share/elasticsearch/bin/plugin install mobz/elasticsearch-head
-> Installing mobz /elasticsearch-head ...
Trying https: //github .com /mobz/elasticsearch-head/archive/master .zip ...
Downloading .............................................................................................................................................................................................................................................................................................................................................................................................................................................................................................................................................................................................................................................DONE
Verifying https: //github .com /mobz/elasticsearch-head/archive/master .zip checksums if available ...
NOTE: Unable to verify checksum for downloaded plugin (unable to find .sha1 or .md5 file to verify)
Installed head into /usr/share/elasticsearch/plugins/head
安装kopf插件
[root@elk-node01 ~] # /usr/share/elasticsearch/bin/plugin install lmenezes/elasticsearch-kopf
-> Installing lmenezes /elasticsearch-kopf ...
Trying https: //github .com /lmenezes/elasticsearch-kopf/archive/master .zip ...
Downloading ....................................................................................................................................................................................................................................................................................................................................................................................................................................................................................................................................................................................................................................................................................................................................................................................................................................................................................................................................................................................................................................................................................................................................................................................................................................................................................................................................................................................................................................................................DONE
Verifying https: //github .com /lmenezes/elasticsearch-kopf/archive/master .zip checksums if available ...
NOTE: Unable to verify checksum for downloaded plugin (unable to find .sha1 or .md5 file to verify)
Installed kopf into /usr/share/elasticsearch/plugins/kopf
安装bigdesk插件
[root@elk-node01 ~] # /usr/share/elasticsearch/bin/plugin install hlstudio/bigdesk
-> Installing hlstudio /bigdesk ...
Trying https: //github .com /hlstudio/bigdesk/archive/master .zip ...
Downloading ................................................................................................................................................................................................................................DONE
Verifying https: //github .com /hlstudio/bigdesk/archive/master .zip checksums if available ...
NOTE: Unable to verify checksum for downloaded plugin (unable to find .sha1 or .md5 file to verify)
Installed bigdesk into /usr/share/elasticsearch/plugins/bigdesk
三个插件安装后,记得给plugins目录授权,并重启elasticsearch服务
[root@elk-node01 ~] # chown -R elasticsearch:elasticsearch /usr/share/elasticsearch/plugins
[root@elk-node01 ~] # ll /usr/share/elasticsearch/plugins
total 4
drwxr-xr-x. 3 elasticsearch elasticsearch 124 May 29 14:58 bigdesk
drwxr-xr-x. 6 elasticsearch elasticsearch 4096 May 29 14:56 head
drwxr-xr-x. 8 elasticsearch elasticsearch 230 May 29 14:57 kopf
[root@elk-node01 ~] # systemctl restart elasticsearch
[root@elk-node01 ~] # lsof -i:9200 #服务重启后,9200端口稍过一会儿才能起来
COMMAND PID USER FD TYPE DEVICE SIZE /OFF NODE NAME
java 31855 elasticsearch 107u IPv6 87943 0t0 TCP elk-node01:wap-wsp (LISTEN)
最后就可以查看插件状态,直接访问http: //ip :9200 /_plugin/ "插件名" ;
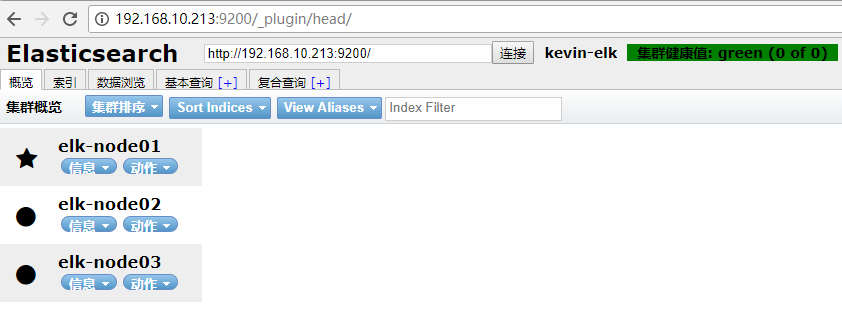
head 集群管理界面的状态图,五角星表示该节点为master;
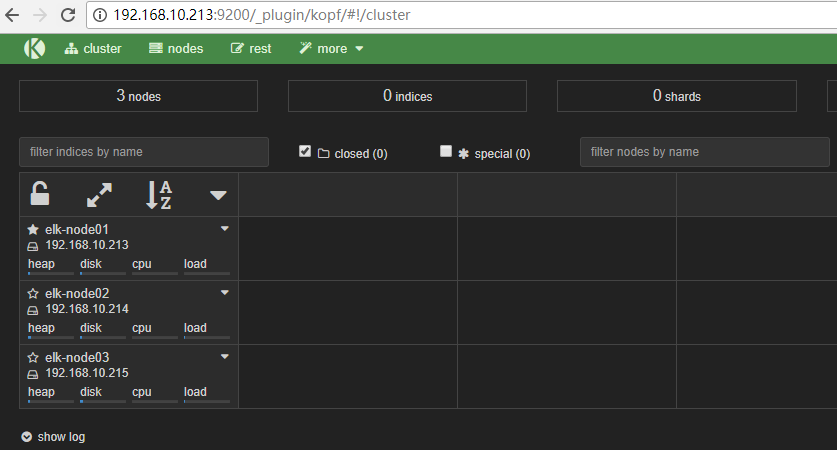
这里在三个节点机上安装了插件,所以三个节点都可以访问插件状态。
比如用elk-node01节点的ip地址访问这三个插件,分别是http://192.168.10.213:9200/\_plugin/head、http://192.168.10.213:9200/\_plugin/kopf、http://192.168.10.213:9200/\_plugin/bigdesk,如下:

3)Redis+Keepalived高可用环境部署记录
1
2
3
4
5
6
7
8
9
10
11
12
13
14
15
16
17
18
19
20
21
22
23
24
25
26
27
参考另一篇文档:https: //www .cnblogs.com /kevingrace/p/9001975 .html
部署过程在此省略
[root@elk-node01 ~] # redis-cli -h 192.168.10.213 INFO|grep role
role:master
[root@elk-node01 ~] # redis-cli -h 192.168.10.214 INFO|grep role
role:slave
[root@elk-node01 ~] # redis-cli -h 192.168.10.217 INFO|grep role
role:master
[root@elk-node01 ~] # ip addr
1: lo: <LOOPBACK,UP,LOWER_UP> mtu 65536 qdisc noqueue state UNKNOWN qlen 1
link /loopback 00:00:00:00:00:00 brd 00:00:00:00:00:00
inet 127.0.0.1 /8 scope host lo
valid_lft forever preferred_lft forever
inet6 ::1 /128 scope host
valid_lft forever preferred_lft forever
2: eth0: <BROADCAST,MULTICAST,UP,LOWER_UP> mtu 1500 qdisc pfifo_fast state UP qlen 1000
link /ether 52:54:00:ae:01:00 brd ff:ff:ff:ff:ff:ff
inet 192.168.10.213 /24 brd 192.168.10.255 scope global eth0
valid_lft forever preferred_lft forever
inet 192.168.10.217 /32 scope global eth0
valid_lft forever preferred_lft forever
inet6 fe80::7562:4278:d71d:f862 /64 scope link
valid_lft forever preferred_lft forever
即redis的master主节点一开始在elk-node01节点上。
4)Kibana及nginx代理访问环境部署(访问权限控制)。在elk-node03节点机上操作
1
2
3
4
5
6
7
8
9
10
11
12
13
14
15
16
17
18
19
20
21
22
23
24
25
26
27
28
29
30
31
32
33
34
35
36
37
38
39
40
41
42
43
44
45
46
47
48
49
50
51
52
53
54
55
56
57
58
59
60
61
62
63
64
65
66
67
68
69
70
71
72
73
74
75
76
77
78
79
80
81
82
83
84
85
86
87
88
89
90
91
92
93
94
95
96
97
98
99
100
101
102
103
104
105
106
107
108
109
110
111
112
113
114
115
116
117
118
119
120
121
122
123
124
125
126
127
128
129
130
131
132
133
134
135
136
137
138
139
140
141
142
143
144
145
146
147
148
149
150
151
152
153
154
155
156
157
158
159
160
161
162
163
164
165
166
167
168
169
170
171
172
173
174
175
176
177
178
179
180
181
182
183
184
185
186
187
188
189
190
191
192
193
194
195
196
197
198
a)kibana安装配置(官网下载地址:https: //www .elastic.co /downloads )
[root@elk-node03 ~] # cd /usr/local/src/
[root@elk-node03 src] # wget https://download.elastic.co/kibana/kibana/kibana-4.6.6-linux-x86_64.tar.gz
[root@elk-node03 src] # tar -zvxf kibana-4.6.6-linux-x86_64.tar.gz
由于维护的业务系统比较多,每个系统下的业务日志在kibana界面展示的访问权限只给该系统相关人员开放,对系统外人员不开放。所以需要做kibana权限控制。
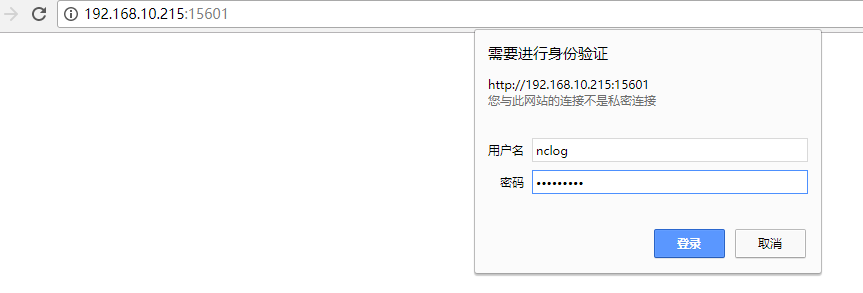
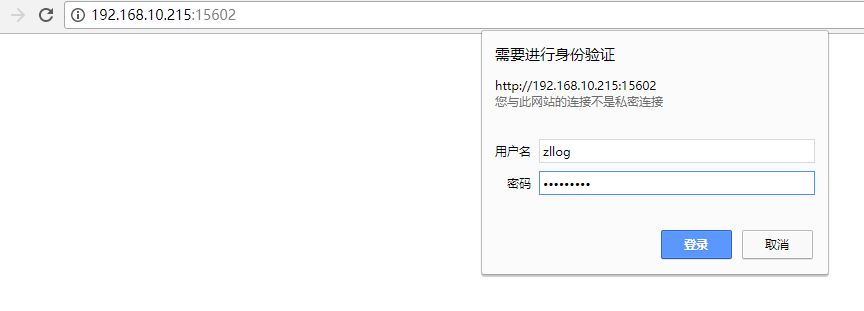
这里通过nginx的访问验证配置来实现。
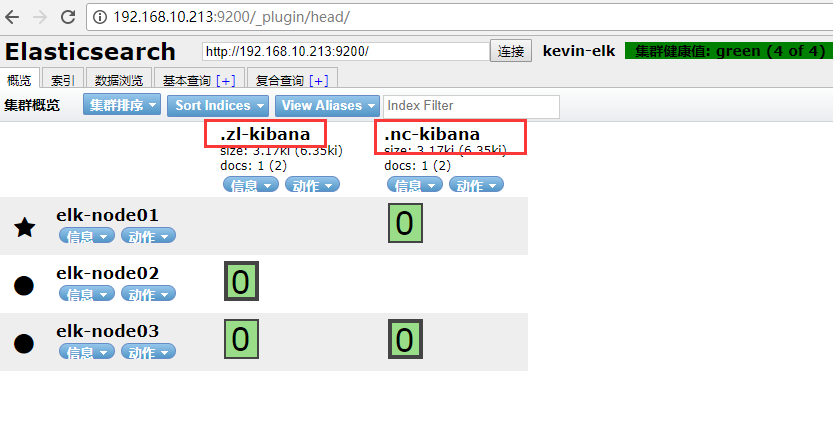
可以配置多个端口的kibana,每个系统单独开一个kibana端口号,比如财务系统kibana使用5601端口、租赁系统kibana使用5602,然后nginx做代理访问配置。
每个系统的业务日志单独在其对应的端口的kibana界面里展示。
[root@elk-node03 src] # cp -r kibana-4.6.6-linux-x86_64 /usr/local/nc-5601-kibana
[root@elk-node03 src] # cp -r kibana-4.6.6-linux-x86_64 /usr/local/zl-5602-kibana
[root@elk-node03 src] # ll -d /usr/local/*-kibana
drwxr-xr-x. 11 root root 203 May 29 16:49 /usr/local/nc-5601-kibana
drwxr-xr-x. 11 root root 203 May 29 16:49 /usr/local/zl-5602-kibana
修改配置文件:
[root@elk-node03 src] # vim /usr/local/nc-5601-kibana/config/kibana.yml
......
server.port: 5601
server.host: "0.0.0.0"
elasticsearch.url: "http://192.168.10.213:9200" #添加elasticsearch的master主节点的ip地址
kibana.index: ".nc-kibana"
[root@elk-node03 src] # vim /usr/local/zl-5602-kibana/config/kibana.yml
......
server.port: 5602
server.host: "0.0.0.0"
elasticsearch.url: "http://192.168.10.213:9200"
kibana.index: ".zl-kibana"
安装 screen ,并启动kibana
[root@elk-node03 src] # yum -y install screen
[root@elk-node03 src] # screen
[root@elk-node03 src] # /usr/local/nc-5601-kibana/bin/kibana #按键ctrl+a+d将其放在后台执行
[root@elk-node03 src] # screen
[root@elk-node03 src] # /usr/local/zl-5602-kibana/bin/kibana #按键ctrl+a+d将其放在后台执行
[root@elk-node03 src] # lsof -i:5601
COMMAND PID USER FD TYPE DEVICE SIZE /OFF NODE NAME
node 32627 root 13u IPv4 1028042 0t0 TCP *:esmagent (LISTEN)
[root@elk-node03 src] # lsof -i:5602
COMMAND PID USER FD TYPE DEVICE SIZE /OFF NODE NAME
node 32659 root 13u IPv4 1029133 0t0 TCP *:a1-msc (LISTEN)
--------------------------------------------------------------------------------------
接着配置nginx的反向代理以及访问验证
[root@elk-node03 ~] # yum -y install gcc pcre-devel zlib-devel openssl-devel
[root@elk-node03 ~] # cd /usr/local/src/
[root@elk-node03 src] # wget http://nginx.org/download/nginx-1.9.7.tar.gz
[root@elk-node03 src] # tar -zvxf nginx-1.9.7.tar.gz
[root@elk-node03 src] # cd nginx-1.9.7
[root@elk-node03 nginx-1.9.7] # useradd www -M -s /sbin/nologin
[root@elk-node03 nginx-1.9.7] # ./configure --prefix=/usr/local/nginx --user=www --group=www --with-http_ssl_module --with-http_flv_module --with-http_stub_status_module --with-http_gzip_static_module --with-pcre
[root@elk-node03 nginx-1.9.7] # make && make install
nginx的配置
[root@elk-node03 nginx-1.9.7] # cd /usr/local/nginx/conf/
[root@elk-node03 conf] # cp nginx.conf nginx.conf.bak
[root@elk-node03 conf] # cat nginx.conf
user www;
worker_processes 8;
#error_log logs/error.log;
#error_log logs/error.log notice;
#error_log logs/error.log info;
#pid logs/nginx.pid;
events {
worker_connections 65535;
}
http {
include mime.types;
default_type application /octet-stream ;
charset utf-8;
######
## set access log format
######
log_format main '$http_x_forwarded_for $remote_addr $remote_user [$time_local] "$request" '
'$status $body_bytes_sent "$http_referer" '
'"$http_user_agent" "$http_cookie" $host $request_time' ;
#######
## http setting
#######
sendfile on;
tcp_nopush on;
tcp_nodelay on;
keepalive_timeout 65;
proxy_cache_path /var/www/cache levels=1:2 keys_zone=mycache:20m max_size=2048m inactive=60m;
proxy_temp_path /var/www/cache/tmp ;
fastcgi_connect_timeout 3000;
fastcgi_send_timeout 3000;
fastcgi_read_timeout 3000;
fastcgi_buffer_size 256k;
fastcgi_buffers 8 256k;
fastcgi_busy_buffers_size 256k;
fastcgi_temp_file_write_size 256k;
fastcgi_intercept_errors on;
#
client_header_timeout 600s;
client_body_timeout 600s;
# client_max_body_size 50m;
client_max_body_size 100m;
client_body_buffer_size 256k;
gzip on;
gzip_min_length 1k;
gzip_buffers 4 16k;
gzip_http_version 1.1;
gzip_comp_level 9;
gzip_types text /plain application /x-javascript text /css application /xml text /javascript application /x-httpd-php ;
gzip_vary on;
## includes vhosts
include vhosts/*.conf;
}
[root@elk-node03 conf] # mkdir vhosts
[root@elk-node03 conf] # cd vhosts/
[root@elk-node03 vhosts] # vim nc_kibana.conf
server {
listen 15601;
server_name localhost;
location / {
proxy_pass http: //192 .168.10.215:5601/;
auth_basic "Access Authorized" ;
auth_basic_user_file /usr/local/nginx/conf/nc_auth_password ;
}
}
[root@elk-node03 vhosts] # vim zl_kibana.conf
server {
listen 15602;
server_name localhost;
location / {
proxy_pass http: //192 .168.10.215:5602/;
auth_basic "Access Authorized" ;
auth_basic_user_file /usr/local/nginx/conf/zl_auth_password ;
}
}
[root@elk-node03 vhosts] # /usr/local/nginx/sbin/nginx
[root@elk-node03 vhosts] # /usr/local/nginx/sbin/nginx -s reload
[root@elk-node03 vhosts] # lsof -i:15601
[root@elk-node03 vhosts] # lsof -i:15602
---------------------------------------------------------------------------------------------
设置验证访问
创建类htpasswd文件(如果没有htpasswd命令,可通过 "yum install -y *htpasswd*" 或 "yum install -y httpd" )
[root@elk-node03 vhosts] # yum install -y *htpasswd*
创建财务系统日志的kibana访问的验证权限
[root@elk-node03 vhosts] # htpasswd -c /usr/local/nginx/conf/nc_auth_password nclog
New password:
Re- type new password:
Adding password for user nclog
[root@elk-node03 vhosts] # cat /usr/local/nginx/conf/nc_auth_password
nclog:$apr1$WLHsdsCP$PLLNJB /wxeQKy/OHp/7o2 .
创建租赁系统日志的kibana访问的验证权限
[root@elk-node03 vhosts] # htpasswd -c /usr/local/nginx/conf/zl_auth_password zllog
New password:
Re- type new password:
Adding password for user zllog
[root@elk-node03 vhosts] # cat /usr/local/nginx/conf/zl_auth_password
zllog:$apr1$dRHpzdwt$yeJxnL5AAQh6A6MJFPCEM1
++++++++++++++++++++++++++++++++++++++++++++++++++++++++++
htpasswd命令的使用技巧
1) 首次生成验证文件,使用-c参数,创建时后面跟一个用户名,但是不能直接跟密码,需要回车输入两次密码
# htpasswd -c /usr/local/nginx/conf/nc_auth_password nclog
2)在验证文件生成后,后续添加用户,使用-b参数,后面可以直接跟用户名和密码。
注意这时不能加-c参数,否则会将之前创建的用户信息覆盖掉。
# htpasswd -c /usr/local/nginx/conf/nc_auth_password kevin kevin@123
3)删除用于,使用-D参数。
#htpasswd -D /usr/local/nginx/conf/nc_auth_password kevin
4)修改用户密码(可以先删除,再创建)
# htpasswd -D /usr/local/nginx/conf/nc_auth_password kevin
# htpasswd -b /usr/local/nginx/conf/nc_auth_password kevin keivn@#2312
++++++++++++++++++++++++++++++++++++++++++++++++++++++++++
5)客户机日志收集操作(Logstash)
1
2
3
4
5
6
7
8
9
10
11
12
13
14
15
16
17
18
19
20
21
22
23
24
25
26
27
28
29
30
31
32
33
34
35
36
37
38
39
40
41
42
43
44
45
46
47
48
49
50
51
52
53
54
55
56
57
58
59
60
61
62
63
64
65
66
67
68
69
70
71
72
73
74
75
76
77
78
79
80
81
82
83
84
85
86
87
88
89
90
91
92
93
94
95
96
97
98
99
100
101
102
103
104
105
106
107
108
109
110
111
112
113
114
115
116
117
118
119
120
121
122
123
124
125
126
127
128
129
130
131
132
133
134
135
136
137
138
139
140
141
142
143
144
145
146
147
148
149
150
151
152
153
154
155
156
157
158
159
160
161
162
163
164
1)安装logstash
[root@elk-client ~] # cat /etc/yum.repos.d/logstash.repo
[logstash-2.1]
name=Logstash repository for 2.1.x packages
baseurl=http: //packages .elastic.co /logstash/2 .1 /centos
gpgcheck=1
gpgkey=http: //packages .elastic.co /GPG-KEY-elasticsearch
enabled=1
[root@elk-client ~] # yum install -y logstash
[root@elk-client ~] # ll -d /opt/logstash/
drwxr-xr-x. 5 logstash logstash 160 May 29 17:45 /opt/logstash/
2)调整java环境。
有些服务器由于业务代码自身限制只能用java6或java7,而新版logstash要求java8环境。
这种情况下,要安装Logstash,就只能单独配置Logstas自己使用的java8环境了。
[root@elk-client ~] # java -version
java version "1.6.0_151"
OpenJDK Runtime Environment (rhel-2.6.11.0.el6_9-x86_64 u151-b00)
OpenJDK 64-Bit Server VM (build 24.151-b00, mixed mode)
下载jdk-8u172-linux-x64. tar .gz,放到 /usr/local/src 目录下
下载地址:https: //pan .baidu.com /s/1z3L4Q24AuHA2r6KT6oT9vw
提取密码:dprz
[root@elk-client ~] # cd /usr/local/src/
[root@elk-client src] # tar -zvxf jdk-8u172-linux-x64.tar.gz
[root@elk-client src] # mv jdk1.8.0_172 /usr/local/
在 /etc/sysconfig/logstash 文件结尾添加下面两行内容:
[root@elk-client src] # vim /etc/sysconfig/logstash
.......
JAVA_CMD= /usr/local/jdk1 .8.0_172 /bin
JAVA_HOME= /usr/local/jdk1 .8.0_172
在 /opt/logstash/bin/logstash .lib.sh文件添加下面一行内容:
[root@elk-client src] # vim /opt/logstash/bin/logstash.lib.sh
.......
export JAVA_HOME= /usr/local/jdk1 .8.0_172
这样使用logstash收集日志,就不会报java版本的错误了。
3)使用logstash收集日志
------------------------------------------------------------
比如收集财务系统的日志
[root@elk-client ~] # mkdir /opt/nc
[root@elk-client ~] # cd /opt/nc
[root@elk-client nc ] # vim redis-input.conf
input {
file {
path => "/data/nc-tomcat/logs/catalina.out"
type => "nc-log"
start_position => "beginning"
codec => multiline {
pattern => "^[a-zA-Z0-9]|[^ ]+" #收集以字母(大小写)或数字或空格开头的日志信息
negate => true
what => "previous"
}
}
}
output {
if [ type ] == "nc-log" {
redis {
host => "192.168.10.217"
port => "6379"
db => "1"
data_type => "list"
key => "nc-log"
}
}
}
[root@elk-client nc ] # vim file.conf
input {
redis {
type => "nc-log"
host => "192.168.10.217" #redis高可用的vip地址
port => "6379"
db => "1"
data_type => "list"
key => "nc-log"
}
}
output {
if [ type ] == "nc-log" {
elasticsearch {
hosts => [ "192.168.10.213:9200" ] #elasticsearch集群的master主节点地址
index => "nc-app01-nc-log-%{+YYYY.MM.dd}"
}
}
}
验证收集日志的logstash文件是否配置OK
[root@elk-client nc ] # /opt/logstash/bin/logstash -f /opt/nc/redis-input.conf --configtest
Configuration OK
[root@elk-client nc ] # /opt/logstash/bin/logstash -f /opt/nc/file.conf --configtest
Configuration OK
启动收集日志的logstash程序
[root@elk-client nc ] # /opt/logstash/bin/logstash -f /opt/nc/redis-input.conf &
[root@elk-client nc ] # /opt/logstash/bin/logstash -f /opt/nc/file.conf &
[root@elk-client nc ] # ps -ef|grep logstash
-------------------------------------------------------------------
再比如收集租赁系统的日志
[root@elk-client ~] # mkdir /opt/zl
[root@elk-client ~] # cd /opt/zl
[root@elk-client zl] # vim redis-input.conf
input {
file {
path => "/data/zl-tomcat/logs/catalina.out"
type => "zl-log"
start_position => "beginning"
codec => multiline {
pattern => "^[a-zA-Z0-9]|[^ ]+"
negate => true
what => "previous"
}
}
}
output {
if [ type ] == "zl-log" {
redis {
host => "192.168.10.217"
port => "6379"
db => "2"
data_type => "list"
key => "zl-log"
}
}
}
[root@elk-client zl] # vim file.conf
input {
redis {
type => "zl-log"
host => "192.168.10.217"
port => "6379"
db => "2"
data_type => "list"
key => "zl-log"
}
}
output {
if [ type ] == "zl-log" {
elasticsearch {
hosts => [ "192.168.10.213:9200" ]
index => "zl-app01-zl-log-%{+YYYY.MM.dd}"
}
}
}
[root@elk-client zl] # /opt/logstash/bin/logstash -f /opt/zl/redis-input.conf --configtest
Configuration OK
[root@elk-client zl] # /opt/logstash/bin/logstash -f /opt/zl/file.conf --configtest
Configuration OK
[root@elk-client zl] # ps -ef|grep logstash
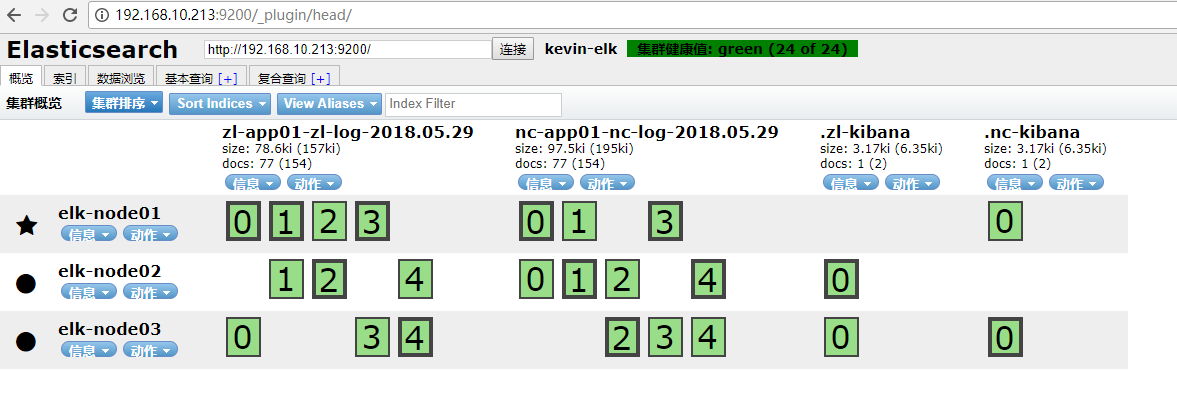
当上面财务和租赁系统日志有新数据写入时,日志就会被logstash收集起来,并最终通过各自的kibana进行web展示。
访问head插件就可以看到收集的日志信息(在logstash程序启动后,当有新日志数据写入时,才会在head插件访问界面里展示)
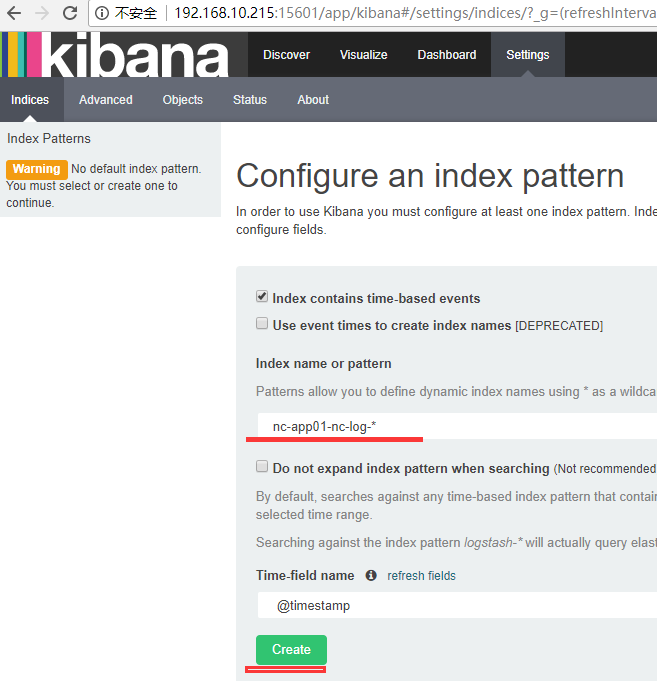
添加财务系统kibana日志展示

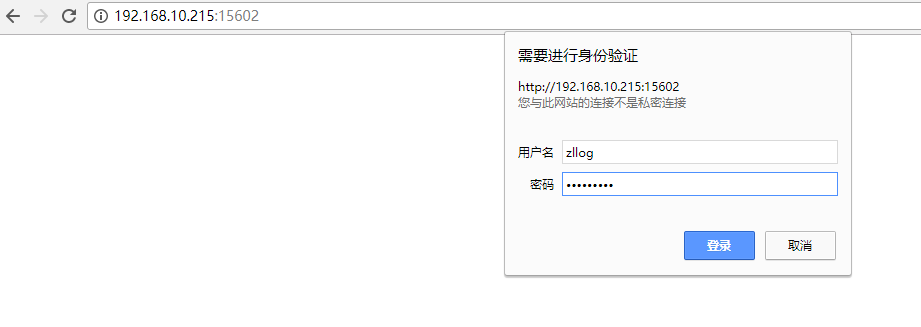
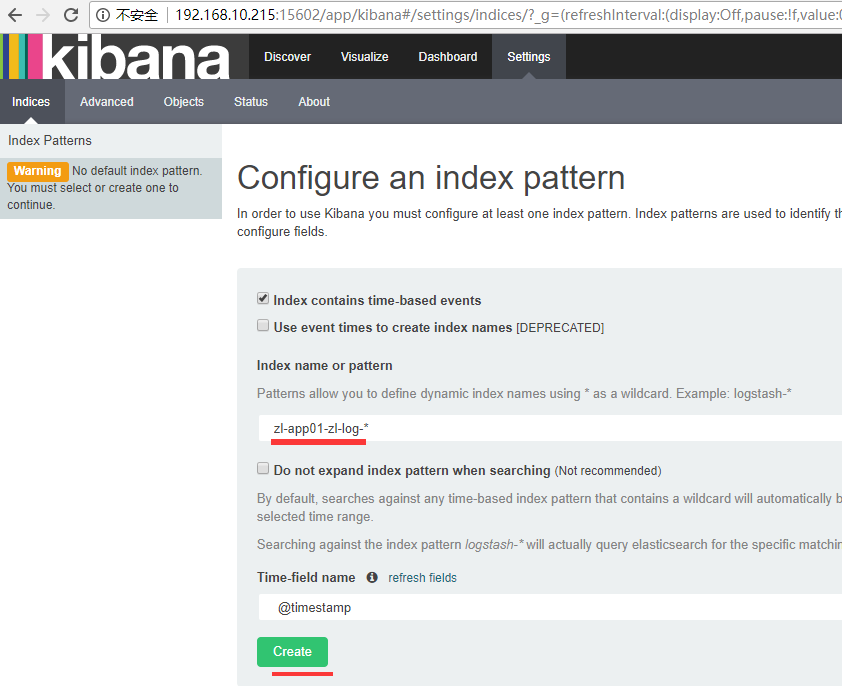
添加租赁系统kibana日志展示

========Logstash之multiline插件(匹配多行日志)使用说明========
在处理日志时,除了访问日志外,还要处理运行时日志,该日志大都用程序写的,比如log4j。运行时日志跟访问日志最大的不同是,运行时日志是多行,也就是说,连续的多行才能表达一个意思。如果能按多行处理,那么把它们拆分到字段就很容易了。这里就需要说下Logstash的multiline插件,用于匹配多行日志。首先看下面一个java日志:
1
2
3
4
5
6
7
8
9
10
11
12
13
14
[2016-05-20 11:54:24,106][INFO][cluster.metadata ] [node-1][.kibana] creating index,cause [api],template [],shards [1]/[1],mappings [config]
at oracle.jdbc.driver.T4CTTIoer.processError(T4CTTIoer.java:440)
at oracle.jdbc.driver.T4CTTIoer.processError(T4CTTIoer.java:396)
at oracle.jdbc.driver.T4C8Oall.processError(T4C8Oall.java:837)
at oracle.jdbc.driver.T4CTTIfun.receive(T4CTTIfun.java:445)
at oracle.jdbc.driver.T4CTTIfun.doRPC(T4CTTIfun.java:191)
at oracle.jdbc.driver.T4C8Oall.doOALL(T4C8Oall.java:523)
at oracle.jdbc.driver.T4CPreparedStatement.doOall8(T4CPreparedStatement.java:207)
at oracle.jdbc.driver.T4CPreparedStatement.executeForDescribe(T4CPreparedStatement.java:863)
at oracle.jdbc.driver.OracleStatement.executeMaybeDescribe(OracleStatement.java:1153)
at oracle.jdbc.driver.OracleStatement.doExecuteWithTimeout(OracleStatement.java:1275)
at oracle.jdbc.driver.OraclePreparedStatement.executeInternal(OraclePreparedStatement.java:3576)
at oracle.jdbc.driver.OraclePreparedStatement.executeQuery(OraclePreparedStatement.java:3620)
再看看这些日志信息在kibana界面里的展示效果:

可以看到,每一行at其实都属于一个事件的信息,但是Logstash却使用了多行显示出来,这样会造成阅读不便。为了解决这个问题,可以使用Logstash input插件中的file插件,其中还有一个子功能是Codec-->multiline。官方对于multiline插件的描述是“Merges multiline messages into a single event”,翻译过来就是将多行信息合并为单一事件。
登录客户机器查看Java日志,发现每一个单独的事件都是以“[ ]”方括号开始的,所以可以把这个方括号当做特征,再结合multiline插件来实现合并信息。使用插件的语法如下,主要含义是“把任何不以[开头的行,都与前面不是[开头的行合并成一个事件”:
1
2
3
4
5
6
7
8
9
10
11
12
13
14
15
16
17
18
19
20
21
22
23
24
25
[root@elk-client zl] # vim redis-input.conf
input {
file {
path => "/data/zl-tomcat/logs/catalina.out"
type => "zl-log"
start_position => "beginning"
codec => multiline {
pattern => "^\["
negate => true
what => previous
}
}
}
output {
if [ type ] == "zl-log" {
redis {
host => "192.168.10.217"
port => "6379"
db => "2"
data_type => "list"
key => "zl-log"
}
}
}
解释说明:
pattern => "^\[" 这是正则表达式,用来做规则匹配。匹配多行日志的方式要根据实际日志信息进行正则匹配,这里是以"[",也可以是正则匹配,以日志具体情况而定。
negate => true 这个negate是对pattern的结果做判断是否匹配,默认值是false代表匹配,而true代表不匹配,这里并没有反,因为negate本身是否定的意思,在这里就是不以大括号开头的内容才算符合条件,后续才会进行合并操作。
what => previous next或者previous二选一,previous代表codec将把匹配内容与之前的内容合并,next代表之后的内容。
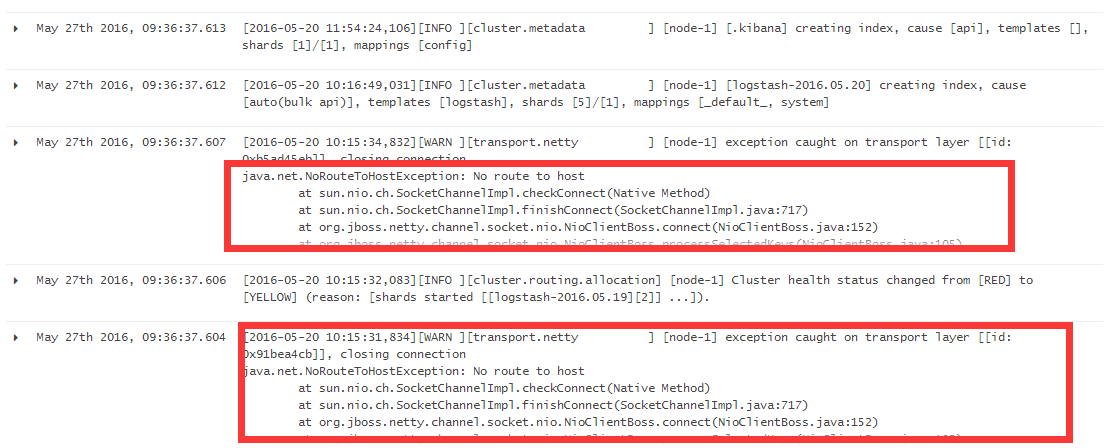
经过插件整理后的信息在kibana界面里查看就直观多了,如下图:
multiline 字段属性
对multiline 插件来说,有三个设置比较重要:negate、pattern 和 what。
negate
- 类型是 boolean
- 默认为 false
否定正则表达式(如果没有匹配的话)。
pattern
- 必须设置
- 类型为 string
- 没有默认值
要匹配的正则表达式。
what
- 必须设置
- 可以为 previous 或 next
- 没有默认值
如果正则表达式匹配了,那么该事件是属于下一个或是前一个事件?
==============================================
再来看一例:
1
2
3
4
5
6
7
8
9
10
11
12
13
14
15
16
17
18
19
20
21
22
23
24
25
26
27
28
29
30
31
32
33
34
35
36
37
38
39
40
41
42
43
44
45
46
47
48
49
50
51
52
53
看下面的java日志:
[root@elk-client ~] # tail -f /data/nc-tomcat/logs/catalina.out
........
........
$$callid=1527643542536-4261 $$thread=[WebContainer : 23] $$host=10.0.52.21 $$userid=1001A6100000000006KR $$ts=2018-05-30 09:25:42 $$remotecall=[ nc .bs.dbcache.intf.ICacheVersionBS] $$debuglevel=ERROR $$msg=<Select CacheTabName, CacheTabVersion From BD_cachetabversion where CacheTabVersion >= null order by CacheTabVersion desc>throws ORA-00942: 表或视图不存在
$$callid=1527643542536-4261 $$thread=[WebContainer : 23] $$host=10.0.52.21 $$userid=1001A6100000000006KR $$ts=2018-05-30 09:25:42 $$remotecall=[ nc .bs.dbcache.intf.ICacheVersionBS] $$debuglevel=ERROR $$msg=sql original exception
java.sql.SQLException: ORA-00942: 表或视图不存在
at oracle.jdbc.driver.T4CTTIoer.processError(T4CTTIoer.java:440)
at oracle.jdbc.driver.T4CTTIoer.processError(T4CTTIoer.java:396)
at oracle.jdbc.driver.T4C8Oall.processError(T4C8Oall.java:837)
at oracle.jdbc.driver.T4CTTIfun.receive(T4CTTIfun.java:445)
at oracle.jdbc.driver.T4CTTIfun.doRPC(T4CTTIfun.java:191)
at oracle.jdbc.driver.T4C8Oall.doOALL(T4C8Oall.java:523)
at oracle.jdbc.driver.T4CPreparedStatement.doOall8(T4CPreparedStatement.java:207)
at oracle.jdbc.driver.T4CPreparedStatement.executeForDescribe(T4CPreparedStatement.java:863)
at oracle.jdbc.driver.OracleStatement.executeMaybeDescribe(OracleStatement.java:1153)
at oracle.jdbc.driver.OracleStatement.doExecuteWithTimeout(OracleStatement.java:1275)
at oracle.jdbc.driver.OraclePreparedStatement.executeInternal(OraclePreparedStatement.java:3576)
at oracle.jdbc.driver.OraclePreparedStatement.executeQuery(OraclePreparedStatement.java:3620)
at oracle.jdbc.driver.OraclePreparedStatementWrapper.executeQuery(OraclePreparedStatementWrapper.java:1203)
at com.ibm.ws.rsadapter.jdbc.WSJdbcPreparedStatement.pmiExecuteQuery(WSJdbcPreparedStatement.java:1110)
at com.ibm.ws.rsadapter.jdbc.WSJdbcPreparedStatement.executeQuery(WSJdbcPreparedStatement.java:712)
at nc .jdbc.framework.crossdb.CrossDBPreparedStatement.executeQuery(CrossDBPreparedStatement.java:103)
at nc .jdbc.framework.JdbcSession.executeQuery(JdbcSession.java:297)
从以上日志可以看出,每一个单独的事件都是以 "$" 开始的,所以可以把这个方括号当做特征,结合multiline插件来实现合并信息。
[root@elk-client nc ] # vim redis-input.conf
input {
file {
path => "/data/nc-tomcat/logs/catalina.out"
type => "nc-log"
start_position => "beginning"
codec => multiline {
pattern => "^\$" #匹配以$开头的日志信息。(如果日志每行是以日期开头显示,比如"2018-05-30 11:42.....",则此行就配置为pattern => "^[0-9]",即表示匹配以数字开头的行)
negate => true #不匹配
what => "previous" #即上面不匹配的行的内容与之前的行的内容合并
}
}
}
output {
if [ type ] == "nc-log" {
redis {
host => "192.168.10.217"
port => "6379"
db => "1"
data_type => "list"
key => "nc-log"
}
}
}
如上调整后,登录kibana界面,就可以看到匹配的多行合并的展示效果了(如果多行合并后内容过多,可以点击截图中的小箭头,点击进去直接看message信息,这样就能看到合并多行后的内容了):
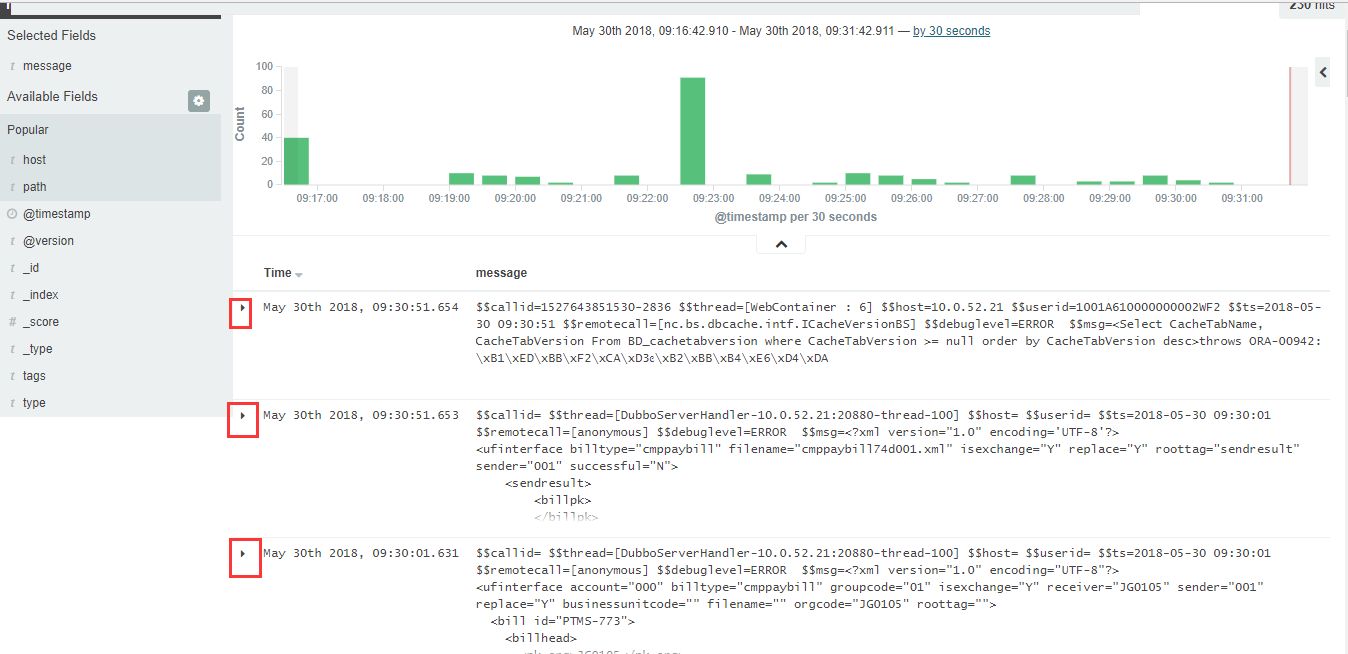
=======================================================
从上面的例子中可以发现,logstash收集的日志在kibana的展示界面里出现了中文乱码。

这就需要在logstash收集日志的配置中指定编码。使用"file"命令去查看对应日志文件的字符编码:
1)如果命令返回结果说明改日志为utf-8,则logstash配置文件中charset设置为UTF-8。(其实如果命令结果为utf-8,则默认不用添加charset设置,logstash收集日志中的中文信息也会正常显示出来)
2)如果命令返回结果说明改日志不是utf-8,则logstash配置文件中charset统一设置为GB2312。
具体操作记录:
1
2
3
4
5
6
7
8
9
10
11
12
13
14
15
16
17
18
19
20
21
22
23
24
25
26
27
28
29
30
31
32
33
[root@elk-client ~] # file /data/nchome/nclogs/master/nc-log.log
/data/nchome/nclogs/master/nc-log .log: ISO-8859 English text, with very long lines, with CRLF, LF line terminators
由上面的 file 命令查看得知,该日志文件的字符编码不是UTF-8,所以在logstash配置文件中将charset统一设置为GB2312。
根据上面的例子,只需要在redis-input.conf文件中添加对应字符编码的配置即可, file .conf文件不需要修改。如下:
[root@elk-client nc ] # vim redis-input.conf
input {
file {
path => "/data/nc-tomcat/logs/catalina.out"
type => "nc-log"
start_position => "beginning"
codec => multiline {
charset => "GB2312" #添加这一行
pattern => "^\$"
negate => true
what => "previous"
}
}
}
output {
if [ type ] == "nc-log" {
redis {
host => "192.168.10.217"
port => "6379"
db => "1"
data_type => "list"
key => "nc-log"
}
}
}
重启logstash程序,然后登陆kibana,就发现中文能正常显示了!
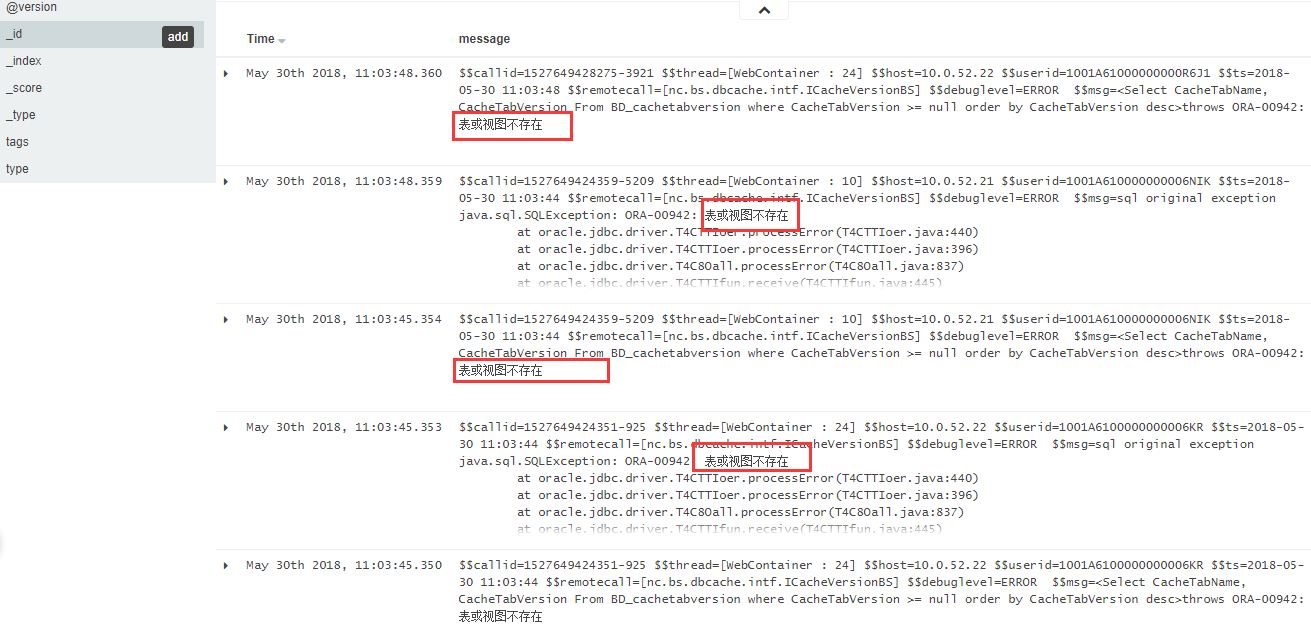
=============================================================
logstash收集那些存在"以当天日期为目录名"下的日志,如下:
1
2
3
4
5
6
7
8
9
10
11
12
13
14
15
16
17
18
19
20
21
22
23
24
25
26
27
28
29
30
31
32
33
34
35
36
37
38
39
40
41
42
43
44
45
46
47
48
49
50
51
52
53
54
55
56
57
58
59
60
61
62
63
64
65
66
67
68
69
70
71
72
73
74
75
76
77
78
79
80
81
82
83
84
85
86
87
88
89
90
91
92
93
94
95
96
97
98
99
100
101
102
103
104
105
106
107
108
109
110
111
112
113
114
115
116
117
118
119
120
121
122
123
124
125
126
127
128
129
130
131
132
133
134
135
136
137
138
139
140
141
142
143
144
145
146
147
148
149
150
151
152
153
154
155
156
157
158
159
160
161
162
163
164
165
166
167
168
169
170
[root@elk-client ~] # cd /data/yxhome/yx_data/applog
[root@elk-client applog] # ls
20180528 20180529 20180530 20180531 20180601 20180602 20180603 20180604
[root@elk-client applog] # ls 20180604
cm.log timsserver.log
/data/yxhome/yx_data/applog 下那些以当天日期为名称的目录创建时间是0点
[root@elk-client ~] # ll -d /data/yxhome/yx_data/applog/20180603
drwxr-xr-x 2 root root 4096 6月 3 00:00 /data/yxhome/yx_data/applog/20180603
由于logstash文件中input-> file 下的path路径配置不能跟` date +%Y%m%d`或$( date +%Y%m%d)。
我的做法是:写个脚本将每天的日志软链接到一个固定路径下,然后logstash文件中的path配置成软链之后的新路径。
[root@elk-client ~] # vim /mnt/yx_log_line.sh
#!/bin/bash
/bin/rm -f /mnt/yx_log/ *
/bin/ln -s /data/yxhome/yx_data/applog/ $( date +%Y%m%d) /cm .log /mnt/yx_log/cm .log
/bin/ln -s /data/yxhome/yx_data/applog/ $( date +%Y%m%d) /timsserver .log /mnt/yx_log/timsserver .log
[root@elk-client ~] # chmod +755 /mnt/yx_log_line.sh
[root@elk-client ~] # /bin/bash -x /mnt/yx_log_line.sh
[root@elk-client ~] # ll /mnt/yx_log
总用量 0
lrwxrwxrwx 1 root root 43 6月 4 14:29 cm.log -> /data/yxhome/yx_data/applog/20180604/cm .log
lrwxrwxrwx 1 root root 51 6月 4 14:29 timsserver.log -> /data/yxhome/yx_data/applog/20180604/timsserver .log
[root@elk-client ~] # crontab -l
0 3 * * * /bin/bash -x /mnt/yx_log_line .sh > /dev/null 2>&1
logstash配置如下(多个log日志采集的配置放在一个文件里):
[root@elk-client ~] # cat /opt/redis-input.conf
input {
file {
path => "/data/nchome/nclogs/master/nc-log.log"
type => "nc-log"
start_position => "beginning"
codec => multiline {
charset => "GB2312"
pattern => "^\$"
negate => true
what => "previous"
}
}
file {
path => "/mnt/yx_log/timsserver.log"
type => "yx-timsserver.log"
start_position => "beginning"
codec => multiline {
charset => "GB2312"
pattern => "^[0-9]" #以数字开头。实际该日志是以2018日期字样开头,比如2018-06-04 09:19:53,364:......
negate => true
what => "previous"
}
}
file {
path => "/mnt/yx_log/cm.log"
type => "yx-cm.log"
start_position => "beginning"
codec => multiline {
charset => "GB2312"
pattern => "^[0-9]"
negate => true
what => "previous"
}
}
}
output {
if [ type ] == "nc-log" {
redis {
host => "192.168.10.217"
port => "6379"
db => "2"
data_type => "list"
key => "nc-log"
}
}
if [ type ] == "yx-timsserver.log" {
redis {
host => "192.168.10.217"
port => "6379"
db => "4"
data_type => "list"
key => "yx-timsserver.log"
}
}
if [ type ] == "yx-cm.log" {
redis {
host => "192.168.10.217"
port => "6379"
db => "5"
data_type => "list"
key => "yx-cm.log"
}
}
}
[root@elk-client ~] # cat /opt/file.conf
input {
redis {
type => "nc-log"
host => "192.168.10.217"
port => "6379"
db => "2"
data_type => "list"
key => "nc-log"
}
redis {
type => "yx-timsserver.log"
host => "192.168.10.217"
port => "6379"
db => "4"
data_type => "list"
key => "yx-timsserver.log"
}
redis {
type => "yx-cm.log"
host => "192.168.10.217"
port => "6379"
db => "5"
data_type => "list"
key => "yx-cm.log"
}
}
output {
if [ type ] == "nc-log" {
elasticsearch {
hosts => [ "192.168.10.213:9200" ]
index => "elk-client(10.0.52.21)-nc-log-%{+YYYY.MM.dd}"
}
}
if [ type ] == "yx-timsserver.log" {
elasticsearch {
hosts => [ "192.168.10.213:9200" ]
index => "elk-client(10.0.52.21)-yx-timsserver.log-%{+YYYY.MM.dd}"
}
}
if [ type ] == "yx-cm.log" {
elasticsearch {
hosts => [ "192.168.10.213:9200" ]
index => "elk-client(10.0.52.21)-yx-cm.log-%{+YYYY.MM.dd}"
}
}
}
先检查配置是否正确
[root@elk-client ~] # /opt/logstash/bin/logstash -f /opt/redis-input.conf --configtest
Configuration OK
[root@elk-client ~] # /opt/logstash/bin/logstash -f /opt/file.conf --configtest
Configuration OK
[root@elk-client ~] #
接着启动
[root@elk-client ~] # /opt/logstash/bin/logstash -f /opt/redis-input.conf &
[root@elk-client ~] # /opt/logstash/bin/logstash -f /opt/file.conf &
[root@elk-client ~] # ps -ef|grep logstash
当日志文件中有新信息写入,访问elasticsearch的 head 插件就能看到对应的索引了,然后添加到kibana界面里即可。
====================ELK收集IDC防火墙日志======================
1
2
3
4
5
6
7
8
9
10
11
12
13
14
15
16
17
18
19
20
21
22
23
24
25
26
27
28
29
30
31
32
33
34
35
36
37
38
39
40
41
42
43
44
45
46
47
48
49
50
51
52
53
54
55
56
57
58
59
60
61
62
63
64
65
66
67
68
69
70
71
72
73
74
75
76
77
78
79
80
81
82
83
84
85
86
87
88
89
90
1)通过rsyslog将机房防火墙(地址为10.1.32.105)日志收集到一台linux服务器上(比如A服务器)
rsyslog收集防火墙日志操作,可参考:http: //www .cnblogs.com /kevingrace/p/5570411 .html
比如收集到A服务器上的日志路径为:
[root@Server-A ~] # cd /data/fw_logs/10.1.32.105/
[root@Server-A 10.1.32.105] # ll
total 127796
-rw------- 1 root root 130855971 Jun 13 16:24 10.1.32.105_2018-06-13.log
由于rsyslog收集后的日志会每天产生一个日志文件,并且以当天日期命名。
可以编写脚本,将每天收集的日志文件软链接到一个固定名称的文件上。
[root@Server-A ~] # cat /data/fw_logs/log.sh
#!/bin/bash
/bin/unlink /data/fw_logs/firewall .log
/bin/ln -s /data/fw_logs/10 .1.32.105 /10 .1.32.105_$( date +%Y-%m-%d).log /data/fw_logs/firewall .log
[root@Server-A ~] # sh /data/fw_logs/log.sh
[root@Server-A ~] # ll /data/fw_logs/firewall.log
lrwxrwxrwx 1 root root 52 Jun 13 15:17 /data/fw_logs/firewall .log -> /data/fw_logs/10 .1.32.105 /10 .1.32.105_2018-06-13.log
通过 crontab 定时执行
[root@Server-A ~] # crontab -l
0 1 * * * /bin/bash -x /data/fw_logs/log .sh > /dev/null 2>&1
0 6 * * * /bin/bash -x /data/fw_logs/log .sh > /dev/null 2>&1
2)在A服务器上配置logstash
安装logstash省略(如上)
[root@Server-A ~] # cat /opt/redis-input.conf
input {
file {
path => "/data/fw_logs/firewall.log"
type => "firewall-log"
start_position => "beginning"
codec => multiline {
pattern => "^[a-zA-Z0-9]|[^ ]+"
negate => true
what => previous
}
}
}
output {
if [ type ] == "firewall-log" {
redis {
host => "192.168.10.217"
port => "6379"
db => "5"
data_type => "list"
key => "firewall-log"
}
}
}
[root@Server-A ~] # cat /opt/file.conf
input {
redis {
type => "firewall-log"
host => "192.168.10.217"
port => "6379"
db => "5"
data_type => "list"
key => "firewall-log"
}
}
output {
if [ type ] == "firewall-log" {
elasticsearch {
hosts => [ "192.168.10.213:9200" ]
index => "firewall-log-%{+YYYY.MM.dd}"
}
}
}
[root@Server-A ~] # /opt/logstash/bin/logstash -f /opt/zl/redis-input.conf --configtest
Configuration OK
[root@Server-A ~] # /opt/logstash/bin/logstash -f /opt/zl/file.conf --configtest
Configuration OK
[root@Server-A ~] # /opt/logstash/bin/logstash -f /opt/zl/redis-input.conf &
Configuration OK
[root@Server-A ~] # /opt/logstash/bin/logstash -f /opt/zl/file.conf &
Configuration OK
注意:
logstash配置文件中的index名称有时不注意的话,会invalid无效。
比如上面 "firewall-log-%{+YYYY.MM.dd}" 改为 "IDC-firewall-log-%{+YYYY.MM.dd}" 的话,启动logstash就会报错:index name is invalid!
然后登陆kibana界面,将firewall-log日志添加进去展示即可。


