Mybatis和logback的应用配置
1、在module的pom.xml文件中,加载springboot和swagger、lombok、fastjson、mysql、mybatis包
2、在resources中添加配置:
配置文件有两种,一种是properties,另一种是yaml,这里使用yaml
yaml配置与properties一样,只是格式不同,内容则类似。
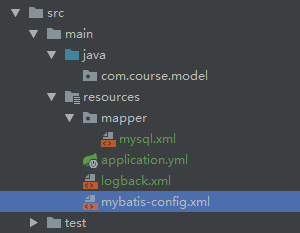
3、在配置文件application.yml中,编写MySQL的连接配置(通过url连接数据库course)
server:
  port: 8888         # 程序端口

logging:
  path: logs         # 在项目根路径下
  file: mylog.log


spring:
  application:
    name: myTest       # 程序名
  datasource:
    driver-class-name: com.mysql.jdbc.Driver
    url: jdbc:mysql://localhost:3306/course
    username: root
    password: root

mybatis:
  type-aliases-package: com.course.model       #用mybatis时,需要用到的一些包,做映射
  mapper-locations:                            #用来写SQL的
    - mapper/*                                 #指加载resource/mapper路径下,所有的XML文件
- 4、在resources下,创建日志配置文件logback.xml(含日志回滚),如下
<?xml version="1.0" encoding="UTF-8"?>
<configuration>

    <include resource="org/springframework/boot/logging/logback/defaults.xml"/>
    <property name="FILE_LOG_PATTERN" value="%d{yyyy-MM-dd HH:mm:ss.SSS} [%thread] %-5level %logger{80} - %msg%n"/>
    <property name="LOG_PATH" value="${LOG_PATH:-${LOG_TEMP:-${java.io.tmpdir:-/tmp}}}"/>
    <appender name="FILE" class="ch.qos.logback.core.rolling.RollingFileAppender">
        <!--此处加载的是application.yml文件里的log中的path和file值-->
        <file>${LOG_PATH}/${LOG_FILE}</file>
        <rollingPolicy class="ch.qos.logback.core.rolling.TimeBasedRollingPolicy">
            <fileNamePattern>${LOG_PATH}/${LOG_FILE}.%d{yyyy-MM-dd}</fileNamePattern>
        </rollingPolicy>
        <encoder charset="UTF-8">
            <pattern>${FILE_LOG_PATTERN}</pattern>
        </encoder>
    </appender>


    <appender name="STDOUT" class="ch.qos.logback.core.ConsoleAppender">
        <encoder>
            <pattern>${FILE_LOG_PATTERN}</pattern>
        </encoder>
    </appender>


    <appender name="CRAWLER_LOG" class="ch.qos.logback.core.rolling.RollingFileAppender">
        <file>${LOG_PATH}/event.log</file>
        <rollingPolicy class="ch.qos.logback.core.rolling.TimeBasedRollingPolicy">
            <fileNamePattern>${LOG_PATH}/event.%d{yyyy-MM-dd}.log</fileNamePattern>
            <maxHistory>30</maxHistory>
        </rollingPolicy>
        <encoder class="ch.qos.logback.classic.encoder.PatternLayoutEncoder">
            <pattern>%msg%n</pattern>
        </encoder>
    </appender>


    <logger name="com.business.intelligence.util.CrawlerLogger" level="INFO" additivity="false">
        <appender-ref ref="CRAWLER_LOG"/>
    </logger>

    <root level="INFO">
        <appender-ref ref="STDOUT"/>
        <appender-ref ref="FILE"/>
    </root>


</configuration>
- 5、在resources下,创建mybatis配置文件mybatis-config.xml,如下
<?xml version="1.0" encoding="UTF-8" ?>
<!--
       Copyright 2015-2016 the original author or authors.
       Licensed under the Apache License, Version 2.0 (the "License");
       you may not use this file except in compliance with the License.
       You may obtain a copy of the License at
          http://www.apache.org/licenses/LICENSE-2.0
       Unless required by applicable law or agreed to in writing, software
       distributed under the License is distributed on an "AS IS" BASIS,
       WITHOUT WARRANTIES OR CONDITIONS OF ANY KIND, either express or implied.
       See the License for the specific language governing permissions and
       limitations under the License.
-->
<!--这里是引用的模板-->
<!DOCTYPE configuration
        PUBLIC "-//mybatis.org//DTD Config 3.0//EN"
        "http://mybatis.org/dtd/mybatis-3-config.dtd">

<!--这里是关键配置,第一个是需要映射的包,第二个是需要映射(加载)的XML文件-->
<configuration>
    <!--简化类命名空间,简化之后我们后续引用只需要写类名即可-->
    <typeAliases>
        <package name="com.course.model"/>
    </typeAliases>
    <!--mapper映射器,注册一个sql映射;其中resource、url是以配置文件的方式来注册,class是以接口的方式-->
    <!--resource:引用类路径下的sql映射文件-->
    <mappers>
        <mapper resource="mapper/mysql.xml"/>

    </mappers>
</configuration>
使用mybatis+SpringBoot完成第一个查询demo
- 1、在resources下创建一个文件夹mapper,然后创建mysql.xml(存储mybatis的SQL语句的配置文件),在mysql.xml里编写需要执行的sql语句
<?xml version="1.0" encoding="UTF-8" ?>
<!DOCTYPE mapper
        PUBLIC "-//mybatis.org//DTD Mapper 3.0//EN"
        "http://mybatis.org/dtd/mybatis-3-mapper.dtd">
<!--namespace是命名空间-->
<mapper namespace="com.course">
    <!--执行SQL时,需要用到此id来定位SQL语句;resultType是指运行SQL语句后,返回结果的数据类型;标签里面是要执行的SQL语句-->
    <select id="getUserCount" resultType="Integer">
        select count(*) from user;

    </select>

</mapper>
- 2、在Java下新建com.course.controller包,然后在该包下新建demo.java类,如下
package com.course.controller;

import io.swagger.annotations.Api;
import io.swagger.annotations.ApiOperation;

import lombok.extern.log4j.Log4j2;
import org.mybatis.spring.SqlSessionTemplate;
import org.springframework.beans.factory.annotation.Autowired;
import org.springframework.web.bind.annotation.*;

@Log4j2     //日志注解,用于写日志,是对.Log4j的优化
@RestController
@Api(value = "v1",description = "这是我的第一个版本的demo")     //这里的value值需与RequestMapping的值一致,因这里是后者的一个说明,这里表示对v1请求的说明
@RequestMapping("v1")    //表示根目录为v1,后续的接口路径都需要先加上该根目录
public class Demo {

    //首先创建一个执行sql语句的对象template

    @Autowired      //该标签是指启动即加载,即将Demo类启动时,就自动加载了template对象
    private SqlSessionTemplate template;

    @RequestMapping(value = "/getUserCount",method = RequestMethod.GET)     //注明请求路径和请求方法
    @ApiOperation(value = "可以获取到用户数",httpMethod = "GET")           //表明该接口为get接口,以及它的作用
    public int getUserCount(){
        return template.selectOne("getUserCount");    //该请求的响应结果,即通过执行SQL语句后,把结果返回,通过id定位到需执行的sql
    }                                                             //selectOne表执行一条查询,getUserCount即mysql.xml中的select标签的id值

}
- 3、在包com.course下新建一个启动程序Application.java , 该启动程序与之前的不同,之前的写法需要指定扫描某个包,而这里的写法则不需要指定扫描某个包,这种写法是通用的,可以直接拿到其他的地方执行,而不需做改动。
package com.course;
//通用型入口启动程序写法
import org.springframework.boot.SpringApplication;
import org.springframework.boot.autoconfigure.SpringBootApplication;
import org.springframework.context.ConfigurableApplicationContext;
import org.springframework.scheduling.annotation.EnableScheduling;

import javax.annotation.PreDestroy;

@EnableScheduling
@SpringBootApplication
public class Application {

    private static ConfigurableApplicationContext context;
    //启动程序
    public static void main(String[] args){
       Application.context = SpringApplication.run(Application.class,args);
    }

    //退出程序
    @PreDestroy
    public void close(){
        Application.context.close();
    }
}
- 4、执行入口程序后,调用接口结果如下:

使用mybaits实现数据的更新和删除
- user.java
package com.course.model;

import lombok.Data;

@Data
public class User {
    private int id;
    private String name;
    private String sex;
    private int age;

}
- Demo.java
package com.course.controller;

import com.course.model.User;
import io.swagger.annotations.Api;
import io.swagger.annotations.ApiOperation;

import lombok.extern.log4j.Log4j2;
import org.mybatis.spring.SqlSessionTemplate;
import org.springframework.beans.factory.annotation.Autowired;
import org.springframework.web.bind.annotation.*;

@Log4j2     //日志注解,用于写日志,是对.Log4j的优化
@RestController
@Api(value = "v1",description = "这是我的第一个版本的demo")     //这里的value值需与RequestMapping的值一致,因这里是后者的一个说明,这里表示对v1请求的说明
@RequestMapping("v1")    //表示根目录为v1,后续的接口路径都需要先加上该根目录
public class Demo {

    //首先创建一个执行sql语句的对象template

    @Autowired      //该标签是指启动即加载,即将Demo类启动时,就自动加载了template对象
    private SqlSessionTemplate template;

    @RequestMapping(value = "/getUserCount",method = RequestMethod.GET)     //注明请求路径和请求方法
    @ApiOperation(value = "可以获取到用户数",httpMethod = "GET")           //表明该接口为get接口,以及它的作用
    public int getUserCount(){
        return template.selectOne("getUserCount");    //该请求的响应结果,即通过执行SQL语句后,把结果返回,通过id定位到需执行的sql
    }                                                             //selectOne表执行一条查询,getUserCount即mysql.xml中的select标签的id值

    //插入数据的接口请求
    @RequestMapping(value = "/addUser",method = RequestMethod.POST)
    public int addUser(@RequestBody User user){
        //通过id定位到sql语句,并传入该sql语句所需的参数user对象
        int result = template.insert("addUser",user);    //返回的结果是插入的数据条数,整型;Alt+enter可看到返回值类型
        return result;
    }

    //更新数据库请求
    @RequestMapping(value = "/updateUser",method = RequestMethod.POST)
    public int updateUser(@RequestBody User user){
        return  template.update("updateUser",user);
    }

    //删除请求,此时只需知道删除条件的值,不需要知道user类里的成员,因而这里直接定义一个参数即可
    @RequestMapping(value = "/deleteUser",method = RequestMethod.GET)
    public int delUser(@RequestParam int id){
        return template.delete("deleteUser",id);
    }

}
- mysql.xml
<?xml version="1.0" encoding="UTF-8" ?>
<!DOCTYPE mapper
        PUBLIC "-//mybatis.org//DTD Mapper 3.0//EN"
        "http://mybatis.org/dtd/mybatis-3-mapper.dtd">
<!--namespace是命名空间-->
<mapper namespace="com.course">
    <!--执行SQL时,需要用到此id来定位SQL语句;resultType是指运行SQL语句后,返回结果的数据类型;标签里面是要执行的SQL语句-->
    <select id="getUserCount" resultType="Integer">
        select count(*) from user;
    </select>

<!--通过id定位的插入语句,参数类型为User类型,插入的值对应User类里的成员,参数类型需写到具体的包直到类,否则会定位不到该参数引用的类;
这里的变量值#{id}等与User里的成员一致-->
    <insert id="addUser" parameterType="com.course.model.User">
        insert into user(id,name,age,sex)
        values(#{id},#{name},#{age},#{sex})
    </insert>

    <!--通过id定位到更新的sql语句,后面是入参类型,这里是User类-->
    <update id="updateUser" parameterType="com.course.model.User">
        update user set name=#{name},age=#{age}
        where id=#{id}
    </update>

    <!--这里的入参类型不同,为整型,因为删除条件中只需要某个字段的值即可,这里的#{id}是个普通参数,从另外的执行类中传入-->
    <delete id="deleteUser" parameterType="Integer">
        delete from user where id = #{id}
    </delete>

</mapper>
跨类依赖实现
跨类依赖在类中的实现1
在类上面,加上@Component的注解,该类会被作为普通组件加入bean配置中,程序运行时,会优先初始化运行该类。
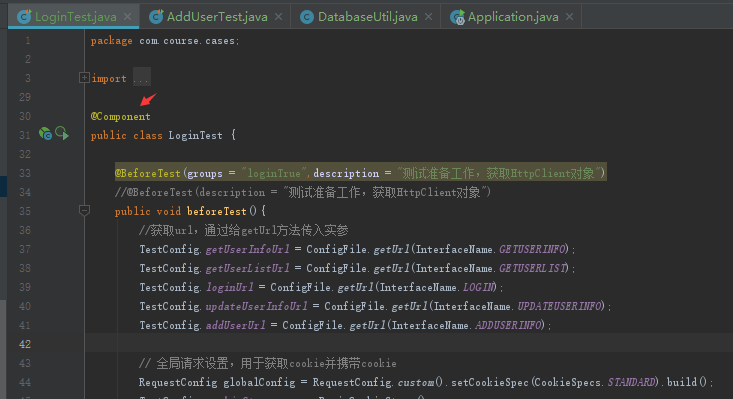
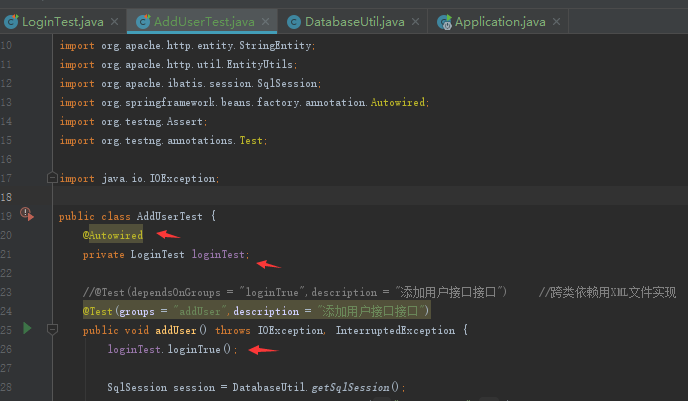
在有依赖关系的类下,加入@Autowired注解,用来给指定的字段或方法注入所需的外部资源。这里在该注解下申明了一个LoginTest对象,表明该类是引用外部的类,后续即可使用该对象方法
跨类依赖在类中的实现2(通过XML文件实现)
- 1、对各个测试方法进行分组
@Test(groups = "loginTrue",description = "用户成功登陆接口")
public void loginTrue() throws IOException {
- 2、在XML执行文件如:testng.xml中,写上它们之间的依赖关系
<?xml version="1.0" encoding="UTF-8" ?>

<suite name="用户管理系统测试套件">

    <test name="用户管理系统测试用例">
        <groups>
            <dependencies>
                <group name ="addUser" depends-on="loginTrue" />
            </dependencies>
        </groups>
        <classes>
            <class name="com.course.cases.LoginTest">
                <methods>
                    <include name="loginTrue"/>
                    <include name="loginFalse"/>
                </methods>
            </class>
            <class name="com.course.cases.AddUserTest">
            <methods>
            <include name="addUser"/>
            </methods>
            </class>
        </classes>
    </test>

    <listeners>
        <listener class-name="com.course.config.ExtentTestNGIReporterListener" />
    </listeners>

</suite>
- 该文件表明,用户管理系统的测试用例,包含addUser和loginTrue测试组,且addUser测试组的执行依赖于loginTrue测试组,该测试用例下,包含两个测试类,分别是addUserTest和LoginTest,其中LoginTest包含两个测试方法(本次需要执行的),分别是loginTrue和loginFalse。
封装SQLsession 用于简化数据库操作
- DatabaseUtil.java 如下(SQLsession是属于mybatis的方法)
package com.course.utils;

import org.apache.ibatis.io.Resources;
import org.apache.ibatis.session.SqlSession;
import org.apache.ibatis.session.SqlSessionFactory;
import org.apache.ibatis.session.SqlSessionFactoryBuilder;

import java.io.IOException;
import java.io.Reader;

public class DatabaseUtil {
    //工具类一般用静态方法,方便直接引用。这里方法的数据类型是SqlSession类
    public static SqlSession getSqlSession() throws IOException {
        //获取配置的资源文件,即加载xml的配置文件,注:这里使用的是org.apache.ibatis.io的类包
        Reader reader = Resources.getResourceAsReader("databaseConfig.xml");
        //得到SqlSessionFactory,使用类加载器加载上面获取到的xml文件,即将上面的文件build出来
        SqlSessionFactory factory = new SqlSessionFactoryBuilder().build(reader);
        //创建sqlSession对象,这个对象就能够用于执行配置文件中的sql语句了,true:自动提交事务,false:手动提交,不填则默认false
        SqlSession sqlSession = factory.openSession(true);
        //返回sqlSession,后续引用即可通过getSqlSession.sql语句来执行了
        return sqlSession;
    }
}
接口代码开发
- 新建model,并引用相关依赖包
- 在resource下新建相关基础配置文件
- Swagger默认配置文件:application.yml
- 日志配置文件:logback.xml
- Mybatis的配置文件:mybatis-config.xml
- mapper下放存储操作数据库sql语句的配置文件:mysql.xml
- 编写启动类:Application.java
- 分层:
- 新建model层,用于存放数据类型类,比如User.java
- 配置层config,存放程序配置类,如SwaggerConfig.java,存放需在swagger上发布的接口方法、路径等配置
- 控制层 controller,存放执行类,如入口执行类UserManager.java,里面存放控制本程序运行的具体业务逻辑方法。
相关代码如下:
- User.java
package com.course.model;

import lombok.Data;

@Data
public class User {
    private int id;
    private String userName;
    private String password;
    private int age;
    private String sex;
    private int permission;
    private int isDelete;

}
- mysql.xml
<?xml version="1.0" encoding="UTF-8" ?>
<!DOCTYPE mapper
        PUBLIC "-//mybatis.org//DTD Mapper 3.0//EN"
        "http://mybatis.org/dtd/mybatis-3-mapper.dtd">

<mapper namespace="com.course">

    <!--登陆接口sql-->
    <select id="login" parameterType="com.course.model.User" resultType="Integer">

        select count(*) from user
        where userName=#{userName}
        and password=#{password}
    </select>

    <!--添加用户接口-->
    <insert id="addUser" parameterType="com.course.model.User">
        insert into
        user (userName,password,sex,age,permission,isDelete)
        values (#{userName},#{password},#{sex},#{age},#{permission},#{isDelete});
    </insert>

    <!--获取用户信息sql--><!--多个不定条件查询的写法,此时不过存入什么字段,以下的sql语句都有效-->
    <!--动态sql的trim标签,如果prefix有值,就在第一个匹配上的子标签sql语句的最先面加上prefix的值,
    前部处理:如果prefixOverrides有元素,拿该元素去匹配第一个子标签sql语句,若匹配上,就删掉sql语句的匹配部分(前面)
    尾部处理:如果suffixOverrides有元素,拿该元素去匹配第一个子标签sql语句,若匹配上,就删掉sql语句的匹配部分(后面)-->
    <select id="getUserInfo" parameterType="com.course.model.User" resultType="com.course.model.User">
        select * from user
        <trim prefix="WHERE" prefixOverrides="and">
            <!--如果引用该sql语句的测试程序中,符合标签里的条件,则取标签中的值-->
            <if test="null != id and '' !=id">
                AND id=#{id}
            </if>
            <if test="null != userName and '' !=userName">
                AND userName=#{userName}
            </if>
            <if test="null != password and '' !=password">
                AND password=#{password}
            </if>
            <if test="null != sex and '' !=sex">
                AND sex=#{sex}
            </if>
            <if test="null != age and '' !=age">
                AND age=#{age}
            </if>
            <if test="null != permission and '' !=permission">
                AND permission=#{permission}
            </if>
            <if test="null != isDelete and '' !=isDelete">
                AND isDelete=#{isDelete}
            </if>
        </trim>
    </select>

    <!--更新/删除用户信息动作-->
    <update id="updateUserInfo" parameterType="com.course.model.User">
        update user
        <trim prefix="SET" suffixOverrides=",">
            <if test="null != userName and '' !=userName">
                userName=#{userName},
            </if>
            <if test="null != sex and '' !=sex">
                sex=#{sex},
            </if>
            <if test="null != age and '' !=age">
                age=#{age},
            </if>
            <if test="null != permission and '' !=permission">
                permission=#{permission},
            </if>
            <if test="null != isDelete and '' !=isDelete">
                isDelete=#{isDelete},
            </if>
        </trim>
        where id = #{id}
    </update>

</mapper>
- SwaggerConfig.java
package com.course.config;

import org.springframework.context.annotation.Bean;
import org.springframework.context.annotation.Configuration;
import springfox.documentation.builders.ApiInfoBuilder;
import springfox.documentation.builders.PathSelectors;
import springfox.documentation.service.ApiInfo;
import springfox.documentation.service.Contact;
import springfox.documentation.spi.DocumentationType;
import springfox.documentation.spring.web.plugins.Docket;
import springfox.documentation.swagger2.annotations.EnableSwagger2;

//Configuration和EnableSwagger2这两个注解标签用于自动加载swagger的配置文件
@Configuration
@EnableSwagger2
public class SwaggerConfig {
    @Bean
    //固定写法,方法名api自定义
    public Docket api(){
        return new Docket(DocumentationType.SWAGGER_2)
                //括号里加载的是下面创建的apiInfo方法
                .apiInfo(apiInfo())
                //配置整个的访问路径,这里为根路径
                .pathMapping("/")
                //选择上前面的目录,根路径
                .select()
                //路径选择器,正则配置controller下的方法,这里选择根目录下的所有方法
                .paths(PathSelectors.regex("/.*"))
                //build下该文件
                .build();
    }

    private ApiInfo apiInfo(){
        //swagger界面标题,联系人(含姓名,链接,邮箱),描述,该应用本次发布的版本,最后build这个文件
        return new ApiInfoBuilder().title("我的接口文档")
                .contact(new Contact("junjun","http://test.com","test168test@126.com"))
                .description("this is UserManager service API")
                .version("1.0.0.0")
                .build();

    }
}
- UserManager.java
package com.course.controller;

import com.course.model.User;
import io.swagger.annotations.Api;
import io.swagger.annotations.ApiOperation;
import lombok.extern.log4j.Log4j2;
import org.mybatis.spring.SqlSessionTemplate;
import org.springframework.beans.factory.annotation.Autowired;
import org.springframework.web.bind.annotation.RequestBody;
import org.springframework.web.bind.annotation.RequestMapping;
import org.springframework.web.bind.annotation.RequestMethod;
import org.springframework.web.bind.annotation.RestController;

import javax.servlet.http.Cookie;
import javax.servlet.http.HttpServletRequest;
import javax.servlet.http.HttpServletResponse;
import java.util.List;
import java.util.Objects;

@Log4j2     //日志注解,用于写日志,是对.Log4j的优化
@RestController
@Api(value = "v1",description = "用户管理系统")
@RequestMapping("v1")
public class UserManager {

    //首先获取一个执行sql语句的对象

    @Autowired
    private SqlSessionTemplate template;

    @ApiOperation(value = "登陆接口",httpMethod = "POST")
    @RequestMapping(value = "/login",method = RequestMethod.POST)
    public Boolean login(HttpServletResponse response, @RequestBody User user){
        int i  = template.selectOne("login",user);
        log.info("查看到的结果是"+i);
        if(i==1){
            log.info("登录的用户是:"+user.getUserName());
            Cookie cookie = new Cookie("login","true");
            response.addCookie(cookie);
            return true;
        }
        return false;
    }

    @ApiOperation(value = "添加用户接口",httpMethod = "POST")
    @RequestMapping(value = "/addUser",method = RequestMethod.POST)
    public boolean addUser(HttpServletRequest request, @RequestBody User user){
        Boolean x = verifyCookies(request);
        int result = 0;
        if(x ==true){
            result = template.insert("addUser",user);
        }
        if(result>0){
            log.info("添加用户的数量是:"+result);
            return true;
        }
        return false;     //其他情况(即不符合上面两个条件的),返回此结果
    }

    @ApiOperation(value = "获取用户(列表)信息接口",httpMethod = "POST")
    @RequestMapping(value = "/getUserInfo",method = RequestMethod.POST)
    public List<User> getUserInfo(HttpServletRequest request, @RequestBody User user){
        Boolean x = verifyCookies(request);
        if(x==true){
            List<User> users = template.selectList("getUserInfo",user);
            log.info("getUserInfo获取到的用户数量是" +users.size());
            return users;     //返回查询到的具体结果信息
        }else {
            return null;
        }
    }

    @ApiOperation(value = "更新/删除用户接口",httpMethod = "POST")
    @RequestMapping(value = "/updateUserInfo",method = RequestMethod.POST)
    public int updateUser(HttpServletRequest request,@RequestBody User user){
        Boolean x = verifyCookies(request);
        int i = 0;
        if(x==true) {
            i = template.update("updateUserInfo", user);
        }
        log.info("更新数据的条目数为:" + i);
        return i;

    }

    private Boolean verifyCookies(HttpServletRequest request) {
        Cookie[] cookies = request.getCookies();
        if(Objects.isNull(cookies)){
            log.info("cookies为空");
            return false;       //执行了return后,表明该方法已结束,后续的语句不会再被执行
        }
        for(Cookie cookie : cookies){
            if(cookie.getName().equals("login") &&
                    cookie.getValue().equals("true")){
                log.info("cookies验证通过");
                return true;
            }
        }
        return false;       //若前面的条件都不满足,则该方法直接返回此结果,结束该方法
    }

}
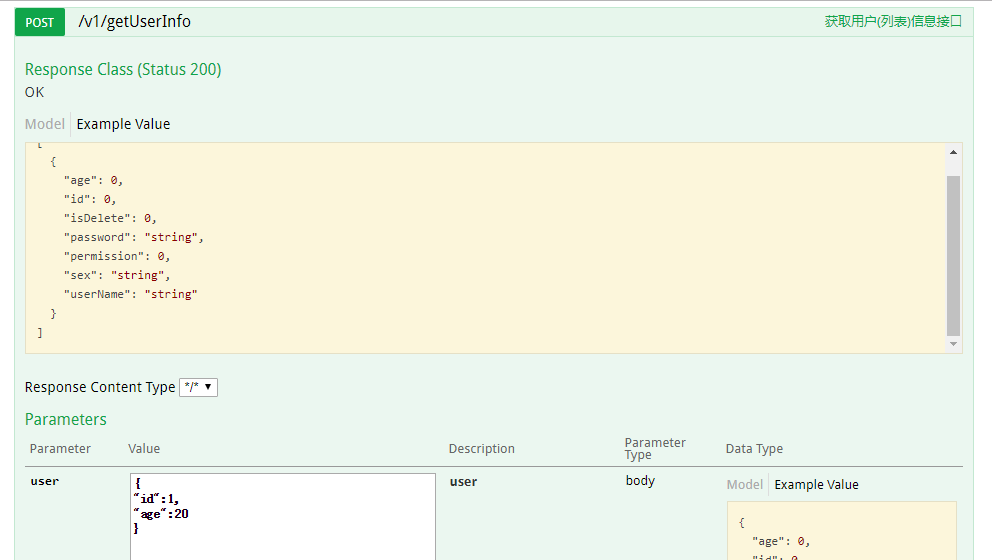
- 发布后,多个参数的请求如下:
自动化测试代码二次开发
- GetUserInfoTest.java
package com.course.cases;

import com.alibaba.fastjson.JSON;
import com.alibaba.fastjson.JSONArray;
import com.alibaba.fastjson.JSONObject;
import com.course.config.TestConfig;
import com.course.model.GetUserInfoCase;
import com.course.model.User;
import com.course.utils.DatabaseUtil;
import org.apache.http.HttpResponse;
import org.apache.http.client.methods.HttpPost;
import org.apache.http.entity.StringEntity;
import org.apache.http.util.EntityUtils;
import org.apache.ibatis.session.SqlSession;
import org.testng.Assert;
import org.testng.annotations.Test;

import java.io.IOException;
import java.util.ArrayList;
import java.util.Arrays;
import java.util.List;

public class GetUserInfoTest {

    //@Test(dependsOnGroups="loginTrue",description = "获取userId为1的用户信息")
    @Test(groups = "getUserInfo",description = "获取userId为1的用户信息")
    public void getUserInfo() throws IOException, InterruptedException {
        SqlSession session = DatabaseUtil.getSqlSession();
        GetUserInfoCase getUserInfoCase = session.selectOne("getUserInfoCase",1);
        System.out.println(getUserInfoCase.toString());
        System.out.println(TestConfig.getUserInfoUrl);

        //执行接口测试
        JSONArray resultJson = getJsonResult(getUserInfoCase);

        Thread.sleep(2000);
        //传入的getUserInfoCase只有userId,即从user表取出userId的用户信息,获取到的是字典
        User user = session.selectOne(getUserInfoCase.getExpected(),getUserInfoCase);
        System.out.println("自己查库获取用户信息:"+user.toString());

        //把字典转成字典列表的形式,否则无法转成json数组,以下申明了一个列表
/*      List是一个接口,而ArrayList是List接口的一个实现类。创建了一个ArrayList实现类的对象后把它上溯到了List接口。此时它就是一个List对象了,它有些ArrayList类具有的,
        但是List接口没有的属性和方法,它就不能再用了。而ArrayList list=newArrayList();创建一对象则保留了ArrayList的所有属性和方法。*/
        List userList = new ArrayList();
        //将user这个json对象添加到列表中,形成json列表。不写下标,则表示在列表的末尾追加元素
        userList.add(user);

        JSONArray jsonArray= JSONArray.parseArray(JSON.toJSONString(userList));
        System.out.println("获取用户信息:"+jsonArray.toString());
        System.out.println("调用接口获取用户信息:"+resultJson.toString());

/*        JSONObject actual = (JSONObject) resultJson.get(0);    //获取json数组的第1项,并将其转成json对象,即{}部分(键值对)
        JSONObject expect = (JSONObject) jsonArray.get(0);
        Assert.assertEquals(expect.toString(), actual.toString());   //将json对象转成字符串,然后比较*/
        Assert.assertEquals(jsonArray,resultJson);     //直接比较json数组
    }

    private JSONArray getJsonResult(GetUserInfoCase getUserInfoCase) throws IOException {
        HttpPost post = new HttpPost(TestConfig.getUserInfoUrl);
        JSONObject param = new JSONObject();
        param.put("id",getUserInfoCase.getUserId());
        //设置请求头信息 设置header
        post.setHeader("content-type","application/json");
        //将参数信息添加到方法中
        StringEntity entity = new StringEntity(param.toString(),"utf-8");
        post.setEntity(entity);
        //执行post请求,并带上上下文的全局设置中的cookie信息
        HttpResponse response =TestConfig.client.execute(post,TestConfig.context);
        //声明一个对象来进行响应结果的存储
        String result;
        //获取响应结果,json字符串
        result = EntityUtils.toString(response.getEntity(),"utf-8");
        System.out.println("调用接口result:"+result);

        //将json字符串转成json数组,即json字符串的中括号[]及里面的内容
        JSONArray jsonArray = JSONArray.parseArray(result);

        return jsonArray;

    }
}
- GetUserInfoListTest.java
package com.course.cases;

import com.alibaba.fastjson.JSON;
import com.alibaba.fastjson.JSONArray;
import com.alibaba.fastjson.JSONObject;
import com.course.config.TestConfig;
import com.course.model.GetUserListCase;
import com.course.model.User;
import com.course.utils.DatabaseUtil;
import org.apache.http.HttpResponse;
import org.apache.http.client.methods.HttpPost;
import org.apache.http.entity.StringEntity;
import org.apache.http.util.EntityUtils;
import org.apache.ibatis.session.SqlSession;
import org.testng.Assert;
import org.testng.annotations.Test;

import java.io.IOException;
import java.util.List;

public class GetUserInfoListTest {

    //@Test(dependsOnGroups="loginTrue",description = "获取性别为男的用户信息")
    @Test(groups = "getUserList",description = "获取性别为男的用户信息")
    public void getUserListInfo() throws IOException, InterruptedException {

        SqlSession session = DatabaseUtil.getSqlSession();
        GetUserListCase getUserListCase = session.selectOne("getUserListCase",1);
        System.out.println(getUserListCase.toString());
        System.out.println(TestConfig.getUserListUrl);

        //执行接口测试
        JSONArray resultJson = getJsonResult(getUserListCase);

        Thread.sleep(2000);
        //通过获取数据库中的期望结果,得到getUserList,通过定位id为getUserList的sql语句,查询数据库得到结果为字典列表
        //传入的getUserListCase只有sex有值,因而查询条件为sex,即从user表取出性别为男的用户信息
        List<User> userList = session.selectList(getUserListCase.getExpected(),getUserListCase);
        System.out.println("数据库返回结果列表:"+userList);  //[{},{}]
        //返回的是多条记录的结果,遍历出来为字典
        for(User u : userList){
            System.out.println("list获取的user:"+u.toString());
        }
        //JSONArray userListJson = new JSONArray(userList);
        //把列表转成json字符串,然后再转成json数组,即[{},{}]
        JSONArray userListJson= JSONArray.parseArray(JSON.toJSONString(userList));
        System.out.println("list转成json数组后:"+userListJson);

        //取json数组的长度,用size();取列表长度,才用length(),这里比较用户数是否等于预期
        Assert.assertEquals(userListJson.size(),resultJson.size());
        //将用户从json数组中取出,对比具体的用户信息是否等于预期
        for(int i = 0;i<resultJson.size();i++){
            JSONObject actual = (JSONObject) resultJson.get(i);    //获取json数组的第i项,并将其转成json对象,即{}部分(键值对)
            JSONObject expect = (JSONObject) userListJson.get(i);
            Assert.assertEquals(expect.toString(), actual.toString());   //将json对象转成字符串,然后比较
        }

    }

    private JSONArray getJsonResult(GetUserListCase getUserListCase) throws IOException {
        HttpPost post = new HttpPost(TestConfig.getUserListUrl);
        JSONObject param = new JSONObject();
        param.put("userName",getUserListCase.getUserName());
        param.put("sex",getUserListCase.getSex());
        param.put("age",getUserListCase.getAge());
        //设置请求头信息 设置header
        post.setHeader("content-type","application/json");
        //将参数信息添加到方法中
        StringEntity entity = new StringEntity(param.toString(),"utf-8");
        post.setEntity(entity);
        //执行post请求,并带上上下文的全局设置中的cookie信息
        HttpResponse response =TestConfig.client.execute(post,TestConfig.context);
        //声明一个对象来进行响应结果的存储
        String result;
        //获取响应结果,这里将响应结果转成转成字符串,然后将响应体保存在result中,即响应结果为json字符串
        result = EntityUtils.toString(response.getEntity(),"utf-8");
        //JSONArray jsonArray = new JSONArray(result);
        //将json字符串转成json数组,即json字符串的中括号[]及里面的内容
        JSONArray jsonArray = JSONArray.parseArray(result);

        System.out.println("调用接口list result:"+result);

        return jsonArray;

    }
}


/*
JSON就是一串字符串 只不过元素会使用特定的符号标注
{} 双括号表示对象

[] 中括号表示数组

"" 双引号内是属性或值
1,JSONObject
  json对象,就是一个键对应一个值,使用的是大括号{ },如:{key:value}

2,JSONArray
  json数组,使用中括号[ ],只不过数组里面的项也是json键值对格式的

  [{name1:{name2:{name3:'value1',name4:'value2'}}},{}]
   取出name4值过程步骤:1,将以上字符串转换为JSONArray对象;2,取出对象的第一项,JSONObject对象;
   3,取出name1的值JSONObject对象;4,取出name2的值JSONObject对象;5,取出name4的值value2。
*/
附录
报错问题解决(执行入口程序后):
- 1、Error starting ApplicationContext. To display the conditions report re-run your application with 'debug' enabled. 2019-06-20 22:37:15.167 [main] ERROR org.springframework.boot.SpringApplication - Application run failed org.springframework.beans.factory.UnsatisfiedDependencyException: Error creating bean with name 'demo': Unsatisfied dependency expressed through field 'template'; nested exception is org.springframework.beans.factory.UnsatisfiedDependencyException: Error creating bean with name 'sqlSessionTemplate' defined in class path resource
- 解决:一般是数据库配置有问题,比如application.yml文件中,数据库的url: jdbc:mysql://localhost:3306/course,若该数据库只有localhost有链接权限,其他ip都无权限,则报此错误,如将localhost改成127.0.0.1,就会出现这种错误。
- 2、ERROR com.zaxxer.hikari.pool.HikariPool - HikariPool-1 - Exception during pool initialization. java.sql.SQLException: The server time zone value '�й���ʱ��' is unrecognized or represents more than one time zone. You must configure either the server or JDBC driver (via the serverTimezone configuration property) to use a more specifc time zone value if you want to utilize time zone support.
- 解决:造成这个原因是因为mysql的版本过高。修改为:
<dependency>
    <groupId>mysql</groupId>
    <artifactId>mysql-connector-java</artifactId>
    <version>5.1.24</version>
    <scope>runtime</scope>
</dependency>
SpringBoot 去除"No MyBatis mapper was found in '[com.XXX]' package. " 警告
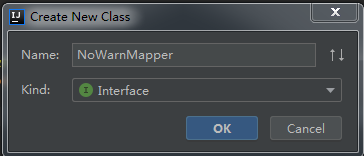
仔细观察发现,这个包恰恰是 Application 主类的包,看样子是默认扫描了。虽然不影响使用,但不想让这个警告出现,怎么去掉这个警告呢?偶然想到一个思路,既然你要找主类包里的mapper,我就给你一个mapper。如下
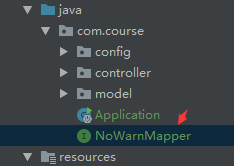
NoWarnMapper.java

package com.course;

@org.apache.ibatis.annotations.Mapper
public interface NoWarnMapper {
}
请求的响应中,出现EDT错误
解决如下:(若没有出现EDT错误,则不需要加如下内容) 在application.yml中,加入serverTimezone=GMT


