单元测试的重要性这里就不说了,直接进入正题。很多程序员不喜欢写单元测试,导致项目经常会花很多时间去debug,这完全得不偿失。对关键方法进行单元测试,可以在早期业务逻辑还没那么复杂的时候,尽快排除症结。
在dao,manager,server,web这样的分层项目中,通常单元测试是要写在server层的,因为server层可以测的最多。本文中不介绍单元测试的原理,只是介绍单元测试最常用的断言和Jmockit的用法,可以应付业务开发中绝大部分单元测试。
首先添加maven依赖
 1 <dependencie>
 2     <dependency>
 3          <groupId>junit</groupId>
 4          <artifactId>junit</artifactId>
 5          <version>4.10</version>
 6          <scope>test</scope>
 7      </dependency>
 8      <dependency>
 9          <groupId>org.springframework</groupId>
10          <artifactId>spring-test</artifactId>
11          <version>3.2.9.RELEASE</version>
12          <scope>test</scope>
13      </dependency>
14      <dependency>
15          <groupId>org.jmockit</groupId>
16          <artifactId>jmockit</artifactId>
17          <version>1.24</version>
18          <scope>test</scope>
19      </dependency>
20      <dependency>
21          <groupId>org.mockito</groupId>
22          <artifactId>mockito-all</artifactId>
23          <version>1.8.4</version>
24          <scope>test</scope>
25      </dependency>
26 </dependencie>
1、BaseTest.java
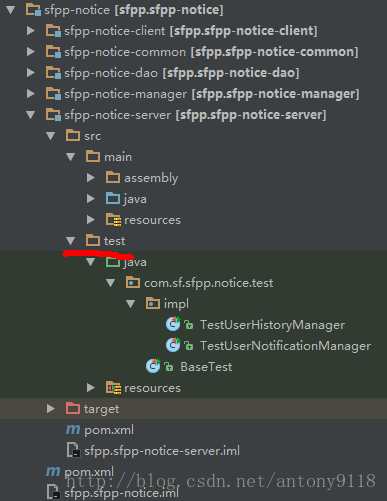
server层新建test包,在IDEA中标记为绿色,这个里面写Before和After,如果不需要,就空在这里即可。其它具体的测试类要继承BaseTest.java。

 1 package com.sf.sfpp.notice.test;
 2
 3 import org.junit.After;
 4 import org.junit.Before;
 5 import org.junit.runner.RunWith;
 6 import org.springframework.test.context.ContextConfiguration;
 7 import org.springframework.test.context.junit4.AbstractTransactionalJUnit4SpringContextTests;
 8 import org.springframework.test.context.junit4.SpringJUnit4ClassRunner;
 9
10 @RunWith(SpringJUnit4ClassRunner.class)
11 @ContextConfiguration(locations = { "/test-service.xml" })
12 public class BaseTest  extends AbstractTransactionalJUnit4SpringContextTests {
13     @Before
14     public void init(){
15     }
16     @After
17     public void print(){
18     }
19 }
2、assert断言
使用assert断言是常用的单元测试方法之一。其本质是将方法的返回结果与预期值进行比较,相等则结果为绿色(单元测试通过),反之为红色(单元测试未通过)。
比方说,我们在Manager层有一个类,UserHistoryManager,里面有个方法是根据ID删除用户操作历史
1 @Autowired
2 private UserHistoryMapper userHistoryMapper;
3
4 public int deleteUserHistoryById(int userHistoryId){
5     return userHistoryMapper.deleteUserHistoryById(userHistoryId);
6 }
现在想要对这个方法进行单元测试,在server层的test下面的impl文件夹中新建一个TestUserHistoryManager类,依旧如第一张图所示,代码如下:
 1 package com.sf.sfpp.notice.test.impl;
 2
 3 import com.sf.sfpp.notice.common.domain.UserHistory;
 4 import com.sf.sfpp.notice.manager.UserHistoryManager;
 5 import com.sf.sfpp.notice.test.BaseTest;
 6 import org.junit.Test;
 7 import org.springframework.beans.factory.annotation.Autowired;
 8
 9 public class TestUserHistoryManager extends BaseTest {
10     @Autowired
11     private UserHistoryManager userHistoryManager;
12
13     @Test
14     public void testDeleteUserHistoryById(){
15         Assert.assertEquals(true,userHistoryManager.deleteUserHistoryById(4) > 0);
16     }
17 }
3、Jmockit
有些方法要远远比上面的assert复杂,例如当你的方法中要添加一个对象到数据库中,此时如何进行单元测试呢?
还是如第一张图片所示,在test下面的impl文件夹中新建TestUserNotificationManager.java,测试一下UserHistoryManager中添加用户历史的方法。
 1 package com.sf.sfpp.notice.test.impl;
 2
 3 import com.sf.sfpp.notice.common.domain.UserHistory;
 4 import com.sf.sfpp.notice.manager.UserHistoryManager;
 5 import com.sf.sfpp.notice.test.BaseTest;
 6 import org.junit.Assert;
 7 import org.junit.Test;
 8 import org.springframework.beans.factory.annotation.Autowired;
 9
10 import static org.mockito.Mockito.mock;
11 import static org.mockito.Mockito.when;
12
13 public class TestUserNotificationManager extends BaseTest {
14     @Autowired
15     private UserHistoryManager userHistoryManager;
16
17     @Test
18     public void testAddUserHistory(){
19         UserHistory userHistory = mock(UserHistory.class);
20         when(userHistory.getAction()).thenReturn("balabala");
21         when(userHistory.getTargetId()).thenReturn("balabala");
22         when(userHistory.getUserId()).thenReturn(43);
23         when(userHistory.getTargetKind()).thenReturn("balabala");
24         when(userHistory.getId()).thenReturn("balabala");
25         Assert.assertTrue(userHistoryManager.addUserHistory(balabala));
26     }
27
28 }
上面的方法相当于用Jmockit虚拟了一个UserHistory对象(用户操作历史),然后根据其中的每个属性看返回值(字符串属性对应字符串返回值,int属性对应int返回值)。
在IDEA中点击方法名前面的绿色箭头(ctrl+shift+F10)
单元测试只要看到下面的绿色条,就表示测试通过了。 
转载自:
http://blog.csdn.net/antony9118/article/details/54312710


