配置自定义的RedisCacheManager--1自定义键生成规则
默认的键生成器
当不指定缓存的key时,SpringBoot会使用SimpleKeyGenerator生成key。
SimpleKeyGenerator
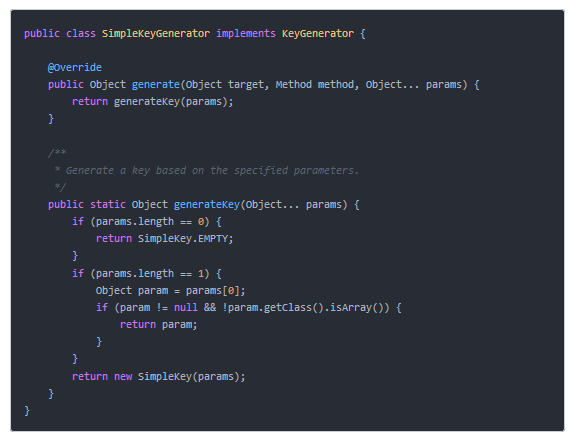
SimpleKey

查看源码可以发现,它是使用方法参数组合生成的一个key。
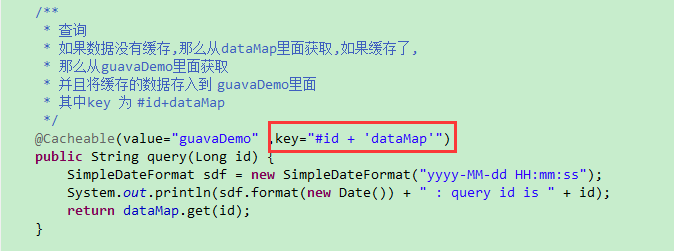
通过SpEL自定义键生成规则
诸如下面红框的代码,SpEL实际上可以写非常复杂的生成规则。
自定义键生成器
在 @Configuration 标注的类中,可以根据自己设计的规则自定义键生成器。
自定义键生成器代码
/**

 * 新的键生成规则

 */

@Bean

@Override

public KeyGenerator keyGenerator() {

return new KeyGenerator(){

public Object generate(Object target, Method method, Object... params){

StringBuilder sb = new StringBuilder();

sb.append(target.getClass().getName());

sb.append("::" + method.getName() + ":");

for (Object obj : params) {

sb.append(obj.toString());

}

return sb.toString();

}

};

}
代码分析
上面自定义的键生成器键的生成规则是:包名+方法名+参数列表。
配置自定义的RedisCacheManager--2创建RedisTemplate模板时自定义序列化器
RedisTemplate默认提供的序列化器
RedisSerializer redis序列化的接口类
OxmSerializer xml到object的序列化/反序列化
StringRedisSerializer string字符串的序列化/反序列化
JacksonJsonRedisSerializer json到object的序列化/反序列化
Jackson2JsonRedisSerializer json到object的序列化/反序列化
JdkSerializationRedisSerializer java对象的序列化/反序列化
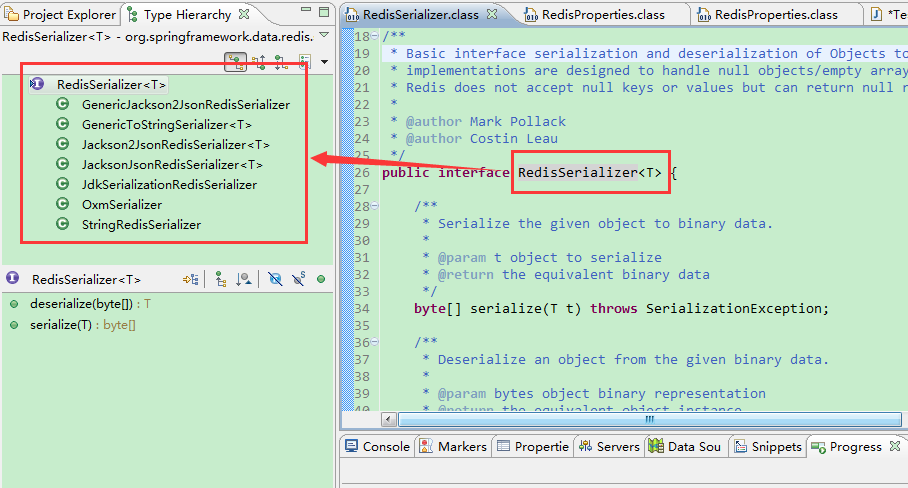
RedisTemplate默认使用的是JdkSerializationRedisSerializer
常见序列化方式的特点
JdkSerializationRedisSerializer:JDK自带的序列化方式、存储的字符串内容在序列化的情况下偏长,会占用过多的内存
OxmSerializer:序列化的时间相对较长
Jackson2JsonRedisSerializer:json数据格式、序列化时间和序列化之后内容的长度都要优于前两种
自定义序列化器--使用Jackson2JsonRedisSerializer
代码
/**

 * RedisTemplate 使用 Jackson2JsonRedisSerializer 作为序列化器

 * @return

 */

@Bean

public RedisTemplate<String, String> redisTemplate() {

StringRedisTemplate redisTemplate = new StringRedisTemplate(jedisConnectionFactory);


Jackson2JsonRedisSerializer<Object> jackson2JsonRedisSerializer = new Jackson2JsonRedisSerializer<Object>(Object.class);

ObjectMapper om = new ObjectMapper();

om.setVisibility(PropertyAccessor.ALL, JsonAutoDetect.Visibility.ANY);

om.enableDefaultTyping(ObjectMapper.DefaultTyping.NON_FINAL);

jackson2JsonRedisSerializer.setObjectMapper(om);


redisTemplate.setValueSerializer(jackson2JsonRedisSerializer);

redisTemplate.afterPropertiesSet();

return redisTemplate;

}
Jackson2JsonRedisSerializer的序列化器需要引入Jackson的依赖
<dependency>

      <groupId>com.fasterxml.jackson.core</groupId>

      <artifactId>jackson-databind</artifactId>

      <version>2.6.7</version>

</dependency>
配置自定义的RedisCacheManager--3示例代码
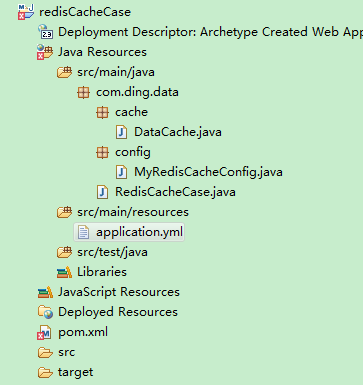
总体项目结构
POM文件
<project xmlns="http://maven.apache.org/POM/4.0.0" xmlns:xsi="http://www.w3.org/2001/XMLSchema-instance"

xsi:schemaLocation="http://maven.apache.org/POM/4.0.0 http://maven.apache.org/xsd/maven-4.0.0.xsd">

<modelVersion>4.0.0</modelVersion>

<groupId>com.ding.data</groupId>

<artifactId>RedisCacheCase</artifactId>

<version>0.0.1-SNAPSHOT</version>


<properties>

<project.build.sourceEncoding>UTF-8</project.build.sourceEncoding>

<boot.version>1.3.5.RELEASE</boot.version>

</properties>


<dependencies>

<dependency>

<groupId>org.springframework.boot</groupId>

<artifactId>spring-boot-starter-web</artifactId>

<version>${boot.version}</version>

</dependency>

<dependency>

<groupId>org.springframework.boot</groupId>

<artifactId>spring-boot-starter-test</artifactId>

<version>${boot.version}</version>

<scope>test</scope>

</dependency>

<dependency>

<groupId>org.springframework.boot</groupId>

<artifactId>spring-boot-starter-cache</artifactId>

<version>${boot.version}</version>

</dependency>

<dependency>

<groupId>org.springframework.boot</groupId>

<artifactId>spring-boot-starter-redis</artifactId>

<version>${boot.version}</version>

</dependency>

<dependency>

      <groupId>com.fasterxml.jackson.core</groupId>

      <artifactId>jackson-databind</artifactId>

      <version>2.6.7</version>

</dependency>

<!-- <dependency>

<groupId>com.google.guava</groupId>

<artifactId>guava</artifactId>

<version>19.0</version>

</dependency> -->

</dependencies>

</project>
配置文件application.yml
spring:

      cache:

        #缓存名称

        #cache-names: guavaDemo

        #缓存最大数量500条, 缓存失效时间 6个小时

        #guava.spec: maximumSize=500,expireAfterWrite=360m

      # REDIS (RedisProperties)

      redis :

        host : localhost # server host

        port : 6379 # connection port

        password : 123

        database : 1

        pool.max-idle : 8 # pool settings ...

        pool.min-idle : 1

        pool.max-active : 8

        pool.max-wait : -1
主启动类
package com.ding.data;


import java.text.SimpleDateFormat;

import java.util.Date;


import org.springframework.beans.factory.annotation.Autowired;

import org.springframework.boot.SpringApplication;

import org.springframework.boot.autoconfigure.SpringBootApplication;

import org.springframework.cache.annotation.EnableCaching;

import org.springframework.web.bind.annotation.RequestMapping;

import org.springframework.web.bind.annotation.RestController;


import com.ding.data.cache.DataCache;


/**

 * 是Spring Boot项目的核心注解,主要是开启自动配置

 */

@SpringBootApplication // same as @Configuration @EnableAutoConfiguration @ComponentScan

@RestController

// 开启缓存

@EnableCaching

public class RedisCacheCase {


@Autowired

private DataCache dataCache;


public static void main(String[] args) {

SpringApplication.run(RedisCacheCase.class, args);

}


@RequestMapping("/put")

public String put(Long id, String value) {

SimpleDateFormat sdf = new SimpleDateFormat("yyyy-MM-dd HH:mm:ss");

return  sdf.format(new Date()) + " : value is " + dataCache.put(id, value) ;

}


@RequestMapping("/get")

public String query(Long id){

SimpleDateFormat sdf = new SimpleDateFormat("yyyy-MM-dd HH:mm:ss");

return sdf.format(new Date()) + " : value is " +dataCache.query(id) ;

}


@RequestMapping("/remove")

public String remove(Long id) {

SimpleDateFormat sdf = new SimpleDateFormat("yyyy-MM-dd HH:mm:ss");

dataCache.remove(id) ;

return sdf.format(new Date()) + " : success " ;

}


}
配置类代码
package com.ding.data.config;

import java.lang.reflect.Method;


import org.springframework.beans.factory.annotation.Autowired;

import org.springframework.cache.CacheManager;

import org.springframework.cache.annotation.CachingConfigurerSupport;

import org.springframework.cache.interceptor.KeyGenerator;

import org.springframework.context.annotation.Bean;

import org.springframework.context.annotation.Configuration;

import org.springframework.data.redis.cache.RedisCacheManager;

import org.springframework.data.redis.connection.jedis.JedisConnectionFactory;

import org.springframework.data.redis.core.RedisTemplate;

import org.springframework.data.redis.core.StringRedisTemplate;

import org.springframework.data.redis.serializer.Jackson2JsonRedisSerializer;


import com.fasterxml.jackson.annotation.JsonAutoDetect;

import com.fasterxml.jackson.annotation.PropertyAccessor;

import com.fasterxml.jackson.databind.ObjectMapper;


@Configuration

public class MyRedisCacheConfig extends CachingConfigurerSupport{


@Autowired

private JedisConnectionFactory jedisConnectionFactory;


@Bean

public CacheManager cacheManager() {

RedisCacheManager redisCacheManager = new RedisCacheManager(redisTemplate());

redisCacheManager.setDefaultExpiration(86400);

return redisCacheManager;

}


/**

 * RedisTemplate 使用 Jackson2JsonRedisSerializer 作为序列化器

 * @return

 */

@Bean

public RedisTemplate<String, String> redisTemplate() {

StringRedisTemplate redisTemplate = new StringRedisTemplate(jedisConnectionFactory);


Jackson2JsonRedisSerializer<Object> jackson2JsonRedisSerializer = new Jackson2JsonRedisSerializer<Object>(Object.class);

ObjectMapper om = new ObjectMapper();

om.setVisibility(PropertyAccessor.ALL, JsonAutoDetect.Visibility.ANY);

om.enableDefaultTyping(ObjectMapper.DefaultTyping.NON_FINAL);

jackson2JsonRedisSerializer.setObjectMapper(om);


redisTemplate.setValueSerializer(jackson2JsonRedisSerializer);

redisTemplate.afterPropertiesSet();

return redisTemplate;

}


/**

 * 新的键生成规则

 */

@Bean

@Override

public KeyGenerator keyGenerator() {

return new KeyGenerator(){

public Object generate(Object target, Method method, Object... params){

StringBuilder sb = new StringBuilder();

sb.append(target.getClass().getName());

sb.append("::" + method.getName() + ":");

for (Object obj : params) {

sb.append(obj.toString());

}

return sb.toString();

}

};

}

}
业务层代码
package com.ding.data.cache;


import java.text.SimpleDateFormat;

import java.util.Date;

import java.util.HashMap;

import java.util.Map;


import javax.annotation.PostConstruct;


import org.springframework.cache.annotation.CacheEvict;

import org.springframework.cache.annotation.CachePut;

import org.springframework.cache.annotation.Cacheable;

import org.springframework.stereotype.Component;


@Component

public class DataCache {


private Map<Long, String> dataMap = new HashMap<Long, String>();


/**

 * 初始化

 */

@PostConstruct

public void init() {

dataMap.put(1L, "张三");

dataMap.put(2L, "李四");

dataMap.put(3L, "王五");

}


/**

 * 查询

 * 如果数据没有缓存,那么从dataMap里面获取,如果缓存了,

 * 那么从redisDemo里面获取

 * 并且将缓存的数据存入到 redisDemo里面

 * 其中key 为 #id+dataMap

 */

// @Cacheable(value="redisDemo" ,key="#id + 'dataMap'")

@Cacheable(value="redisDemo")

public String query(Long id) {

SimpleDateFormat sdf = new SimpleDateFormat("yyyy-MM-dd HH:mm:ss");

System.out.println(sdf.format(new Date()) + " : query id is " + id);

return dataMap.get(id);

}


/**

 * 插入 或者更新

 * 插入或更新数据到dataMap中

 * 并且缓存到 redisDemo中

 * 如果存在了那么更新缓存中的值

 * 其中key 为 #id+dataMap

 */

// @CachePut(value="redisDemo" ,key="#id + 'dataMap'")

@CachePut(value="redisDemo")

public String put(Long id, String value) {

SimpleDateFormat sdf = new SimpleDateFormat("yyyy-MM-dd HH:mm:ss");

System.out.println(sdf.format(new Date()) + " : add data ,id is "+ id);

dataMap.put(id, value);

// data persistence

return value;

}


/**

 * 删除

 * 删除dataMap里面的数据

 * 并且删除缓存redisDemo中的数据

 * 其中key 为 #id+dataMap

 */

// @CacheEvict(value="redisDemo" , key="#id + 'dataMap'")

@CacheEvict(value="redisDemo")

public void remove(Long id) {

SimpleDateFormat sdf = new SimpleDateFormat("yyyy-MM-dd HH:mm:ss");

System.out.println(sdf.format(new Date()) + " : remove id is "+ id + " data");

dataMap.remove(id);

// data remove

}


}
测试
依次访问:
http://localhost:8080/get?id=1
http://localhost:8080/get?id=2
http://localhost:8080/put?id=1&value=meixi
http://localhost:8080/put?id=1&value=neimaer
http://localhost:8080/put?id=1&value=cluo
查看Redis内存的内容,如下(因为Redis的database参数用的1,所以用的是Redis中的db1库)
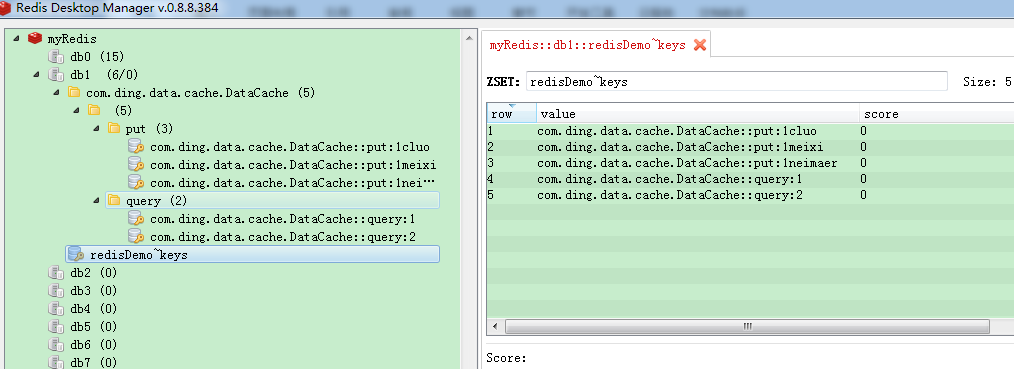
与代码的逻辑是相符的,但是出现了新的问题,除了 @Cacheable 注解的方法仍然起到缓存的作用,其他的缓存方法实际上没起作用。这主要是因为现在缓存键生成的规则不具备重复利用性,实际项目需要根据需求对键生成规则进行修改的。
代码改造一下:使 @CachePut 注解的方法也能起作用
新增一个类MyKeyGenerator****
package com.ding.data.config;


import java.lang.reflect.Method;


import org.springframework.cache.interceptor.KeyGenerator;

import org.springframework.stereotype.Component;


@Component

public class MyKeyGenerator implements KeyGenerator{


public Object generate(Object target, Method method, Object... params) {

StringBuilder sb = new StringBuilder();

sb.append(target.getClass().getName());

sb.append("::" + "query" + ":" + params[0].toString());

return sb.toString();

    }

}
DataCache类中** @CachePut 标注的方法改造如下**
/**

 * 插入 或者更新

 * 插入或更新数据到dataMap中

 * 并且缓存到 redisDemo中

 * 如果存在了那么更新缓存中的值

 * 其中key 为 #id+dataMap

 */

// @CachePut(value="redisDemo" ,key="#id + 'dataMap'")

@CachePut(value="redisDemo",keyGenerator="myKeyGenerator")

public String put(Long id, String value) {

SimpleDateFormat sdf = new SimpleDateFormat("yyyy-MM-dd HH:mm:ss");

System.out.println(sdf.format(new Date()) + " : add data ,id is "+ id);

dataMap.put(id, value);

// data persistence

return value;

}
keyGenerator=**"myKeyGenerator"**啥意思
意思就是说明这个方法的键生成规则采用myKeyGenerator这个类
再次测试(先将刚才测试的数据都清空)
依次访问:
http://localhost:8080/get?id=1
http://localhost:8080/put?id=1&value=meixi
查看Redis数据库中的数据
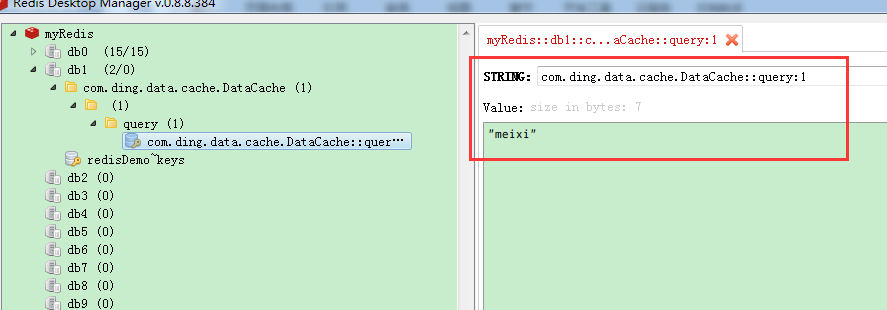
可见改造后@CachePut 标注的方法也起作用了。
但是现在代码仍然太“死性”,无法应用于实际项目。要想应用于实际项目,还需要根据具体需求进行设计。


