Java单元测试
1.概述
java单元测试是最小的功能单元测试代码, 单元测试就是针对单个java方法的测试。java程序的最小功能单元是方法。
- main方法进行测试的缺点:
- 只能有一个main()方法, 不能把测试代码分离出来
- 无法打印出测试结果和期望结果.例如: expected: 3628800, but actual: 123456
- 单元测试的优点:
- 确保单个方法正常运行
- 如果修改了方法代码, 只需要保其对应的单元测试通过就可以了
- 测试代码本省就可以作为示例代码
- 可以自动化运行所有测试并获得报告
前期准备
导入maven依赖(或导入jar包):
<dependency>
      <groupId>junit</groupId>
      <artifactId>junit</artifactId>
      <version>4.12</version>
     <!-- junit的版本有3.x, 4.x, 5.x 5.x还没有发布, 现在都用是4.x -->
</dependency>
2.单元测试
java中常用的注解介绍:
@BeforeClass:针对所有测试,只执行一次,且必须为static void
@Before:初始化方法
@Test:测试方法,在这里可以测试期望异常和超时时间
@Test(timeout=1000)可以设置超时时间,单位毫秒
@Test(expected=Exception.class), 对可能发生的每种类型的异常进行测试
// 运行如下代码, 正常运行, 确实发生了ArithmeticException异常, 代码通过
@Test(expected = ArithmeticException.class)
    public void testException() {
       int i = 1 / 0;
    }
//运行如下代码: 有报错信息
@Test(expected = ArithmeticException.class)
    public void testException() {
       int i = 1 / 1;
    }
@After:释放资源
@AfterClass:针对所有测试,只执行一次,且必须为static void
@Ignore:忽略的测试方法
编写java类
public class Calculate{
    public int calculate(int a,int b){
        return a+b;
    }
}
编写测试类
public class TestCaculate{
    @Test
    public void calculate(){
        assertEquals(3,new Calculate().calculate(1,2));
        assertEquals(6,new Calculate().calculate(1,2));
    }
}
测试结果:java.lang.AssertionError: expected:<6> but was:<3>
第一个方法是正确的没有报错
第二个方法清楚的显示了结果的对比情况
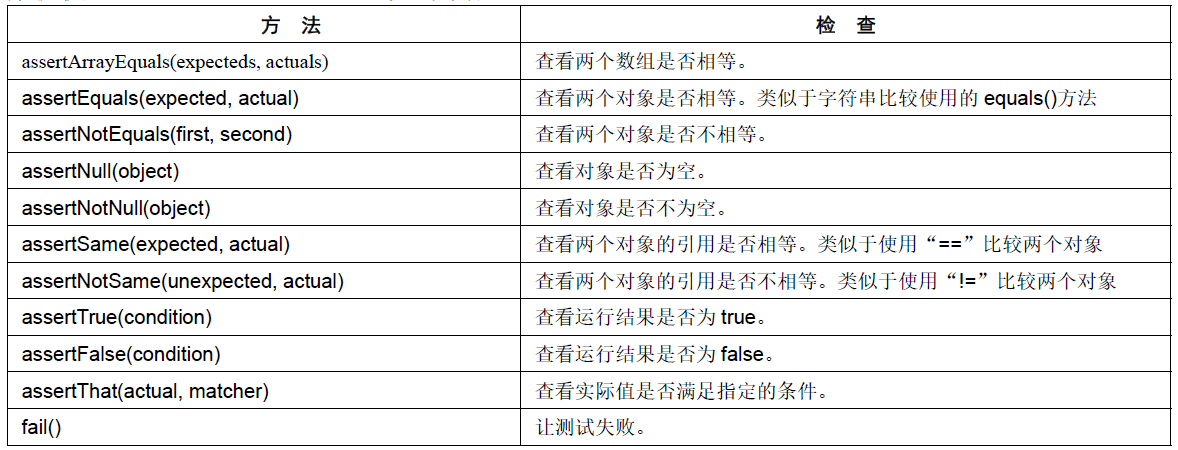
3.断言
包名:import static org.junit.Assert.*;

Assert.assertEquals方法
函数原型1:assertEquals([String message],expected,actual)
参数说明:
message是个可选的消息,假如提供,将会在发生错误时报告这个消息。
expected是期望值,通常都是用户指定的内容。
actual是被测试的代码返回的实际值。
函数原型2:assertEquals([String message],expected,actual,tolerance)
参数说明:
message是个可选的消息,假如提供,将会在发生错误时报告这个消息。
expected是期望值,通常都是用户指定的内容。
actual是被测试的代码返回的实际值。
tolerance是误差参数,参加比较的两个浮点数在这个误差之内则会被认为是相等的。
4.Spring整合Junit
在测试类中,每个测试方法都有以下两行代码: ApplicationContext ac = new ClassPathXmlApplicationContext("bean.xml"); IAccountService as = ac.getBean("accountService",IAccountService.class); 这两行代码的作用是获取容器,如果不写的话,直接会提示空指针异常。所以又不能轻易删掉。
步骤:
导入jar包
使用@RunWith替换原有运行器
@RunWith(SpringJUnit4ClassRunner.class)
public class AccountServiceTest {
}
使用@ContextConfiguration指定配置文件
@RunWith(SpringJUnit4ClassRunner.class)
@ContextConfiguration(locations= {"classpath:bean.xml"})
public class AccountServiceTest {
}
使用@Autowired注入数据
@RunWith(SpringJUnit4ClassRunner.class)
@ContextConfiguration(locations= {"classpath:bean.xml"})
public class AccountServiceTest {
@Autowired
private IAccountService as ;
}


