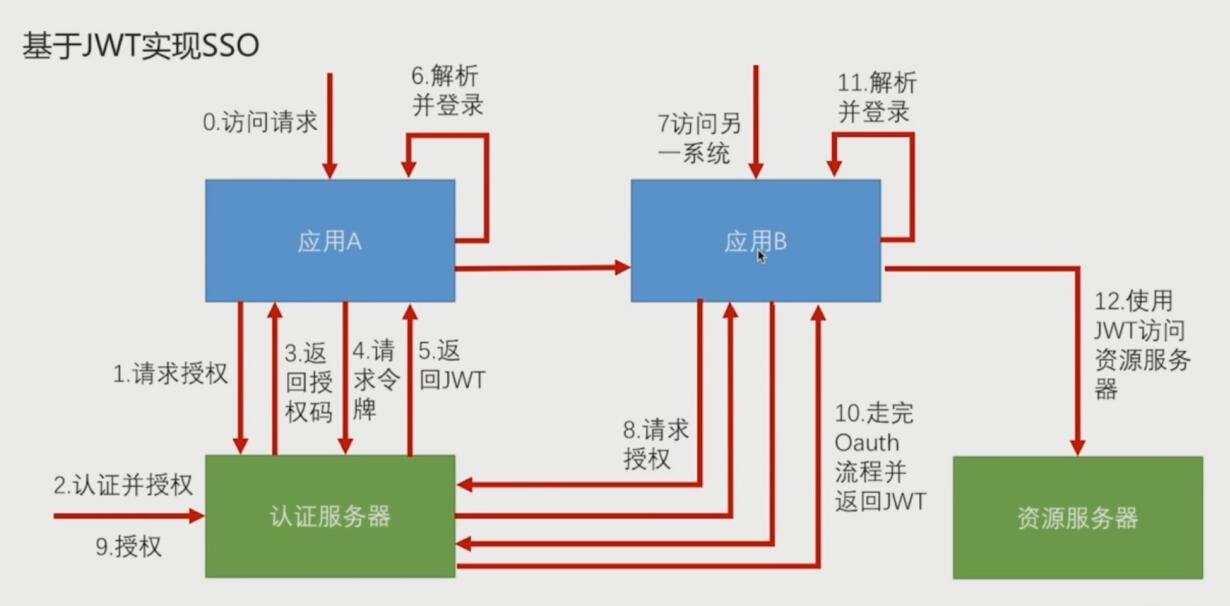
⒈认证服务器
1.添加pom依赖
 1         <dependency>
 2             <groupId>org.springframework.boot</groupId>
 3             <artifactId>spring-boot-starter-web</artifactId>
 4         </dependency>
 5
 6         <dependency>
 7             <groupId>org.springframework.cloud</groupId>
 8             <artifactId>spring-cloud-starter-oauth2</artifactId>
 9             <version>2.1.2.RELEASE</version>
10         </dependency>
11
12         <dependency>
13             <groupId>org.springframework.boot</groupId>
14             <artifactId>spring-boot-starter-test</artifactId>
15             <scope>test</scope>
16         </dependency>
17         <dependency>
18             <groupId>org.springframework.security</groupId>
19             <artifactId>spring-security-test</artifactId>
20             <scope>test</scope>
21         </dependency>
2.配置文件相关配置
1 server.port=10086
2 server.servlet.context-path=/server
3.Security配置
 1 package cn.coreqi.ssoserver.config;
 2
 3 import org.springframework.beans.factory.annotation.Autowired;
 4 import org.springframework.beans.factory.annotation.Qualifier;
 5 import org.springframework.context.annotation.Bean;
 6 import org.springframework.security.authentication.AuthenticationManager;
 7 import org.springframework.security.config.annotation.authentication.builders.AuthenticationManagerBuilder;
 8 import org.springframework.security.config.annotation.web.builders.HttpSecurity;
 9 import org.springframework.security.config.annotation.web.configuration.EnableWebSecurity;
10 import org.springframework.security.config.annotation.web.configuration.WebSecurityConfigurerAdapter;
11 import org.springframework.security.core.userdetails.UserDetailsService;
12 import org.springframework.security.crypto.bcrypt.BCryptPasswordEncoder;
13 import org.springframework.security.crypto.factory.PasswordEncoderFactories;
14 import org.springframework.security.crypto.password.NoOpPasswordEncoder;
15 import org.springframework.security.crypto.password.PasswordEncoder;
16
17 @EnableWebSecurity
18 public class SsoWebSecurityConfig extends WebSecurityConfigurerAdapter {
19
20     @Override
21     @Bean
22     public AuthenticationManager authenticationManagerBean() throws Exception {
23         return super.authenticationManagerBean();
24     }
25
26     @Qualifier("ssoUserDetailsService")
27     @Autowired
28     private UserDetailsService userDetailsService;
29
30     @Bean
31     public PasswordEncoder passwordEncoder()
32     {
33         //return NoOpPasswordEncoder.getInstance();
34         //return new BCryptPasswordEncoder();
35         return PasswordEncoderFactories.createDelegatingPasswordEncoder();
36     }
37
38     @Override
39     protected void configure(HttpSecurity http) throws Exception {
40         http.formLogin()
41                 .and()
42                 .authorizeRequests()
43                 .antMatchers("/oauth/*","/login/*").permitAll()
44                 .anyRequest().authenticated()  //任何请求都需要身份认证
45                 .and().csrf().disable();    //禁用CSRF
46     }
47
48     @Override
49     protected void configure(AuthenticationManagerBuilder auth) throws Exception {
50 //        auth.inMemoryAuthentication()
51 //                .withUser("fanqi").password("admin").roles("admin");
52         auth.userDetailsService(userDetailsService).passwordEncoder(passwordEncoder());
53     }
54 }
⒋用户登录逻辑
 1 package cn.coreqi.ssoserver.service;
 2
 3 import org.springframework.beans.factory.annotation.Autowired;
 4 import org.springframework.security.core.authority.AuthorityUtils;
 5 import org.springframework.security.core.userdetails.User;
 6 import org.springframework.security.core.userdetails.UserDetails;
 7 import org.springframework.security.core.userdetails.UserDetailsService;
 8 import org.springframework.security.core.userdetails.UsernameNotFoundException;
 9 import org.springframework.security.crypto.password.PasswordEncoder;
10 import org.springframework.stereotype.Component;
11
12 @Component
13 public class SsoUserDetailsService implements UserDetailsService {
14
15     @Autowired
16     private PasswordEncoder passwordEncoder;
17
18     @Override
19     public UserDetails loadUserByUsername(String username) throws UsernameNotFoundException {
20         return new User(username,passwordEncoder.encode("admin"),
21                 AuthorityUtils.commaSeparatedStringToAuthorityList("ADMIN"));
22     }
23 }
5.认证服务器配置
 1 package cn.coreqi.ssoserver.config;
 2
 3 import org.springframework.beans.factory.annotation.Autowired;
 4 import org.springframework.context.annotation.Bean;
 5 import org.springframework.context.annotation.Configuration;
 6 import org.springframework.security.authentication.AuthenticationManager;
 7 import org.springframework.security.crypto.password.PasswordEncoder;
 8 import org.springframework.security.oauth2.config.annotation.configurers.ClientDetailsServiceConfigurer;
 9 import org.springframework.security.oauth2.config.annotation.web.configuration.AuthorizationServerConfigurerAdapter;
10 import org.springframework.security.oauth2.config.annotation.web.configuration.EnableAuthorizationServer;
11 import org.springframework.security.oauth2.config.annotation.web.configurers.AuthorizationServerEndpointsConfigurer;
12 import org.springframework.security.oauth2.config.annotation.web.configurers.AuthorizationServerSecurityConfigurer;
13 import org.springframework.security.oauth2.provider.token.TokenStore;
14 import org.springframework.security.oauth2.provider.token.store.JwtAccessTokenConverter;
15 import org.springframework.security.oauth2.provider.token.store.JwtTokenStore;
16
17 @Configuration
18 @EnableAuthorizationServer  //声明当前应用为认证服务器
19 public class SsoAuthorizationServerConfig extends AuthorizationServerConfigurerAdapter {
20
21     @Autowired
22     private AuthenticationManager authenticationManagerBean;
23
24     @Autowired
25     private PasswordEncoder passwordEncoder;
26
27     /**
28      * Token生成过程处理
29      * @return
30      */
31     @Bean
32     public JwtAccessTokenConverter jwtAccessTokenConverter(){
33         JwtAccessTokenConverter accessTokenConverter = new JwtAccessTokenConverter();
34         accessTokenConverter.setSigningKey("fanqi");   //Token签名用的密钥
35         //发出去的令牌需要密钥签名,验令牌的时候也需要令牌来验签,如果他人获知了我们的密钥
36         //就可以用我们的密钥来签发我们的JWT令牌,JWT唯一的安全性就是密钥
37         //别人用我们的密钥来签发我们的JWT令牌就可以随意进入我们的系统
38         return accessTokenConverter;
39     }
40
41     @Bean
42     public TokenStore jwtTokenStore(){
43         return new JwtTokenStore(jwtAccessTokenConverter());
44     }
45
46     /**
47      * 针对端点的配置
48      * @param endpoints
49      * @throws Exception
50      */
51     @Override
52     public void configure(AuthorizationServerEndpointsConfigurer endpoints) throws Exception {
53         endpoints
54                 .tokenStore(jwtTokenStore())
55                 .accessTokenConverter(jwtAccessTokenConverter())
56                 .authenticationManager(authenticationManagerBean);
57     }
58
59     /**
60      * 配置当前认证服务器可以给那些应用发令牌
61      * @param clients
62      * @throws Exception
63      */
64     @Override
65     public void configure(ClientDetailsServiceConfigurer clients) throws Exception {
66
67         clients.inMemory()
68                 .withClient("coreqi1")
69                 .secret(passwordEncoder.encode("coreqisecret1"))
70                 .authorizedGrantTypes("authorization_code","refresh_token")
71                 .redirectUris("http://localhost:10010/client1/login","http://127.0.0.1:10010/client1/login")
72                 .scopes("all")
73             .and()
74                 .withClient("coreqi2")
75                 .secret(passwordEncoder.encode("coreqisecret2"))
76                 .authorizedGrantTypes("authorization_code","refresh_token")
77                 .redirectUris("http://localhost:10000/client2/login","http://127.0.0.1:10000/client2/login")
78                 .scopes("all");
79     }
80
81     /**
82      * 针对安全性有关的配置
83      * @param security
84      * @throws Exception
85      */
86     @Override
87     public void configure(AuthorizationServerSecurityConfigurer security) throws Exception {
88         security
89                 .tokenKeyAccess("isAuthenticated()");   //访问认证服务器的tokenKey(Token签名密钥)时需要身份认证
90     }
91 }
6.覆写登录授权页面,直接跳过
  1 package cn.coreqi.ssoserver.controller;
  2
  3 import org.springframework.security.oauth2.provider.AuthorizationRequest;
  4 import org.springframework.security.web.csrf.CsrfToken;
  5 import org.springframework.web.bind.annotation.RequestMapping;
  6 import org.springframework.web.bind.annotation.RestController;
  7 import org.springframework.web.bind.annotation.SessionAttributes;
  8 import org.springframework.web.servlet.ModelAndView;
  9 import org.springframework.web.servlet.View;
 10 import org.springframework.web.servlet.support.ServletUriComponentsBuilder;
 11 import org.springframework.web.util.HtmlUtils;
 12
 13 import javax.servlet.http.HttpServletRequest;
 14 import javax.servlet.http.HttpServletResponse;
 15 import java.util.Iterator;
 16 import java.util.Map;
 17
 18 /**
 19  * 登录完不授权直接进入网站
 20  * 授权的页面根据OAuth协议是无法直接跳过去的
 21  * 因此,我们模仿WhitelabelApprovalEndpoint类,在表单逻辑处直接提交
 22  */
 23 @RestController
 24 @SessionAttributes({"authorizationRequest"})
 25 public class SsoApprovalEndpoint {
 26     @RequestMapping({"/oauth/confirm_access"})
 27     public ModelAndView getAccessConfirmation(Map<String, Object> model, HttpServletRequest request) throws Exception {
 28         final String approvalContent = this.createTemplate(model, request);
 29         if (request.getAttribute("_csrf") != null) {
 30             model.put("_csrf", request.getAttribute("_csrf"));
 31         }
 32
 33         View approvalView = new View() {
 34             public String getContentType() {
 35                 return "text/html";
 36             }
 37
 38             public void render(Map<String, ?> model, HttpServletRequest request, HttpServletResponse response) throws Exception {
 39                 response.setContentType(this.getContentType());
 40                 response.getWriter().append(approvalContent);
 41             }
 42         };
 43         return new ModelAndView(approvalView, model);
 44     }
 45
 46     protected String createTemplate(Map<String, Object> model, HttpServletRequest request) {
 47         AuthorizationRequest authorizationRequest = (AuthorizationRequest)model.get("authorizationRequest");
 48         String clientId = authorizationRequest.getClientId();
 49         StringBuilder builder = new StringBuilder();
 50         builder.append("<html><body><div style='display:none'><h1>OAuth Approval</h1>");
 51         builder.append("<p>Do you authorize \"").append(HtmlUtils.htmlEscape(clientId));
 52         builder.append("\" to access your protected resources?</p>");
 53         builder.append("<form id=\"confirmationForm\" name=\"confirmationForm\" action=\"");
 54         String requestPath = ServletUriComponentsBuilder.fromContextPath(request).build().getPath();
 55         if (requestPath == null) {
 56             requestPath = "";
 57         }
 58
 59         builder.append(requestPath).append("/oauth/authorize\" method=\"post\">");
 60         builder.append("<input name=\"user_oauth_approval\" value=\"true\" type=\"hidden\"/>");
 61         String csrfTemplate = null;
 62         CsrfToken csrfToken = (CsrfToken)((CsrfToken)(model.containsKey("_csrf") ? model.get("_csrf") : request.getAttribute("_csrf")));
 63         if (csrfToken != null) {
 64             csrfTemplate = "<input type=\"hidden\" name=\"" + HtmlUtils.htmlEscape(csrfToken.getParameterName()) + "\" value=\"" + HtmlUtils.htmlEscape(csrfToken.getToken()) + "\" />";
 65         }
 66
 67         if (csrfTemplate != null) {
 68             builder.append(csrfTemplate);
 69         }
 70
 71         String authorizeInputTemplate = "<label><input name=\"authorize\" value=\"Authorize\" type=\"submit\"/></label></form>";
 72         if (!model.containsKey("scopes") && request.getAttribute("scopes") == null) {
 73             builder.append(authorizeInputTemplate);
 74             builder.append("<form id=\"denialForm\" name=\"denialForm\" action=\"");
 75             builder.append(requestPath).append("/oauth/authorize\" method=\"post\">");
 76             builder.append("<input name=\"user_oauth_approval\" value=\"false\" type=\"hidden\"/>");
 77             if (csrfTemplate != null) {
 78                 builder.append(csrfTemplate);
 79             }
 80
 81             builder.append("<label><input name=\"deny\" value=\"Deny\" type=\"submit\"/></label></form>");
 82         } else {
 83             builder.append(this.createScopes(model, request));
 84             builder.append(authorizeInputTemplate);
 85         }
 86
 87         builder.append("</div><script>document.getElementById('confirmationForm').submit()</script></body></html>");
 88         return builder.toString();
 89     }
 90
 91     private CharSequence createScopes(Map<String, Object> model, HttpServletRequest request) {
 92         StringBuilder builder = new StringBuilder("<ul>");
 93         Map<String, String> scopes = (Map)((Map)(model.containsKey("scopes") ? model.get("scopes") : request.getAttribute("scopes")));
 94         Iterator var5 = scopes.keySet().iterator();
 95
 96         while(var5.hasNext()) {
 97             String scope = (String)var5.next();
 98             String approved = "true".equals(scopes.get(scope)) ? " checked" : "";
 99             String denied = !"true".equals(scopes.get(scope)) ? " checked" : "";
100             scope = HtmlUtils.htmlEscape(scope);
101             builder.append("<li><div class=\"form-group\">");
102             builder.append(scope).append(": <input type=\"radio\" name=\"");
103             builder.append(scope).append("\" value=\"true\"").append(approved).append(">Approve</input> ");
104             builder.append("<input type=\"radio\" name=\"").append(scope).append("\" value=\"false\"");
105             builder.append(denied).append(">Deny</input></div></li>");
106         }
107
108         builder.append("</ul>");
109         return builder.toString();
110     }
111
112 }
⒉应用A
1.pom依赖
 1         <dependency>
 2             <groupId>org.springframework.boot</groupId>
 3             <artifactId>spring-boot-starter-web</artifactId>
 4         </dependency>
 5
 6         <dependency>
 7             <groupId>org.springframework.cloud</groupId>
 8             <artifactId>spring-cloud-starter-oauth2</artifactId>
 9             <version>2.1.2.RELEASE</version>
10         </dependency>
11
12         <dependency>
13             <groupId>org.springframework.boot</groupId>
14             <artifactId>spring-boot-starter-test</artifactId>
15             <scope>test</scope>
16         </dependency>
17         <dependency>
18             <groupId>org.springframework.security</groupId>
19             <artifactId>spring-security-test</artifactId>
20             <scope>test</scope>
21         </dependency>
2.配置文件相关配置
1 server.port=10010
2 server.servlet.context-path=/client1
3 security.oauth2.client.client-id=coreqi1
4 security.oauth2.client.client-secret=coreqisecret1
5 security.oauth2.client.scope=all
6 security.oauth2.client.user-authorization-uri=http://127.0.0.1:10086/server/oauth/authorize
7 security.oauth2.client.access-token-uri=http://127.0.0.1:10086/server/oauth/token
8 security.oauth2.resource.jwt.key-uri=http://127.0.0.1:10086/server/oauth/token_key
3.主程序类添加@EnableOAuth2Sso注解使之生效
 1 package cn.coreqi;
 2
 3 import org.springframework.boot.SpringApplication;
 4 import org.springframework.boot.autoconfigure.SpringBootApplication;
 5 import org.springframework.boot.autoconfigure.security.oauth2.client.EnableOAuth2Sso;
 6
 7 @SpringBootApplication
 8 @EnableOAuth2Sso    //使sso生效
 9 public class SsoClient1Application {
10
11     public static void main(String[] args) {
12         SpringApplication.run(SsoClient1Application.class, args);
13     }
14
15 }
4.编写Action接口用于查看授权信息
 1 package cn.coreqi.sso_client1.controller;
 2
 3 import org.springframework.security.core.Authentication;
 4 import org.springframework.web.bind.annotation.GetMapping;
 5 import org.springframework.web.bind.annotation.RequestMapping;
 6 import org.springframework.web.bind.annotation.RestController;
 7
 8 @RestController
 9 @RequestMapping("/user")
10 public class UserController {
11
12     @GetMapping
13     public Authentication user(Authentication user){
14         return user;
15     }
16 }
5.编写resources/static/index.html文件,用于跳转测试
 1 <!DOCTYPE html>
 2 <html lang="en">
 3 <head>
 4     <meta charset="UTF-8">
 5     <title>SSO Client1</title>
 6 </head>
 7 <body>
 8     <h1> SSO Demo Client1</h1>
 9     <a href="http://127.0.0.1:10000/client2/index.html">访问Client2</a>
10 </body>
11 </html>
⒊应用B
1.添加pom依赖
 1         <dependency>
 2             <groupId>org.springframework.boot</groupId>
 3             <artifactId>spring-boot-starter-web</artifactId>
 4         </dependency>
 5
 6         <dependency>
 7             <groupId>org.springframework.cloud</groupId>
 8             <artifactId>spring-cloud-starter-oauth2</artifactId>
 9             <version>2.1.2.RELEASE</version>
10         </dependency>
11
12         <dependency>
13             <groupId>org.springframework.boot</groupId>
14             <artifactId>spring-boot-starter-test</artifactId>
15             <scope>test</scope>
16         </dependency>
17         <dependency>
18             <groupId>org.springframework.security</groupId>
19             <artifactId>spring-security-test</artifactId>
20             <scope>test</scope>
21         </dependency>
2.配置文件相关配置
1 server.port=10000
2 server.servlet.context-path=/client2
3 security.oauth2.client.client-id=coreqi2
4 security.oauth2.client.client-secret=coreqisecret2
5 security.oauth2.client.scope=all
6 security.oauth2.client.user-authorization-uri=http://127.0.0.1:10086/server/oauth/authorize
7 security.oauth2.client.access-token-uri=http://127.0.0.1:10086/server/oauth/token
8 security.oauth2.resource.jwt.key-uri=http://127.0.0.1:10086/server/oauth/token_key
3.主程序类添加@EnableOAuth2Sso注解使之生效
 1 package cn.coreqi;
 2
 3 import org.springframework.boot.SpringApplication;
 4 import org.springframework.boot.autoconfigure.SpringBootApplication;
 5 import org.springframework.boot.autoconfigure.security.oauth2.client.EnableOAuth2Sso;
 6
 7 @SpringBootApplication
 8 @EnableOAuth2Sso    //使sso生效
 9 public class SsoClient2Application {
10
11     public static void main(String[] args) {
12         SpringApplication.run(SsoClient2Application.class, args);
13     }
14
15 }
4.编写Action接口用于查看授权信息
 1 package cn.coreqi.sso_client2.controller;
 2
 3 import org.springframework.security.core.Authentication;
 4 import org.springframework.web.bind.annotation.GetMapping;
 5 import org.springframework.web.bind.annotation.RequestMapping;
 6 import org.springframework.web.bind.annotation.RestController;
 7
 8 @RestController
 9 @RequestMapping("/user")
10 public class UserController {
11
12     @GetMapping
13     public Authentication user(Authentication user){
14         return user;
15     }
16 }
5.编写resources/static/index.html文件,用于跳转测试
 1 <!DOCTYPE html>
 2 <html lang="en">
 3 <head>
 4     <meta charset="UTF-8">
 5     <title>SSO Client2</title>
 6 </head>
 7 <body>
 8     <h1> SSO Demo Client2</h1>
 9     <a href="http://127.0.0.1:10010/client1/index.html">访问Client1</a>
10 </body>
11 </html>


