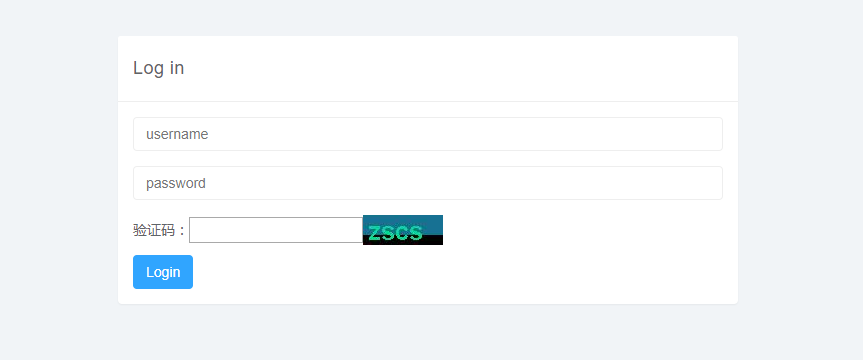
近期手头有个需要重构的小项目,于是就想用Springboot来完成,所以就周末在家先初步搭好,功能很简单,实现密码和图片验证码双重验证以及解析excel获取数据,一开始是使用docker+mysql的,后来经理建议换成h2,所以就改了下数据库,然后上传excel文件并解析其中数据,解析后数据的操作使用就是公司业务问题就不便在此多说了。接下来一步步操作吧,最后也会附上代码。
环境要求:
JDK 7 springboot 1.5.9 maven 3.0.5 h2 1.4.195 (或者mysql 5.6 +docker )
1、新建Springboot项目
新建项目的步骤之前写过,附上链接,刚学的朋友可以参考下
https://my.oschina.net/xiaozhiwen/blog/1585456
也可以直接使用这位博主的代码再继续加功能,这里使用了mysql
http://blog.csdn.net/huang906391/article/details/78376766
图片验证码是参考这篇博客的,当然有修改了点
https://www.cnblogs.com/xuningchuanblogs/p/7852377.html
2、新建页面
springboot是不推荐jsp的,要用 jsp 要引入一些依赖包,这个过程也花了我一些时间去研究的。
如果你直接用html页面而且放在resources/template的话这一步可以跳过
主要是这两个依赖
        <dependency>
            <groupId>javax.servlet</groupId>
            <artifactId>javax.servlet-api</artifactId>
            <scope>provided</scope>
        </dependency>
        <dependency>
            <groupId>javax.servlet</groupId>
            <artifactId>jstl</artifactId>
            <version>1.1.2</version>
        </dependency>
springboot对静态资源的管理也不太一样,在resources目录下新建static,然后把css和js那些放在此目录下就可以在页面中使用啦,页面和图片我放在 webapp下的views目录和images目录,所以需要在application.properties文件中配置jsp路径(使用mysql的可以在此配置数据库信息),访问端口也可以在此设置。
#数据库配置
#spring.datasource.url=jdbc:mysql://192.168.166.170:3306/userdb?characterEncoding=UTF-8&useUnicode=true
#spring.datasource.username=root
#spring.datasource.password=root
#spring.datasource.driver-class-name=com.mysql.jdbc.Driver
#spring.jpa.properties.hibernate.hbm2ddl.auto=update

spring.mvc.view.prefix=/views/
spring.mvc.view.suffix=.jsp

server.port=8080
3、新建数据库
mysql的话我用了之前用docker创建的镜像,有兴趣的可以看下,挺简单的
https://my.oschina.net/xiaozhiwen/blog/1601539
项目中用的是 H2database,参考了这两篇,也挺简单易懂的
https://www.cnblogs.com/xdp-gacl/p/4171024.html
http://blog.csdn.net/guicaizhou/article/details/51859500
准备好数据库后就加上user表和字段啦
如果不使用数据库或者使用H2Database(jdbc方式连接)的话,要在启动类(com目录下的App.java)中加上注解,防止扫描数据库连接信息
@SpringBootApplication(exclude={DataSourceAutoConfiguration.class,HibernateJpaAutoConfiguration.class})
4、文件处理
实现EXCEL文件的上传和解析
我这里使用了 jxl 的包
        <dependency>
            <groupId>jexcelapi</groupId>
            <artifactId>jxl</artifactId>
            <version>2.6.6</version>
        </dependency>

public static String[][] parse(String filePath, int colNum) throws Exception {
        try {
            Workbook book = Workbook.getWorkbook(new File(filePath));
            // 获得第一个工作表对象
            Sheet sheet = book.getSheet(0);
            int rowNum = sheet.getRows();
            // 创建二维数组
            String[][] data = new String[rowNum][colNum];
            Cell[] cells = null;
            for (int i = 0; i < rowNum; i++) {
                cells = sheet.getRow(i);
                for (int j = 0; j < colNum; j++) {
                    if (CellType.DATE.equals(cells[j].getType())) {
                        DateCell date = (DateCell) cells[j];
                        data[i][j] = format(date.getDate(), "yyyyMMdd");
                    } else {
                        data[i][j] = cells[j].getContents();
                    }
                }
            }
            book.close();
            return data;
        } catch (Exception e) {
            throw e;
        }
    }
如果ExcelUtil文件报错的话,可能需要手动buildpath jxl 的jar包
jar包下载地址:https://pan.baidu.com/s/1pM55nkR 密码:2mxh
5、打包部署
打包部署时也遇到不少麻烦,打成jar后访问不了页面,进去jar包后才发现静态资源没有被打包进去,所以就打包成war包进行部署了。而且本项目是采用jdk7开发的,本来打算在docker容器运行的,后来就在服务器下载7的jre,在jre内运行了。pom文件需要加上一下内容指定main方法入口和静态资源。
<build>
        <finalName>springboot_excel</finalName>
        <resources>
                <resource>
                    <directory>${basedir}/src/main/webapp</directory>
                    <!--注意此次必须要放在此目录下才能被访问到-->
                    <targetPath>META-INF/resources</targetPath>
                    <includes>
                        <include>**/**</include>
                    </includes>
                </resource>
                <resource>
                    <directory>${basedir}/src/main/resources</directory>
                    <includes>
                        <include>**/**</include>
                    </includes>
                </resource>
        </resources>
        <plugins>
            <plugin>
                <groupId>org.apache.maven.plugins</groupId>
                <artifactId>maven-compiler-plugin</artifactId>
                <configuration>
                    <source>1.7</source>
                    <target>1.7</target>
                    <encode>UTF-8</encode>
                </configuration>
            </plugin>
            <plugin>
                <groupId>org.springframework.boot</groupId>
                <artifactId>spring-boot-maven-plugin</artifactId>
                <configuration>
                    <maimClass>com.App</maimClass>
                </configuration>
                <executions>
                    <execution>
                        <goals>
                            <goal>repackage</goal>
                        </goals>
                    </execution>
                </executions>
            </plugin>
        </plugins>
    </build>
如果测试时 h2的是test的,记得去掉
        <dependency>
            <groupId>com.h2database</groupId>
            <artifactId>h2</artifactId>
            <version>1.4.195</version>
        </dependency>
效果:


停止进程脚本:
新建脚本 stopExcelProcess.sh
#!/bin/bash

ps -ef|grep -v 'grep'| grep 'springboot_excel' | grep -v 'stopExcelProcess'|awk '{print$2}' > temp
for i in `cat temp`
do
    echo $i
    kill $i
done
rm temp

echo "The process(springboot_excel) has been killed!"
总结:这次项目的搭建遇到的问题还是听多的,刚刚打了一段问题总结太乱了就删掉了,各位也遇到一些问题的话可以评论留下,一起探讨。


