摘要:
CLion, a cross-platform C/C++ IDE. 本文主要介绍基于Clion作为IDE, MinGW作为编译器,CMake作为项目构建工具,开发基于Qt5、qwt的C++图形GUI项目的安装、配置、编译过程。
KeyWords:Clion;Cmake;Qt5;Qwt;msys2;MinGW;Windows
目录:
- 软件安装
- 环境配置
- 开发示例
- 注意事项
- pacman基本命令参数
教程:
1. 软件安装
- Jetbrains CLion
- CLion: A Cross-Platform IDE for C and C++ by JetBrains
- https://www.jetbrains.com/clion/
- jetbrains-agent: Jetbrains 全家桶项目。
- https://gitee.com/pengzhile/jetbrains-agent
- Cmake(可选)
- 除非必要,一般不必另安装,可以使用Clion中自带的Cmake。如一定要选用个人安装的,请注意在工具链中的Cmake路径设置,否则可以直接选bundled即可。
- Qt5 for MinGW64 use msys2
- msys2:下载安装msys2,在MinGW-64下载页面(url: http://mingw-w64.org/doku.php/download ),进入msys2页面进行下载,也可直接从http://www.msys2.org进入下载( 32位:msys2-i686-20180531.exe;64位:msys2-x86_64-20180531.exe),建议安装在磁盘空间大的磁盘目录下,因为安装Qt及依赖软件需要占用很多存储空间,本例中安装在C:\msys64目录下,并将此目录和bin目录加入系统路径中。
- Pacman:msys2 移植了Arch Linux 上的软件包管理系统 Pacman,有了包管理系统,升级、安装新的软件就很简单了(pacman常用命令参数见文末说明)。在此管理系统中,软件包的命名中前缀为“mingw-w64-”,然后是针对命名32位或64位系统使用, "-x86_64-" for 64-bit, "-i686-" for 32-bit。下载的软件包也会据此安装部署到不同的目录中,如32位的软件会部署到C:\msys64\mingw32中,64位的会部署到C:\msys64\mingw64中。软件下载包是放在C:\msys64\var\cache\pacman\pkg中。
- Qt5:msys2提供编译好的MinGW-w64套件,一般提供了32位和64位两个版本。Qt也分别有编译好的32位和64位版本,以及静态链接和动态链接共4个版本,以及QtCreator。(mingw-w64-i686-qt5,mingw-w64-i686-qt5-static,mingw-w64-i686-qt-creator;mingw-w64-x86_64-qt5,mingw-w64-x86_64-qt5-stati, mingw-w64-x86_64-qt-creator)。
- 启动msys2的命令行窗口,通过pacman下载安装MinGW版本的Qt5。在此已32位的为例。
- pacman -S mingw-w64-i686-qt5 mingw-w64-i686-qt5-static
- 下载安装make和gdb工具;
- pacman -S mingw-w64-i686-make mingw-w64-i686-gdb
- 安装完成后,在系统路径中添加bin路径;
- C:\msys64;C:\msys64\mingw32\bin
- 至此,即可正常使用Qt5了。可以用Qt5自带的示例测试是否安装正常,用CLion编译过程附后。
- 第三方库安装(以QWT为例)
- QWT:全称是Qt Widgets for Technical Applications,是一个基于LGPL版权协议的开源项目, 可生成各种统计图。它为具有技术专业背景的程序提供GUI组件和一组实用类,其目标是以基于2D方式的窗体部件来显示数据, 数据源以数值,数组或一组浮点数等方式提供, 输出方式可以是Curves(曲线),Slider(滚动条),Dials(圆盘),Compasses(仪表盘)等等。该工具库基于Qt开发,所以也继承了Qt的跨平台特性。在msys2中针对MinGW-w64提供了两个版本(mingw-w64-i686-qwt-qt5 mingw-w64-x86_64-qwt-qt5)。本文以32位为例,进行下载安装。因为第三方库的路径都是基于msys2的,所以无需后续系统路径的配置。
- pacman -S mingw-w64-i686-qwt-qt5
- 至此,如果需要用Clion作为IDE,用MinGW作为编译器,用CMake作为项目构建工具,开发基于Qt5、qwt的C++图形GUI项目,就已经基本具备条件了。
- 其他可选的编译器或Qt版本
- 基于MinGW的Qt5官方安装包模式:此模式下,需用其自带的MinGW,如使用qwt,需对qwt源码进行此版本下的编译生成,方可使用。
- 下载地址: http://download.qt.io/archive/qt/5.7/5.7.1/qt-opensource-windows-x86-mingw530-5.7.1.exe
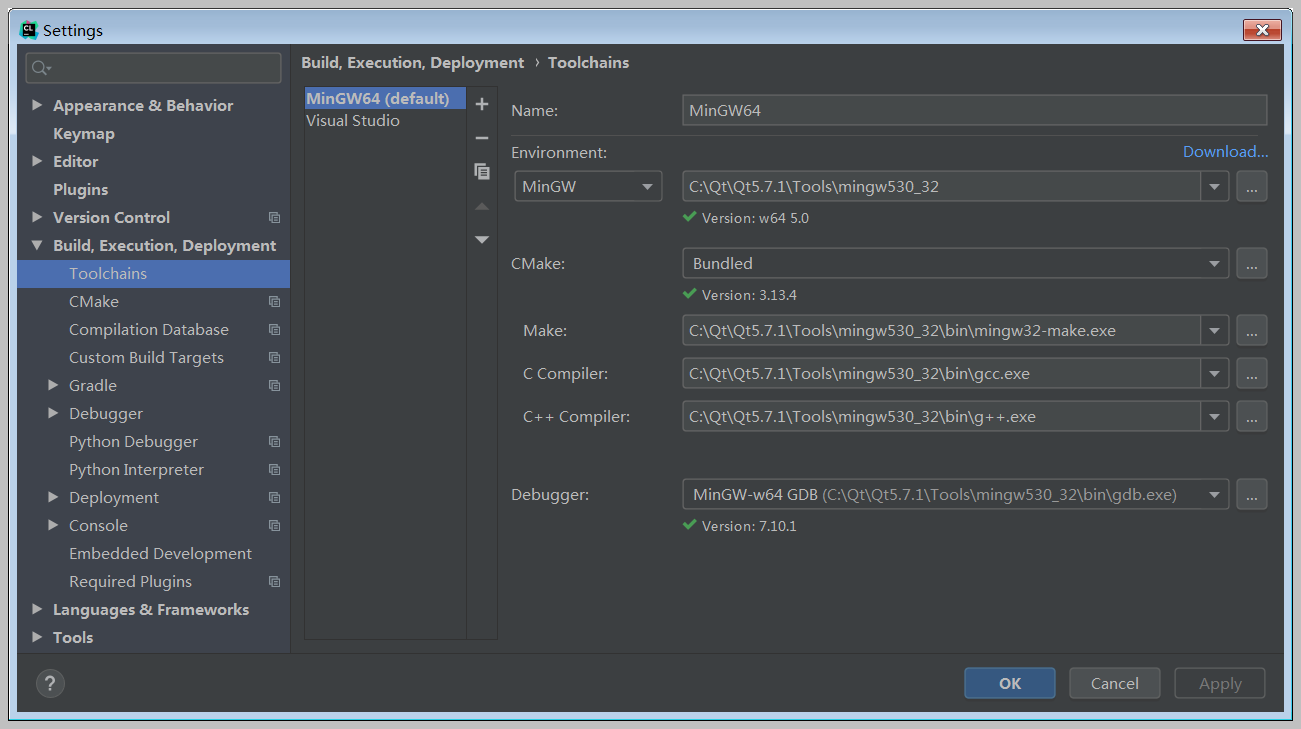
- 安装需要注意,选择Tools里面的MinGW5.3.0,安装的Qt for MinGW的Tools中含有gcc/g++,是用来编译此版本Qt项目的。在CLion中,如图设置Toolchains:
- 基于MinGW的Qt5官方安装包模式:此模式下,需用其自带的MinGW,如使用qwt,需对qwt源码进行此版本下的编译生成,方可使用。
- LLVM Clang for MinGW64 (可选)
- Step 1: Install the msys2.
- Step 2: Launch the msys terminal and install llvm/clang.
- pacman -S mingw-w64-i686-llvm mingw-w64-i686-clang mingw-w64-i686-make mingw-w64-i686-gdb
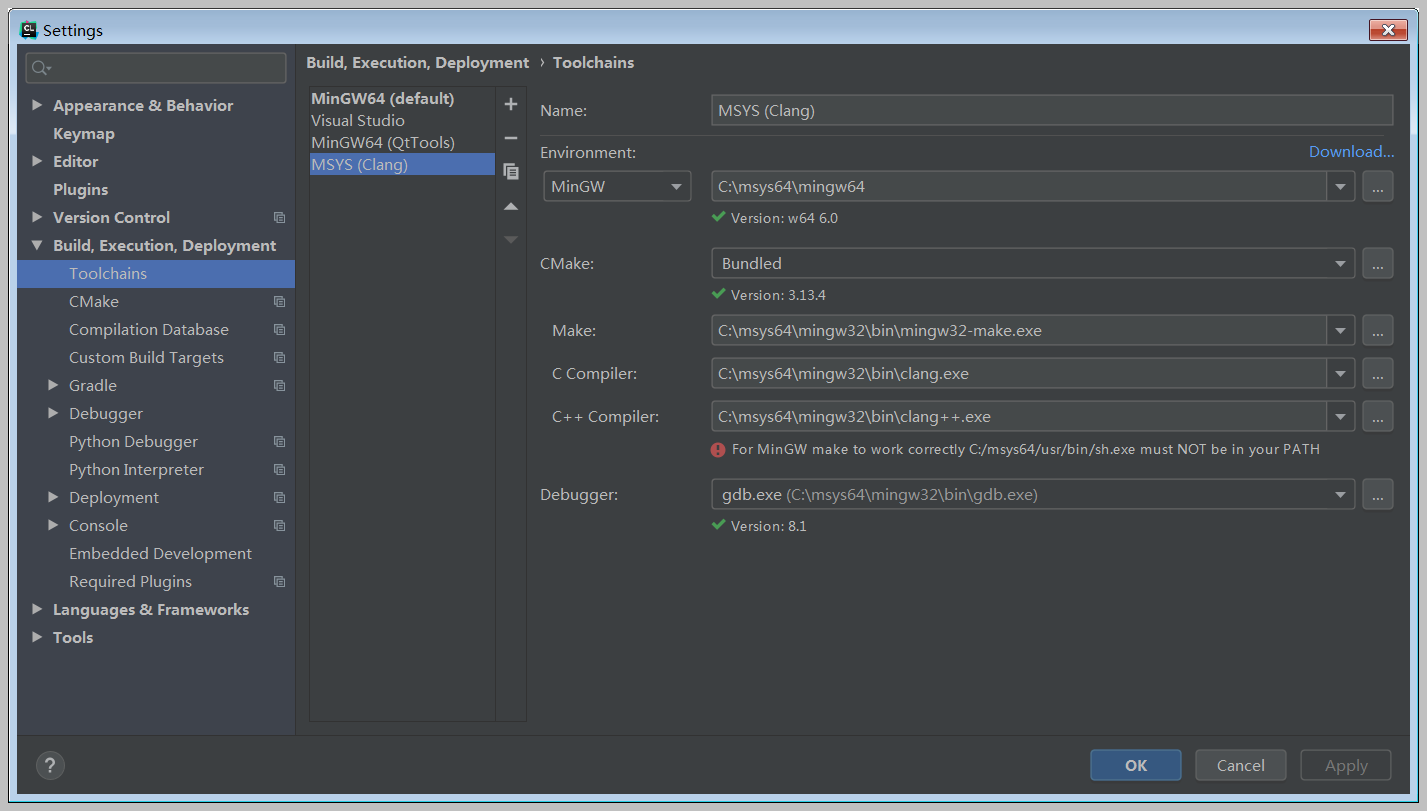
- Step 3: Let CMake detect clang from the environment variables.
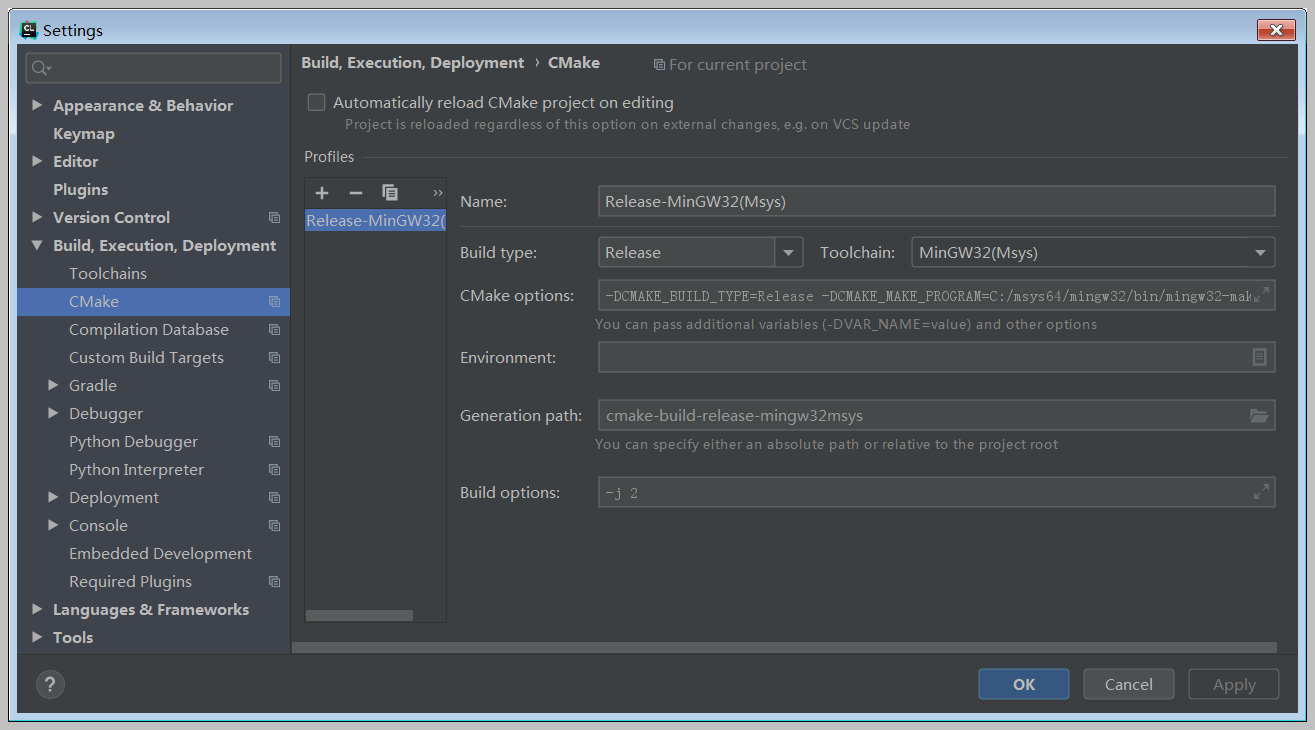
- CLion Setting Toolchains
- LLVM Clang for MinGW64 (可选)
- CLion Setting CMake
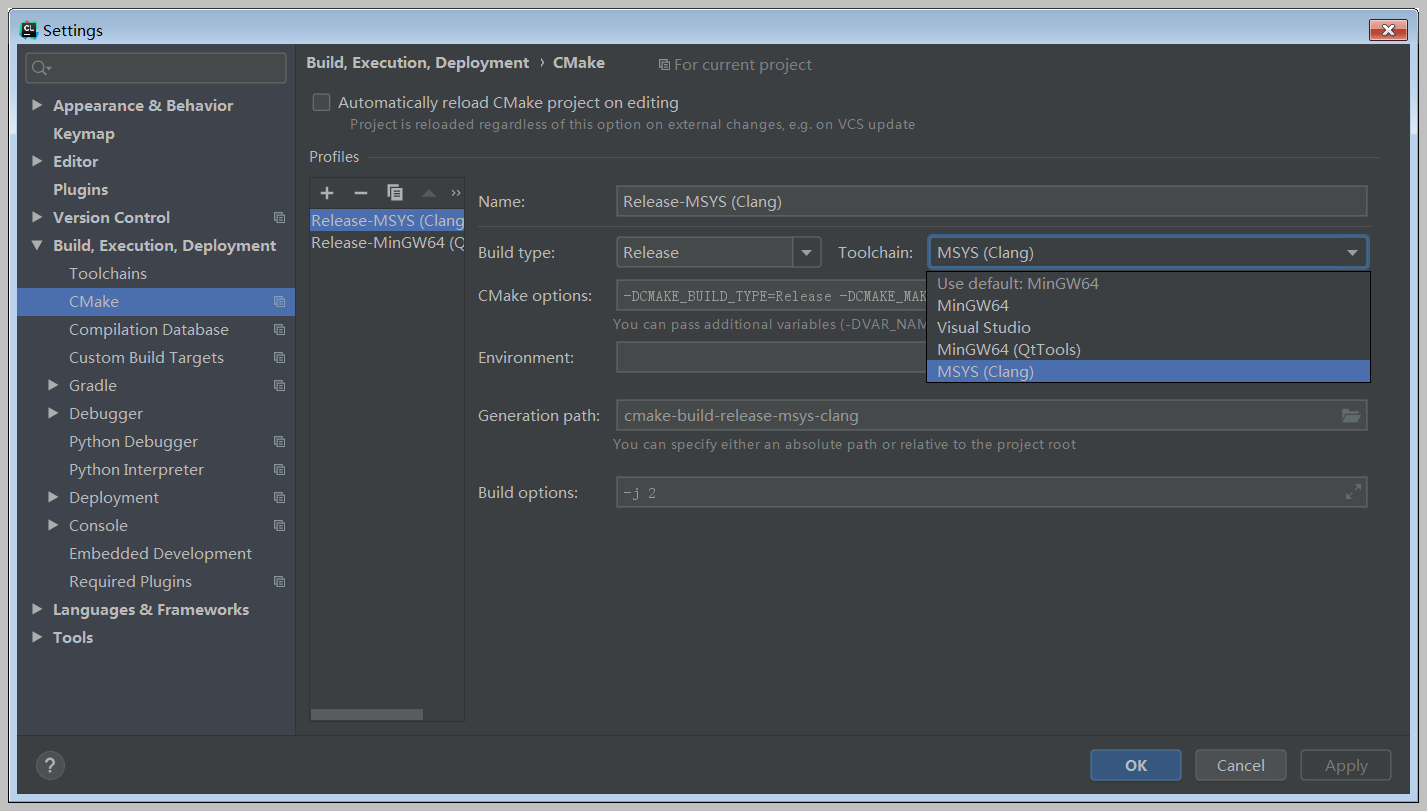
- Step 4: Rebuild the project workspace.
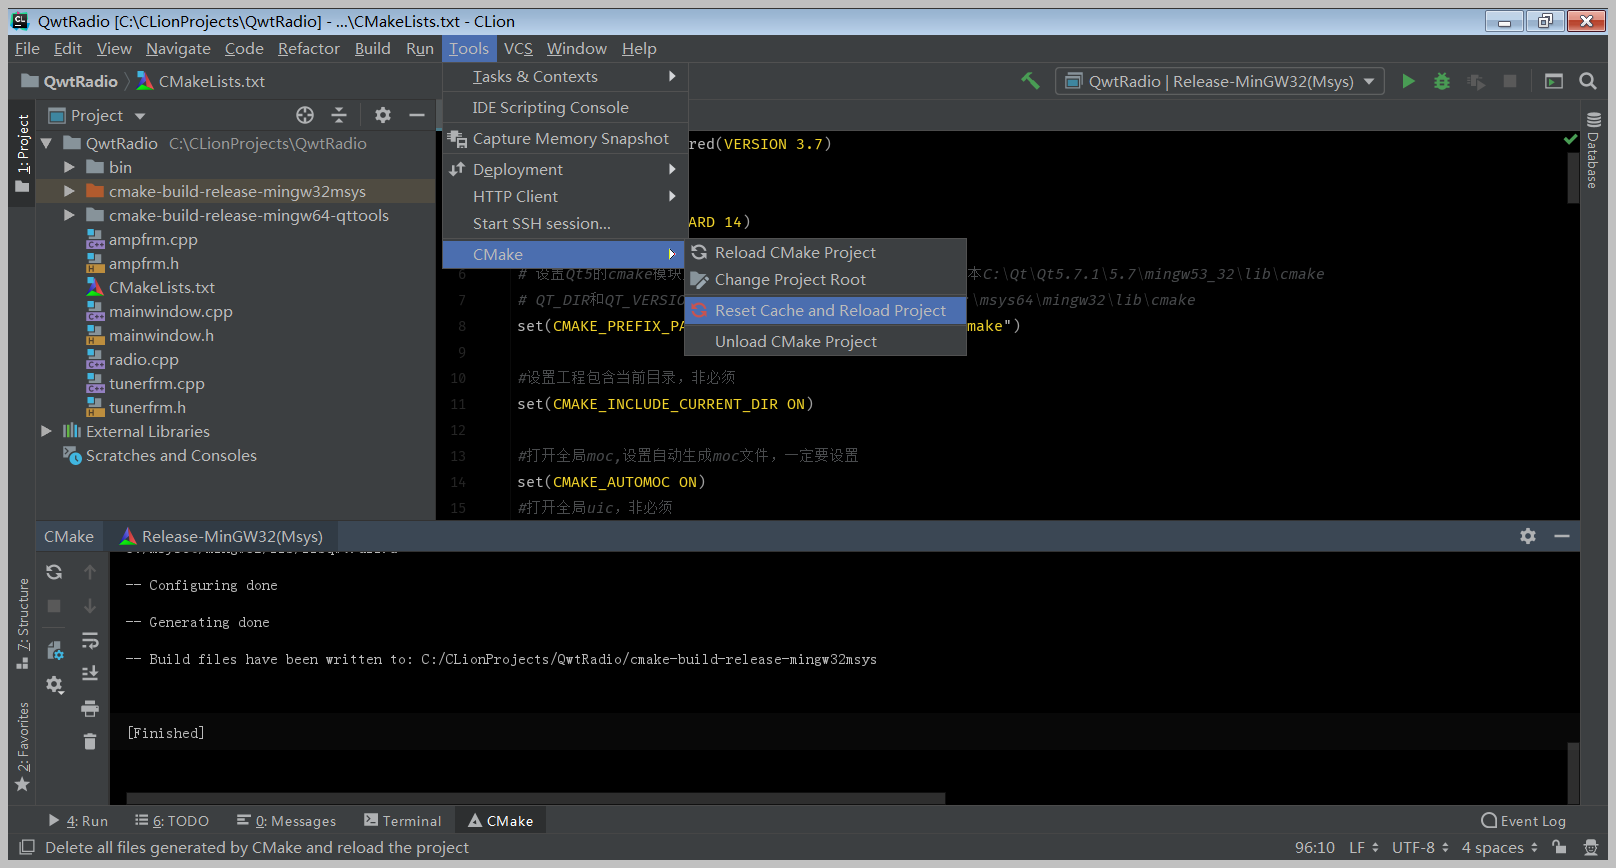
- Tools -> CMake -> Reset Cache and Reload Project
"C:\Program Files\JetBrains\CLion 2019.1\bin\cmake\win\bin\cmake.exe" -DCMAKE_BUILD_TYPE=Release -DCMAKE_MAKE_PROGRAM=C:/msys64/mingw32/bin/mingw32-make.exe -DCMAKE_C_COMPILER=C:/msys64/mingw32/bin/clang.exe -DCMAKE_CXX_COMPILER=C:/msys64/mingw32/bin/clang++.exe -G "CodeBlocks - MinGW Makefiles" C:\CLionProjects\DynamicLayouts -- The C compiler identification is Clang 5.0.1 -- The CXX compiler identification is Clang 5.0.1 -- Check for working C compiler: C:/msys64/mingw32/bin/clang.exe -- Check for working C compiler: C:/msys64/mingw32/bin/clang.exe -- works -- Detecting C compiler ABI info -- Detecting C compiler ABI info - done -- Detecting C compile features -- Detecting C compile features - done -- Check for working CXX compiler: C:/msys64/mingw32/bin/clang++.exe -- Check for working CXX compiler: C:/msys64/mingw32/bin/clang++.exe -- works -- Detecting CXX compiler ABI info -- Detecting CXX compiler ABI info - done -- Detecting CXX compile features -- Detecting CXX compile features - done -- Configuring done -- Generating done -- Build files have been written to: C:/CLionProjects/DynamicLayouts/cmake-build-release-msys-clang
[Finished]
然而,这种方法编译Qt项目,生成的项目执行文件比用QtTool的MinGW编译的大!
2. CLion开发Qt5环境配置
- CLion Setting Toolchains
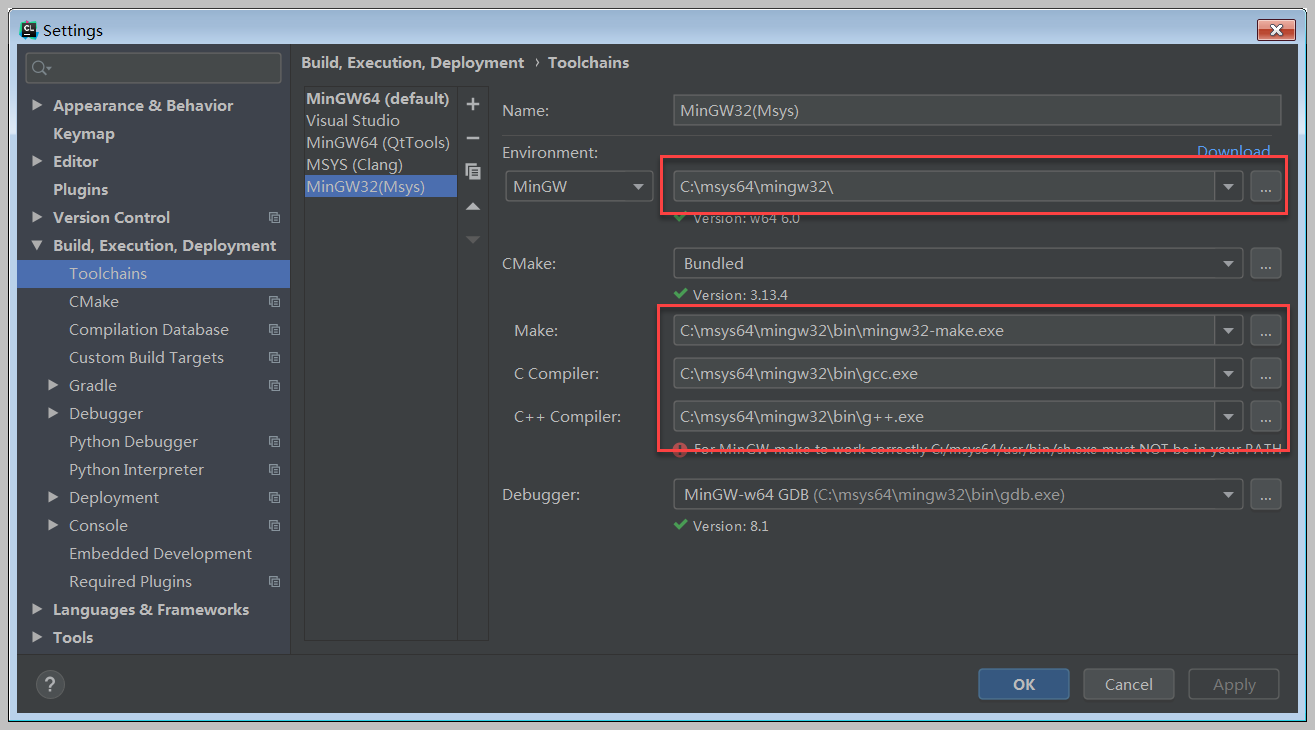
- CLion Setting CMake(除选择Build Type和Toolchain外,其他都是默认项)
- 一般在做了工具链修改或项目CMakeLists.txt文件的修改,需要重新构建项目,再进行项目编译调试。通过在CLion中,选择Tools -> CMake -> Reset Cache and Reload Project
3. 开发示例
Qt5 for msys2 MinGW32
CMakeLists.txt for qt5 project,在CLion中,可用MinGW32、MinGW for Qt Tool、Clang编译工具链均可。
cmake_minimum_required(VERSION 3.7) project(DynamicLayouts)
指定c++标准的版本
set(CMAKE_CXX_STANDARD 14)
设置Qt5的cmake模块所在目录,如果不设置将使用系统提供的版本
QT_DIR和QT_VERSION是指定了qt安装目录和版本的环境变量
set(CMAKE_PREFIX_PATH $ENV{QT_DIR}/$ENV{QT_VERSION}/mingw53_32/lib/cmake)
set(CMAKE_PREFIX_PATH "C:\Qt\Qt5.7.1\5.7\mingw53_32\lib\cmake")
#设置工程包含当前目录,非必须 set(CMAKE_INCLUDE_CURRENT_DIR ON)
#打开全局moc,设置自动生成moc文件,一定要设置 set(CMAKE_AUTOMOC ON) #打开全局uic,非必须 set(CMAKE_AUTOUIC ON) #打开全局rcc,非必须,如需打开,注意修改33行的qrc文件名 set(CMAKE_AUTORCC ON)
Add compiler flags for building executables (-fPIE)
set(CMAKE_CXX_FLAGS "${CMAKE_CXX_FLAGS} ${Qt5Widgets_EXECUTABLE_COMPILE_FLAGS}")
#设置运行时输出可执行文件目录(CMAKE源目录CMAKE_CURRENT_SOURCE_DIR,执行目录CMAKE_CURRENT_BINARY_DIR) set(CMAKE_RUNTIME_OUTPUT_DIRECTORY ${CMAKE_CURRENT_BINARY_DIR}/bin)#设置运行时输出共享库文件目录SET(CMAKE_LIBRARY_OUTPUT_DIRECTORY ${CMAKE_CURRENT_BINARY_DIR}/lib)#查找需要的Qt库文件,最好每一个库都要写,Qt也会根据依赖关系自动添加 set(Projects_QT5_COMPONENTS Core Gui Widgets )
set(Projects_QT5_Includes ${Qt5Core_INCLUDE} ${Qt5Gui_INCLUDE} ${Qt5Widgets_INCLUDE} )
set(Projects_QT5_Libraries Qt5::Core Qt5::Gui Qt5::Widgets )
find_package(Qt5 COMPONENTS ${Projects_QT5_COMPONENTS} REQUIRED)
INCLUDE_DIRECTORIES( ${CMAKE_CURRENT_SOURCE_DIR} ${Projects_QT5_Includes} )#设置项目包含目录
#查找当前文件夹中的所有源代码文件,也可以通过Set命令将所有文件设置为一个变量 FILE(GLOB SRC_FILES "./.cpp") #查找设置当前文件夹中所有的头文件 FILE(GLOB HEAD_FILES "./.h") #查找设置当前文件夹中所有的ui文件 FILE(GLOB UI_FILES "./*.ui")
#通过Ui文件生成对应的头文件,一定要添加
qt5_wrap_ui(WRAP_FILES ${UI_FILES})
#添加资源文件,非必须,一旦采用,注意修改相应的qrc文件名
set(RCC_FILES rcc.qrc)
#将ui文件和生成文件整理在一个文件夹中,非必须
source_group("Ui" FILES ${UI_FILES} ${WRAP_FILES} )
#创建工程文件
add_executable(${PROJECT_NAME} ${SRC_FILES} ${HEAD_FILES} ${RCC_FILES} ${WRAP_FILES})
add_executable(${PROJECT_NAME} ${SRC_FILES} ${HEAD_FILES} )
#添加Qt5依赖项 target_link_libraries(${PROJECT_NAME} ${Projects_QT5_Libraries} )
CMakeLists.txt for qt5-qwt Projects,在CLion中,用msys2的MinGW32编译工具链。
cmake_minimum_required(VERSION 3.7) project(QwtRadio)
指定c++标准的版本
set(CMAKE_CXX_STANDARD 14)
设置Qt5的cmake模块所在目录,如果不设置将使用系统提供的版本C:\Qt\Qt5.7.1\5.7\mingw53_32\lib\cmake
QT_DIR和QT_VERSION是指定了qt安装目录和版本的环境变量C:\msys64\mingw32\lib\cmake
set(CMAKE_PREFIX_PATH "C:\msys64\mingw32\lib\cmake")
#设置工程包含当前目录,非必须 set(CMAKE_INCLUDE_CURRENT_DIR ON)
#打开全局moc,设置自动生成moc文件,一定要设置 set(CMAKE_AUTOMOC ON) #打开全局uic,非必须 set(CMAKE_AUTOUIC ON) #打开全局rcc,非必须,如需打开,注意修改33行的qrc文件名 set(CMAKE_AUTORCC ON)
Add compiler flags for building executables (-fPIE)
set(CMAKE_CXX_FLAGS "${CMAKE_CXX_FLAGS} ${Qt5Widgets_EXECUTABLE_COMPILE_FLAGS}")
#设置运行时输出可执行文件目录(CMAKE源目录CMAKE_CURRENT_SOURCE_DIR,执行目录CMAKE_CURRENT_BINARY_DIR)set(CMAKE_RUNTIME_OUTPUT_DIRECTORY ${CMAKE_CURRENT_BINARY_DIR}/bin)#设置运行时输出共享库文件目录SET(CMAKE_LIBRARY_OUTPUT_DIRECTORY ${CMAKE_CURRENT_BINARY_DIR}/lib)#查找需要的Qt库文件,最好每一个库都要写,Qt也会根据依赖关系自动添加 MESSAGE("======Searching for Qt5======") set(Projects_QT5_COMPONENTS Core Gui Widgets ) set(Projects_QT5_Includes ${Qt5Core_INCLUDE_DIRS} ${Qt5Gui_INCLUDE_DIRS} ${Qt5Widgets_INCLUDE_DIRS} ) set(Projects_QT5_Libraries Qt5::Core Qt5::Gui Qt5::Widgets ) find_package(Qt5 COMPONENTS ${Projects_QT5_COMPONENTS} REQUIRED) MESSAGE(${Qt5Widgets_INCLUDE_DIRS}) MESSAGE(${Projects_QT5_Libraries})
MESSAGE("=======Searching for QWT======") FIND_PATH(QWT_INCLUDE_DIR NAMES qwt.h PATHS ${QT_INCLUDE_DIR} PATH_SUFFIXES qwt ) MESSAGE(${QWT_INCLUDE_DIR}) FIND_LIBRARY(QWT_LIBRARY NAMES qwt PATHS ${QT_INCLUDE_DIR}/lib ) MESSAGE(${QWT_LIBRARY})
#设置项目包含目录,包括将第三方库附加 INCLUDE_DIRECTORIES( ${CMAKE_CURRENT_SOURCE_DIR} ${Projects_QT5_Includes} ${QWT_INCLUDE_DIR} )
将第三方库附加到变量Projects_Extra_Libraries中,便于管理
list(APPEND Projects_Extra_Libraries ${QWT_LIBRARY})
等价于VS下 属性-<配置属性-<C/C++-<预处理器,预处理器定义:QWT_DLL LOG4QT_DLL
ADD_DEFINITIONS(-DQWT_DLL)
#查找当前文件夹中的所有源代码文件,也可以通过Set命令将所有文件设置为一个变量 FILE(GLOB SRC_FILES "./.cpp") #查找设置当前文件夹中所有的头文件 FILE(GLOB HEAD_FILES "./.h") #查找设置当前文件夹中所有的ui文件 FILE(GLOB UI_FILES "./*.ui")
#通过Ui文件生成对应的头文件,一定要添加
qt5_wrap_ui(WRAP_FILES ${UI_FILES})
#添加资源文件,非必须,一旦采用,注意修改相应的qrc文件名
set(RCC_FILES rcc.qrc)
#将ui文件和生成文件整理在一个文件夹中,非必须
source_group("Ui" FILES ${UI_FILES} ${WRAP_FILES} )
#创建工程文件
add_executable(${PROJECT_NAME} ${SRC_FILES} ${HEAD_FILES} ${RCC_FILES} ${WRAP_FILES})
add_executable(${PROJECT_NAME} ${SRC_FILES} ${HEAD_FILES}
${RCC_FILES}
)
#添加Qt5依赖项,添加qwt等第三方依赖项 target_link_libraries(${PROJECT_NAME} ${Projects_QT5_Libraries} ${Projects_Extra_Libraries} )
CMake输出信息:
"C:\Program Files\JetBrains\CLion 2019.1\bin\cmake\win\bin\cmake.exe" -DCMAKE_BUILD_TYPE=Release -DCMAKE_MAKE_PROGRAM=C:/msys64/mingw32/bin/mingw32-make.exe -DCMAKE_C_COMPILER=C:/msys64/mingw32/bin/gcc.exe -DCMAKE_CXX_COMPILER=C:/msys64/mingw32/bin/g++.exe -G "CodeBlocks - MinGW Makefiles" C:\CLionProjects\QwtRadio -- The C compiler identification is GNU 7.3.0 -- The CXX compiler identification is GNU 7.3.0 -- Check for working C compiler: C:/msys64/mingw32/bin/gcc.exe -- Check for working C compiler: C:/msys64/mingw32/bin/gcc.exe -- works -- Detecting C compiler ABI info -- Detecting C compiler ABI info - done -- Detecting C compile features -- Detecting C compile features - done -- Check for working CXX compiler: C:/msys64/mingw32/bin/g++.exe -- Check for working CXX compiler: C:/msys64/mingw32/bin/g++.exe -- works -- Detecting CXX compiler ABI info -- Detecting CXX compiler ABI info - done -- Detecting CXX compile features -- Detecting CXX compile features - done ======Searching for Qt5====== C:/msys64/mingw32/include/C:/msys64/mingw32/include/QtWidgetsC:/msys64/mingw32/include/QtGuiC:/msys64/mingw32/include/QtCoreC:/msys64/mingw32/share/qt5//mkspecs/win32-g++ Qt5::CoreQt5::GuiQt5::Widgets =======Searching for QWT====== C:/msys64/mingw32/include/qwt C:/msys64/mingw32/lib/libqwt.dll.a -- Configuring done -- Generating done -- Build files have been written to: C:/CLionProjects/QwtRadio/cmake-build-release-mingw32msys
[Finished]
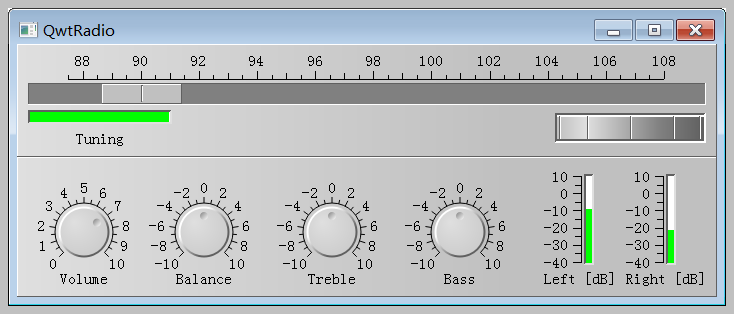
示例用QWT自带的示例Radio(可从https://sourceforge.net/projects/qwt/files/qwt/下载的压缩包中获得),在项目中去掉.pro文件,然后添加相应针对qwt的CMakeLists.txt文件,在CLion中,用基于msys2的工具链进行编译调试,顺利成功!
注意事项
- 在测试过程中发现,一定要注意非自编译的库,如Qt、Qwt等,都是从官方或msys中获得,必须要保证其已编译的库所使用的工具环境一致性,不同工具环境编译的库是不能互相调用的。如需要使用msys中的qwt库,就一定要用其对应的Qt库(同样从msys中获得的),因为都是用msys中的MinGW生成的,所以在使用时不会有问题;如果用Qt官方的MinGW版本的Qt进行使用,则不能成功,即使编译通过,会输出:Process finished with exit code -1073741511 (0xC0000139),打开执行文件会提示无法定位程序入口的弹窗,如必须使用此版本Qt,那需要通过qwt源码,用此Qt版本工具中的MinGW重新编译生成qwt库,再行使用方可。同时,这也体现在CLion的Toolchains设置中,各项也都应保持一致。
附:pacman基本命令参数
更新本地软件包:
pacman -S --refresh
可以缩写为:pacman -Sy

升级软件包:
pacman -S --refresh --sysupgrade
可以缩写为:pacman -Syu

列出所有已安装软件包:
pacman -Q --explicit
或者
pacman -Q -e
可以列出所有的软件组:
pacman -Q --groups

安装新的软件包:
pacman -S <package_names|package_groups>
比如安装 Qt5:
pacman -S mingw-w64-i686-qt5
注:可以不用明确软件包版本,系统会根据依赖项进行自动匹配下载相应版本。

搜索软件包:
如果不清楚软件的准确名称,可以通过核心软件名查询软件包的名称。
pacman -Ss <name_pattern>
比如搜索gcc相关的软件
pacman -Ss gcc

删除软件包:
pacman -R <package_names|package_groups>
- MSYS2 pacman mirrors(/msys64/etc/pacman.d)
## mirrorlist.mingw32
## 32-bit Mingw-w64 repository mirrorlist
##

## Primary
## msys2.org
Server = http://mirrors.ustc.edu.cn/msys2/mingw/i686/
Server = https://mirrors.tuna.tsinghua.edu.cn/msys2/mingw/i686/
Server = https://mirrors.huaweicloud.com/msys2/mingw/i686/

Server = http://repo.msys2.org/mingw/i686/
Server = https://sourceforge.net/projects/msys2/files/REPOS/MINGW/i686/
Server = http://www2.futureware.at/~nickoe/msys2-mirror/mingw/i686/
Server = https://mirror.yandex.ru/mirrors/msys2/mingw/i686/

--------------------------------------------------------------------------
## mirrorlist.mingw64
## 64-bit Mingw-w64 repository mirrorlist
##

## Primary
## msys2.org
Server = http://mirrors.ustc.edu.cn/msys2/mingw/x86_64/
Server = https://mirrors.tuna.tsinghua.edu.cn/msys2/mingw/x86_64/
Server = https://mirrors.huaweicloud.com/msys2/mingw/x86_64/

Server = http://repo.msys2.org/mingw/x86_64/
Server = https://sourceforge.net/projects/msys2/files/REPOS/MINGW/x86_64/
Server = http://www2.futureware.at/~nickoe/msys2-mirror/mingw/x86_64/
Server = https://mirror.yandex.ru/mirrors/msys2/mingw/x86_64/
开发环境安装配置示例:
https://www.devdungeon.com/content/install-gcc-compiler-windows-msys2-cc
Install gcc compiler on Windows with MSYS2 for C/C++
Installing and running MSYS2
Download MSYS2 from http://www.msys2.org/. Download the .exe file and follow the installation instructions on the site. After installing, navigate to the directory where it was installed, and run msys2.exe. For this tutorial, we will assume the default location of C:\msys64. After opening it you should find yourself in a bash shell.
- Updating MSYS2
MSYS2 uses the pacman package manager that the Arch Linux distribution uses. After your initial install it is a good idea to update all the packages. Update everything using:
pacman –Syu
pacman –Su
- Installing gcc using MSYS2
In the MSYS2 bash shell, use pacman again to install the build toolchain and compilers. Run the command below to install the mingw-w64-x86_64-toolchain package group.
# Install make, autoconf, etc to C:\msys64\usr\bin
pacman -S base-devel

# pacman -S base-devel
   1) asciidoc  2) autoconf  3) autoconf2.13  4) autogen  5) automake-wrapper
   6) automake1.10  7) automake1.11  8) automake1.12  9) automake1.13
   10) automake1.14  11) automake1.15  12) automake1.16  13) automake1.6
   14) automake1.7  15) automake1.8  16) automake1.9  17) bison  18) diffstat
   19) diffutils  20) dos2unix  21) file  22) flex  23) gawk  24) gdb
   25) gettext  26) gettext-devel  27) gperf  28) grep  29) groff  30) help2man
   31) intltool  32) lemon  33) libtool  34) libunrar  35) libunrar-devel
   36) m4  37) make  38) man-db  39) pacman  40) pactoys-git  41) patch
   42) patchutils  43) perl  44) pkg-config  45) pkgfile  46) quilt  47) rcs
   48) scons  49) sed  50) swig  51) texinfo  52) texinfo-tex  53) ttyrec
- Installing other packages with pacman
If you want to compile an SSL program that links to libssl and libcrypto with -lssl -lcrypto you will need to install openssl-devel as shown below. There are many other devel packages. For example, libbz2-devel, libelf-devel, libunrar-devel, and libyaml-devel. The environment is rather limited, but it can be useful for learning.
# Install all *-devel packages
pacman -S development
Packages included in "development" group:
:: There are 78 members in group development:
:: Repository msys
   1) apr-devel  2) apr-util-devel  3) aspell-devel  4) bash-devel  5) cloog-devel
   6) gamin-devel  7) gettext-devel  8) glib2-devel  9) gmp-devel  10) heimdal-devel
   11) icu-devel  12) isl-devel  13) jansson-devel  14) jsoncpp-devel  15) libarchive-devel
   16) libargp-devel  17) libassuan-devel  18) libatomic_ops-devel  19) libbobcat-devel
   20) libbz2-devel  21) libcares-devel  22) libcrypt-devel  23) libcurl-devel  24) libdb-devel
   25) libedit-devel  26) libelf-devel  27) libevent-devel  28) libexpat-devel  29) libffi-devel
   30) libgc-devel  31) libgcrypt-devel  32) libgdbm-devel  33) libgnutls-devel
   34) libgpg-error-devel  35) libgpgme-devel  36) libgpgme-python2  37) libgpgme-python3
   38) libguile-devel  39) libiconv-devel  40) libidn-devel  41) libidn2-devel  42) libksba-devel
   43) liblz4-devel  44) liblzma-devel  45) liblzo2-devel  46) libmetalink-devel
   47) libneon-devel  48) libnettle-devel  49) libnghttp2-devel  50) libnpth-devel
   51) libp11-kit-devel  52) libpipeline-devel  53) libpsl-devel  54) libreadline-devel
   55) librhash-devel  56) libsasl-devel  57) libserf-devel  58) libsqlite-devel
   59) libssh2-devel  60) libtasn1-devel  61) libtirpc-devel  62) libtre-devel-git
   63) libunistring-devel  64) libuv-devel  65) libxml2-devel  66) libxslt-devel
   67) libyaml-devel  68) mpc-devel  69) mpfr-devel  70) ncurses-devel  71) openssl-devel
   72) pcre-devel  73) pcre2-devel  74) protobuf-devel  75) ucl-devel  76) util-macros
   77) xproto  78) zlib-devel
- Optional: Add executables to your Windows PATH
If you want to access everything from your Windows Command Prompt, then add the bin directory to your Windows PATH environment variable. Keep in mind this adds a lot of executables to your path which might conflict with other applications. The usr\bin\ directory contains the whole slew of executables listed above. There is a lot of unnecessary stuff in that directory. mingw64\bin\ directory :
;C:\msys64;C:\msys64\mingw64\bin;C:\msys64\usr\bin
- Header files and libraries
Libraries and include files can be found in two places.
# The dynamic lib runtime .dll files will be in bin dirs
# Add the bin directory to PATH environment variable so it can find the .dll files
C:\msys64\mingw64\bin
C:\msys64\usr\bin

# Static libraries
C:\msys64\usr\lib
C:\msys64\mingw64\lib

# Header files
C:\msys64\usr\include
C:\msys64\mingw64\include
- A note about msys vs mingw64 repos
Some things are only available in the msys/ repo like vim and git, and will only be available in \usr\bin\. Some things like gcc are available in msys\, mingw32\, and mingw64\ repos and can potentially end up being installed in both \usr\bin\ and \mingw64\bin\. This is where you have to be careful about how you set up your PATH environment variable. If you add \usr\bin\ in order to make vim or git available, you will also add everything in that directory, which may conflict with something if you also add the \mingw64\bin\ directory to your path. If you only want the toolchain without as much extra stuff, use the mingw64 packages. Then you can add only the \mingw64\bin directory to your PATH if desired. The mingw64 repository generally has more libraries available for install that are unavailable in the general msys repo (e.g. SDL, exif, freeglut). The msys packages are intended to be used inside the msys shell, and the mingw packages are intended to be used outside of msys2.
# Install gcc in C:\msys64\mingw64\bin\ directory
# To go with C:\msys64\mingw64\include and C:\msys64\mingw64\lib
pacman -S mingw-w64-x86_64-toolchain

Packages (17)
mingw-w64-x86_64-binutils-2.30-5
mingw-w64-x86_64-crt-git-7.0.0.5245.edf66197-1
mingw-w64-x86_64-gcc-8.2.0-3
mingw-w64-x86_64-gcc-ada-8.2.0-3
mingw-w64-x86_64-gcc-fortran-8.2.0-3
mingw-w64-x86_64-gcc-libgfortran-8.2.0-3
mingw-w64-x86_64-gcc-libs-8.2.0-3
mingw-w64-x86_64-gcc-objc-8.2.0-3
mingw-w64-x86_64-gdb-8.2-1
mingw-w64-x86_64-headers-git-7.0.0.5245.edf66197-1
mingw-w64-x86_64-libmangle-git-7.0.0.5230.69c8fad6-1
mingw-w64-x86_64-libwinpthread-git-7.0.0.5231.7da6518b-1
mingw-w64-x86_64-make-4.2.1-2
mingw-w64-x86_64-pkg-config-0.29.2-1
mingw-w64-x86_64-tools-git-7.0.0.5242.1b29d1bc-1
mingw-w64-x86_64-winpthreads-git-7.0.0.5231.7da6518b-1
mingw-w64-x86_64-winstorecompat-git-7.0.0.5230.69c8fad6-1
Configuring IDE to work with this toolchain.


