简介
将静态图转化为分块加载的动态图
方案
1. PIL:
    1. 创建背景图
    2. 将原图拆分成N块并依次合成到背景图的相应位置, 得到N张素材图
    3. 将N张素材图合成GIF

2. pygifsicle
    对合成的GIF进行优化(无损压缩, 精简体积)
    注意: 需要电脑安装gifsicle, 官网: https://www.lcdf.org/gifsicle/,
    若看不懂英文, 网上资料一大把, (其实不安装也不影响正常使用, 只是没有优化GIF而已)

3. tkinter:
    用于图形化界面的实现, 便于操作

4. pyinstaller
    用于将脚本打包成exe
源码

https://gitee.com/tianshl/img2gif.git
脚本介绍
img2gif.py
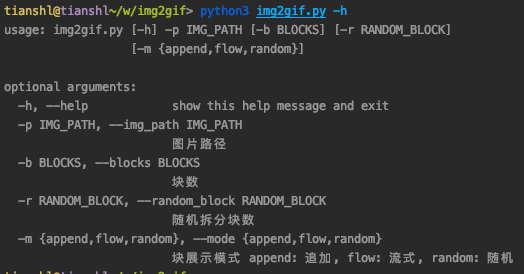
简介: 将图片转成gif 命令行模式
使用: python img2gif.py -h
示例: python img2gif.py -p /Users/tianshl/Documents/sample.jpg
img2gif_gui.py
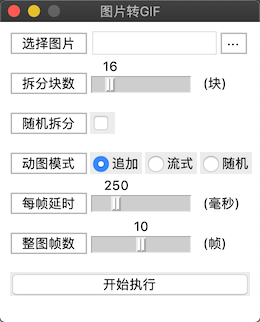
简介: 将图片转成gif 图像化界面
使用: python img2gif_gui.py
打包成exe
pyinstaller -F -w -i gif.ico img2gif_gui.py
# 执行完指令后, exe文件在dist目录下
# 我打包的exe: https://download.csdn.net/download/xiaobuding007/12685554
效果图
命令行模式

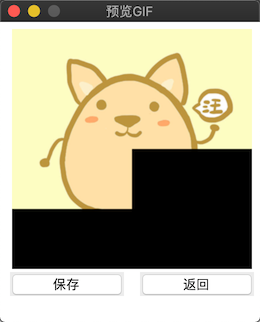
图形化界面


代码
requirements.txt (依赖)
Pillow==7.2.0
pygifsicle==1.0.1
img2gif.py (命令行模式 )
# -*- coding: utf-8 -*-
"""
 **********************************************************
 * Author        : tianshl
 * Email         : xiyuan91@126.com
 * Last modified : 2020-07-29 14:58:57
 * Filename      : img2gif.py
 * Description   : 图片转动图
 * Documents     : https://www.lcdf.org/gifsicle/
 * ********************************************************
"""
import argparse
import copy
import logging
import os
import random

from PIL import Image
from pygifsicle import optimize

LOG_FORMAT = '%(asctime)s - %(name)s - %(levelname)s - %(message)s'
logging.basicConfig(level=logging.INFO, format=LOG_FORMAT)
log = logging.getLogger(__name__)


class Img2Gif:
    """
    图片转动图
    """

    def __init__(self, img_path, blocks=16, mode='append', random_block=False):
        """
        初始化
        :param img_path:        图片地址
        :param blocks:          分块数
        :param mode:            展示模式 append: 追加, flow: 流式, random: 随机
        :param random_block:    随机拆分
        """
        self.mode = mode if mode in ['flow', 'append', 'random'] else 'append'

        self.blocks = blocks
        self.random_block = random_block

        # 背景图
        self.img_background = None

        self.img_path = img_path
        self.img_dir, self.img_name = os.path.split(img_path)
        self.img_name = os.path.splitext(self.img_name)[0]

        self.gif_path = os.path.join(self.img_dir, '{}.gif'.format(self.img_name))

    def get_ranges(self):
        """
        获取横向和纵向块数
        """
        if not self.random_block:
            w = int(self.blocks ** 0.5)
            return w, w

        ranges = list()
        for w in range(2, int(self.blocks ** 0.5) + 1):
            if self.blocks % w == 0:
                ranges.append((w, self.blocks // w))

        if ranges:
            return random.choice(ranges)
        else:
            return self.blocks, 1

    def materials(self):
        """
        素材
        """

        log.info('分割图片')
        img_origin = Image.open(self.img_path)
        (width, height) = img_origin.size
        self.img_background = Image.new(img_origin.mode, img_origin.size)

        # 单方向分割次数
        blocks_w, blocks_h = self.get_ranges()

        block_width = width // blocks_w
        block_height = height // blocks_h

        img_tmp = copy.copy(self.img_background)
        # 动图中的每一帧
        _materials = list()
        for h in range(blocks_h):
            for w in range(blocks_w):
                block_box = (w * block_width, h * block_height, (w + 1) * block_width, (h + 1) * block_height)
                block_img = img_origin.crop(block_box)
                if self.mode in ['flow', 'random']:
                    img_tmp = copy.copy(self.img_background)
                img_tmp.paste(block_img, (w * block_width, h * block_height))
                _materials.append(copy.copy(img_tmp))

        # 随机打乱顺序
        if self.mode == 'random':
            random.shuffle(_materials)

        log.info('分割完成')
        # 最后十帧展示原图
        [_materials.append(copy.copy(img_origin)) for _ in range(10)]
        return _materials

    def gif(self):
        """
        合成gif
        """

        materials = self.materials()
        log.info('合成GIF')
        self.img_background.save(self.gif_path, save_all=True, loop=True, append_images=materials, duration=250)
        log.info('合成完成')

        log.info('压缩GIF')
        optimize(self.gif_path)
        log.info('压缩完成')


if __name__ == '__main__':
    parser = argparse.ArgumentParser()
    parser.add_argument("-p", "--img_path", required=True, help="图片路径")
    parser.add_argument("-b", "--blocks", type=int, default=16, help="块数")
    parser.add_argument("-r", "--random_block", type=bool, default=False, help="随机拆分块数")
    parser.add_argument(
        '-m', '--mode', default='append', choices=['append', 'flow', 'random'],
        help="块展示模式 append: 追加, flow: 流式, random: 随机"
    )
    args = parser.parse_args()

    Img2Gif(**args.__dict__).gif()
img2gif_gui.py (图形化界面)
# -*- coding: utf-8 -*-
"""
 **********************************************************
 * Author        : tianshl
 * Email         : xiyuan91@126.com
 * Last modified : 2020-07-29 14:58:57
 * Filename      : img2gif_gui.py
 * Description   : 图片转动图
 * Documents     : https://www.lcdf.org/gifsicle/
 * ********************************************************
"""
import copy
import random
from tkinter import *
from tkinter import ttk, messagebox
from tkinter.filedialog import askopenfilename, asksaveasfilename

from PIL import Image, ImageTk
from pygifsicle import optimize


class Img2Gif(Frame):
    """
    图形化界面
    """

    def __init__(self):
        """
        初始化
        """
        Frame.__init__(self)

        # 设置窗口信息
        self.__set_win_info()

        # 渲染窗口
        self._gif_pane = None
        self.__render_pane()

    def __set_win_info(self):
        """
        设置窗口信息
        """
        # 获取屏幕分辨率
        win_w = self.winfo_screenwidth()
        win_h = self.winfo_screenheight()
        # 设置窗口尺寸/位置
        self._width = 260
        self._height = 300
        self.master.geometry('{}x{}+{}+{}'.format(
            self._width, self._height, (win_w - self._width) // 2, (win_h - self._height) // 2)
        )
        # 设置窗口不可变
        self.master.resizable(width=False, height=False)

    @staticmethod
    def __destroy_frame(frame):
        """
        销毁frame
        """
        if frame is None:
            return

        for widget in frame.winfo_children():
            widget.destroy()

        frame.destroy()

    def __render_pane(self):
        """
        渲染窗口
        """

        self._main_pane = Frame(self.master, width=self._width, height=self._height)
        self._main_pane.pack()

        # 设置窗口标题
        self.master.title('图片转GIF')

        # 选择图片
        image_path_label = Label(self._main_pane, text='选择图片', relief=RIDGE, padx=10)
        image_path_label.place(x=10, y=10)

        self._image_path_entry = Entry(self._main_pane, width=13)
        self._image_path_entry.place(x=90, y=7)

        image_path_button = Label(self._main_pane, text='···', relief=RIDGE, padx=5)
        image_path_button.bind('<Button-1>', self.__select_image)
        image_path_button.place(x=220, y=10)

        # 拆分块数
        blocks_label = Label(self._main_pane, text='拆分块数', relief=RIDGE, padx=10)
        blocks_label.place(x=10, y=50)

        self._blocks_scale = Scale(
            self._main_pane, from_=2, to=100, orient=HORIZONTAL, sliderlength=10
        )
        self._blocks_scale.set(16)
        self._blocks_scale.place(x=90, y=33)

        Label(self._main_pane, text='(块)').place(x=200, y=50)

        # 随机拆分
        random_block_label = Label(self._main_pane, text='随机拆分', relief=RIDGE, padx=10)
        random_block_label.place(x=10, y=90)

        self._random_block = BooleanVar(value=False)
        random_block_check_button = ttk.Checkbutton(
            self._main_pane, variable=self._random_block,
            width=0, onvalue=True, offvalue=False
        )
        random_block_check_button.place(x=90, y=90)

        # 动图模式
        mode_label = Label(self._main_pane, text='动图模式', relief=RIDGE, padx=10)
        mode_label.place(x=10, y=130)

        self._mode = StringVar(value='append')
        ttk.Radiobutton(self._main_pane, text='追加', variable=self._mode, value='append').place(x=90, y=130)
        ttk.Radiobutton(self._main_pane, text='流式', variable=self._mode, value='flow').place(x=145, y=130)
        ttk.Radiobutton(self._main_pane, text='随机', variable=self._mode, value='random').place(x=200, y=130)

        # 每帧延时
        duration_label = Label(self._main_pane, text='每帧延时', relief=RIDGE, padx=10)
        duration_label.place(x=10, y=170)
        self._duration_scale = Scale(
            self._main_pane, from_=50, to=1000, orient=HORIZONTAL, sliderlength=10
        )
        self._duration_scale.set(250)
        self._duration_scale.place(x=90, y=152)

        Label(self._main_pane, text='(毫秒)').place(x=200, y=170)

        # 整图帧数
        whole_frames_label = Label(self._main_pane, text='整图帧数', relief=RIDGE, padx=10)
        whole_frames_label.place(x=10, y=210)

        self._whole_frames_scale = Scale(
            self._main_pane, from_=0, to=20, orient=HORIZONTAL, sliderlength=10
        )
        self._whole_frames_scale.set(10)
        self._whole_frames_scale.place(x=90, y=193)

        Label(self._main_pane, text='(帧)').place(x=200, y=210)

        # 开始转换
        execute_button = ttk.Button(self._main_pane, text='开始执行', width=23, command=self.__show_gif)
        execute_button.place(x=10, y=250)

    def __select_image(self, event):
        """
        选择图片
        """
        image_path = askopenfilename(title='选择图片', filetypes=[
            ('PNG', '*.png'), ('JPG', '*.jpg'), ('JPG', '*.jpeg'), ('BMP', '*.bmp'), ('ICO', '*.ico')
        ])
        self._image_path_entry.delete(0, END)
        self._image_path_entry.insert(0, image_path)

    def __block_ranges(self):
        """
        获取图片横向和纵向需要拆分的块数
        """
        blocks = self._blocks_scale.get()
        if not self._random_block.get():
            n = int(blocks ** 0.5)
            return n, n

        ranges = list()
        for horizontally in range(1, blocks + 1):
            if blocks % horizontally == 0:
                ranges.append((horizontally, blocks // horizontally))

        if ranges:
            return random.choice(ranges)
        else:
            return blocks, 1

    def __generate_materials(self):
        """
        根据原图生成N张素材图
        """
        image_path = self._image_path_entry.get()
        if not image_path:
            messagebox.showerror(title='错误', message='请选择图片')
            return
        self._image_origin = Image.open(image_path)

        # 获取图片分辨率
        (width, height) = self._image_origin.size

        # 创建底图
        self._image_background = Image.new(self._image_origin.mode, self._image_origin.size)
        image_tmp = copy.copy(self._image_background)

        # 获取横向和纵向块数
        horizontally_blocks, vertically_blocks = self.__block_ranges()

        # 计算每块尺寸
        block_width = width // horizontally_blocks
        block_height = height // vertically_blocks

        width_diff = width - block_width * horizontally_blocks
        height_diff = height - block_height * vertically_blocks

        # GIF模式
        gif_mode = self._mode.get()
        # 生成N帧图片素材
        materials = list()
        for v_idx, v in enumerate(range(vertically_blocks)):
            for h_idx, h in enumerate(range(horizontally_blocks)):
                _block_width = (h + 1) * block_width
                # 最右一列 宽度+误差
                if h_idx + 1 == horizontally_blocks:
                    _block_width += width_diff

                _block_height = (v + 1) * block_height
                # 最后一行 高度+误差
                if v_idx + 1 == vertically_blocks:
                    _block_height += height_diff

                block_box = (h * block_width, v * block_height, _block_width, _block_height)
                block_img = self._image_origin.crop(block_box)
                if gif_mode in ['flow', 'random']:
                    image_tmp = copy.copy(self._image_background)
                image_tmp.paste(block_img, (h * block_width, v * block_height))
                materials.append(copy.copy(image_tmp))

        # mode=random时随机打乱顺序
        if gif_mode == 'random':
            random.shuffle(materials)

        # 整图帧数
        [materials.append(copy.copy(self._image_origin)) for _ in range(self._whole_frames_scale.get())]

        return materials

    def __show_gif(self):
        """
        展示GIF
        """

        self._materials = self.__generate_materials()
        if not self._materials:
            return

        self._main_pane.place(x=0, y=-1 * self._height)
        self._gif_pane = Frame(self.master, width=self._width, height=self._height)
        self._gif_pane.pack()

        # 设置窗口标题
        self.master.title('预览GIF')

        label_width = 240
        label = Label(self._gif_pane, width=label_width, height=label_width)
        label.place(x=8, y=5)

        button_save = ttk.Button(self._gif_pane, text='保存', width=9, command=self.__save_gif)
        button_save.place(x=8, y=250)

        button_cancel = ttk.Button(self._gif_pane, text='返回', width=9, command=self.__show_main_pane)
        button_cancel.place(x=138, y=250)

        # 尺寸
        (width, height) = self._image_origin.size
        # 帧速
        duration = self._duration_scale.get()
        # 缩放
        gif_size = (label_width, int(height / width * label_width))

        frames = [ImageTk.PhotoImage(img.resize(gif_size, Image.ANTIALIAS)) for img in self._materials]
        # 帧数
        idx_max = len(frames)

        def show(idx):
            """
            展示图片
            """
            frame = frames[idx]
            label.configure(image=frame)
            idx = 0 if idx == idx_max else idx + 1
            self._gif_pane.after(duration, show, idx % idx_max)

        show(0)

    def __save_gif(self):
        """
        存储GIF
        """
        gif_path = asksaveasfilename(title='保存GIF', filetypes=[('GIF', '.gif')])
        if not gif_path:
            return

        gif_path += '' if gif_path.endswith('.gif') or gif_path.endswith('.GIF') else '.gif'
        # 存储GIF
        Image.new(self._image_origin.mode, self._image_origin.size).save(
            gif_path, save_all=True, loop=True, duration=self._duration_scale.get(), append_images=self._materials
        )

        # 优化GIF
        optimize(gif_path)
        messagebox.showinfo(title='提示', message='保存成功')

        self.__show_main_pane()

    def __show_main_pane(self):
        """
        取消保存
        """
        self.__destroy_frame(self._gif_pane)
        self._main_pane.place(x=0, y=0)


if __name__ == '__main__':
    Img2Gif().mainloop()


