1、分类与聚类的概念与区别
分类:是从一组已知的训练样本中发现分类模型,并且使用这个分类模型来预测待分类样本。
目前常用的分类算法主要有:朴素贝叶斯分类算法(Naïve Bayes)、支持向量机分类算法(Support Vector Machines)、 KNN最近邻算法(k-Nearest Neighbors)、神经网络算法(NNet)以及决策树(Decision Tree)等等。
聚类:本身没有类别的样本聚集成不同的组。
聚类分析也称无监督学习, 因为和分类学习相比,聚类的样本没有标记,需要由聚类学习算法来自动确定。聚类分析是研究如何在没有训练的条件下把样本划分为若干类。
2、原理:根据距离函数计算待分类样本X和每个训练样本的距离,然后选出离这个数据最近的K个点,看这K个点属于什么类型,利用少数服从多数的原则,将新数据归类。如下图:

若K=3,那么离绿色点(待分类样本)最近的有2个红色三角形和1个蓝色的正方形,于是绿色的这个待分类点属于红色的三角形。
若K=5,那么离绿色点(待分类样本)最近的有2个红色三角形和3个蓝色的正方形,于是绿色的这个待分类点属于蓝色的正方形。
3、根据上述原理,就可以准备数据了。
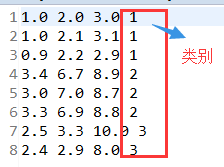
训练样本集knn-train.txt如下图:

待分类样本knn.txt如下图:

4、代码实现:
根据上述数据,首先我们需要一个Point类,将点的数据和类型作为两个变量。实现如下:
public class Point {
private int type;
private Vectorv = new Vector ();
private String value;
public Point(){}
public Point(String value){
this.value = value;
String[] strs = value.split(" ");
int index=0;
//获得值
for(;index<strs.length-1;){
v.add(Double.parseDouble(strs[index]));
index++;
}
//获得类型
type = Integer.parseInt(strs[index]);
}
public String toString(){
return value;
}
public int getType() {
return type;
}
public void setType(int type) {
this.type = type;
}
public VectorgetV() {
return v;
}
public void setV(Vectorv) {
this.v = v;
}
}
因为是根据待分类样本数据和数据集中每个点计算距离,所以还需要一个工具类KNNUtils。实现如下:
public class KNNUtils {
public static double getDiatance(Point p1, Point p2) {
// 隐藏条件p1.size()==p2.size
double result = 0.0;
for (int i = 0; i < p1.getV().size(); i++) {
result += Math.pow(p1.getV().get(i) - p2.getV().get(i), 2);
}
return Math.sqrt(result);
}
}
除此之外,知道待分类样本与所有已知样本的距离后,还需要比较之间的距离。如图:

所以还定义了一个类,专门存储类别及距离,并且因为要实现根据距离来排序,所以需实现Comparable接口。实现如下:
public class KNNDisAndType implements Comparable
{
private int type;
private double distance;
public KNNDisAndType(){}
public KNNDisAndType(String str){
String[] strs = str.split(":");
type = Integer.parseInt(strs[0]);
distance = Double.parseDouble(strs[1]);
}
public KNNDisAndType(int type, double distance){
this.type = type;
this.distance = distance;
}
public int getType() {
return type;
}
public void setType(int type) {
this.type = type;
}
public double getDistance() {
return distance;
}
public void setDistance(double distance) {
this.distance = distance;
}
/**
* 比较待分类样本与已知样本距离大小
* @author ZD
*/
@Override
public int compareTo(KNNDisAndType o) {
if(this.distance>o.distance){
return 1;
}else if(this.distance<o.distance){
return -1;
}
return 0;
}
public String toString(){
return type+":"+distance;
}
}
一切准备就绪,最后只需在Reducer阶段统计类别次数,最终写入文件。实现如下:
/**
* KNN算法原理实现
* @author ZD
*/
public class KNNExer {
private static final int NUM=5;
public static class KNNExerMapper extends Mapper<LongWritable, Text, Text, Text>{
private static Listtrains = new ArrayList ();
@Override
protected void setup(Mapper<LongWritable, Text, Text, Text>.Context context)
throws IOException, InterruptedException {
FileSystem fs = FileSystem.get(context.getConfiguration());
BufferedReader br = new BufferedReader(new InputStreamReader(fs.open(new Path("/input/knn-train.txt"))));
String line = "";
while((line = br.readLine())!=null){
Point p = new Point(line);
trains.add(p);
}
}@Override
protected void map(LongWritable key, Text value, Mapper<LongWritable, Text, Text, Text>.Context context)
throws IOException, InterruptedException {
FileSplit fSplit = (FileSplit)context.getInputSplit();
if(fSplit.getPath().getName().equals("knn.txt")){
//格式和数据集一样,0代表未知分类
Point p1 = new Point(value.toString());
for(Point p2:trains){
double distance = KNNUtils.getDiatance(p1, p2);
//当然也可以在map阶段就获取类别个数
context.write(new Text(p1.toString()), new Text(p2.getType()+":"+distance));
}
}
}
}
private static class KNNExerReducer extends Reducer<Text, Text, Text, IntWritable>{@Override
protected void reduce(Text value, Iterabledatas, Reducer<Text, Text, Text, IntWritable>.Context context) throws IOException, InterruptedException {
Listlist = new ArrayList ();
for (Text data : datas) {
KNNDisAndType knnbean = new KNNDisAndType(data.toString());
list.add(knnbean);
}
Collections.sort(list);
Map<Integer, Integer> map = new HashMap<Integer, Integer>();
for(int i=0; i<NUM; i++){ //找距离最近的NUM个,根据少数服从多数原则判断待分类样本类别
KNNDisAndType knn = list.get(i);
int type = knn.getType();
if(map.get(type)==null){
map.put(type, 1);
}else{
map.put(type, map.get(type)+1);
}
}
int finalType = 1;
int count=0;
for(Integer key:map.keySet()){
if(map.get(key)>count){
count = map.get(key);
finalType = key;
}
}
String[] strs = value.toString().split(" ");
StringBuffer sb = new StringBuffer();
for (int i=0; i<strs.length-1; i++) {
sb.append(strs[i]).append(" ");
}
int len = sb.toString().length();
context.write(new Text(sb.toString().substring(0, len-1)), new IntWritable(finalType));
}
}
public static void main(String[] args) {
try {
Configuration cfg = HadoopCfg.getConfigration();
Job job = Job.getInstance(cfg);
job.setJobName("KNNExer");
job.setJarByClass(KNNExer.class);
job.setMapperClass(KNNExerMapper.class);
job.setMapOutputKeyClass(Text.class);
job.setMapOutputValueClass(Text.class);
job.setReducerClass(KNNExerReducer.class);
job.setOutputKeyClass(Text.class);
job.setOutputValueClass(IntWritable.class);
FileInputFormat.addInputPath(job, new Path("/input/knn"));
FileOutputFormat.setOutputPath(job, new Path("/KNNExer/"));
System.exit(job.waitForCompletion(true) ? 0 : 1);
} catch (Exception e) {
e.printStackTrace();
}
}
}
最后结果展示:

写在最后:本人也是在慢慢学习中成长,希望能给大家带来收获。若有错误,望指出纠正。本次分享的KNN算法原理比较简单,实现起来也较为容易。下次将与大家分享朴素贝叶斯算法的原理分析与实现。


