使用SpringCloud技术栈搭建微服务集群,可以选择的组件比较多,由于有些组件已经闭源或停更,这里主要选用spring-cloud-alibaba作为我们的技术栈。
- 服务注册与发现:
nacos-discovery - 统一配置管理:
nacos-config - 微服务网关:
spring cloud gateway
由于nacos本身就已经是完备的服务,故参考官方文档直接安装使用就可以,这里重点介绍如何使用SpringCloud Gateway实现路由转发和身份认证。
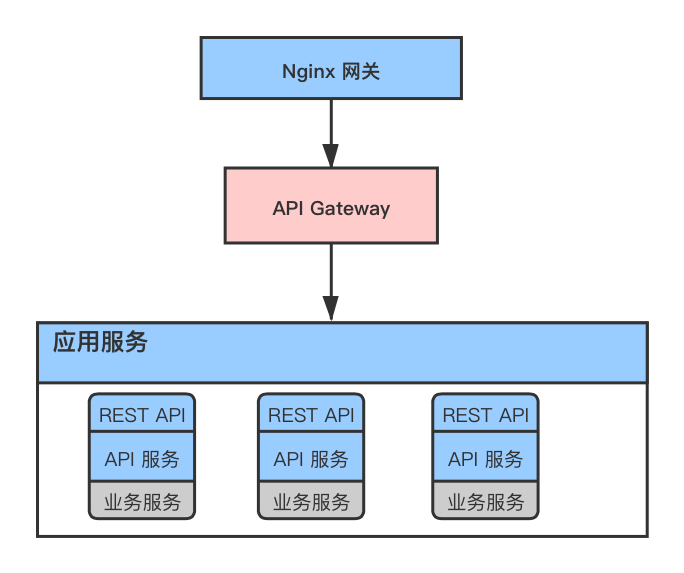
一、微服务架构

- 所有的请求先通过
nginx进行负载和转发 API Gateway负责进行微服务内的路由转发和身份认证
二、实现路由转发
1. 引入gateway包
<dependency>
    <groupId>org.springframework.cloud</groupId>
    <artifactId>spring-cloud-starter-gateway</artifactId>
</dependency>
需要注意的是:如果启动时报错,提示在依赖中发现的springMvc与gateway不能兼容,需要删除spring-boot-starter-web相关引用
**********************************************************

Spring MVC found on classpath, which is incompatible with Spring Cloud Gateway at this time. Please remove spring-boot-starter-web dependency.

**********************************************************
2. 添加启动类
@EnableDiscoveryClient
@SpringBootApplication
public class GatewayApplication {

    public static void main(String[] args) {
        SpringApplication.run(GatewayApplication.class, args);
    }
}
@EnableDiscoveryClient用于集群下的服务注册与发现
3. 配置路由表
配置文件最好选用YAML,结构清晰易读
spring:
  application:
    name: cloud-api #服务名
  cloud:
    nacos:
      discovery:
        server-addr: 127.0.0.1:8848 # nacos服务器地址
    gateway:
      routes:
        - id: cloud-user
          uri: lb://cloud-user  # 后端服务名
          predicates:
            - Path=/user/**   # 路由地址
          filters:
            - StripPrefix=1 # 去掉前缀

server:
  port: 8000

# 用于actuator暴露监控指标
management:
  endpoints:
    web:
      exposure:
        include: "*"
StripPrefix=1用于在路由转发时去掉前缀地址,若无则将前缀一起转发给后端服务,比如:
请求地址为:http://localhost:8000/user/home 在没有加
StripPrefix时,转发给后端服务地址为:**http://{cloud-user}/user/home,否则为http://{cloud-user}/home**
management配置用于暴露监控指标,可请求 http://localhost:8000/actuator/gateway/routes 获取所有的映射路由
三、实现身份认证
在分布式系统中有三种常用的身份认证方式:
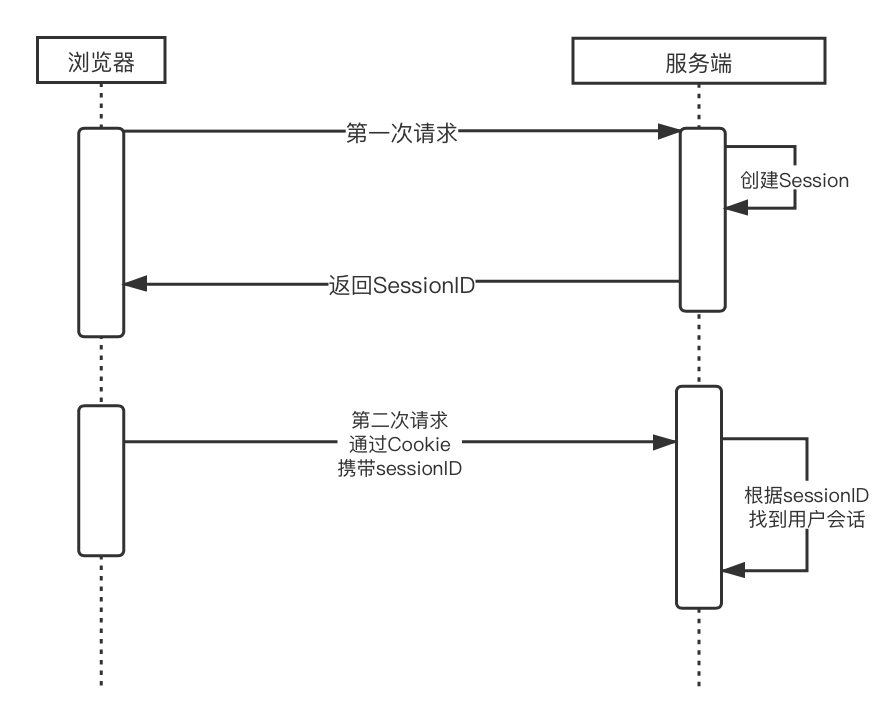
1.使用Session,可使用spring security来实现Session的管理 ,使用redis来存储会话状态,客户端的sessionID需要cookie来存储

优点 :
- 使用方便,客户端无感知
- 安全性高
- 会话管理支持较好
缺点 :
- 对客户端应用支持不友好
- 无法实现跨站跨端共享
- 实现方式相对复杂
- 需要客户端Cookie支持
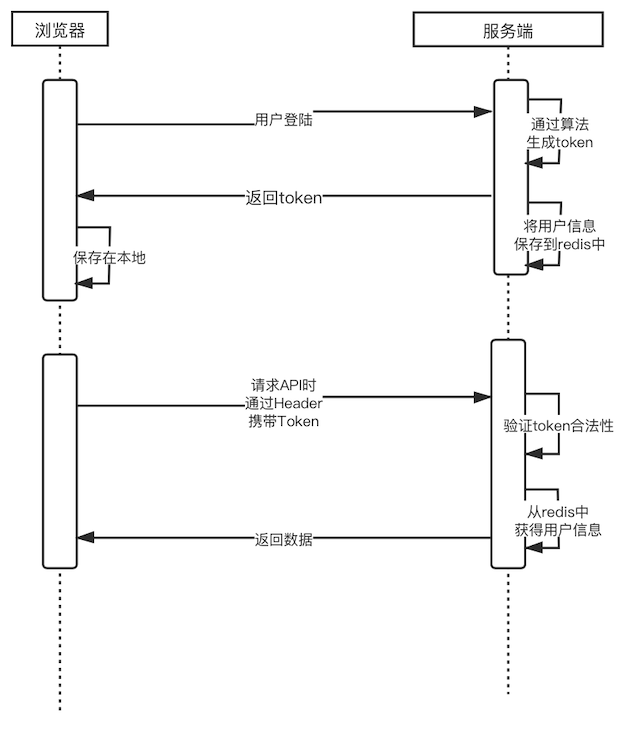
2.使用Token,由服务端签发,并将用户信息存储在redis中,客户端每次请求都带上进行验证

优点 :
- 对多端共享支持友好
- 对多端共享会话支持友好
- 实现方式相对简单
- 安全性高
- 无须Cookie支持
缺点 :
- 会话过期时间维护较复杂
- 服务端需要维持会话状态
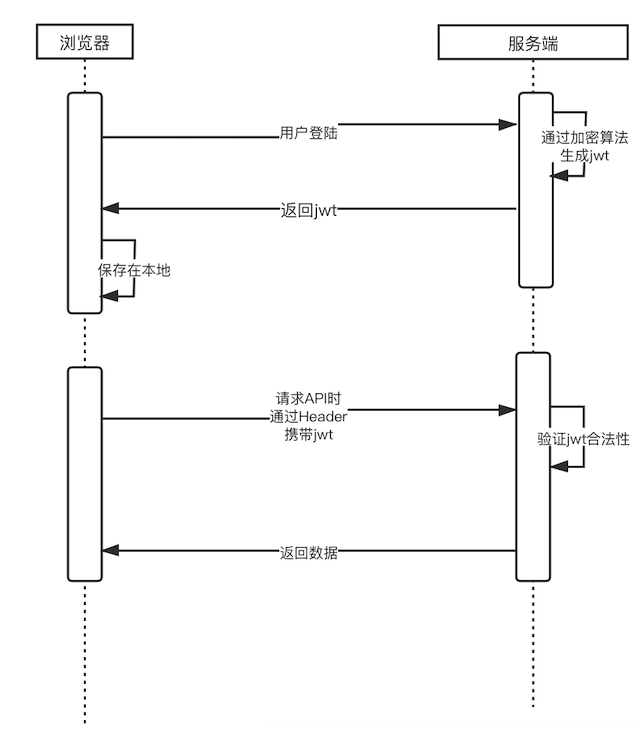
3.使用JWT,由服务端签发且不保存会话状态,客户端每次请求都需要验证合法性

优点 :
- 对多端共享支持友好
- 对多端共享会话支持友好
- 服务端无会话状态
- 无须Cookie支持
- 可携带载荷数据
缺点 :
- 会话过期时间维护较复杂
- 默认情况下,安全性较低
- 一旦签发无法撤销,或撤销较复杂
简单token验证
本例子的token是uuid生成随机码的方式,没有使用算法做验证,这样有可能导致客户端穷举token,不断查询redis造成风险。在生产环境中可使用一定算法进行token签发(如加密解密,有效时间戳等),保证伪造token对服务器的影响降到最低。
1. 用户登陆保存session状态
@Service
public class Session {

    @Autowired
    private RedisTemplate<String, String> redisTemplate;

    Long expireTime = 10800L;

    /**
     * 保存session
     * @param loginUser
     */
    public void saveSession(LoginUser loginUser) {
        String key = String.format("login:user:%s", loginUser.userToken);

        redisTemplate.opsForValue().set(key, JSON.toJSONString(loginUser),
                expireTime, TimeUnit.SECONDS);
    }

    /**
     * 获取session
     * @param token
     * @return
     */
    public LoginUser getSession(String token){
        String key = String.format("login:user:%s", token);

        String s = redisTemplate.opsForValue().get(key);
        if (Strings.isEmpty(s)){
            return null;
        }

        return JSON.parseObject(s, LoginUser.class);
    }
}
保存会话状态时,需要设置过期时间,且不宜过长或过短。如进一步思考如何刷新会话过期时间。
2. 增加AuthCheckFilter,拦截路由请求
@Slf4j
@Component
public class AuthCheckFilter extends AbstractGatewayFilterFactory {

    @Autowired
    private Session session;

    @Override
    public GatewayFilter apply(Object config) {
        return (exchange, chain) -> {

            ServerHttpRequest request = exchange.getRequest();
            ServerHttpResponse response = exchange.getResponse();

            // 1. 获取token
            String token = request.getHeaders().getFirst("token");

            log.info("当前请求的url:{}, method:{}", request.getURI().getPath(), request.getMethodValue());

            if (Strings.isEmpty(token)) {
                response.setStatusCode(HttpStatus.UNAUTHORIZED);
                return response.setComplete();
            }

            // 2. 验证用户是否已登陆
            LoginUser loginUser = this.session.getSession(token);
            if (loginUser == null) {
                response.setStatusCode(HttpStatus.UNAUTHORIZED);
                return response.setComplete();
            }

            // 3. 将用户名传递给后端服务
            ServerWebExchange build;
            try {
                ServerHttpRequest host = exchange.getRequest().mutate()
                        .header("X-User-Name", loginUser.userName)
                        // 中文字符需要编码
                        .header("X-Real-Name", URLEncoder.encode(loginUser.realName, "utf-8"))
                        .build();
                build = exchange.mutate().request(host).build();
            } catch (UnsupportedEncodingException e) {
                build = exchange;
            }

            return chain.filter(build);
        };

    }
}
此拦截器作用为验证请求是否已登陆,否则返回401状态,并将用户会话信息传递给后端服务。
3. 配置Filter
在gateway项目的yml配置文件中配置需要进行验证的路由filters: AuthCheckFilter
spring:
    gateway:
      routes:
        - id: cloud-user
          uri: lb://cloud-user  # 后端服务名
          predicates:
            - Path=/user/**   # 路由地址
          filters:
            - name: AuthCheckFilter     #会话验证
            - StripPrefix=1 # 去掉前缀
由此就实现了对后端路由地址的身份验证功能
三、完整代码
https://gitee.com/hypier/barry-cloud


