一、前言
在分布式、微服务系统架构中,一个大的项目在进行服务拆分之后,变成了众多个子服务,由于服务的数量居多,每个服务都有自己的一套配置文件,这时候就不像传统的单体架构SSM、SSH、以及当下比较流行的SpringBoot快速开发框架,一个项目基本一份配置文件就可以搞定。而在微服务项目架构中,为了方便众多个服务的配置文件统一进行集中管理、实时的动态更新、与项目代码解耦开来,所以需要分布式配置中心组件,在SpringCloud微服务全家桶中,已经有比较成熟的分布式配置中心组件Spring Cloud Config,本篇文章我们就来学习基于Spring Cloud Config构建分布式配置中心。
二、特点
Spring Cloud Config分为config server端和config client,config server它支持服务配置文件存放在配置服务的内存中(即本地文件)同时也支持放在远程Git或SVN仓库中。 关于config server端和config client端,简要说明如下:
config server: 用于读取远程Git或SVN仓库中的配置文件信息,缓存在JVM内存当中,另外也会持久化一份到本地硬盘上,此存放路径可以自己设置,后面会讲到;config client: 用于连接config server端,从config server端读取配置文件的属性信息,读取有两种方式,一种是通过spring.cloud.config.url,另一种是通过service-id服务名读取。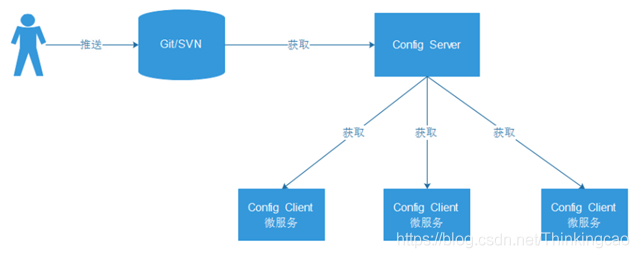
三、Spring Cloud Config可解决的痛点
- 集中管理配置文件;
- 不同环境不同配置,动态化的配置更新,分环境部署比如dev/test/prod/beta/release;
- 运行期间动态调整配置,不再需要在每个服务部署的机器上编写配置文件,服务会向配置中心统一拉取配置信息;
- 当配置发生变动时,服务不需要重启即可感知到配置的变化并应用新的配置;
- 将配置信息以REST接口形式暴露
- 默认实现基于 Git ,可以进行版本管理
四、准备工作
基于上述理论知识的基础之上,搭建config-server:8080、config-client:8081、eureka-server:8888 三个工程,如图所示。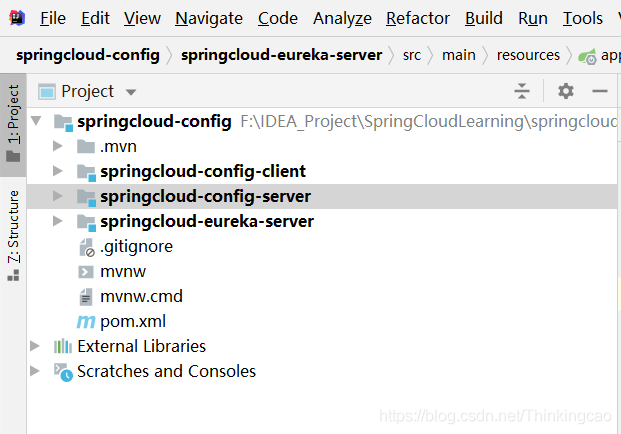
五. 搭建eureka-server环境
1. pom.xml
<groupId>com.thinkingcao.api</groupId>
    <artifactId>springcloud-eureka-server</artifactId>
    <version>0.0.1-SNAPSHOT</version>
    <name>springcloud-eureka-server</name>
    <description>SpringCloud整合Eureka组件搭建微服务注册中心</description>

    <!--SpringBoot依赖版本-->
    <parent>
        <groupId>org.springframework.boot</groupId>
        <artifactId>spring-boot-starter-parent</artifactId>
        <version>2.0.3.RELEASE</version>
        <relativePath/>
    </parent>

    <!--项目编码、jdk版本、SpringCloud版本定义-->
    <properties>
        <project.build.sourceEncoding>UTF-8</project.build.sourceEncoding>
        <project.reporting.outputEncoding>UTF-8</project.reporting.outputEncoding>
        <java.version>1.8</java.version>
        <spring-cloud.version>Finchley.RELEASE</spring-cloud.version>
    </properties>

    <!--声明管理SpringCloud版本依赖信息-->
    <dependencyManagement>
        <dependencies>
            <dependency>
                <groupId>org.springframework.cloud</groupId>
                <artifactId>spring-cloud-dependencies</artifactId>
                <version>${


   spring-cloud.version}</version>
                <type>pom</type>
                <scope>import</scope>
            </dependency>
        </dependencies>
    </dependencyManagement>

    <!--依赖信息-->
    <dependencies>
        <!--springcloud整合eureka服务端组件-->
        <dependency>
            <groupId>org.springframework.cloud</groupId>
            <artifactId>spring-cloud-starter-netflix-eureka-server</artifactId>
        </dependency>
    </dependencies>
2. application.yml
#服务端口号
server:
  port: 8888
#定义服务名称(服务注册到eureka名称)
spring:
  application:
    name: app-thinkingcao-eureka
eureka:
  instance:
    #Eureka注册中心ip地址
    hostname: 127.0.0.1
  client:
    serviceUrl:
      #注册地址
      defaultZone: http://${


   eureka.instance.hostname}:${


   server.port}/eureka/
    #表示是否需要将自己注册给自己的注册中心,因为自己是注册中心,单机版本时不需要,设置为false(集群的时候需要是为true)
    register-with-eureka: false
    #因为自己是注册中心,不需要去检索服务信息,单机版本时不需要,设置为false(集群的时候需要是为true)
    fetch-registry: false
  #Eureka自我保护机制
  server:
    #关闭eureka自我保护机制false(默认为true)
    enable-self-preservation: false
    # 清理间隔(单位毫秒,默认是60*1000)
    eviction-interval-timer-in-ms: 2000
3. AppEurekaServer启动类
@EnableEurekaServer: 表示启动eureka server注册中心服务
package com.thinkingcao.api;

import org.springframework.boot.SpringApplication;
import org.springframework.boot.autoconfigure.SpringBootApplication;
import org.springframework.cloud.netflix.eureka.server.EnableEurekaServer;

@SpringBootApplication
@EnableEurekaServer
public class AppEurekaServer {


    public static void main(String[] args) {


        SpringApplication.run(AppEurekaServer.class, args);
    }

}
六、搭建config-server端
1. 创建项目,选择如下依赖
lombok : 代码简化插件config server : config server分布式配置中心服务端Eureka Discovery Client : eureka注册中心客户端依赖,在需要向eureka注册中心注册服务时使用。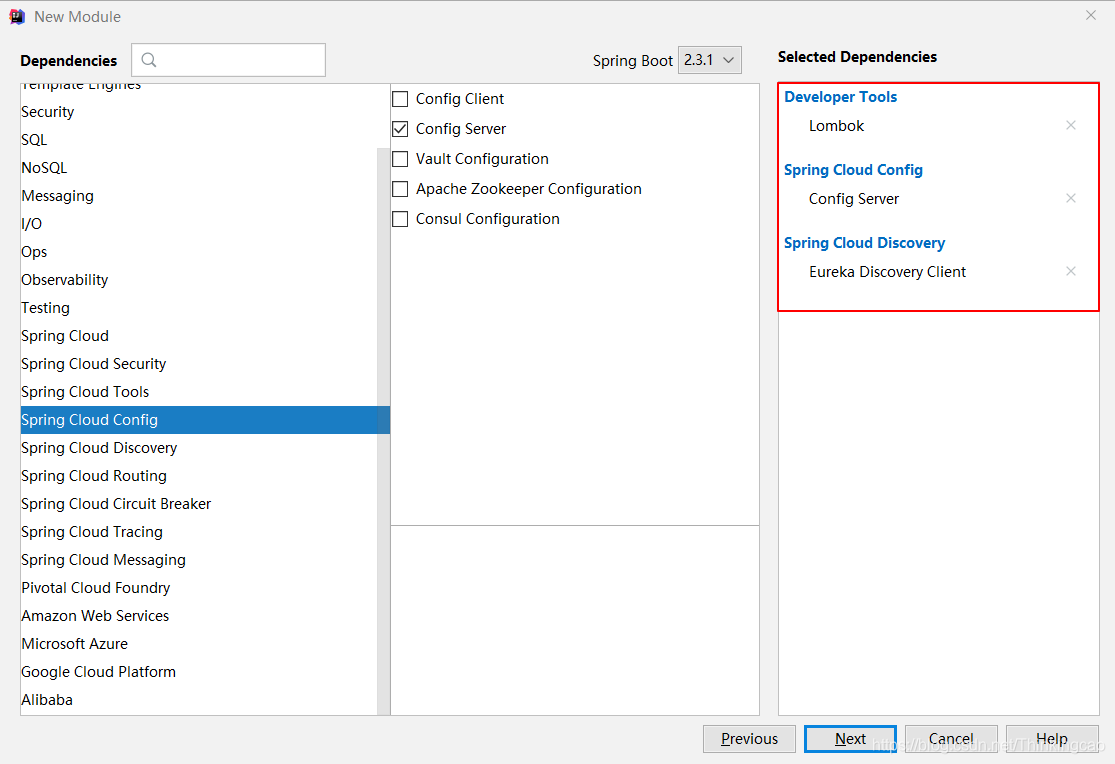
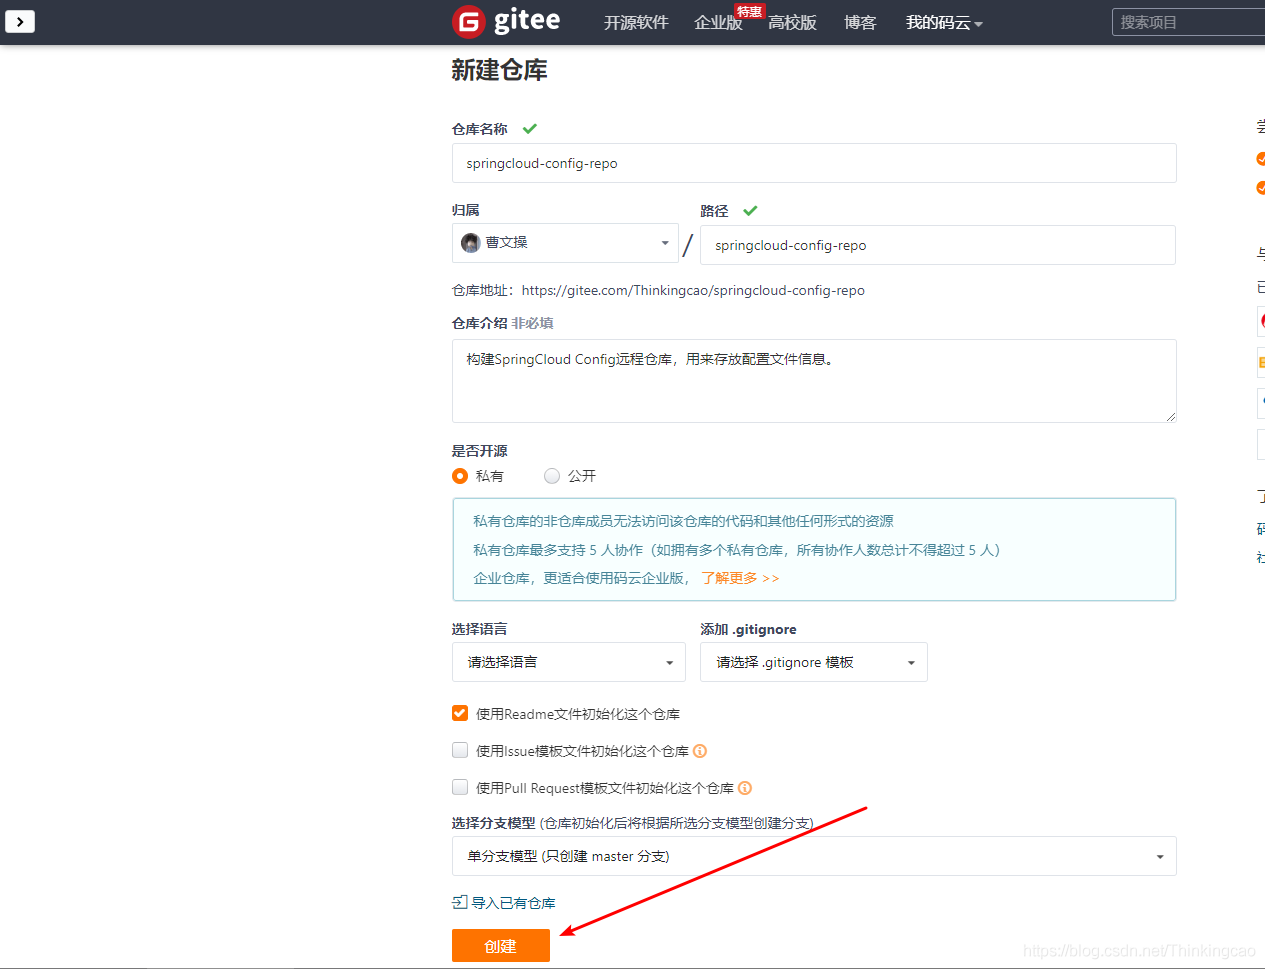
2. 构建远程Git仓库
3. 创建配置文件
远程仓库:https://gitee.com/Thinkingcao/springcloud-config-repo 是我创建的私有仓库,同时创建一个文件夹叫做config-respo 用来专门存放服务的配置文件,实际项目开发中可以根据项目的服务名字来区分文件夹,config-respo中有个具体的order-dev.yml配置文件,order-dev.yml配置文件内容信息如下: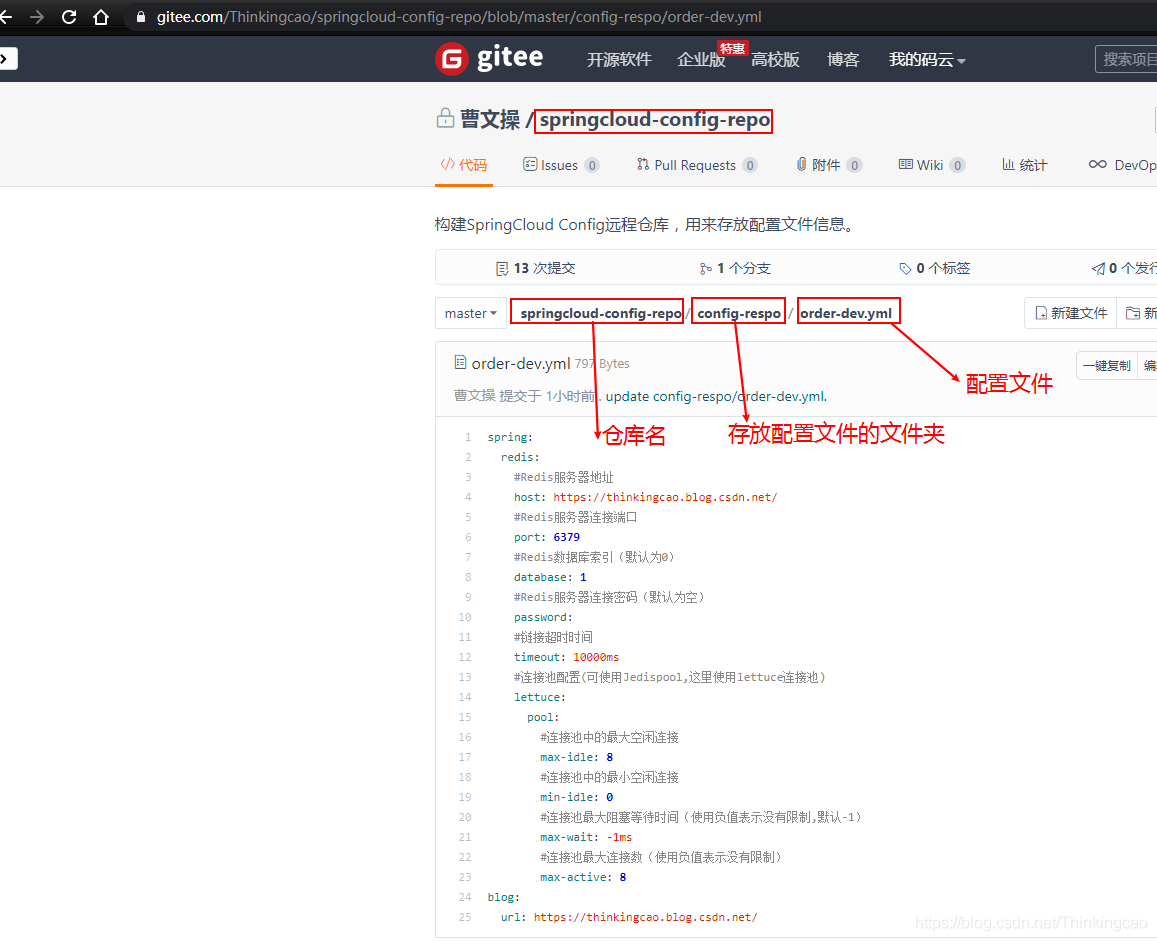
注意: 学过SpringBoot的大佬们可能都知道,SpringBoot中配置文件的形式默认是: application-profile.yml或者application-profile.properties,那么在配置中心中也是一样,在Git远程仓库创建配置文件时也是如此,例如: order-dev.yml、order-prod.yml。
其中:
- profile表示的是环境
- application表示的是文件名称
- yml则为文件的类型。
4. config-server依赖
  <groupId>com.thinkingcao</groupId>
    <artifactId>springcloud-config-server</artifactId>
    <version>0.0.1-SNAPSHOT</version>
    <name>springcloud-config-server</name>
    <description>搭建SpringCloud configServer环境</description>

    <!--SpringBoot依赖版本-->
    <parent>
        <groupId>org.springframework.boot</groupId>
        <artifactId>spring-boot-starter-parent</artifactId>
        <version>2.0.3.RELEASE</version>
        <relativePath/>
    </parent>

    <!--项目编码、jdk版本、SpringCloud版本定义-->
    <properties>
        <project.build.sourceEncoding>UTF-8</project.build.sourceEncoding>
        <project.reporting.outputEncoding>UTF-8</project.reporting.outputEncoding>
        <java.version>1.8</java.version>
        <spring-cloud.version>Finchley.RELEASE</spring-cloud.version>
    </properties>

    <!--声明管理SpringCloud版本依赖信息-->
    <dependencyManagement>
        <dependencies>
            <dependency>
                <groupId>org.springframework.cloud</groupId>
                <artifactId>spring-cloud-dependencies</artifactId>
                <version>${


   spring-cloud.version}</version>
                <type>pom</type>
                <scope>import</scope>
            </dependency>
        </dependencies>
    </dependencyManagement>

    <!--依赖信息-->
    <dependencies>

        <!--SpringCloud整合config-server组件-->
        <dependency>
            <groupId>org.springframework.cloud</groupId>
            <artifactId>spring-cloud-config-server</artifactId>
        </dependency>

        <!--SpringCloud整合-eureka-client组件-->
        <dependency>
            <groupId>org.springframework.cloud</groupId>
            <artifactId>spring-cloud-starter-netflix-eureka-client</artifactId>
        </dependency>

        <!--Lombok简化代码插件-->
        <dependency>
            <groupId>org.projectlombok</groupId>
            <artifactId>lombok</artifactId>
            <optional>true</optional>
        </dependency>

    </dependencies>
5. 配置config-server连接远程git仓库
如果Git仓库为公开仓库,可以不填写用户名和密码,如果是私有仓库需要填写,本例子是使用私有仓库,所以密码大家在搭环境的时候填写自己Git仓库的账号密码。
#端口号
server:
  port: 8080

#定义服务名称(服务注册到eureka名称)
spring:
  application:
    name: app-config-server
  #Spring Cloud Config Server端配置
  cloud:
    config:
      server:
        git:
          #远程存储库的URI地址。
          uri: https://gitee.com/Thinkingcao/springcloud-config-repo
          #使用远程Git仓库验证用户名。
          username: 617271837@qq.com
          #使用远程Git仓库验证密码。
          password: xxxxxx
          #指定远程Git仓库的分支
          default-label: master
          #指定本地仓库地址用来存储获取远程Git上的配置文件
          basedir: G:\temp\path\config-properties
          #git仓库地址下的相对地址,可以配置多个,用,分割,也就是配置文件所在根目录文件夹名称
          search-paths: config-respo
      #标记以指示启用配置服务器发现(配置服务器URL将通过发现查找)。
      discovery:
        enabled: true

#在此指定服务注册中心地址,将当前服务注册到eureka注册中心上
eureka:
  client:
    service-url:
      defaultZone: http://127.0.0.1:8888/eureka
    #启动注册操作,该值默认为true。若设置为fasle将不会启动注册操作。是否需要去检索寻找服务,默认是true
    register-with-eureka: true
    #是否需要从eureka上获取注册信息
    fetch-registry: true
关于Spring Cloud Config配置文件的属性信息在上面的yml文件中注释已经写的非常的清楚了,这里我就不过多解释。
6. 启动类AppConfigServer
@EnableDiscoveryClient : 开启向注册中心注册服务@EnableConfigServer : 开启分布式配置中心服务端
import org.springframework.boot.SpringApplication;
import org.springframework.boot.autoconfigure.SpringBootApplication;
import org.springframework.cloud.client.discovery.EnableDiscoveryClient;
import org.springframework.cloud.config.server.EnableConfigServer;

@SpringBootApplication
@EnableDiscoveryClient
@EnableConfigServer
public class AppConfigServer {


    public static void main(String[] args) {


        SpringApplication.run(AppConfigServer.class, args);
    }
}
7. 测试config-server读取配置文件
启动程序,访问: http://127.0.0.1:8080/order-dev.yaml ,浏览器展示如下结果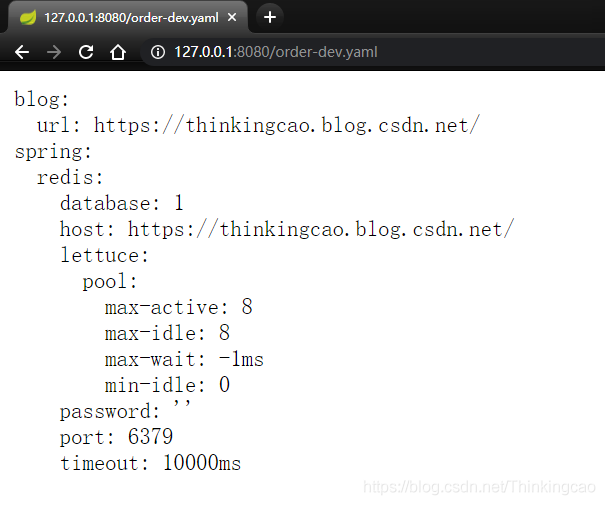
Spring Cloud Config 有一套URL访问规则,我们通过这套规则在浏览器上直接访问即可。
注意: 这里的application指的是Git远程仓库中的配置文件的名字
/{


   application}/{


   profile}[/{


   label}]
/{


   application}-{


   profile}.yml
/{


   label}/{


   application}-{


   profile}.yml
/{


   application}-{


   profile}.properties
/{


   label}/{


   application}-{


   profile}.properties
结论: 当访问config-server的程序,格式: Http+IP+Port+远程git仓库的配置文件名称 时,响应结果为整个配置文件的信息,证明配置服务中心可以从远程程序获取配置信息,这时候指定的basedir:G:\temp\path\config-properties本地文件夹,发现配置服务中心将从远程git仓库上的配置文件持久化一份到硬盘中去了,同时也缓存一份到JVM内存中。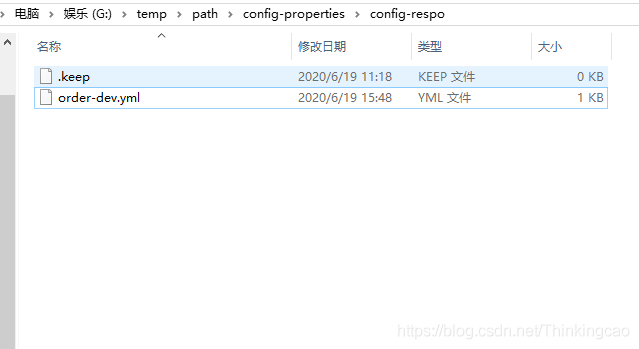
七、如何配置config从本地读取
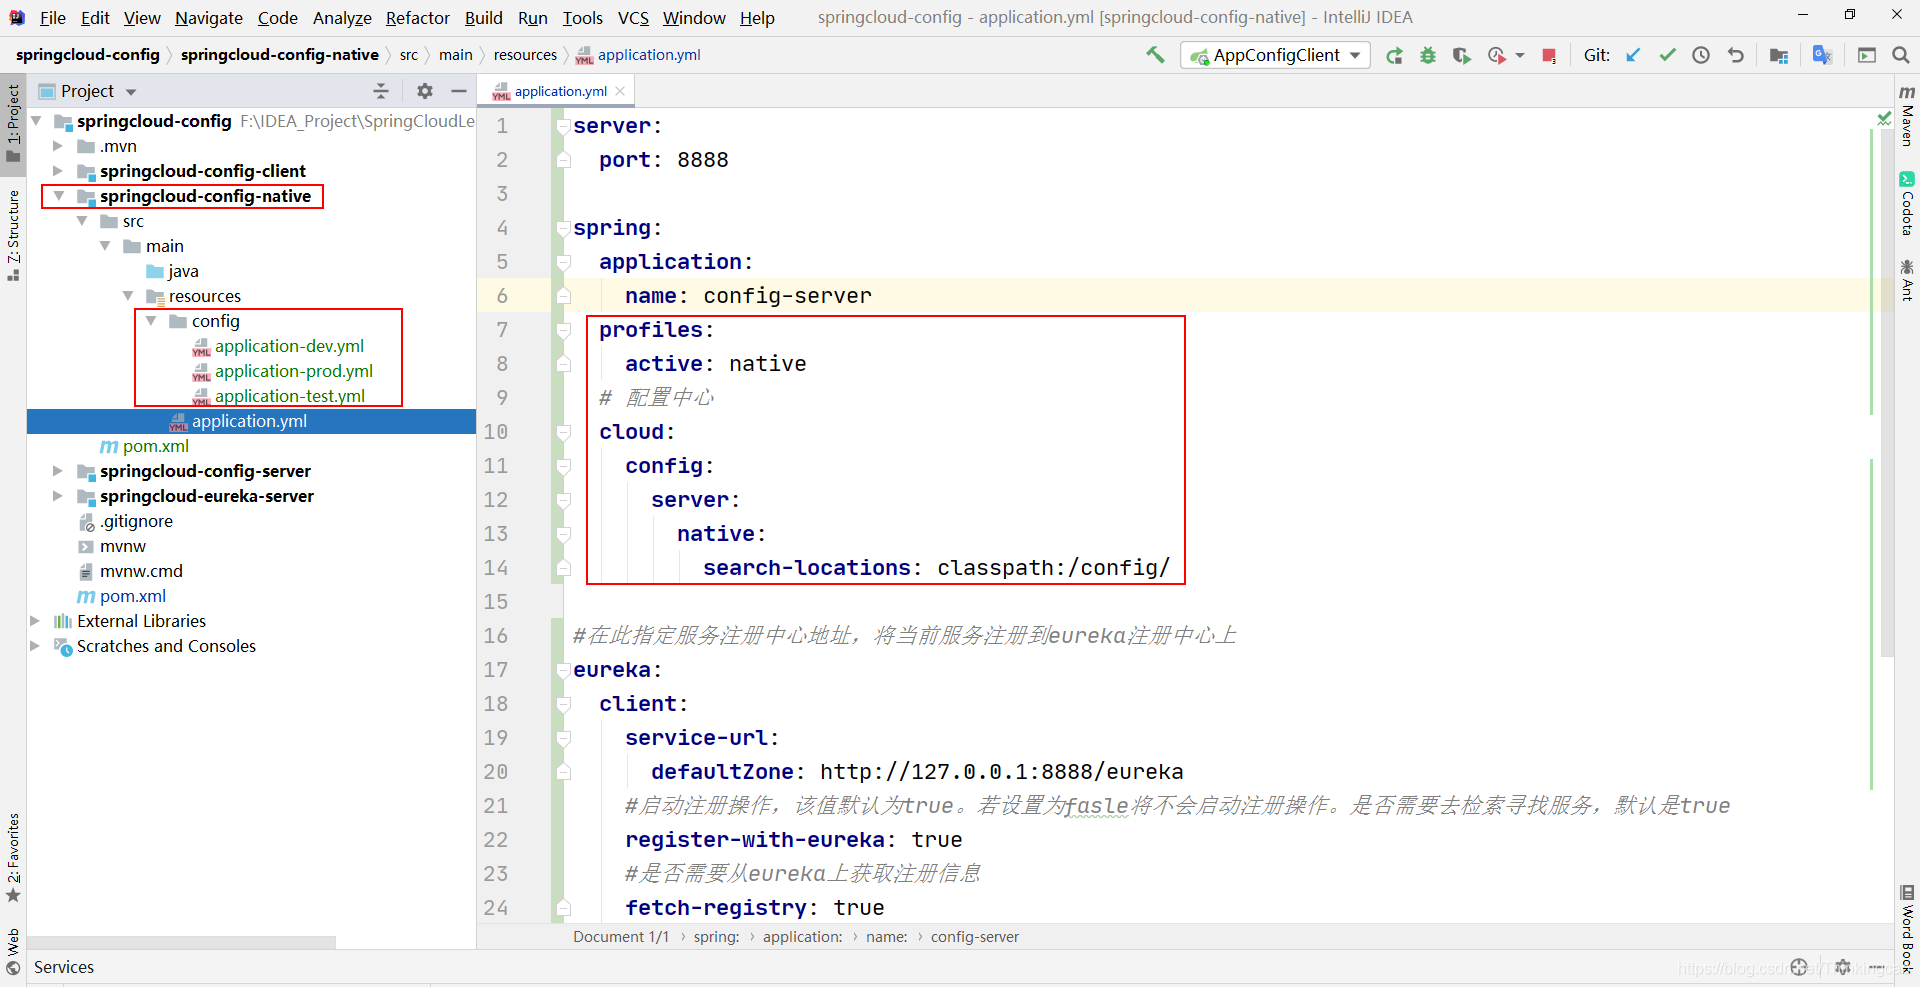
之前也提到过spring cloud config配置中心支持从本地读取和从远程Git/SVN仓库读取这两种方式,如果想要使用spring cloud config读取本地文件,而不是读取远程Git仓库的配置文件信息,可以通过如下做法实现:
spring:
  application:
    name: config-server
  profiles:
    active: native
  # 配置中心
  cloud:
    config:
      server:
        native:
          search-locations: classpath:/config/
好了,言归正传,我们回到主题上,接下来继续开始搭建config-client端。
八、搭建config-client端
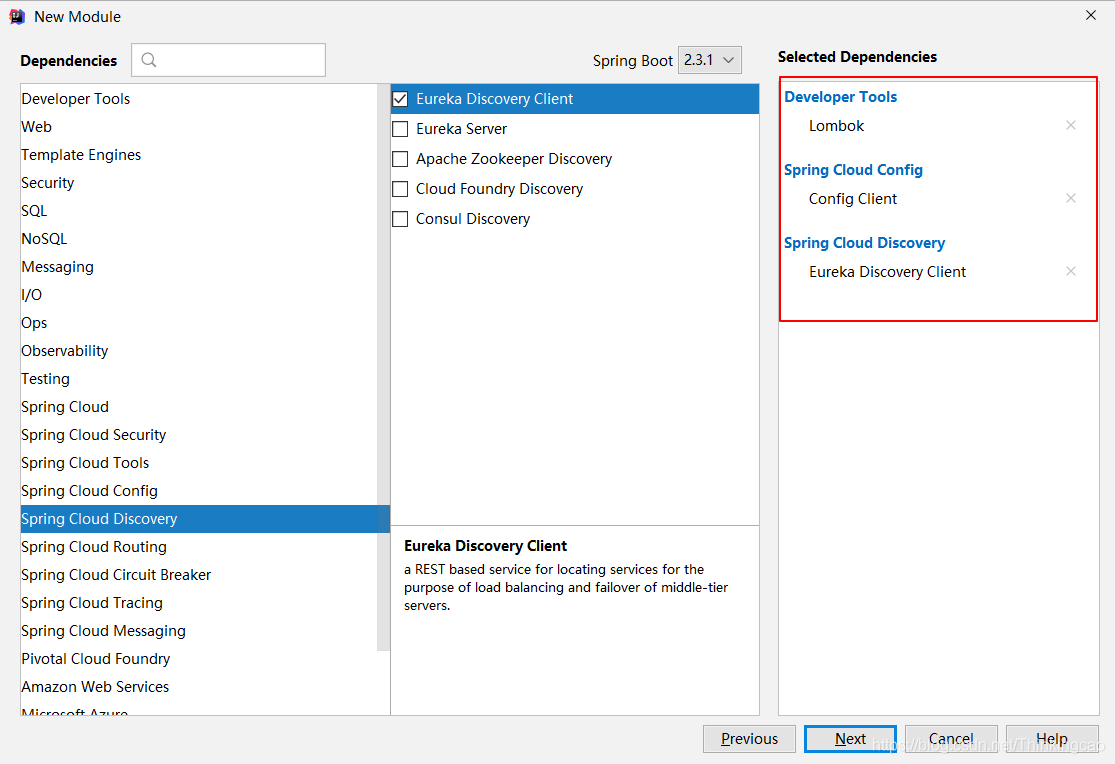
1. 创建项目,选择如下依赖
2. 依赖信息
<groupId>com.thinkingcao</groupId>
    <artifactId>springcloud-config-client</artifactId>
    <version>0.0.1-SNAPSHOT</version>
    <name>springcloud-config-client</name>
    <description>搭建SpringCloud Config端读取Git仓库配置文件信息</description>
    <!--SpringBoot依赖版本-->
    <parent>
        <groupId>org.springframework.boot</groupId>
        <artifactId>spring-boot-starter-parent</artifactId>
        <version>2.0.3.RELEASE</version>
        <relativePath/>
    </parent>

    <!--项目编码、jdk版本、SpringCloud版本定义-->
    <properties>
        <project.build.sourceEncoding>UTF-8</project.build.sourceEncoding>
        <project.reporting.outputEncoding>UTF-8</project.reporting.outputEncoding>
        <java.version>1.8</java.version>
        <spring-cloud.version>Finchley.RELEASE</spring-cloud.version>
    </properties>

    <!--声明管理SpringCloud版本依赖信息-->
    <dependencyManagement>
        <dependencies>
            <dependency>
                <groupId>org.springframework.cloud</groupId>
                <artifactId>spring-cloud-dependencies</artifactId>
                <version>${


   spring-cloud.version}</version>
                <type>pom</type>
                <scope>import</scope>
            </dependency>
        </dependencies>
    </dependencyManagement>

    <!--依赖信息-->
    <dependencies>
        <!-- SpringBoot整合Web组件 -->
        <dependency>
            <groupId>org.springframework.boot</groupId>
            <artifactId>spring-boot-starter-web</artifactId>
        </dependency>

        <!--SpringCloud整合config-client组件-->
        <dependency>
            <groupId>org.springframework.cloud</groupId>
            <artifactId>spring-cloud-starter-config</artifactId>
        </dependency>

        <!--SpringCloud整合-eureka-client组件-->
        <dependency>
            <groupId>org.springframework.cloud</groupId>
            <artifactId>spring-cloud-starter-netflix-eureka-client</artifactId>
        </dependency>

        <dependency>
            <groupId>org.springframework.boot</groupId>
            <artifactId>spring-boot-starter-actuator</artifactId>
        </dependency>

        <!--Lombok简化代码插件-->
        <dependency>
            <groupId>org.projectlombok</groupId>
            <artifactId>lombok</artifactId>
            <optional>true</optional>
        </dependency>
    </dependencies>
4. 配置config-client从config-server读取配置信息
坑点1:
客户端的spring.application.name配置config-clent端时要和Git服务器上面的文件名相对应的,如果你的客户端是其他名字就报错找不到参数,config-clent端服务会启动失败。我的Git上面配置文件是 order-dev.yml,所以在配置config-clent端时,spring.application.name必须要为order,我在这里说明一下,大家需要特别注意。
坑点2:
客户端加载到的配置文件的配置项会覆盖本项目已有配置,比如客户端你自己配置的端口是8881,但是如果读取到order-dev.yml这个配置文件中也有配置端口为8882,那么此时客户端访问的地址应该是8882。
#服务端口号
server:
  port: 8081
#定义服务名称(服务注册到eureka名称)
spring:
  application:
    name: order
  cloud:
    config:
      name: ${


   spring.application.name}
      profile: dev   #profile对应config server所获取的配置文件中的{profile}
      label: master  #指定Git仓库的分支,对应config server所获取的配置文件的{label}
      discovery:
        #标记以指示启用配置服务器发现(配置服务器URL将通过发现查找)
        enabled: true
        #读取config-server注册地址
        service-id: app-config-server
      #uri: http://127.0.0.1:8080/
#在此指定服务注册中心地址,将当前服务注册到eureka注册中心上
eureka:
  client:
    service-url:
      defaultZone: http://127.0.0.1:8888/eureka
    #启动注册操作,该值默认为true。若设置为fasle将不会启动注册操作。是否需要去检索寻找服务,默认是true
    register-with-eureka: true
    #是否需要从eureka上获取注册信息
    fetch-registry: true

management:
  endpoints:
    web:
      exposure:
        include: "*"
5. 启动类
import org.springframework.boot.SpringApplication;
import org.springframework.boot.autoconfigure.SpringBootApplication;

@SpringBootApplication
public class AppConfigClient {


    public static void main(String[] args) {


        SpringApplication.run(AppConfigClient.class, args);
    }
}
6. ConfigClient接口读取值
package com.thinkingcao.api;

import org.springframework.beans.factory.annotation.Value;
import org.springframework.cloud.context.config.annotation.RefreshScope;
import org.springframework.web.bind.annotation.RequestMapping;
import org.springframework.web.bind.annotation.RestController;

/**
 * @desc:
 * @author: cao_wencao
 * @date: 2020-06-19 13:29
 */
@RefreshScope
@RestController
public class ConfigClientController {


    //@Value("${port:没找到配置值,读默认值为80吧}")
    @Value("${blog.url:没找到配置值,读默认值为www.baidu.com吧}")
    private String url;

    @RequestMapping("/message")
    String getMessage() {


        return this.url;
    }
}
7. 测试config-client端获取配置文件值
访问URL: http://127.0.0.1:8081/message ,浏览器响应结果如下:
九、调用actuator/refresh接口更新config-client端值
- 浏览器发送一个post请求,http://127.0.0.1:8081/actuator/refresh
当Git远程仓库的配置文件内容发生改变的时候,config-server会同步更新最新的文件内容缓存到JVM内存中,同时也会更新持久化到硬盘上的那份文件的内容,但是有一个问题,就是config-client端无法动态感知到config-server服务JVM内存中内容的变化,为此,Spring Cloud Config提供了一个接口来刷新,通过调用/actuator/refresh接口+@RefreshScope注解, 来刷新config-client客户端JVM中的值。使其不需要重启服务即可发生改变。
这种操作看起来是可以解决问题,但是太过于繁琐,在分布式项目开发中,仍旧没有达到动态刷新的效果,但是Spring Cloud Config Bus消息总线为广大分布式开发者解决了这个问题,通过Spring Cloud Config Bus消息总线来实现动态刷新,无需人工干预。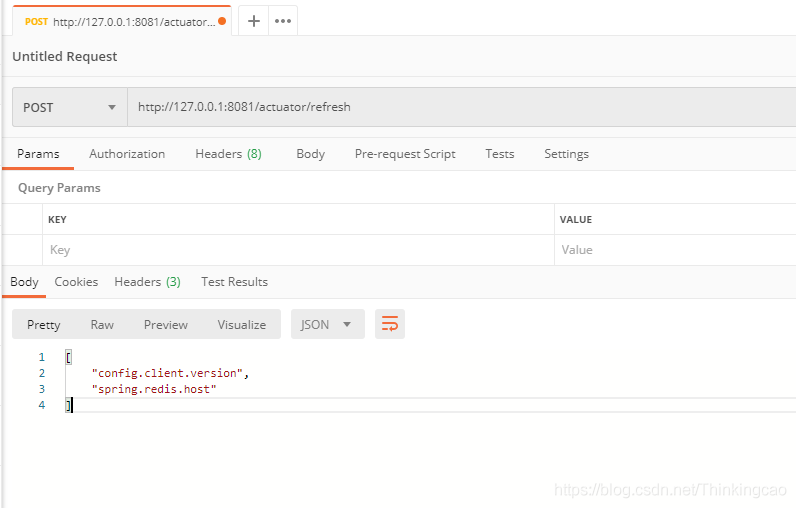
十、源码
源码: https://github.com/Thinkingcao/SpringCloudLearning/tree/master/springcloud-config
本文同步分享在 博客“Thinkingcao”(CSDN)。
如有侵权,请联系 support@oschina.cn 删除。
本文参与“OSC源创计划”,欢迎正在阅读的你也加入,一起分享。


