之前的文章样例中,认证数据都是定义在内存里。而在真实项目中,用户的基本信息以及角色等都存储在数据库中,因此需要从数据库中获取数据进行认证。本文通过样例进行演示。
三、基于数据库的用户角色配置
1、添加依赖、配置数据库
本次样例使用 MyBatis 来操作数据库,首先在项目中添加 MyBatis 相关依赖,并进行数据库连接配置。
(1)在pom文件添加依赖:
<!-- MyBatis依赖 -->
<dependency>
    <groupId>org.mybatis.spring.boot</groupId>
    <artifactId>mybatis-spring-boot-starter</artifactId>
    <version>1.3.2</version>
</dependency>

<!-- 数据库驱动依赖 -->
<dependency>
    <groupId>mysql</groupId>
    <artifactId>mysql-connector-java</artifactId>
</dependency>

<!-- 数据库连接池 -->
<dependency>
    <groupId>com.alibaba</groupId>
    <artifactId>druid</artifactId>
    <version>1.1.9</version>
</dependency>
- mybatis-spring-boot-starter:MyBatis 依赖
- mysql-connector-java:MySQL 数据库驱动
- druid:Druid 是阿里巴巴开发的号称为监控而生的数据库连接池,也是目前最好的数据库连接池。
(2)接着在 application.properties 中配置数据库连接信息:
spring.datasource.type=com.alibaba.druid.pool.DruidDataSource
spring.datasource.url=jdbc:mysql://localhost:3306/hangge?serverTimezone=Asia/Shanghai
spring.datasource.username=root
spring.datasource.password=hangge1234
2、创建数据表
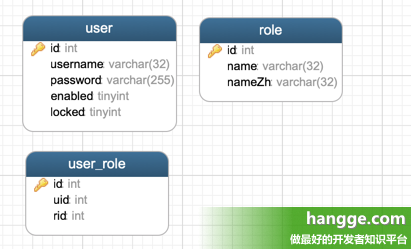
(1)首先创建相关的用户角色表,共三张:分别是用户表、角色表以及用户角色关联表。

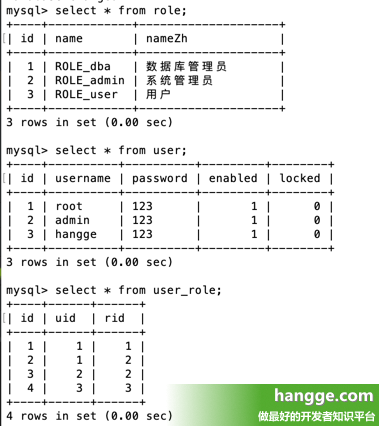
(2)然后在表中添加一些测试数据。注意:角色名需要有一个默认的前缀“ROLE_”

3、创建实体类
(1)首先创建一个角色表对应的实体类。
@Setter
@Getter
@NoArgsConstructor
public class Role {
    private Integer id;
    private String name;
    private String nameZh;
}
(2)接着创建用户表对应的实体类。用户实体类需要实现 UserDetails 接口,并实现该接口中的 7 个方法:
- getAuthorities():获取当前用户对象所具有的角色信息
- getPassword():获取当前用户对象的密码
- getUsername():获取当前用户对象的用户名
- isAccountNonExpired():当前账户是否未过期
- isAccountNonLocked():当前账户是否未锁定
- isCredentialsNonExpired():当前账户密码是否未过期
- isEnabled():当前账户是否可用
(1)用户根据实际情况设置这 7 个方法的返回值。默认情况下不需要开发者自己进行密码角色等信息的比对,开发者只需要提供相关信息即可,例如:
- getPassword() 方法返回的密码和用户输入的登录密码不匹配,会自动抛出 BadCredentialsException 异常
- isAccountNonLocked() 方法返回了 false,会自动抛出 AccountExpiredException 异常。
- 本案例因为数据库中只有 enabled 和 locked 字段,故账户未过期和密码未过期两个方法都返回 true.
(2)getAuthorities 方法用来获取当前用户所具有的角色信息,本案例中,用户所具有的角色存储在 roles 属性中,因此该方法直接遍历 roles 属性,然后构造 SimpleGrantedAuthority 集合并返回。
@NoArgsConstructor
public class User implements UserDetails {
    private Integer id;
    private String username;
    private String password;
    private Boolean enabled;
    private Boolean locked;
    private List<Role> roles;

    @Override
    public Collection<? extends GrantedAuthority> getAuthorities() {
        List<SimpleGrantedAuthority> authorities = new ArrayList<>();
        for (Role role : roles) {
            authorities.add(new SimpleGrantedAuthority(role.getName()));
        }
        return authorities;
    }

    @Override
    public String getPassword() {
        return password;
    }

    @Override
    public String getUsername() {
        return username;
    }

    @Override
    public boolean isAccountNonExpired() {
        return true;
    }

    @Override
    public boolean isAccountNonLocked() {
        return !locked;
    }

    @Override
    public boolean isCredentialsNonExpired() {
        return true;
    }

    @Override
    public boolean isEnabled() {
        return enabled;
    }

    /** get、set 方法 **/

    public Integer getId() {
        return id;
    }

    public void setId(Integer id) {
        this.id = id;
    }

    public void setUsername(String username) {
        this.username = username;
    }

    public void setPassword(String password) {
        this.password = password;
    }

    public void setEnabled(Boolean enabled) {
        this.enabled = enabled;
    }

    public Boolean getLocked() {
        return locked;
    }

    public void setLocked(Boolean locked) {
        this.locked = locked;
    }

    public List<Role> getRoles() {
        return roles;
    }

    public void setRoles(List<Role> roles) {
        this.roles = roles;
    }
}
4、创建数据库访问层
(1)首先创建 UserMapper 接口:
@Mapper
public interface UserMapper {
    User loadUserByUsername(String username);
    List<Role> getUserRolesByUid(Integer id);
}
(2)接着在 UserMapper 相同的位置创建 UserMapper.xml 文件,内容如下:
<?xml version="1.0" encoding="UTF-8" ?>
<!DOCTYPE mapper
        PUBLIC "-//mybatis.org//DTD Mapper 3.0//EN"
        "http://mybatis.org/dtd/mybatis-3-mapper.dtd">
<mapper namespace="com.example.demo.mapper.UserMapper">
    <select id="loadUserByUsername" resultType="com.example.demo.bean.User">
        select * from user where username=#{username}
    </select>
    <select id="getUserRolesByUid" resultType="com.example.demo.bean.Role">
        select * from role r,user_role ur where r.id=ur.rid and ur.uid=#{id}
    </select>
</mapper>
(3)由于在 Maven 工程中,XML 配置文件建议写在 resources 目录下,但上面的 UserMapper.xml 文件写在包下,Maven 在运行时会忽略包下的 XML 文件。因此需要在 pom.xml 文件中重新指明资源文件位置,配置如下:
<build>
    <plugins>
        <plugin>
            <groupId>org.springframework.boot</groupId>
            <artifactId>spring-boot-maven-plugin</artifactId>
        </plugin>
    </plugins>
    <!-- 重新指明资源文件位置 -->
    <resources>
        <resource>
            <directory>src/main/java</directory>
            <includes>
                <include>**/*.xml</include>
            </includes>
        </resource>
        <resource>
            <directory>src/main/resources</directory>
        </resource>
    </resources>
</build>
5、创建 UserService
定义的 UserService 实现 UserDetailsService 接口,并实现该接口中的 loadUserByUsername 方法,该方法将在用户登录时自动调用。
loadUserByUsername 方法的参数就是用户登录时输入的用户名,通过用户名去数据库中查找用户:
- 如果没有查找到用户,就抛出一个账户不存在的异常。
- 如果查找到了用户,就继续查找该用户所具有的角色信息,并将获取到的 user 对象返回,再由系统提供的 DaoAuthenticationProvider 类去比对密码是否正确。
@Service
public class UserService implements UserDetailsService {
    @Autowired
    UserMapper userMapper;

    @Override
    public UserDetails loadUserByUsername(String username) throws UsernameNotFoundException {
        User user = userMapper.loadUserByUsername(username);
        if (user == null) {
            throw new UsernameNotFoundException("账户不存在!");
        }
        user.setRoles(userMapper.getUserRolesByUid(user.getId()));
        return user;
    }
}
6、配置 Spring Security
Spring Security 大部分配置与前文一样,只不过这次没有配置内存用户,而是将刚刚创建好的 UserService 配置到 AuthenticationManagerBuilder 中。
@Configuration
public class MyWebSecurityConfig extends WebSecurityConfigurerAdapter {
    @Autowired
    UserService userService;

    // 指定密码的加密方式
    @SuppressWarnings("deprecation")
    @Bean
    PasswordEncoder passwordEncoder(){
        // 不对密码进行加密
        return NoOpPasswordEncoder.getInstance();
    }

    // 配置用户及其对应的角色
    @Override
    protected void configure(AuthenticationManagerBuilder auth) throws Exception {
        auth.userDetailsService(userService);
    }

    // 配置 URL 访问权限
    @Override
    protected  void configure(HttpSecurity http) throws Exception {
        http.authorizeRequests() // 开启 HttpSecurity 配置
            .antMatchers("/admin/**").hasRole("ADMIN") // admin/** 模式URL必须具备ADMIN角色
            .antMatchers("/user/**").access("hasAnyRole('ADMIN','USER')") // 该模式需要ADMIN或USER角色
            .antMatchers("/db/**").access("hasRole('ADMIN') and hasRole('DBA')") // 需ADMIN和DBA角色
            .anyRequest().authenticated() // 用户访问其它URL都必须认证后访问(登录后访问)
            .and().formLogin().loginProcessingUrl("/login").permitAll() // 开启表单登录并配置登录接口
            .and().csrf().disable(); // 关闭csrf
    }
}
7、运行测试
(1)首先在 Conctoller 中添加如下接口进行测试:
@RestController
public class HelloController {

    @GetMapping("/admin/hello")
    public String admin() {
        return "hello admin";
    }

    @GetMapping("/user/hello")
    public String user() {
        return "hello user";
    }
    @GetMapping("/db/hello")
    public String db() {
        return "hello db";
    }

    @GetMapping("/hello")
    public String hello() {
        return "hello";
    }
}
(2)接下来测试一下,我们使用 admin 用户进行登录,由于该用户具有 ADMIN 和 USER 这两个角色,所以登录后可以访问 /hello、/admin/hello 以及 /user/hello 这三个接口。

(3)而由于 /db/hello 接口同时需要 ADMIN 和 DBA 角色,因此 admin 用户仍然无法访问。


