maven配置iText的jar,主要不是所有私服都有iText的jar,maven仓库没有的,可以去https://mvnrepository.com/artifact/com.itextpdf/itextpdf/5.5.12 这里下载
<!-- itextpdf -->
        <dependency>
            <groupId>com.itextpdf</groupId>
            <artifactId>itextpdf</artifactId>
            <version>5.5.12</version>
        </dependency>
同样先写个工具类,这里是加文字水印和图片水印的
import java.io.BufferedOutputStream;
import java.io.File;
import java.io.FileOutputStream;
import java.io.IOException;
import java.text.SimpleDateFormat;
import java.util.Calendar;

import com.itextpdf.text.BaseColor;
import com.itextpdf.text.DocumentException;
import com.itextpdf.text.Element;
import com.itextpdf.text.Image;
import com.itextpdf.text.pdf.BaseFont;
import com.itextpdf.text.pdf.PdfContentByte;
import com.itextpdf.text.pdf.PdfGState;
import com.itextpdf.text.pdf.PdfReader;
import com.itextpdf.text.pdf.PdfStamper;


public class WaterMarkPDFUtils {

    public static void main(String[] args)throws IOException, DocumentException {
        // 要输出的pdf文件
        BufferedOutputStream bos = new BufferedOutputStream(new FileOutputStream(new File("C:/Users/admin/Desktop/target.pdf")));
        Calendar cal = Calendar.getInstance();
        SimpleDateFormat format = new SimpleDateFormat("yyyy-MM-dd hh:mm:ss");
        // 将pdf文件先加水印然后输出
        setWatermark(bos, "C:/Users/admin/Desktop/t1.pdf", format.format(cal.getTime()) + "  下载使用人:" + "测试user", 16);
    }

    /**
     *
     * @param bos输出文件的位置
     * @param filePath
     *            原PDF位置
     * @param waterMarkName
     *            页脚添加水印
     * @param permission
     *            权限码
     * @throws DocumentException
     * @throws IOException
     */
    public static void setWatermark(BufferedOutputStream bos, String filePath, String waterMarkName, int permission)
            throws  IOException, DocumentException {
        PdfReader reader = new PdfReader(filePath);
        PdfStamper stamper = new PdfStamper(reader, bos);
        int total = reader.getNumberOfPages() + 1;
        PdfContentByte waterMar;

        PdfGState gs = new PdfGState();
        long startTime = System.currentTimeMillis();
        System.out.println("PDF加图片水印>> start");
        for (int i = 1; i < total; i++) {
            //content = stamper.getOverContent(i);// 在内容上方加水印
            waterMar = stamper.getUnderContent(1);//在内容下方加水印
            // 设置图片透明度为0.2f
            gs.setFillOpacity(0.2f);
            // 设置笔触字体不透明度为0.4f
            gs.setStrokeOpacity(0.4f);
            // 开始水印处理
            waterMar.beginText();
            // 设置透明度
            waterMar.setGState(gs);
            // 设置水印字体参数及大小
             waterMar.setFontAndSize(BaseFont.createFont(BaseFont.HELVETICA, BaseFont.WINANSI, BaseFont.NOT_EMBEDDED), 60);
             // 设置水印对齐方式 水印内容 X坐标 Y坐标 旋转角度
             waterMar.showTextAligned(Element.ALIGN_CENTER, "公司内部文件,请注意保密!",  500, 430, 45);
             // 设置水印颜色
             waterMar.setColorFill(BaseColor.GRAY);
            // 创建水印图片
            Image image = Image.getInstance("C:/Users/admin/Desktop/icon.jpg");
            // 水印图片位置
            image.setAbsolutePosition(380, 720);
            // 边框固定
            image.scaleToFit(200, 200);
            // 设置旋转弧度
            //image.setRotation(30);// 旋转 弧度
             // 设置旋转角度
             //image.setRotationDegrees(45);// 旋转 角度
             // 设置等比缩放
             image.scalePercent(90);
             // 自定义大小
             image.scaleAbsolute(200,100);
             // 附件加上水印图片
             waterMar.addImage(image);
             // 完成水印添加
             waterMar.endText();
             // stroke
             waterMar.stroke();
        }
        long endTime = System.currentTimeMillis();
        System.out.println("PDF加图片水印>> ok 所用时间:[{}]"+(endTime-startTime)+"s");
        stamper.close();
        reader.close();
    }

}
PDF加上水印 
【拓展功能】 ok,这只是基本功能,然后要对其进行拓展
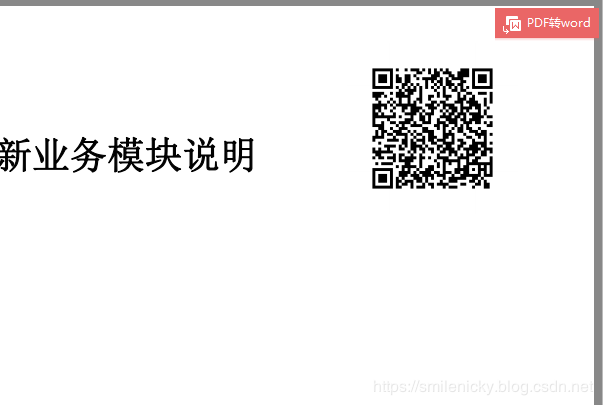
业务场景:要在上传的pdf文件自动加上二维码水印,用户可以扫描二维码获取对应数据
首先二维码里面其实也就是一些数据,比如一个链接,或者一堆文字等等,这里可以通过Google开源的zxing库来事项生成二维码图片,然后附加到图片,形成水印
maven配置zxing对应jar:
<!-- 条形码、二维码生成 -->
        <dependency>
            <groupId>com.google.zxing</groupId>
            <artifactId>core</artifactId>
            <version>2.2</version>
        </dependency>
        <dependency>
            <groupId>com.google.zxing</groupId>
            <artifactId>javase</artifactId>
            <version>2.2</version>
        </dependency>
写个工具类用于生成二维码图片:
import java.awt.image.BufferedImage;
import java.io.IOException;
import java.util.Hashtable;

import com.google.zxing.BarcodeFormat;
import com.google.zxing.EncodeHintType;
import com.google.zxing.MultiFormatWriter;
import com.google.zxing.WriterException;
import com.google.zxing.client.j2se.MatrixToImageWriter;
import com.google.zxing.common.BitMatrix;
import com.google.zxing.qrcode.decoder.ErrorCorrectionLevel;

/**
 * 二维码生成工具类
 */
public class QrCodeUtils {

    /**
     * 生成二维码
     * @author nicky.ma
     * @date   2019年6月11日下午4:39:16
     * @param contents 二维码的内容
     * @param width 二维码图片宽度
     * @param height 二维码图片高度
     */
    public static BufferedImage createQrCodeBufferdImage(String contents, int width, int height){
        Hashtable hints= new Hashtable();
        hints.put(EncodeHintType.CHARACTER_SET, "utf-8");
        BufferedImage image = null;
        try {
            BitMatrix bitMatrix = new MultiFormatWriter().encode(
                    contents,BarcodeFormat.QR_CODE, width, height, hints);
            image = toBufferedImage(bitMatrix);
        } catch (WriterException e) {
            e.printStackTrace();
        }
        return image;
    }

    public static BufferedImage toBufferedImage(BitMatrix matrix) {
        int width = matrix.getWidth();
        int height = matrix.getHeight();
        BufferedImage image = new BufferedImage(width, height, BufferedImage.TYPE_INT_RGB);
        for (int x = 0; x < width; x++) {
          for (int y = 0; y < height; y++) {
            image.setRGB(x, y, matrix.get(x, y) ? 0xFF000000 : 0xFFFFFFFF);
          }
        }
        return image;
    }
}


import java.awt.AlphaComposite;
import java.awt.Color;
import java.awt.Graphics2D;
import java.awt.Image;
import java.awt.RenderingHints;
import java.awt.image.BufferedImage;
import java.io.BufferedOutputStream;
import java.io.File;
import java.io.FileOutputStream;
import java.io.IOException;
import java.io.InputStream;
import java.io.OutputStream;
import java.text.SimpleDateFormat;
import java.util.Date;

import javax.imageio.ImageIO;
import javax.swing.ImageIcon;

import com.itextpdf.text.BadElementException;
import com.itextpdf.text.DocumentException;
import com.itextpdf.text.Rectangle;
import com.itextpdf.text.pdf.PdfContentByte;
import com.itextpdf.text.pdf.PdfGState;
import com.itextpdf.text.pdf.PdfReader;
import com.itextpdf.text.pdf.PdfStamper;
import com.itextpdf.text.pdf.PdfStructTreeController.returnType;
import com.itextpdf.text.pdf.parser.PdfImageObject.ImageBytesType;
import com.stuff.stuffmanage.model.CommonStuffModel;
/**
 *
 * <pre>
 *  进行水印处理. <br>
 * </pre>
 *
 * @author mazq
 * @date 2019/06/11
 */
public class WaterMarkUtils {

    //Logger LOG = LoggerFactory.getLogger(WaterMarkUtils.class);


    /**
     *  生成二维码
     * @author nicky.ma
     * @date   2019年6月12日下午2:15:51
     * @param commonStuffModel
     * @return
     */
    private static BufferedImage createQrCodeImg(CommonStuffModel commonStuffModel){
        StringBuffer strBuf = new StringBuffer();
        strBuf.append("材料入库时间:").append(new SimpleDateFormat("yyyy-MM-dd").format(new Date())).append("\n");
        strBuf.append("材料有效期:").append(commonStuffModel.getValidEndDateStr()).append("\n");
        strBuf.append("材料名称:").append(commonStuffModel.getStuffName()).append("\n");
        strBuf.append("材料目录:").append(commonStuffModel.getDirName()).append("\n");
        strBuf.append("材料版本:").append(commonStuffModel.getVersion()).append("\n");
        strBuf.append("出具单位:").append(commonStuffModel.getIssueUnit()).append("\n");
        // 生成二维码
        BufferedImage bufferedImage = QrCodeUtils.createQrCodeBufferdImage(strBuf.toString(), 175, 175);
        return bufferedImage;
    }

    /**
     * PDF附件添加二维码
     * @author nicky.ma
     * @date   2019年6月11日下午3:42:15
     * @param bos 输出文件的位置
     * @param input 输入文件流
     */
    public static void setQrCodeForPDF(BufferedOutputStream bos, InputStream input,
            CommonStuffModel commonStuffModel){
        BufferedImage bufferedImage = createQrCodeImg(apprCommonStuffModel);
        try {
            //PDF附件加上二维码水印
            setWatermarkForPDF(bos, input, bufferedImage);
        } catch (IOException e) {
            e.printStackTrace();
        } catch (DocumentException e) {
            e.printStackTrace();
        }
    }

    /**
     * 为PDF附件添加图片水印
     * @author nicky.ma
     * @date   2019/6/11 12:00:32
     * @param bos 输出文件的位置
     * @param input 输入文件流
     * @param image 水印图片
     */
    public static void setWatermarkForPDF(BufferedOutputStream bos, InputStream input, BufferedImage image)
            throws  IOException, DocumentException {
        PdfReader reader = new PdfReader(input);
        PdfStamper stamper = new PdfStamper(reader, bos);
        int total = reader.getNumberOfPages() + 1;
        PdfContentByte waterMar;

        PdfGState gs = new PdfGState();
        long startTime = System.currentTimeMillis();
        System.out.println("PDF加图片水印 start");
        for (int i = 1; i < total; i++) {
            //content = stamper.getOverContent(i);// 在内容上方加水印
            waterMar = stamper.getUnderContent(1);//在内容下方加水印
            // 设置图片透明度为0.2f
            //gs.setFillOpacity(0.2f);
            // 设置笔触字体不透明度为0.4f
            //gs.setStrokeOpacity(0.4f);
            // 开始水印处理
            waterMar.beginText();
            // 设置透明度
            waterMar.setGState(gs);
            // 设置水印字体参数及大小
             //waterMar.setFontAndSize(BaseFont.createFont(BaseFont.HELVETICA, BaseFont.WINANSI, BaseFont.NOT_EMBEDDED), 60);
             // 设置水印对齐方式 水印内容 X坐标 Y坐标 旋转角度
             //waterMar.showTextAligned(Element.ALIGN_CENTER, "公司内部文件,请注意保密!",  500, 430, 45);
             // 设置水印颜色
             //waterMar.setColorFill(BaseColor.GRAY);
            // 创建水印图片
            com.itextpdf.text.Image itextimage = getImage(image,99);
            // 水印图片位置
            itextimage.setAbsolutePosition(415, 745);
            // 边框固定
            itextimage.scaleToFit(200, 200);
            // 设置旋转弧度
            //image.setRotation(30);// 旋转 弧度
             // 设置旋转角度
             //image.setRotationDegrees(45);// 旋转 角度
             // 设置等比缩放
            //itextimage.scalePercent(90);
             // 自定义大小
            itextimage.scaleAbsolute(100,100);
             // 附件加上水印图片
             waterMar.addImage(itextimage);
             // 完成水印添加
             waterMar.endText();
             // stroke
             waterMar.stroke();
        }
        long endTime = System.currentTimeMillis();
        System.out.println("PDF加图片水印 ok 所用时间:"+(endTime-startTime)+"s");
        stamper.close();
        reader.close();
    }
}
对于上传的文件,我们怎么知道类型?如果用Spring提供的MultipartFile,这里可以获取ContentType来判断,这里只提供思路
    /**文件类型集合*/
    private static Map<String,String> FILE_TYPES =new HashMap<String,String>();


    static{
        FILE_TYPES.put("xlsx", "application/vnd.openxmlformats-officedocument.spreadsheetml.sheet");//xlsx
        FILE_TYPES.put("xls", "application/vnd.ms-excel");//xls
        FILE_TYPES.put("docx", "application/vnd.openxmlformats-officedocument.wordprocessingml.document");//docx
        FILE_TYPES.put("doc", "application/msword");//doc
        FILE_TYPES.put("jpg", "image/jpeg");//jpg
        FILE_TYPES.put("png", "image/png");//png
        FILE_TYPES.put("gif", "image/gif");//gif
        FILE_TYPES.put("bmp", "image/bmp");//bmp
        FILE_TYPES.put("txt", "text/plain");//txt
        FILE_TYPES.put("pdf", "application/pdf");//pdf
        FILE_TYPES.put("zip", "application/x-zip-compressed");//zip
        FILE_TYPES.put("rar", "application/octet-stream");//rar
    }
有了工具类之后,我们需要获取文件上传的inputStream
public void upload(MultipartFile myfiles,String url,String rootPath,CommonStuffModel commonStuffModel)throws Exception{

        if(!myfiles.isEmpty()){
            File localFile = new File(rootPath+url);
            File parentFile = localFile.getParentFile();
            if(!parentFile.exists()){
                parentFile.mkdirs();
            }

            String contentType = myfiles.getContentType();
         if (FILE_TYPES.get("pdf").equals(contentType)) {//上传了PDF附件
                    InputStream inputStream = myfiles.getInputStream();
                    BufferedOutputStream bos = new BufferedOutputStream(new FileOutputStream(localFile));
                    WaterMarkUtils.setQrCodeForPDF(bos, inputStream, commonStuffModel);
                }else{
                    myfiles.transferTo(localFile);
                }
        }
}
ok,然后对上传的PDF文件就可以加上二维码 


