##目录
- 1、同步,异步,阻塞,非阻塞的理解
- 2、什么是 BIO、NIO、AIO
- 3、java NIO 常用类和方法介绍
- 3.1. 缓冲区 Buffer
- 3.2. 通道 Channel
- 3.2.1 FileChannel
- 3.2.2 SocketChannel
- 3.2.3 ServerSocketChannel
- 3.3. 多路复用器(通道管理器)Selector
一、同步,异步,阻塞,非阻塞的理解
在介绍之前,我们先花点时间弄清楚几个基本的概念,同步,异步,阻塞,非阻塞。
编号
名词
解释
举例
1
同步
指的是用户进程触发IO操作并等待(阻塞)或者轮询(非阻塞)的去查看IO操作是否就绪
自己亲自出马持银行卡到银行取钱
2
异步
异步是指用户进程触发IO操作以后便开始做自己的事情,而当IO操作已经完成的时候会得到IO完成的通知(异步的特点就是通知)
委托一小弟拿银行卡到银行取钱,然后给你(使用异步IO时,Java将IO读写委托给OS处理,需要将数据缓冲区地址和大小传给OS(银行卡和密码),OS需要支持异步IO操作API)
3
阻塞
所谓阻塞方式的意思是指, 当试图对该文件描述符进行读写时, 如果当时没有东西可读,或者暂时不可写, 程序就进入等待状态, 直到有东西可读或者可写为止
ATM排队取款,你只能等待(使用阻塞IO时,Java调用会一直阻塞到读写完成才返回)
4
非阻塞
非阻塞状态下, 如果没有东西可读, 或者不可写, 读写函数马上返回, 而不会等待,
柜台取款,取个号,然后坐在椅子上做其它事,等号广播会通知你办理,没到号你就不能去,你可以不断问大堂经理排到了没有,大堂经理如果说还没到你就不能去(使用非阻塞IO时,如果不能读写Java调用会马上返回,当IO事件分发器会通知可读写时再继续进行读写,不断循环直到读写完成)
同步指的是用户进程触发IO操作并等待或者轮询的去查看IO操作是否就绪,而异步是指用户进程触发IO操作以后便开始做自己的事情,而当IO操作已经完成的时候会得到IO完成的通知。
阻塞和非阻塞是针对于进程在访问数据的时候,根据IO操作的就绪状态来采取的不同方式,说白了是一种读取或者写入操作函数的实现方式,阻塞方式下读取或者写入函数将一直等待,而非阻塞方式下,读取或者写入函数会立即返回一个状态值。
本质上来说,同步异步、阻塞非阻塞不是同一种概念,同步和异步是消息的通知机制的概念,阻塞非阻塞是指进程的状态 。
二、什么是 BIO、NIO、AIO
下面我们再来举个例子来理解组合方式的IO类型:
**举例一、**如果你想吃一份宫保鸡丁盖饭:
同步阻塞:你到饭馆点餐,然后在那等着,还要一边喊:好了没啊!
同步非阻塞:在饭馆点完餐,就去遛狗了。不过溜一会儿,就回饭馆喊一声:好了没啊!
异步阻塞:遛狗的时候,接到饭馆电话,说饭做好了,让您亲自去拿。
异步非阻塞:饭馆打电话说,我们知道您的位置,一会给你送过来,安心遛狗就可以了。
IO的方式通常分为几种,同步阻塞的BIO、同步非阻塞的NIO、异步非阻塞的AIO。
**举例二、**有一个经典的举例。烧开水。
假设有这么一个场景,有一排水壶(客户)在烧水。
AIO的做法是,每个水壶上装一个开关,当水开了以后会提醒对应的线程去处理。
NIO的做法是,叫一个线程不停的循环观察每一个水壶,根据每个水壶当前的状态去处理。
BIO的做法是,叫一个线程停留在一个水壶那,直到这个水壶烧开,才去处理下一个水壶。
可以看出AIO是最聪明省力,NIO相对省力,叫一个人就能看所有的壶,BIO最愚蠢,劳动力低下。
1. BIO同步阻塞IO
从程序上来说,就是当发起IO的读/写的操作时,均为阻塞方式,只有当读到了流或将流写入操作系统后,才会释放资源。
在这个模型中,用户级别的应用程序执行一个系统调用,这会导致应用程序阻塞。这意味着应用程序会一直阻塞,直到系统调用完成为止(数据传输完成或发生错误)。调用应用程序处于一种不再消费 CPU 而只是简单等待响应的状态。
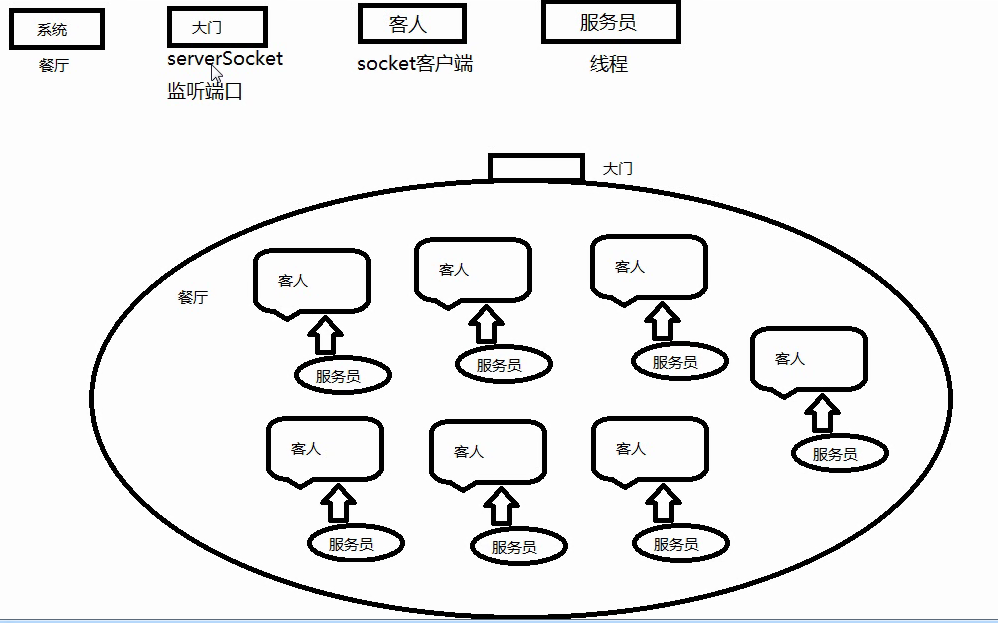
java BIO 服务器实现模式为一个连接一个线程,即客户端有连接请求时服务器端就需要启动一个线程进行处理,如果客户端出现延时等异常,线程可能会被占用很长时间。此时,如果客户端数量众多,可能会消耗大量的系统资源。
BIO方式适用于连接数目比较小且固定的架构,这种方式对服务器资源要求比较高,并发局限于应用中,但程序直观简单易理解。
示例代码
import java.io.IOException;
import java.io.InputStream;
import java.net.ServerSocket;
import java.net.Socket;
import java.util.concurrent.ExecutorService;
import java.util.concurrent.Executors;

/**
 * 传统socket服务端
 *
 */
public class OioServer {

    @SuppressWarnings("resource")
    public static void main(String[] args) throws Exception {

        ExecutorService newCachedThreadPool = Executors.newCachedThreadPool();
        // 创建socket服务,监听10101端口
        ServerSocket server = new ServerSocket(10101);
        System.out.println("服务器启动!");
        while (!Thread.currentThread().isInterrupted()) {
            // 获取一个套接字(阻塞)
            final Socket socket = server.accept();
            System.out.println("来个一个新客户端!");
            newCachedThreadPool.execute(new Runnable() {
                @Override
                public void run() {
                    // 业务处理
                    handler(socket);
                }
            });

        }
    }

    /**
     * 读取数据
     *
     * [@param](https://my.oschina.net/u/2303379) socket
     * [@throws](https://my.oschina.net/throws) Exception
     */
    public static void handler(Socket socket) {
        try {
            byte[] bytes = new byte[1024];
            InputStream inputStream = socket.getInputStream();

            while (!Thread.currentThread().isInterrupted() && !socket.isClosed()) {
                // 读取数据(阻塞)
                int read = inputStream.read(bytes);
                if (read != -1) {
                    System.out.println(new String(bytes, 0, read));
                } else {
                    break;
                }
            }
        } catch (Exception e) {
            e.printStackTrace();
        } finally {
            try {
                System.out.println("socket关闭");
                socket.close();
            } catch (IOException e) {
                e.printStackTrace();
            }
        }
    }
}
2. NIO同步非阻塞IO
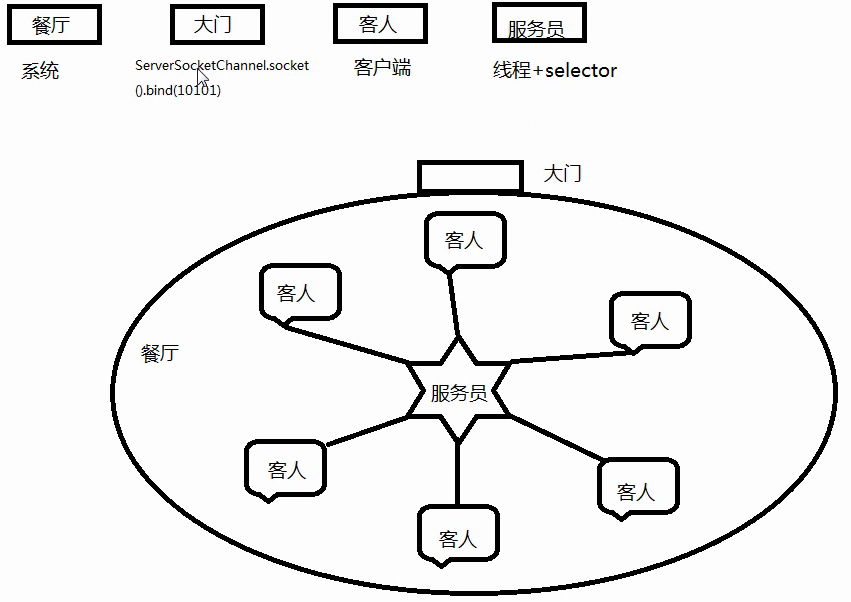
在此种方式下,用户进程发起一个IO操作以后便可返回做其它事情,但是用户进程需要时不时的询问IO操作是否就绪,这就要求用户进程不停的去询问,从而引入不必要的CPU资源浪费。其中目前JAVA的NIO就属于同步非阻塞IO。
NIO是基于事件驱动思想的,实现上通常采用Reactor模式,从程序角度而言,当发起IO的读或写操作时,是非阻塞的;当socket有流可读或可写入socket时,操作系统会相应的通知引用程序进行处理,应用再将流读取到缓冲区或写入操作系统。对于网络IO而言,主要有连接建立、流读取及流写入三种事件、linux2.6以后的版本使用epoll方式实现NIO。
select/epoll的好处就在于单个process就可以同时处理多个网络连接的IO。然而必须指出的是因为这里需要使用两个system call (select 和 recvfrom),而blocking IO只调用了一个system call (recvfrom),所以某些场景下性能可能还要更差一些。但是,用select/epoll的优势在于它可以同时处理多个connection。
NIO方式适用于连接数目多且连接比较短(轻操作)的架构,比如聊天服务器,并发局限于应用中,编程比较复杂。
演示代码:
服务端:
import java.io.IOException;
import java.net.InetSocketAddress;
import java.net.ServerSocket;
import java.nio.ByteBuffer;
import java.nio.channels.SelectionKey;
import java.nio.channels.Selector;
import java.nio.channels.ServerSocketChannel;
import java.nio.channels.SocketChannel;
import java.util.Iterator;
import java.util.Set;

public class NIOServer {

    /*标识数字*/
    private  int flag = 0;
    /*缓冲区大小*/
    private  int BLOCK = 4096;
    /*接受数据缓冲区*/
    private  ByteBuffer sendbuffer = ByteBuffer.allocate(BLOCK);
    /*发送数据缓冲区*/
    private  ByteBuffer receivebuffer = ByteBuffer.allocate(BLOCK);
    private  Selector selector;

    public NIOServer(int port) throws IOException {
        // 获得一个ServerSocket通道
        ServerSocketChannel serverSocketChannel = ServerSocketChannel.open();
        // 配置为非阻塞
        serverSocketChannel.configureBlocking(false);
        // 将该通道对应的ServerSocket绑定到port端口
        ServerSocket serverSocket = serverSocketChannel.socket();
        serverSocket.bind(new InetSocketAddress(port));
        // 获得一个通道管理器
        selector = Selector.open();
        // 将通道管理器和该通道绑定,并为该通道注册SelectionKey.OP_ACCEPT事件,注册该事件后,
        // 当该事件到达时,selector.select()会返回,如果该事件没到达selector.select()会一直阻塞。
        serverSocketChannel.register(selector, SelectionKey.OP_ACCEPT);
        System.out.println("Server Start----8888:");
    }


    // 监听
    private void listen() throws IOException {
        //采用轮询的方式监听selector上是否有需要处理的事件,如果有,则进行处理 。
        while (true) {
            // 当注册的事件到达时,方法返回;否则,该方法会一直阻塞
            selector.select();
            // 获得selector中选中项,项为注册的事件
            Set<SelectionKey> selectionKeys = selector.selectedKeys();
            Iterator<SelectionKey> iterator = selectionKeys.iterator();

            while (iterator.hasNext()) {
                SelectionKey selectionKey = iterator.next();
                //删除已选的key,以防重复处理
                iterator.remove();
                handleKey(selectionKey);
            }
        }
    }

    // 处理请求
    private void handleKey(SelectionKey selectionKey) throws IOException {
        // 接受请求
        ServerSocketChannel server = null;
        SocketChannel client = null;
        String receiveText;
        String sendText;
        int count=0;
        // 客户端请求连接事件
        if (selectionKey.isAcceptable()) {
            // 获得和客户端连接的通道
            server = (ServerSocketChannel) selectionKey.channel();
            client = server.accept();
            // 配置为非阻塞
            client.configureBlocking(false);
            // 在和客户端连接成功之后,为了可以接收到客户端的信息,需要给通道设置读的权限。
            client.register(selector, SelectionKey.OP_READ);
        } else if (selectionKey.isReadable()) {  // 获得了可读的事件
            // 服务器可读取消息:得到事件发生的Socket通道
            client = (SocketChannel) selectionKey.channel();
            //将缓冲区清空以备下次读取
            receivebuffer.clear();
            //读取服务器发送来的数据到缓冲区中
            count = client.read(receivebuffer);
            if (count > 0) {
                receiveText = new String( receivebuffer.array(),0,count);
                System.out.println("服务器端接受客户端数据--:"+receiveText);
                client.register(selector, SelectionKey.OP_WRITE);
            }
        } else if (selectionKey.isWritable()) {
            //将缓冲区清空以备下次写入
            sendbuffer.clear();
            // 服务器可写消息:得到事件发生的Socket通道
            client = (SocketChannel) selectionKey.channel();
            sendText="message from server--" + flag++;
            //向缓冲区中输入数据
            sendbuffer.put(sendText.getBytes());
             //将缓冲区各标志复位,因为向里面put了数据,标志被改变要想从中读取数据发向服务器,就要复位
            sendbuffer.flip();
            //输出到通道
            client.write(sendbuffer);
            System.out.println("服务器端向客户端发送数据--:"+sendText);
            client.register(selector, SelectionKey.OP_READ);
        }
    }

    /**
     * [@param](https://my.oschina.net/u/2303379) args
     * @throws IOException
     */
    public static void main(String[] args) throws IOException {
        // TODO Auto-generated method stub
        int port = 8888;
        NIOServer server = new NIOServer(port);
        server.listen();
    }
}
客户端
import java.io.IOException;
import java.net.InetSocketAddress;
import java.nio.ByteBuffer;
import java.nio.channels.SelectionKey;
import java.nio.channels.Selector;
import java.nio.channels.SocketChannel;
import java.util.Iterator;
import java.util.Set;

public class NIOClient {

    /*标识数字*/
    private static int flag = 0;
    /*缓冲区大小*/
    private static int BLOCK = 4096;
    /*接受数据缓冲区*/
    private static ByteBuffer sendbuffer = ByteBuffer.allocate(BLOCK);
    /*发送数据缓冲区*/
    private static ByteBuffer receivebuffer = ByteBuffer.allocate(BLOCK);
    /*服务器端地址*/
    private final static InetSocketAddress SERVER_ADDRESS = new InetSocketAddress(
            "localhost", 1111);

    public static void main(String[] args) throws IOException {
        // 打开socket通道
        SocketChannel socketChannel = SocketChannel.open();
        // 设置为非阻塞方式
        socketChannel.configureBlocking(false);
        // 打开选择器
        Selector selector = Selector.open();
        // 注册连接服务端socket动作
        socketChannel.register(selector, SelectionKey.OP_CONNECT);
        // 连接
        socketChannel.connect(SERVER_ADDRESS);
        // 分配缓冲区大小内存

        Set<SelectionKey> selectionKeys;
        Iterator<SelectionKey> iterator;
        SelectionKey selectionKey;
        SocketChannel client;
        String receiveText;
        String sendText;
        int count=0;

        while (true) {
            // 这个方法会一直阻塞到某个注册的通道有事件就绪
            selector.select();
            // 返回此选择器的已选择键集。
            selectionKeys = selector.selectedKeys();
            //System.out.println(selectionKeys.size());
            iterator = selectionKeys.iterator();
            while (iterator.hasNext()) {
                selectionKey = iterator.next();
                if (selectionKey.isConnectable()) {
                    System.out.println("client connect");
                    client = (SocketChannel) selectionKey.channel();
                    // 判断此通道上是否正在进行连接操作。
                    // 完成套接字通道的连接过程。
                    if (client.isConnectionPending()) {
                        client.finishConnect();
                        System.out.println("完成连接!");
                        sendbuffer.clear();
                        sendbuffer.put("Hello,Server".getBytes());
                        sendbuffer.flip();
                        client.write(sendbuffer);
                    }
                    client.register(selector, SelectionKey.OP_READ);
                } else if (selectionKey.isReadable()) {
                    client = (SocketChannel) selectionKey.channel();
                    //将缓冲区清空以备下次读取
                    receivebuffer.clear();
                    //读取服务器发送来的数据到缓冲区中
                    count=client.read(receivebuffer);
                    if(count>0){
                        receiveText = new String( receivebuffer.array(),0,count);
                        System.out.println("客户端接受服务器端数据--:"+receiveText);
                        client.register(selector, SelectionKey.OP_WRITE);
                    }

                } else if (selectionKey.isWritable()) {
                    sendbuffer.clear();
                    client = (SocketChannel) selectionKey.channel();
                    sendText = "message from client--" + (flag++);
                    sendbuffer.put(sendText.getBytes());
                     //将缓冲区各标志复位,因为向里面put了数据标志被改变要想从中读取数据发向服务器,就要复位
                    sendbuffer.flip();
                    client.write(sendbuffer);
                    System.out.println("客户端向服务器端发送数据--:"+sendText);
                    client.register(selector, SelectionKey.OP_READ);
                }
            }
            selectionKeys.clear();
        }
    }
}
3. AIO异步非阻塞
AIO为异步IO方式,此种方式下是指应用发起一个IO操作以后,不等待内核IO操作的完成,等内核完成IO操作以后会通知应用程序。
AIO同样基于事件驱动思想,实现上通常采用Proactor模式。从程序的角度而言,与NIO不同,当进行读写操作时,只须直接调用API的read或write方法即可。这两种方法均为异步的,对于读操作而言,当有流可读取时,操作系统会将可读的流传入read方法的缓冲区,并通知应用程序;对于写操作而言,当操作系统将write方法传递的流写入完毕时,操作系统主动通知应用程序。较之NIO而言,AIO一方面简化了程序的编写,流的读取和写入都由操作系统来代替完成;另一方面省去了NIO中程序要遍历事件通知队列(selector)的代价。
AIO方式使用于连接数目多且连接比较长(重操作)的架构,比如相册服务器,充分调用OS参与并发操作,编程比较复杂。
以上几种通信模型,广泛应用于各个通信框架中,jdk1.6及之前的版本都只实现BIO 和 NIO直到jdk1.7开始支持AIO,即NIO 2.0。因此目前很多Java项目都只停留在NIO,还没有使用AIO。
在AIO socket编程中,服务端通道是AsynchronousServerSocketChannel,这个类提供了一个open()静态工厂,一个bind()方法用于绑定服务端IP地址(还有端口号),另外还提供了accept()用于接收用户连接请求。在客户端使用的通道是AsynchronousSocketChannel,这个通道处理提供open静态工厂方法外,还提供了read和write方法。 在AIO编程中,发出一个事件(accept read write等)之后要指定事件处理类(回调函数),AIO中的事件处理类是CompletionHandler<V,A>,这个接口定义了如下两个方法,分别在异步操作成功和失败时被回调。
void completed(V result, A attachment);
void failed(Throwable exc, A attachment);
示例代码
服务端
import java.io.IOException;
import java.net.InetSocketAddress;
import java.nio.ByteBuffer;
import java.nio.channels.AsynchronousServerSocketChannel;
import java.nio.channels.AsynchronousSocketChannel;
import java.nio.channels.CompletionHandler;
import java.util.concurrent.ExecutionException;
import java.util.concurrent.Future;
import java.util.concurrent.TimeUnit;
import java.util.concurrent.TimeoutException;

public class AIOEchoServer {

    public final static int PORT = 8001;
    public final static String IP = "127.0.0.1";


    private AsynchronousServerSocketChannel server = null;

    public AIOEchoServer(){
        try {
            //同样是利用工厂方法产生一个通道,异步通道 AsynchronousServerSocketChannel
            server = AsynchronousServerSocketChannel.open().bind(new InetSocketAddress(IP,PORT));
        } catch (IOException e) {
            e.printStackTrace();
        }
    }

    //使用这个通道(server)来进行客户端的接收和处理
    public void start(){
        System.out.println("Server listen on "+PORT);

        //注册事件和事件完成后的处理器,这个CompletionHandler就是事件完成后的处理器
        server.accept(null,new CompletionHandler<AsynchronousSocketChannel,Object>(){

            final ByteBuffer buffer = ByteBuffer.allocate(1024);

            @Override
            public void completed(AsynchronousSocketChannel result,Object attachment) {

                System.out.println(Thread.currentThread().getName());
                Future<Integer> writeResult = null;

                try{
                    buffer.clear();
                    result.read(buffer).get(100,TimeUnit.SECONDS);

                    System.out.println("In server: "+ new String(buffer.array()));

                    //将数据写回客户端
                    buffer.flip();
                    writeResult = result.write(buffer);
                }catch(InterruptedException | ExecutionException | TimeoutException e){
                    e.printStackTrace();
                }finally{
                    server.accept(null,this);
                    try {
                        writeResult.get();
                        result.close();
                    } catch (InterruptedException | ExecutionException e) {
                        e.printStackTrace();
                    } catch (IOException e) {
                        e.printStackTrace();
                    }
                }

            }

            @Override
            public void failed(Throwable exc, Object attachment) {
                System.out.println("failed:"+exc);
            }

        });
    }

    public static void main(String[] args) {
        new AIOEchoServer().start();
        while(true){
            try {
                Thread.sleep(1000);
            } catch (InterruptedException e) {
                e.printStackTrace();
            }
        }
    }

}
客户端:
import java.io.IOException;
import java.net.InetSocketAddress;
import java.nio.ByteBuffer;
import java.nio.channels.AsynchronousSocketChannel;
import java.nio.channels.CompletionHandler;

public class AIOClient {

    public static void main(String[] args) throws IOException {

        final AsynchronousSocketChannel client = AsynchronousSocketChannel.open();

        InetSocketAddress serverAddress = new InetSocketAddress("127.0.0.1",8001);

        CompletionHandler<Void, ? super Object> handler = new CompletionHandler<Void,Object>(){

            @Override
            public void completed(Void result, Object attachment) {
                client.write(ByteBuffer.wrap("Hello".getBytes()),null,
                        new CompletionHandler<Integer,Object>(){

                            @Override
                            public void completed(Integer result,
                                    Object attachment) {
                                final ByteBuffer buffer = ByteBuffer.allocate(1024);
                                client.read(buffer,buffer,new CompletionHandler<Integer,ByteBuffer>(){

                                    @Override
                                    public void completed(Integer result,
                                            ByteBuffer attachment) {
                                        buffer.flip();
                                        System.out.println(new String(buffer.array()));
                                        try {
                                            client.close();
                                        } catch (IOException e) {
                                            e.printStackTrace();
                                        }
                                    }

                                    @Override
                                    public void failed(Throwable exc,
                                            ByteBuffer attachment) {
                                    }

                                });
                            }

                            @Override
                            public void failed(Throwable exc, Object attachment) {
                            }

                });
            }

            @Override
            public void failed(Throwable exc, Object attachment) {
            }

        };

        client.connect(serverAddress, null, handler);
        try {
            Thread.sleep(1000);
        } catch (InterruptedException e) {
            e.printStackTrace();
        }
    }

}
总结:
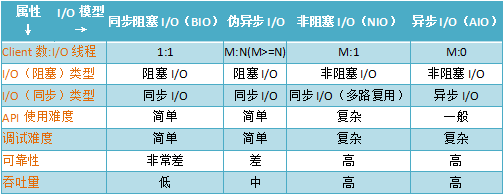
注:伪异步IO是指BIO+线程池的方式实现IO方式
##三、java NIO 常用类和方法介绍
1. 缓冲区 Buffer
Buffer是一个对象,包含一些要写入或者读出的数据。
在NIO库中,所有数据都是用缓冲区处理的。在读取数据时,它是直接读到缓冲区中的;在写入数据时,也是写入到缓冲区中。任何时候访问NIO中的数据,都是通过缓冲区进行操作。
缓冲区实际上是一个数组,并提供了对数据结构化访问以及维护读写位置等信息。
具体的缓存区有这些:ByteBuffe、CharBuffer、 ShortBuffer、IntBuffer、LongBuffer、FloatBuffer、DoubleBuffer。他们实现了相同的接口:Buffer。
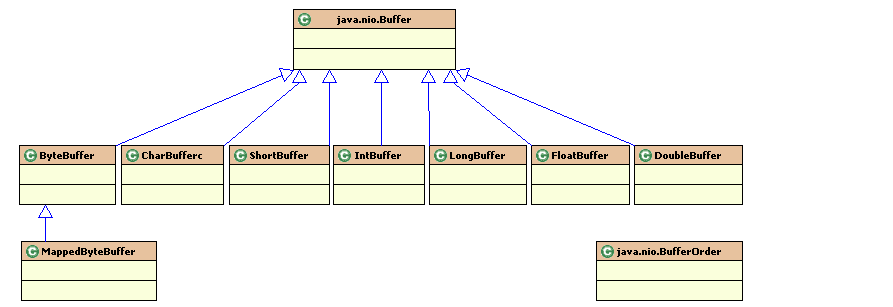
- Buffer 的基本用法
当向buffer写入数据时,buffer会记录下写了多少数据。一旦要读取数据,需要通过flip()方法将Buffer从写模式切换到读模式。在读模式下,可以读取之前写入到buffer的所有数据。 一旦读完了所有的数据,就需要清空缓冲区,让它可以再次被写入。有两种方式能清空缓冲区:调用clear()或compact()方法。clear()方法会清空整个缓冲区。compact()方法只会清除已经读过的数据。任何未读的数据都被移到缓冲区的起始处,新写入的数据将放到缓冲区未读数据的后面。
- Buffer 工作原理
如果想要理解Buffer的工作原理只需需要理解三个属性的含义就够了,capacity:内存容量,position:位置,limit:实际有效数据的位置
Buffer 重要的几个方法:
- allocate方法
要想获得一个Buffer对象首先要进行分配
//创建一个分配48字节capacity的ByteBuffer的对象
ByteBuffer buf = ByteBuffer.allocate(48);
- 向Buffer中写数据
写数据到Buffer有两种方式:
从Channel写到Buffer的例子
int bytesRead = inChannel.read(buf);
通过put方法写Buffer的例子:
buf.put(127);
- flip()方法
flip方法将Buffer从写模式切换到读模式。调用flip()方法会将position设回0,并将limit设置成之前position的值。
换句话说,position现在用于标记读的位置,limit表示之前写进了多少个byte、char等 —— 现在能读取多少个byte、char等。
- 从Buffer中读取数据
从Buffer中读取数据有两种方式:
从Buffer读取数据到Channel的例子:
int bytesWritten = inChannel.write(buf);
使用get()方法从Buffer中读取数据的例子
byte aByte = buf.get();
- rewind()方法
Buffer.rewind()将position设回0,所以你可以重读Buffer中的所有数据。limit保持不变,仍然表示能从Buffer中读取多少个元素(byte、char等)。
- clear()与compact()方法
一旦读完Buffer中的数据,需要让Buffer准备好再次被写入。可以通过clear()或compact()方法来完成。
如果调用的是clear()方法,position将被设回0,limit被设置成 capacity的值。换句话说,Buffer 被清空了。Buffer中的数据并未清除,只是这些标记告诉我们可以从哪里开始往Buffer里写数据。
如果Buffer中有一些未读的数据,调用clear()方法,数据将“被遗忘”,意味着不再有任何标记会告诉你哪些数据被读过,哪些还没有。
如果Buffer中仍有未读的数据,且后续还需要这些数据,但是此时想要先先写些数据,那么使用compact()方法。
compact()方法将所有未读的数据拷贝到Buffer起始处。然后将position设到最后一个未读元素正后面。limit属性依然像clear()方法一样,设置成capacity。现在Buffer准备好写数据了,但是不会覆盖未读的数据
- mark()与reset()方法
通过调用Buffer.mark()方法,可以标记Buffer中的一个特定position。之后可以通过调用Buffer.reset()方法恢复到这个position。例如:
buffer.mark();
//call buffer.get() a couple of times, e.g. during parsing.
buffer.reset();  //set position back to mark.
- equals()方法
当满足下列条件时,表示两个Buffer相等:
- 有相同的类型(byte、char、int等)。
- Buffer中剩余的byte、char等的个数相等。
- Buffer中所有剩余的byte、char等都相同。
equals不是每一个在它里面的元素都比较。实际上,它只比较Buffer中的剩余元素。
- compareTo()方法
compareTo()方法比较两个Buffer的剩余元素(byte、char等), 如果满足下列条件,则认为一个Buffer“小于”另一个Buffer:
- 第一个不相等的元素小于另一个Buffer中对应的元素 。
- 所有元素都相等,但第一个Buffer比另一个先耗尽(第一个Buffer的元素个数比另一个少)。
示例代码:
import java.nio.ByteBuffer;

public class ByteBuffer_flip_clear_Test {
    public static void main(String[] args) throws Exception {

        ByteBuffer b = ByteBuffer.allocate(15); // 15个字节大小的缓冲区
        System.out.println("1: limit=" + b.limit() + " capacity=" + b.capacity() + " position=" + b.position());

        for (int i = 0; i < 10; i++) {
            // 存入10个字节数据
            b.put((byte) i);
        }
        System.out.println("2: limit=" + b.limit() + " capacity=" + b.capacity() + " position=" + b.position());
        b.flip(); // 重置position
        System.out.println("3: limit=" + b.limit() + " capacity=" + b.capacity() + " position=" + b.position());

        for (int i = 0; i < 4; i++) {
            System.out.print(b.get());
        }
        System.out.println();
        System.out.println("4: limit=" + b.limit() + " capacity=" + b.capacity() + " position=" + b.position());
        b.flip();
        System.out.println("5: limit=" + b.limit() + " capacity=" + b.capacity() + " position=" + b.position());

        b.clear();
        System.out.println("6: limit=" + b.limit() + " capacity=" + b.capacity() + " position=" + b.position());
        for (int i = 0; i < 5; i++) {
            // 存入10个字节数据
            b.put((byte) i);
        }
        System.out.println("7: limit=" + b.limit() + " capacity=" + b.capacity() + " position=" + b.position());
    }
}
输出:
1: limit=15 capacity=15 position=0
2: limit=15 capacity=15 position=10
3: limit=10 capacity=15 position=0
0123
4: limit=10 capacity=15 position=4
5: limit=4 capacity=15 position=0
6: limit=15 capacity=15 position=0
7: limit=15 capacity=15 position=5
2. 通道 Channel
我们对数据的读取和写入要通过Channel,它就像水管一样,是一个通道。通道中的数据总是要先读到一个Buffer,或者总是要从一个Buffer中写入。
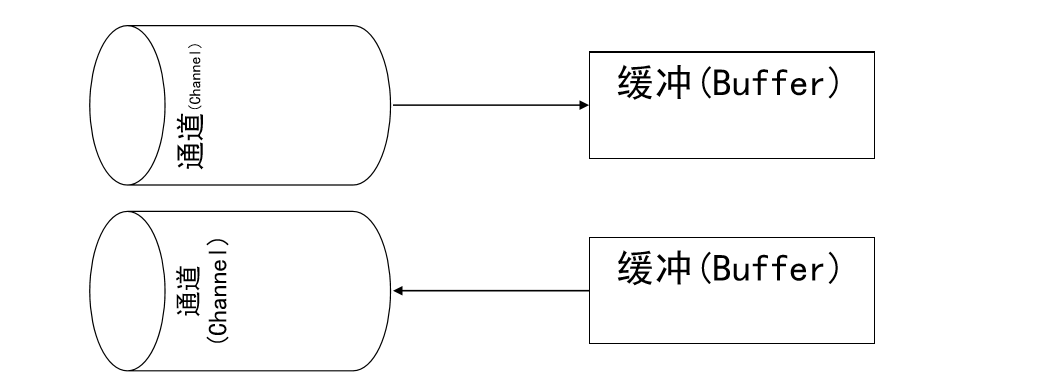
通道不同于流的地方就是通道是双向的,可以用于读、写和同时读写操作。
底层的操作系统的通道一般都是全双工的,所以全双工的Channel比流能更好的映射底层操作系统的API。
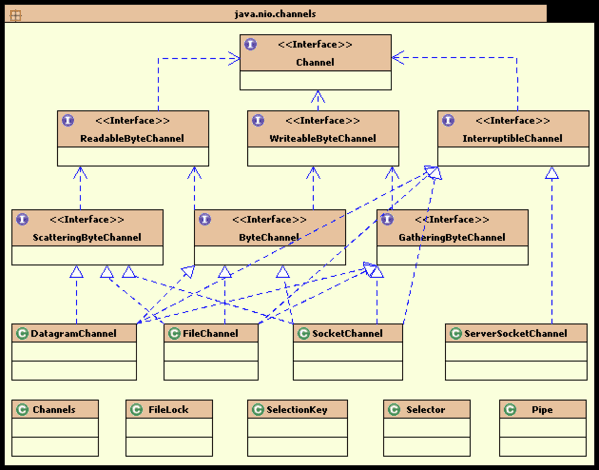
下面这些是Java NIO中最重要的通道的实现:
FileChannel 从文件中读写数据。
DatagramChannel 能通过UDP读写网络中的数据。
SocketChannel 能通过TCP读写网络中的数据。
ServerSocketChannel 可以监听新进来的TCP连接,像Web服务器那样。对每一个新进来的连接都会创建一个SocketChannel。
示例代码
public class ChannelTest {
    // 使用NIO 复制文件
    public static void main(String[] args) {
        String r = "F:/gigaspaces.ppt";
        String d = "F:/gigaspaces.ppt1";
        ChannelTest test = new ChannelTest();
        test.nioCopyFile(r, d);
    }

    public void nioCopyFile(String resource, String destination) {
        if (resource != null && destination != null) {
            FileInputStream in = null;
            FileOutputStream out = null;
            FileChannel inc = null;
            FileChannel outc = null;
            try {
                in = new FileInputStream(new File(resource));
                out = new FileOutputStream(new File(destination));
                // 通道
                inc = in.getChannel();
                outc = out.getChannel();
                // 由于通道channel 必须要和缓冲区Buffer 一起使用,所以定义buffer
                ByteBuffer buffer = ByteBuffer.allocate(1024*1024);// 定义容量
                // 将文件的信息读到缓冲区当中
                while (true) {
                    buffer.clear();// 清空缓冲区里面的内容
                    int len = inc.read(buffer);
                    if (len == -1) {
                        break;
                    }
                    System.err.println("打印每次读取的字节长度:" + len);
                    buffer.flip();// 用于做读写转换
                    outc.write(buffer);// 将缓冲区里面的内容写入到文件
                }
            } catch (IOException e) {
                e.printStackTrace();
            } finally {
                try {
                    in.close();
                    out.close();
                    inc.close();
                    outc.close();
                } catch (IOException e) {
                    e.printStackTrace();
                }
            }

        }
    }

}
输出
打印每次读取的字节长度:1048576
打印每次读取的字节长度:1048576
打印每次读取的字节长度:1048576
打印每次读取的字节长度:1048576
打印每次读取的字节长度:1048576
打印每次读取的字节长度:136704
- scatter/gather
可以从一个Channel中读取数据到多个Buffer中这种情况叫做分散(scatter),还可以由多个Buffer写入数据到一个Channel中,这种情况叫做聚集(gather)。
scatter/gather经常用于需要将传输的数据分开处理的场合,例如传输一个由消息头和消息体组成的消息,你可能会将消息体和消息头分散到不同的buffer中,这样你可以方便的处理消息头和消息体。
代码示例如下
ByteBuffer header = ByteBuffer.allocate(128);
ByteBuffer body   = ByteBuffer.allocate(1024);
ByteBuffer[] bufferArray = { header, body };
//scatter
channel.read(bufferArray);
//gather
//channel.write(bufferArray);
read()方法按照buffer在数组中的顺序将从channel中读取的数据写入到buffer,当一个buffer被写满后,channel紧接着向另一个buffer中写。
Scattering Reads在移动下一个buffer前,必须填满当前的buffer,这也意味着它不适用于动态消息(译者注:消息大小不固定)。换句话说,如果存在消息头和消息体,消息头必须完成填充(例如 128byte),Scattering Reads才能正常工作。
write()方法会按照buffer在数组中的顺序,将数据写入到channel,注意只有position和limit之间的数据才会被写入。因此,如果一个buffer的容量为128byte,但是仅仅包含58byte的数据,那么这58byte的数据将被写入到channel中。因此与Scattering Reads相反,Gathering Writes能较好的处理动态消息。
2.1 FileChannel
Java NIO中的FileChannel是一个连接到文件的通道。可以通过文件通道读写文件。
FileChannel无法设置为非阻塞模式,它总是运行在阻塞模式下。
- 打开FileChannel
在使用FileChannel之前,必须先打开它。需要通过使用一个InputStream、OutputStream或RandomAccessFile来获取一个FileChannel实例。下面是通过RandomAccessFile打开FileChannel的示例:
RandomAccessFile aFile = new RandomAccessFile("data/nio-data.txt", "rw");
FileChannel inChannel = aFile.getChannel();
- 从FileChannel读取数据
首先,分配一个Buffer。 然后,调用FileChannel.read()方法。该方法将数据从FileChannel读取到Buffer中。
如下代码:
ByteBuffer buf = ByteBuffer.allocate(48);
int bytesRead = inChannel.read(buf);
read()方法返回的int值表示了有多少字节被读到了Buffer中。如果返回-1,表示到了文件末尾。
- 向FileChannel写数据
使用FileChannel.write()方法向FileChannel写数据,该方法的参数是一个Buffer。如:
String newData = "New String to write to file..." + System.currentTimeMillis();
ByteBuffer buf = ByteBuffer.allocate(48);
buf.clear();
buf.put(newData.getBytes());
buf.flip();
while(buf.hasRemaining()) {
    channel.write(buf);
}
注意FileChannel.write()是在while循环中调用的。因为无法保证write()方法一次能向FileChannel写入多少字节,因此需要重复调用write()方法,直到Buffer中已经没有尚未写入通道的字节。
- 关闭FileChannel
用完FileChannel后必须将其关闭。如:
channel.close();
- FileChannel的position方法
有时可能需要在FileChannel的某个特定位置进行数据的读/写操作。可以通过调用position()方法获取FileChannel的当前位置。
也可以通过调用position(long pos)方法设置FileChannel的当前位置。
long pos = channel.position();
channel.position(pos +123);
如果将位置设置在文件结束符之后,然后试图从文件通道中读取数据,读方法将返回-1 —— 文件结束标志。
如果将位置设置在文件结束符之后,然后向通道中写数据,文件将撑大到当前位置并写入数据。这可能导致“文件空洞”,磁盘上物理文件中写入的数据间有空隙。
- FileChannel的size方法
FileChannel实例的size()方法将返回该实例所关联文件的大小。如:
long fileSize = channel.size();
- FileChannel的truncate方法
可以使用FileChannel.truncate()方法截取一个文件。截取文件时,文件将中指定长度后面的部分将被删除。如:
channel.truncate(1024);
这个例子截取文件的前1024个字节。
- FileChannel的force方法
FileChannel.force()方法将通道里尚未写入磁盘的数据强制写到磁盘上。出于性能方面的考虑,操作系统会将数据缓存在内存中,所以无法保证写入到FileChannel里的数据一定会即时写到磁盘上。要保证这一点,需要调用force()方法。
force()方法有一个boolean类型的参数,指明是否同时将文件元数据(权限信息等)写到磁盘上。
下面的例子同时将文件数据和元数据强制写到磁盘上:
channel.force(true);
2.2 SocketChannel
Java NIO中的SocketChannel是一个连接到TCP网络套接字的通道。可以通过以下2种方式创建SocketChannel:
打开一个SocketChannel并连接到互联网上的某台服务器。
一个新连接到达ServerSocketChannel时,会创建一个SocketChannel。
打开 SocketChannel
下面是SocketChannel的打开方式:
SocketChannel socketChannel = SocketChannel.open();
socketChannel.connect(new InetSocketAddress("http://jenkov.com", 80));
- 关闭 SocketChannel
当用完SocketChannel之后调用SocketChannel.close()关闭SocketChannel:
socketChannel.close();
- 从 SocketChannel 读取数据
要从SocketChannel中读取数据,调用read()方法。以下是例子:
ByteBuffer buf = ByteBuffer.allocate(48);
int bytesRead = socketChannel.read(buf);
首先,分配一个Buffer。从SocketChannel读取到的数据将会放到这个Buffer中。
然后,调用SocketChannel.read()。该方法将数据从SocketChannel 读到Buffer中。read()方法返回的int值表示读了多少字节进Buffer里。如果返回的是-1,表示已经读到了流的末尾(连接关闭了)。
- 写入 SocketChannel
写数据到SocketChannel用的是SocketChannel.write()方法,该方法以一个Buffer作为参数。示例如下:
String newData = "New String to write to file..." + System.currentTimeMillis();
ByteBuffer buf = ByteBuffer.allocate(48);
buf.clear();
buf.put(newData.getBytes());
buf.flip();
while(buf.hasRemaining()) {
    channel.write(buf);
}
注意SocketChannel.write()方法的调用是在一个while循环中的。Write()方法无法保证能写多少字节到SocketChannel。所以,我们重复调用write()直到Buffer没有要写的字节为止。
- 非阻塞模式
可以设置 SocketChannel 为非阻塞模式(non-blocking mode).设置之后,就可以在异步模式下调用connect(), read() 和write()了。
如果SocketChannel在非阻塞模式下,此时调用connect(),该方法可能在连接建立之前就返回了。为了确定连接是否建立,可以调用finishConnect()的方法。像这样:
socketChannel.configureBlocking(false);
socketChannel.connect(new InetSocketAddress("http://jenkov.com", 80));

while(!socketChannel.finishConnect()){
    //wait, or do something else...
}
非阻塞模式下,write()方法在尚未写出任何内容时可能就返回了。所以需要在循环中调用write()。
非阻塞模式下,read()方法在尚未读取到任何数据时可能就返回了。所以需要关注它的int返回值,它会告诉你读取了多少字节。
非阻塞模式与选择器搭配会工作的更好,通过将一或多个SocketChannel注册到Selector,可以询问选择器哪个通道已经准备好了读取,写入等。
2.3 ServerSocketChannel
Java NIO中的 ServerSocketChannel 是一个可以监听新进来的TCP连接的通道, 就像标准IO中的ServerSocket一样。
- 打开 ServerSocketChannel
通过调用 ServerSocketChannel.open() 方法来打开ServerSocketChannel.如:
ServerSocketChannel serverSocketChannel = ServerSocketChannel.open();
- 关闭 ServerSocketChannel
通过调用ServerSocketChannel.close() 方法来关闭ServerSocketChannel. 如:
serverSocketChannel.close();
- 监听新进来的连接
通过 ServerSocketChannel.accept() 方法监听新进来的连接。当 accept()方法返回的时候,它返回一个包含新进来的连接的 SocketChannel。因此, accept()方法会一直阻塞到有新连接到达。
通常不会仅仅只监听一个连接,在while循环中调用 accept()方法. 如下面的例子:
while(true){
    SocketChannel socketChannel =serverSocketChannel.accept();
    //do something with socketChannel...
}
当然,也可以在while循环中使用除了true以外的其它退出准则。
- 非阻塞模式
ServerSocketChannel可以设置成非阻塞模式。在非阻塞模式下,accept() 方法会立刻返回,如果还没有新进来的连接,返回的将是null。因此,需要检查返回的SocketChannel是否是null。如:
ServerSocketChannel serverSocketChannel = ServerSocketChannel.open();
serverSocketChannel.socket().bind(new InetSocketAddress(9999));
serverSocketChannel.configureBlocking(false);

while(true){
    SocketChannel socketChannel =serverSocketChannel.accept();
    if(socketChannel != null){
        //do something with socketChannel...
    }
}
3. 多路复用器(通道管理器)Selector
Selector是Java NIO 编程的基础。
Selector提供选择已经就绪的任务的能力:Selector会不断轮询注册在其上的Channel,如果某个Channel上面发生读或者写事件,这个Channel就处于就绪状态,会被Selector轮询出来,然后通过SelectionKey可以获取就绪Channel的集合,进行后续的I/O操作。
一个Selector可以同时轮询多个Channel,因为JDK使用了epoll()代替传统的select实现,所以没有最大连接句柄1024/2048的限制。所以,只需要一个线程负责Selector的轮询,就可以接入成千上万的客户端。
Selector的创建
通过调用Selector.open()方法创建一个Selector,如下:
Selector selector = Selector.open();
向Selector注册通道
为了将Channel和Selector配合使用,必须将channel注册到selector上。通过SelectableChannel.register()方法来实现,如下:
channel.configureBlocking(false);
SelectionKey key = channel.register(selector,Selectionkey.OP_READ);
与Selector一起使用时,Channel必须处于非阻塞模式下。这意味着不能将FileChannel与Selector一起使用,因为FileChannel不能切换到非阻塞模式。而套接字通道都可以。
注意register()方法的第二个参数。这是一个“interest集合”,意思是在通过Selector监听Channel时对什么事件感兴趣。可以监听四种不同类型的事件:
事件名
对应值
数值
服务端接收客户端连接事件
SelectionKey.OP_ACCEPT
16
客户端连接服务端事件
SelectionKey.OP_CONNECT
8
读事件
SelectionKey.OP_READ
1
写事件
SelectionKey.OP_WRITE
4
如果你对不止一种事件感兴趣,那么可以用“位或”操作符将常量连接起来,如下:
int interestSet = SelectionKey.OP_READ | SelectionKey.OP_WRITE
SelectionKey
当向Selector注册Channel时,register()方法会返回一个SelectionKey对象。这个对象包含了一些你感兴趣的属性:
- interest集合
- ready集合
- Channel
- Selector
- 附加的对象(可选)
下面我会描述这些属性。
- interest集合
就像向Selector注册通道一节中所描述的,interest集合是你所选择的感兴趣的事件集合。可以通过SelectionKey读写interest集合,像这样:
int interestSet = selectionKey.interestOps();
boolean isInterestedInAccept  = (interestSet & SelectionKey.OP_ACCEPT) == SelectionKey.OP_ACCEPT;
可以看到,用“位与”操作interest集合和给定的SelectionKey常量,可以确定某个确定的事件是否在interest集合中。
- ready集合
ready集合是通道已经准备就绪的操作的集合。在一次选择(Selection)之后,你会首先访问这个ready set。Selection将在下一小节进行解释。可以这样访问ready集合:
int readySet = selectionKey.readyOps(); 可以用像检测interest集合那样的方法,来检测channel中什么事件或操作已经就绪。但是,也可以使用以下四个方法,它们都会返回一个布尔类型:
selectionKey.isAcceptable();
selectionKey.isConnectable();
selectionKey.isReadable();
selectionKey.isWritable();
- Channel + Selector
从SelectionKey访问Channel和Selector很简单。如下:
Channel  channel  = selectionKey.channel();
Selector selector = selectionKey.selector();
- 附加的对象
可以将一个对象或者更多信息附着到SelectionKey上,这样就能方便的识别某个给定的通道。例如,可以附加与通道一起使用的Buffer,或是包含聚集数据的某个对象。使用方法如下:
selectionKey.attach(theObject);
Object attachedObj = selectionKey.attachment();
还可以在用register()方法向Selector注册Channel的时候附加对象。如:
SelectionKey key = channel.register(selector, SelectionKey.OP_READ, theObject);
- 通过Selector选择通道
一旦向Selector注册了一或多个通道,就可以调用几个重载的select()方法。这些方法返回你所感兴趣的事件(如连接、接受、读或写)已经准备就绪的那些通道。换句话说,如果你对“读就绪”的通道感兴趣,select()方法会返回读事件已经就绪的那些通道。
下面是select()方法:
- int select() - 阻塞到至少有一个通道在你注册的事件上就绪了。
- int select(long timeout) - 和select()一样,除了最长会阻塞timeout毫秒(参数)。
- int selectNow() - 不会阻塞,不管什么通道就绪都立刻返回(译者注:此方法执行非阻塞的选择操作。如果自从前一次选择操作后,没有通道变成可选择的,则此方法直接返回零)。
select()方法返回的int值表示有多少通道已经就绪。亦即,自上次调用select()方法后有多少通道变成就绪状态。
- selectedKeys()
一旦调用了select()方法,并且返回值表明有一个或更多个通道就绪了,然后可以通过调用selector的selectedKeys()方法,访问“已选择键集(selected key set)”中的就绪通道。如下所示:
Set selectedKeys = selector.selectedKeys();
当向Selector注册Channel时,Channel.register()方法会返回一个SelectionKey 对象。这个对象代表了注册到该Selector的通道。可以通过SelectionKey的selectedKeySet()方法访问这些对象。
可以遍历这个已选择的键集合来访问就绪的通道。如下:
Set selectedKeys = selector.selectedKeys();
Iterator keyIterator = selectedKeys.iterator();
while(keyIterator.hasNext()) {
    SelectionKey key = keyIterator.next();
    if(key.isAcceptable()) {
        // a connection was accepted by a ServerSocketChannel.
    } else if (key.isConnectable()) {
        // a connection was established with a remote server.
    } else if (key.isReadable()) {
        // a channel is ready for reading
    } else if (key.isWritable()) {
        // a channel is ready for writing
    }
    keyIterator.remove();
}
这个循环遍历已选择键集中的每个键,并检测各个键所对应的通道的就绪事件。
注意每次迭代末尾的keyIterator.remove()调用。Selector不会自己从已选择键集中移除SelectionKey实例。必须在处理完通道时自己移除。否则,下次该通道变成就绪时,Selector会再次将其放入已选择键集中。
SelectionKey.channel()方法返回的通道需要转型成你要处理的类型,如ServerSocketChannel或SocketChannel等。
- wakeUp()
某个线程调用select()方法后阻塞了,即使没有通道已经就绪,也有办法让其从select()方法返回。只要让其它线程在第一个线程调用select()方法的那个Selector对象上调用wakeup()方法即可。阻塞在select()方法上的线程会立马返回。
- close()
用完Selector后调用其close()方法会关闭该Selector,且使注册到该Selector上的所有SelectionKey实例无效。通道本身并不会关闭。
- 完整的示例
这里有一个完整的示例,打开一个Selector,注册一个通道注册到这个Selector上(通道的初始化过程略去),然后持续监控这个Selector的四种事件(接受,连接,读,写)是否就绪。
Selector selector = Selector.open();
channel.configureBlocking(false);
SelectionKey key = channel.register(selector, SelectionKey.OP_READ);
while(true) {
  int readyChannels = selector.select();
  if(readyChannels == 0) continue;
  Set selectedKeys = selector.selectedKeys();
  Iterator keyIterator = selectedKeys.iterator();
  while(keyIterator.hasNext()) {
    SelectionKey key = keyIterator.next();
    if(key.isAcceptable()) {
        // a connection was accepted by a ServerSocketChannel.
    } else if (key.isConnectable()) {
        // a connection was established with a remote server.
    } else if (key.isReadable()) {
        // a channel is ready for reading
    } else if (key.isWritable()) {
        // a channel is ready for writing
    }
    keyIterator.remove();
  }
}
本文章内容参考引用以下文章:
http://blog.csdn.net/vcould163/article/details/51314212
http://qindongliang.iteye.com/blog/2018539
https://my.oschina.net/hosee/blog/615269 http://blog.csdn.net/x_i_y_u_e/article/details/52223406
http://ifeve.com/overview/ http://tutorials.jenkov.com/java-nio/index.html http://www.ibm.com/developerworks/cn/education/java/j-nio/j-nio.html
http://www.2cto.com/kf/201605/513251.html
http://wiki.jikexueyuan.com/project/java-nio-zh/java-nio-non-blocking-server.html 非阻塞服务器设计


