SonarQube 是一个开源工具,可以进行自动代码审查,可帮助进行代码质量分析和报告。它会扫描您的源代码以查找潜在的错误,漏洞和可维护性问题,然后将结果显示在报告中,该报告将使您能够识别应用程序中的潜在问题。
一、下载最新版本的安装包
一般都直接上官网下载,打开官网链接 https://www.sonarqube.org/downloads/ 如下图所示:

可以看到 FREE & OPEN SOURCE ,然后点击下载按钮,跳到下载页面,显示 Thank you for downloading SonarQube Community Edition ,Copy 下载链接,在终端上直接下载即可,如下图所示:

二、准备安装配置
SonarQube 软件安装需要 java 环境,java 环境的配置在此就忽略默认都配置好了,直接安装下面需要的数据库环境,最新版本目前就只支持如下的3种数据库,如想使用 MySQL 数据库的,那只能下载旧的 7.7 版本或以前的 7.6、7.5 版本了。

我要安装最新版本,就选 PostgreSQL 数据库进行安装,在线直接命令行执行安装。
$ sudo apt-get -y install postgresql postgresql-contrib
[sudo] password for scm:
Reading package lists... Done
Building dependency tree
Reading state information... Done
The following additional packages will be installed:
libpq5 libsensors4 postgresql-10 postgresql-client-10 postgresql-client-common postgresql-common ssl-cert sysstat
Suggested packages:
lm-sensors postgresql-doc locales-all postgresql-doc-10 libjson-perl openssl-blacklist isag
The following NEW packages will be installed:
libpq5 libsensors4 postgresql postgresql-10 postgresql-client-10 postgresql-client-common postgresql-common postgresql-contrib ssl-cert
sysstat
0 upgraded, 10 newly installed, 0 to remove and 163 not upgraded.
Need to get 5,353 kB of archives.
After this operation, 21.1 MB of additional disk space will be used.
Get:1 http://archive.ubuntu.com/ubuntu bionic-updates/main amd64 libpq5 amd64 10.14-0ubuntu0.18.04.1 [107 kB]
Get:2 http://archive.ubuntu.com/ubuntu bionic/main amd64 libsensors4 amd64 1:3.4.0-4 [28.8 kB]
Get:3 http://archive.ubuntu.com/ubuntu bionic-updates/main amd64 postgresql-client-common all 190ubuntu0.1 [29.6 kB]
Get:4 http://archive.ubuntu.com/ubuntu bionic-updates/main amd64 postgresql-client-10 amd64 10.14-0ubuntu0.18.04.1 [941 kB]
Get:5 http://archive.ubuntu.com/ubuntu bionic/main amd64 ssl-cert all 1.0.39 [17.0 kB]
Get:6 http://archive.ubuntu.com/ubuntu bionic-updates/main amd64 postgresql-common all 190ubuntu0.1 [157 kB]
Get:6 http://archive.ubuntu.com/ubuntu bionic-updates/main amd64 postgresql-common all 190ubuntu0.1 [157 kB]
Get:7 http://archive.ubuntu.com/ubuntu bionic-updates/main amd64 postgresql-10 amd64 10.14-0ubuntu0.18.04.1 [3,766 kB]
Get:7 http://archive.ubuntu.com/ubuntu bionic-updates/main amd64 postgresql-10 amd64 10.14-0ubuntu0.18.04.1 [3,766 kB]
Get:8 http://archive.ubuntu.com/ubuntu bionic-updates/main amd64 postgresql all 10+190ubuntu0.1 [5,884 B]
Get:9 http://archive.ubuntu.com/ubuntu bionic-updates/main amd64 postgresql-contrib all 10+190ubuntu0.1 [5,896 B]
Get:10 http://archive.ubuntu.com/ubuntu bionic-updates/main amd64 sysstat amd64 11.6.1-1ubuntu0.1 [295 kB]
Fetched 5,130 kB in 6min 55s (12.4 kB/s)
Preconfiguring packages ...
Selecting previously unselected package libpq5:amd64.
(Reading database ... 67010 files and directories currently installed.)
Preparing to unpack .../0-libpq5_10.14-0ubuntu0.18.04.1_amd64.deb ...
Unpacking libpq5:amd64 (10.14-0ubuntu0.18.04.1) ...
Selecting previously unselected package libsensors4:amd64.
Preparing to unpack .../1-libsensors4_1%3a3.4.0-4_amd64.deb ...
Unpacking libsensors4:amd64 (1:3.4.0-4) ...
Selecting previously unselected package postgresql-client-common.
Preparing to unpack .../2-postgresql-client-common_190ubuntu0.1_all.deb ...
Unpacking postgresql-client-common (190ubuntu0.1) ...
Selecting previously unselected package postgresql-client-10.
Preparing to unpack .../3-postgresql-client-10_10.14-0ubuntu0.18.04.1_amd64.deb ...
Unpacking postgresql-client-10 (10.14-0ubuntu0.18.04.1) ...
Selecting previously unselected package ssl-cert.
Preparing to unpack .../4-ssl-cert_1.0.39_all.deb ...
Unpacking ssl-cert (1.0.39) ...
Selecting previously unselected package postgresql-common.
Preparing to unpack .../5-postgresql-common_190ubuntu0.1_all.deb ...
Adding 'diversion of /usr/bin/pg_config to /usr/bin/pg_config.libpq-dev by postgresql-common'
Unpacking postgresql-common (190ubuntu0.1) ...
Selecting previously unselected package postgresql-10.
Preparing to unpack .../6-postgresql-10_10.14-0ubuntu0.18.04.1_amd64.deb ...
Unpacking postgresql-10 (10.14-0ubuntu0.18.04.1) ...
Selecting previously unselected package postgresql.
Preparing to unpack .../7-postgresql_10+190ubuntu0.1_all.deb ...
Unpacking postgresql (10+190ubuntu0.1) ...
Selecting previously unselected package postgresql-contrib.
Preparing to unpack .../8-postgresql-contrib_10+190ubuntu0.1_all.deb ...
Unpacking postgresql-contrib (10+190ubuntu0.1) ...
Selecting previously unselected package sysstat.
Preparing to unpack .../9-sysstat_11.6.1-1ubuntu0.1_amd64.deb ...
Unpacking sysstat (11.6.1-1ubuntu0.1) ...
Processing triggers for ureadahead (0.100.0-21) ...
Setting up ssl-cert (1.0.39) ...
Setting up libpq5:amd64 (10.14-0ubuntu0.18.04.1) ...
Processing triggers for libc-bin (2.27-3ubuntu1) ...
Setting up postgresql-client-common (190ubuntu0.1) ...
Processing triggers for systemd (237-3ubuntu10.24) ...
Setting up postgresql-common (190ubuntu0.1) ...
Adding user postgres to group ssl-cert
Creating config file /etc/postgresql-common/createcluster.conf with new version
Building PostgreSQL dictionaries from installed myspell/hunspell packages...
Removing obsolete dictionary files:
Created symlink /etc/systemd/system/multi-user.target.wants/postgresql.service → /lib/systemd/system/postgresql.service.
Setting up libsensors4:amd64 (1:3.4.0-4) ...
Processing triggers for man-db (2.8.3-2ubuntu0.1) ...
Setting up postgresql-client-10 (10.14-0ubuntu0.18.04.1) ...
update-alternatives: using /usr/share/postgresql/10/man/man1/psql.1.gz to provide /usr/share/man/man1/psql.1.gz (psql.1.gz) in auto mode
Setting up sysstat (11.6.1-1ubuntu0.1) ...
Creating config file /etc/default/sysstat with new version
update-alternatives: using /usr/bin/sar.sysstat to provide /usr/bin/sar (sar) in auto mode
Created symlink /etc/systemd/system/multi-user.target.wants/sysstat.service → /lib/systemd/system/sysstat.service.
Setting up postgresql-10 (10.14-0ubuntu0.18.04.1) ...
Creating new PostgreSQL cluster 10/main ...
/usr/lib/postgresql/10/bin/initdb -D /var/lib/postgresql/10/main --auth-local peer --auth-host md5
The files belonging to this database system will be owned by user "postgres".
This user must also own the server process.
The database cluster will be initialized with locale "en_US.UTF-8".
The default database encoding has accordingly been set to "UTF8".
The default text search configuration will be set to "english".
Data page checksums are disabled.
fixing permissions on existing directory /var/lib/postgresql/10/main ... ok
creating subdirectories ... ok
selecting default max_connections ... 100
selecting default shared_buffers ... 128MB
selecting default timezone ... Etc/UTC
selecting dynamic shared memory implementation ... posix
creating configuration files ... ok
running bootstrap script ... ok
performing post-bootstrap initialization ... ok
syncing data to disk ... ok
Success. You can now start the database server using:
/usr/lib/postgresql/10/bin/pg_ctl -D /var/lib/postgresql/10/main -l logfile start
Ver Cluster Port Status Owner Data directory Log file
10 main 5432 down postgres /var/lib/postgresql/10/main /var/log/postgresql/postgresql-10-main.log
update-alternatives: using /usr/share/postgresql/10/man/man1/postmaster.1.gz to provide /usr/share/man/man1/postmaster.1.gz (postmaster.1.gz) in auto mode
Setting up postgresql (10+190ubuntu0.1) ...
Setting up postgresql-contrib (10+190ubuntu0.1) ...
Processing triggers for ureadahead (0.100.0-21) ...
Processing triggers for systemd (237-3ubuntu10.24) ...
Processing triggers for libc-bin (2.27-3ubuntu1) ...
如上的显示结果,就说明 PostgreSQL 数据库已安装完成,查看一下已安装的数据库版本信息。
~$ /usr/lib/postgresql/10/bin/ postgres -V
postgres (PostgreSQL) 10.14 (Ubuntu 10.14-0ubuntu0.18.04.1)
PostgreSQL 数据库安装完后会自动创建 postgres 用户,此时,也可以查看一下系统用户是否有 postgres 用户存在。
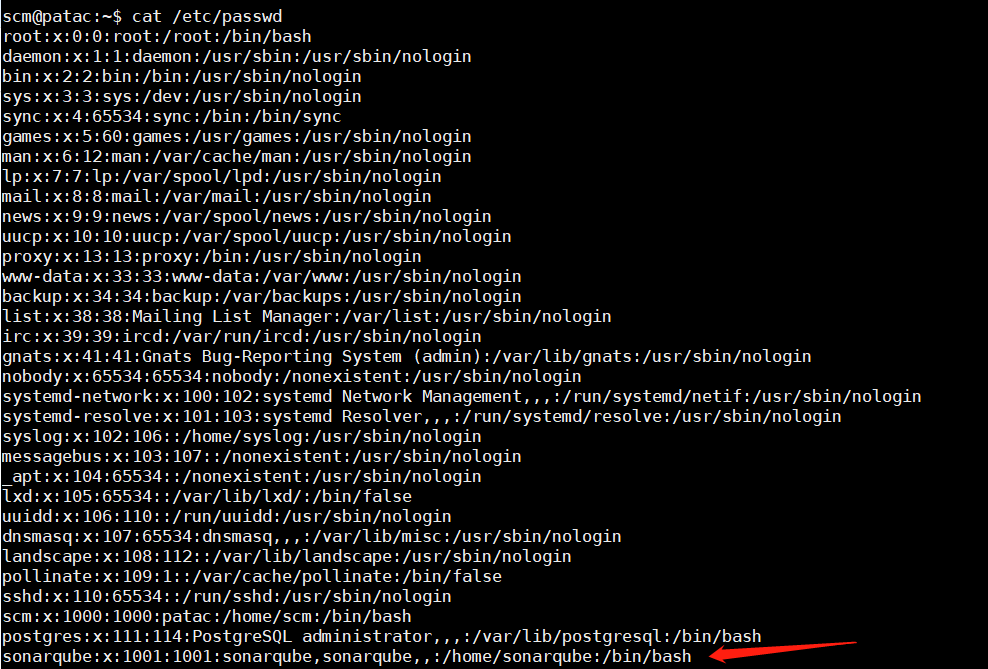
PostgreSQL 数据库顺利安装完成后,系统会自动启动服务,也可以查看一下启动状态。

数据库也正常启动运行,下面接着创建 SonarQube 系统所需要的数据库。
首先,登录 PostgreSQL 数据库,默认是没有设置登录密码的,可以直接登录进去。
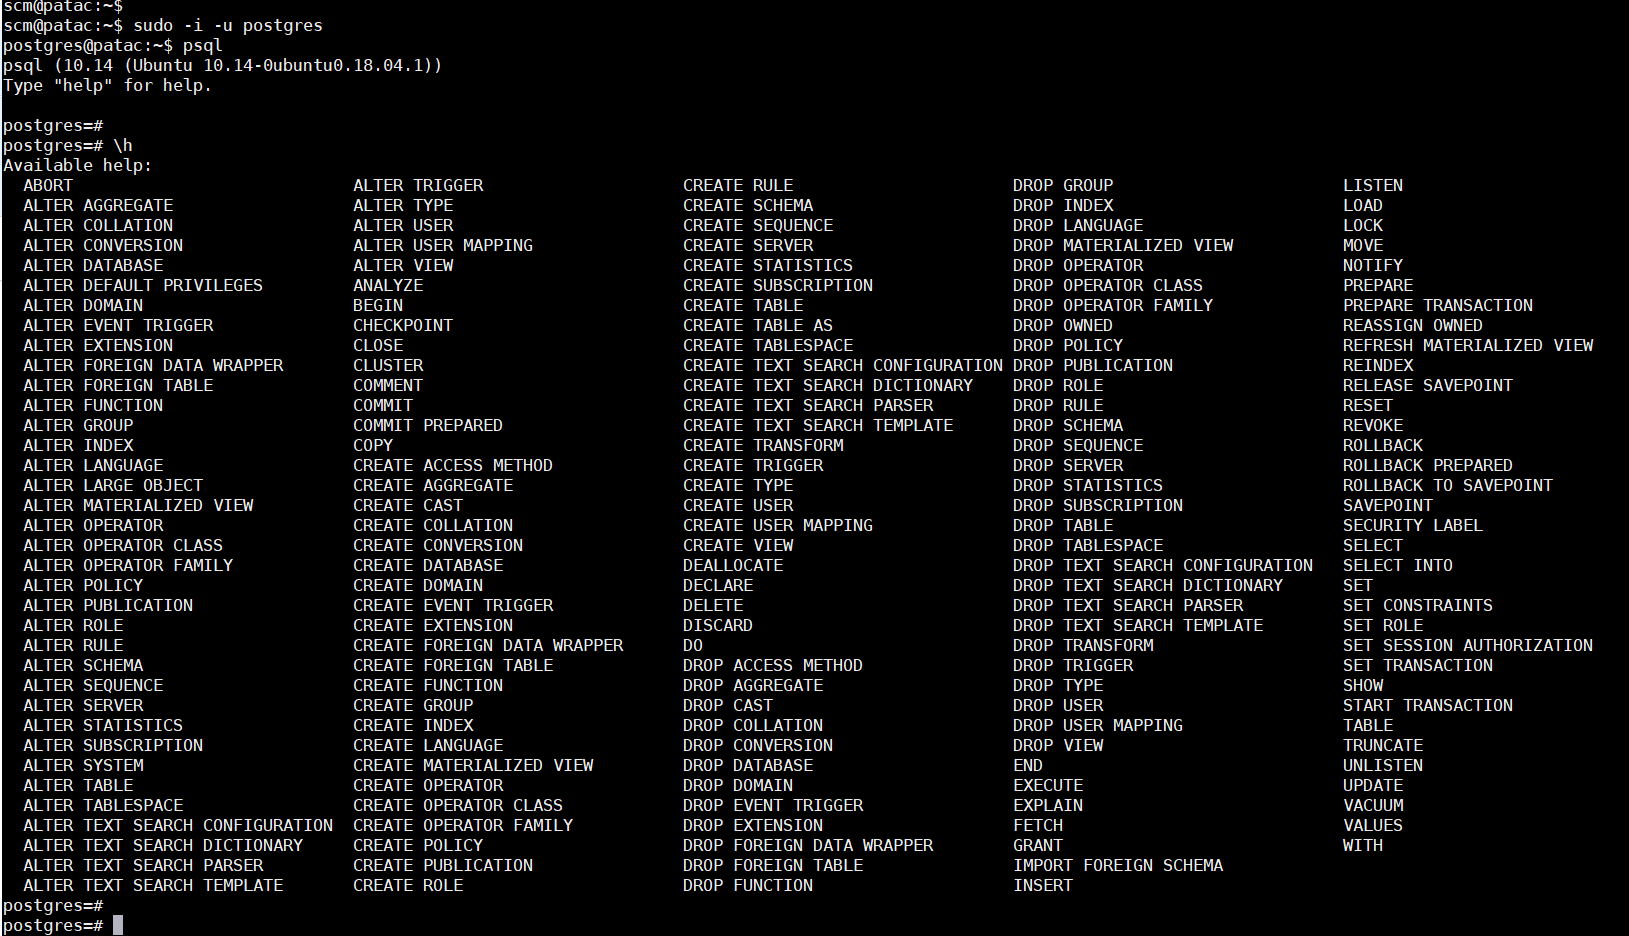
\h 查看帮助,可以列出很多指令来,需要的可以查看帮助说明。
开始创建 sonar 数据库
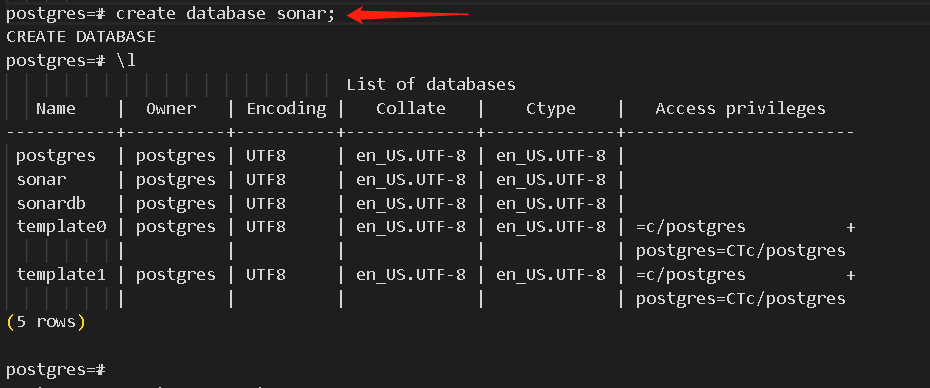
\l 查看一下创建的数据库,sonar 数据库已顺利创建好。
接着创建 sonar 用户

\du 查看创建的用户,也都顺利创建完成。
postgres=# alter database sonar owner to sonar; #更改 sonar 数据库拥有者 (这一步是必须的,否则会 sonarqube 会连接失败)
设置 sonar 用户密码 (否则会导致连不上数据库) 接着在执行3条指令,给 sonar 用户授权。
#给 sonar 用户授权
#给 sonar 用户授权
#给 sonar 用户授权

上面的步骤对 PostgreSQL 数据库配置也就完成了。
三、安装配置 SonarQube
解压安装包,放到自己喜欢的目录下,我的安装目录如下:
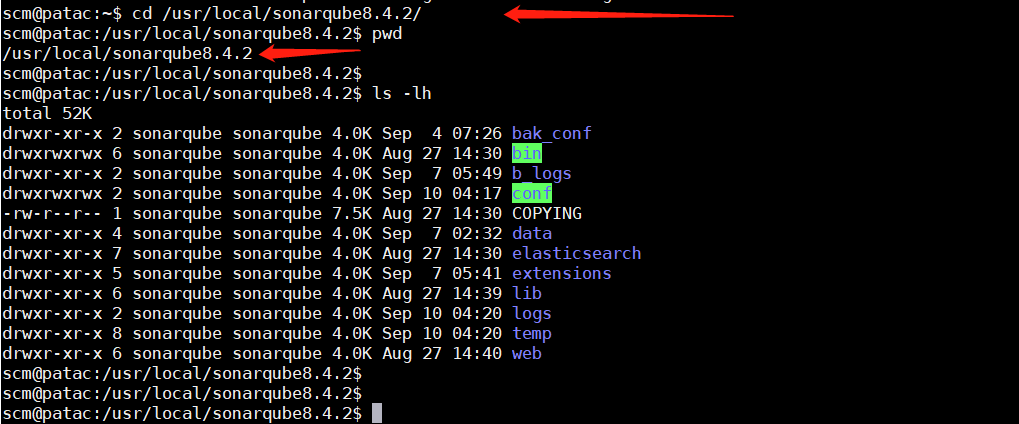
会修改系统配置文件,所以要先备份好原始配置文件,然后在去修改配置文件。
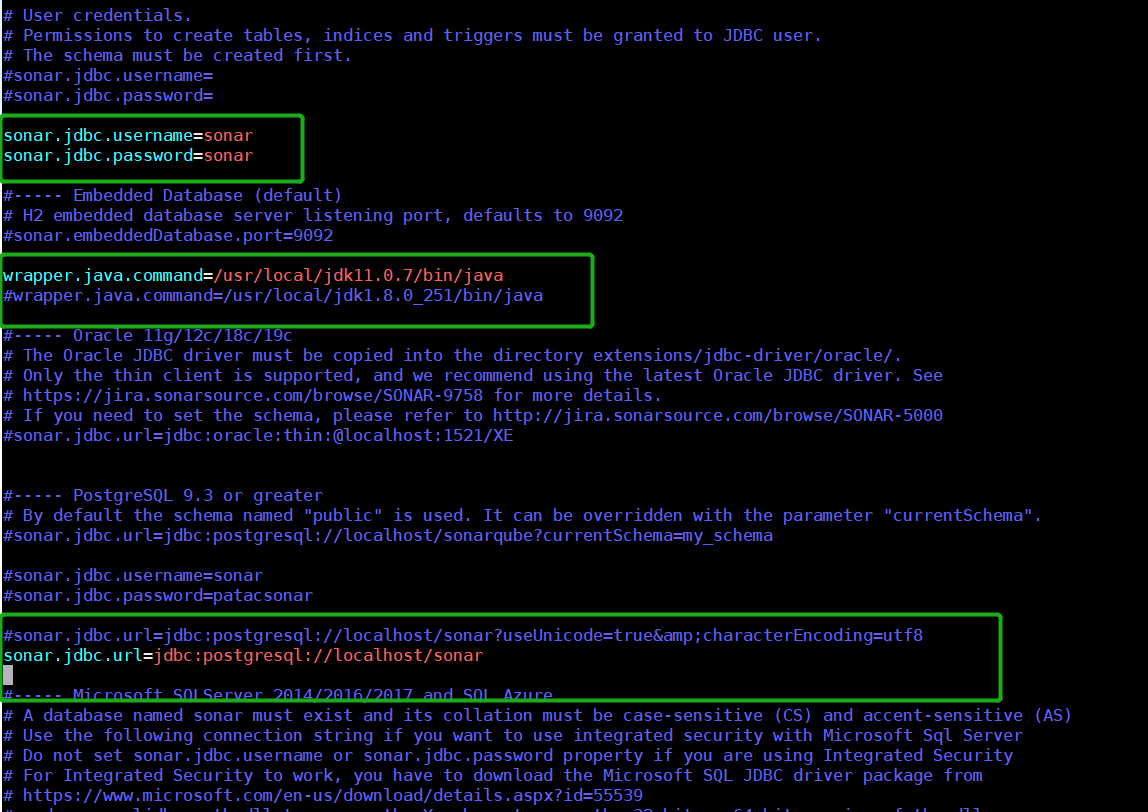
主要就是修改 sonar.properties 配置文件

修改如下绿框标识的几个地方
继续往下修改如下几个地方
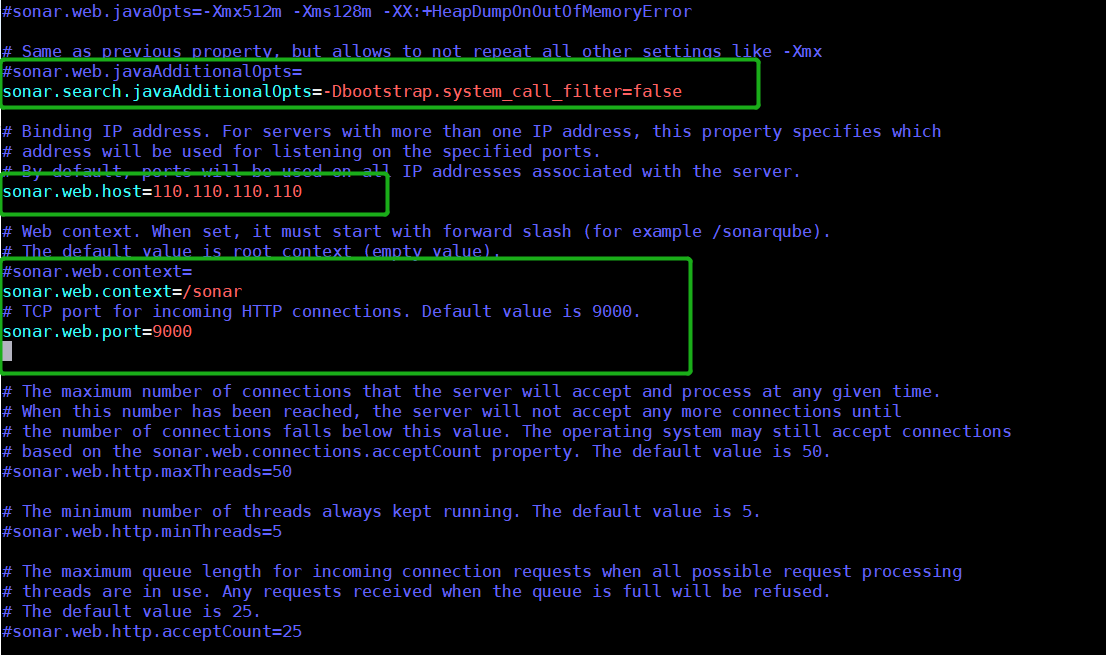
修改完成,保存修改的配置文件。然后到 bin 目录下去启动系统。

此时可以看到系统已经启动了,查看一下系统启动的服务,看看系统端口号是否正常。
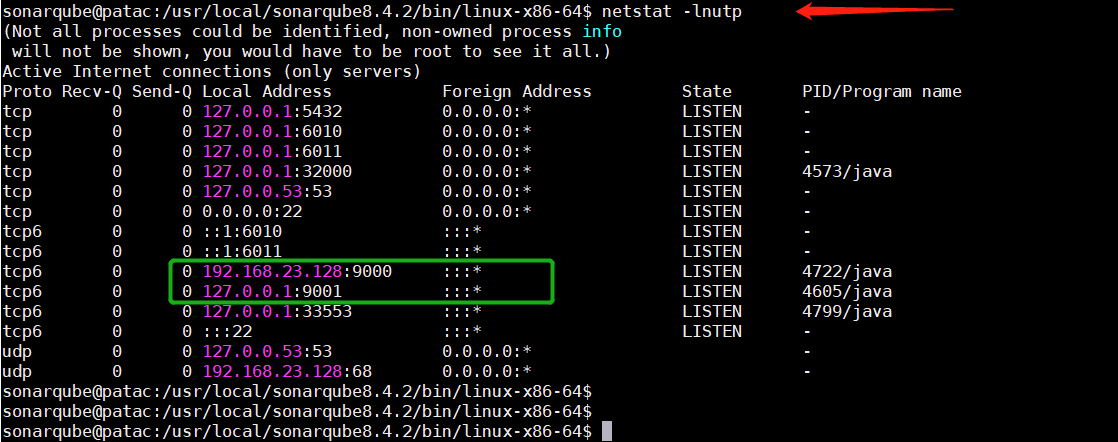
此时可以访问页面,看看系统运行的真面目吧。

拉到系统页底,就可以看到安装系统的版本信息。
总结如下:
1、SonarQube 系统不能使用系统的 root 账户启动! SonarQube 系统不能使用系统的 root 账户启动! SonarQube 系统不能使用系统的 root 账户启动!
2、新创建个其他用户,切换到新创建的用户账户,用新账户来启动 SonarQube 系统即可。
3、依据你安装的操作系统, 系统内核需符合 sonar 安装需求,不然启动后会有报错。
使用 root 账户,执行下面的两条指令
sysctl -w vm.max_map_count=262144
sysctl -w fs.file-max=65536


